2006 SUBARU IMPREZA ignition
[x] Cancel search: ignitionPage 80 of 365

Seat, seatbelt and SRS airbags 1-53
CONTINUED
Operation
1) SRS side airbag deploys as soon as a
collision occurs.
2) SRS side airbag protects the front pas- senger s head and chest.
3) After deployment, SRS side airbag starts to deflate immediately.
The SRS side airbag can function only
when the ignition switch is in the ON po-
sition.
The driver s and front passenger s SRS
side airbags deploy independently of each
other since each has its own impact sen-
sor. Also, the SRS side airbag deploys in-
dependently of the frontal airbags in the
steering wheel and instrument panel.
An impact sensor is incorporated into
each of the vehicle s center pillars. If ei-
ther sensor detects a certain predeter-
mined amount of force during a side im-
pact collision, the control module sends a
signal to the side airbag module on the im-
pacted side of the vehicle, instructing it to
inflate the SRS side airbag. Then the side
airbag module produces gas, which in-
stantly inflates the SRS side airbag. After
deployment, the SRS side airbag will de-
flate in a few seconds.
The SRS side airbag deploys even when
no one occupies the seat on the side on
which an impact is applied.
When the SRS side airbag deploys, a sud-
den, fairly loud inflation noise will be heard
and some smoke will be released. These
occurrences are normal result of the de-
ployment. This smoke does not indicate a
fire in the vehicle.
Do not put any kind of cover or
clothes or other objects over either
front seatback and do not attach la-
bels or stickers to the front seat sur-
face on or near the SRS side airbag.
They could prevent proper deploy-
ment of the SRS side airbag, reduc-
ing protection available to the front
seat s occupant.
1 2 3
100625
Page 84 of 365
Seat, seatbelt and SRS airbags 1-57
CONTINUED
Side airbag sensor (Center pillar right
hand side)
Side airbag sensor (Center pillar left
hand side)
Side airbag module (Driver s side)
Side airbag module (Front passenger s
side)
Seatbelt pretensioner (Driver s side)
Seatbelt pretensioner (Front passen-
ger s side)
Seatbelt buckle switch (Driver s side)
Seatbelt buckle switch (Front passen-
ger s side)
Driver s seat position sensor
Front passenger s seatbelt tension sen-
sor
Front passenger s occupant detection
system weight sensor
Front passenger s occupant detection
control module
Front passenger s frontal airbag ON
and OFF indicator
All related wiring
SRS airbag system servicing
If the warning light exhibits any of
the following conditions, there may
be a malfunction in the seatbelt pre-
tensioners and/or SRS airbag sys-
tem. Immediately take your vehicle
to your nearest SUBARU dealer to
have the system checked. Unless
checked and properly repaired, the
seatbelt pretensioners and/or SRS
airbag will not operate properly in
the event of a collision, which may
increase the risk of injury.
Flashing or flickering of the warn-
ing light
No illumination of the warning
light when the ignition switch is
first turned to the ON position
Continuous illumination of the
warning light
Illumination of the warning light
while driving
When discarding an airbag mod-
ule or scrapping the entire vehicle
damaged by a collision, consult
your SUBARU dealer.
The SRS airbag has no user-ser-
viceable parts. Do not use electri-
cal test equipment on any circuit
related to the SRS airbag system.
For required servicing of the SRS
airbag, see your nearest SUBARU
dealer. Tampering with or discon-
necting the system s wiring could
result in accidental inflation of the
SRS airbag or could make the sys-
tem inoperative, which may result
in serious injury. The wiring har-
nesses of the SRS airbag system
are covered with yellow insulation
and system connectors are yellow
for easy identification.
Page 89 of 365
2-2 Keys and doors
Keys and doorsKeys
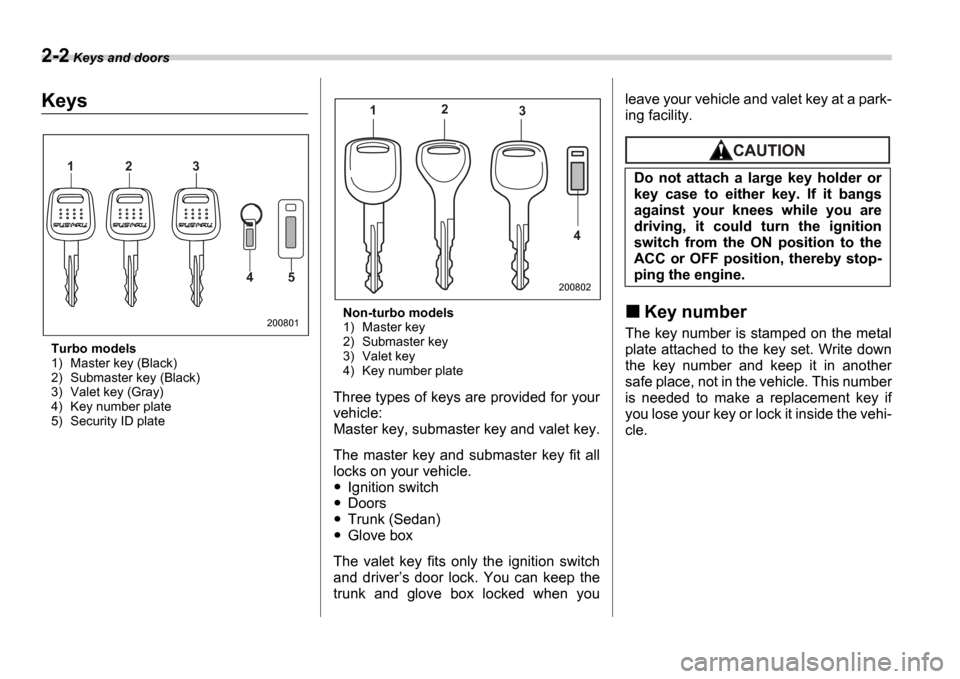
Turbo models
1) Master key (Black)
2) Submaster key (Black)
3) Valet key (Gray)
4) Key number plate
5) Security ID plate Non-turbo models
1) Master key
2) Submaster key
3) Valet key
4) Key number plate
Three types of keys are provided for your
vehicle:
Master key, submaster key and valet key.
The master key and submaster key fit all
locks on your vehicle.
Ignition switch
Doors
Trunk (Sedan)
Glove box
The valet key fits only the ignition switch
and driver s door lock. You can keep the
trunk and glove box locked when you leave your vehicle and valet key at a park-
ing facility.
Key number
The key number is stamped on the metal
plate attached to the key set. Write down
the key number and keep it in another
safe place, not in the vehicle. This number
is needed to make a replacement key if
you lose your key or lock it inside the vehi-
cle.
1 2 3
4 5
200801
12
3
4
200802
Do not attach a large key holder or
key case to either key. If it bangs
against your knees while you are
driving, it could turn the ignition
switch from the ON position to the
ACC or OFF position, thereby stop-
ping the engine.
Page 90 of 365
Keys and doors 2-3
CONTINUED
Immobilizer (Turbo models)
The immobilizer system is designed to
prevent an unauthorized person from
starting the engine. Only keys registered
with your vehicle s immobilizer system
can be used to operate your vehicle. Even
if an unregistered key fits into the ignition
switch and can be turned to the START
position, the engine will automatically stop
after several seconds.
Each immobilizer key contains a tran-
sponder in which the key s ID code is
stored. When a key is inserted into the ig-
nition switch and turned to the ON posi-
tion, the transponder transmits the key s
ID code to the immobilizer system s re-
ceiver. If the transmitted ID code matches
the ID code registered in the immobilizer
system, the system allows the engine to
be started. Since the ID code is transmit-
ted and acted upon almost instantly, the
immobilizer system does not impede nor-
mal starting of the engine.
If the engine fails to start, pull out the key
once before trying again. (Refer to the Ig-
nition switch section [chapter 3].)
This device complies with Part 15 of
the FCC Rules and with RSS-210 of In-
dustry Canada. Operation is subject to
the following two conditions: (1) This device may not cause harmful interfer-
ence, and (2) this device must accept
any interference received, including in-
terference that may cause undesired
operation.
Changes or modifications not express-
ly approved by the party responsible
for compliance could void the user
s
authority to operate the equipment.
NOTE
To protect your vehicle from theft,
please pay close attention to the fol-
lowing security precautions:
Never leave your vehicle unattended
with its keys inside.
Before leaving your vehicle, close all
windows and lock the doors and rear
gate.
Do not leave spare keys or any
record of your key number in the vehi-
cle.
Security ID plate
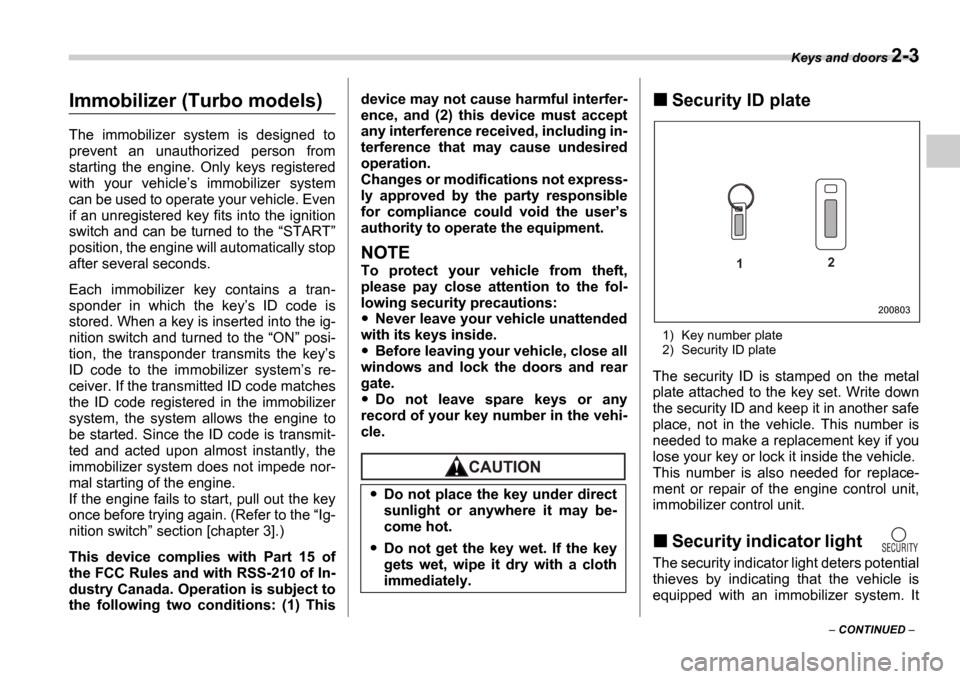
1) Key number plate
2) Security ID plate
The security ID is stamped on the metal
plate attached to the key set. Write down
the security ID and keep it in another safe
place, not in the vehicle. This number is
needed to make a replacement key if you
lose your key or lock it inside the vehicle.
This number is also needed for replace-
ment or repair of the engine control unit,
immobilizer control unit.
Security indicator light
The security indicator light deters potential
thieves by indicating that the vehicle is
equipped with an immobilizer system. It
Do not place the key under direct
sunlight or anywhere it may be-
come hot.
Do not get the key wet. If the key
gets wet, wipe it dry with a cloth
immediately.
1 2
200803
Page 91 of 365
2-4 Keys and doors
begins flashing (approximately once every
three seconds) approximately 60 seconds
after the ignition switch is turned from theON position to the ACC or LOCK po-
sition or immediately after the key is pulled
out.
If the security indicator light does not
flash, the immobilizer system may be
faulty. If this occurs, we recommend that
you contact your SUBARU dealer as soon
as possible.
In case an unauthorized key is used (e.g.
an imitation key), the security indicator
light comes on.
NOTE
Even if the security indicator light
flashes irregularly or its fuse blows
(the light does not flash if its fuse is
blown), the immobilizer system will
function normally.
Key replacement
Your key number and security ID will be
required if you ever need a replacement
key made. Any new key must be regis-
tered for use with your vehicle s immobiliz-
er system before it can be used. Up to four
keys can be registered for use with one
vehicle.
For security, all the keys registered with your vehicle
s immobilizer system will
have their ID codes erased and re-regis-
tered when a new key is made. Therefore,
all of your vehicle s keys must be present-
ed when a new key is registered. Any key
that is not re-registered when a new key is
made cannot be used after the other keys
are re-registered. For information on re-
placement keys and on the registration of
keys with your immobilizer system, con-
tact your SUBARU dealer.
Door locks
Locking and unlocking from
the outside
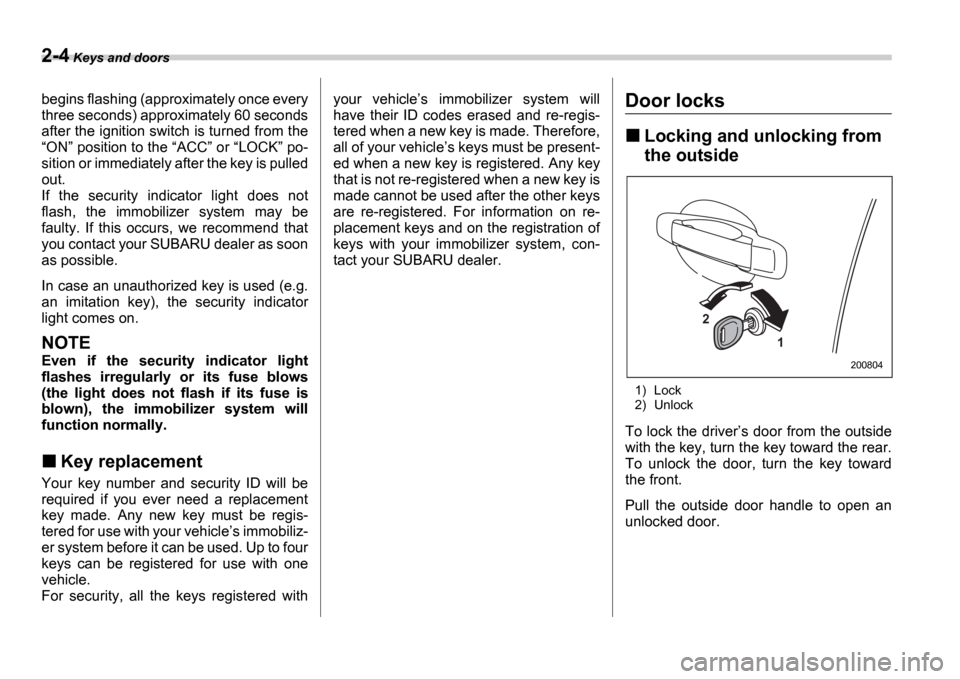
1) Lock
2) Unlock
To lock the driver s door from the outside
with the key, turn the key toward the rear.
To unlock the door, turn the key toward
the front.
Pull the outside door handle to open an
unlocked door.
2
1
200804
Page 92 of 365
Keys and doors 2-5
CONTINUED
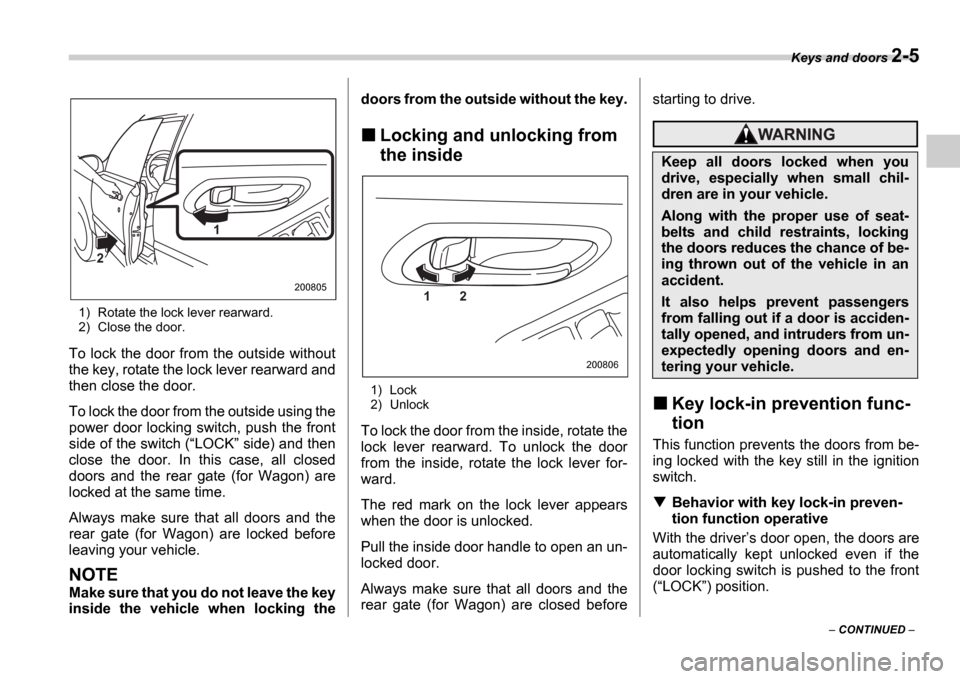
1) Rotate the lock lever rearward.
2) Close the door.
To lock the door from the outside without
the key, rotate the lock lever rearward and
then close the door.
To lock the door from the outside using the
power door locking switch, push the front
side of the switch ( LOCK side) and then
close the door. In this case, all closed
doors and the rear gate (for Wagon) are
locked at the same time.
Always make sure that all doors and the
rear gate (for Wagon) are locked before
leaving your vehicle.
NOTE
Make sure that you do not leave the key
inside the vehicle when locking the doors from the outside without the key.
Locking and unlocking from
the inside
1) Lock
2) Unlock
To lock the door from the inside, rotate the
lock lever rearward. To unlock the door
from the inside, rotate the lock lever for-
ward.
The red mark on the lock lever appears
when the door is unlocked.
Pull the inside door handle to open an un-
locked door.
Always make sure that all doors and the
rear gate (for Wagon) are closed before starting to drive.
Key lock-in prevention func-
tion
This function prevents the doors from be-
ing locked with the key still in the ignition
switch.
Behavior with key lock-in preven-
tion function operative
With the driver s door open, the doors are
automatically kept unlocked even if the
door locking switch is pushed to the front( LOCK ) position.
1
2
2008051 2
200806
Keep all doors locked when you
drive, especially when small chil-
dren are in your vehicle.
Along with the proper use of seat-
belts and child restraints, locking
the doors reduces the chance of be-
ing thrown out of the vehicle in an
accident.
It also helps prevent passengers
from falling out if a door is acciden-
tally opened, and intruders from un-
expectedly opening doors and en-
tering your vehicle.
Page 95 of 365
2-8 Keys and doors
If any of the doors (or the rear gate) is not
fully closed, an electronic chirp will sound
five times and the turn signal lights will
flash five times to alert you that the doors
(or the rear gate) are not properly closed.
When you close the door, it will automati-
cally lock.
NOTE
If the button is pressed for two
seconds or longer, the panic alarm will
sound. When locking the doors in nor-
mal circumstances, press the
button for less than two seconds. For
details on the panic alarm, refer to Sounding a panic alarm .
Unlocking the doors
Briefly press the button (for less
than two seconds) to unlock the driver s
door. An electronic chirp will sound twice
and the turn signal lights will flash twice.
To unlock all other doors (and rear gate on
the Wagon), briefly press the but-
ton a second time within 5 seconds.
NOTE
If the interval between the first and sec-
ond presses of the button (for
unlocking of all of the doors and the
rear gate) is extremely short, the sys-
tem may not respond.
Illuminated entry
The interior (dome) light and ignition
switch light (for turbo models) will illumi-
nate when the button is pressed.
These lights stay illuminated for approxi-
mately 30 seconds if any of the doors (or
the rear gate on the Wagon) is not
opened.
If the button is pressed before 30
seconds have elapsed, these lights will go
out. Also, these lights will go out if the key
is inserted in the ignition switch. The inte-
rior light switch must be set to the middle
position in order for this function to oper-
ate.
Vehicle finder function
Use this function to find your vehicle
parked among many vehicles in a large
parking lot. Provided you are within 30
feet (10 meters) of the vehicle, pressing
the button three times in a five-sec-
ond period will cause your vehicle s horn
to sound once and its turn signal lights to
flash three times.
NOTE
If the interval between presses is too
short when you press the button
three times, the system may not re-
spond to the signals from the remote transmitter.
Sounding a panic alarm
To activate the alarm, keep the
but-
ton pressed for more than two seconds .
The horn will sound and the turn signal
lights will flash.
To deactivate it, press the button or
button. Unless a button on the re-
mote is pressed, the alarm will be deacti-
vated after approximately 30 seconds.
Selecting audible signal op-
eration
Using an electronic chirp, the system will
give you an audible signal when the doors
lock and unlock. If desired, you may turn
the audible signal off.
Do the following to deactivate the audible
signal. You can also use the same steps
to restore the function.
1. Sit in the driver s seat and shut all
doors and the rear gate.
2. Open the driver s door, then remove
the key from the ignition switch.
3. Hold down the UNLOCK side of the
power door locking switch.
4. While holding down the UNLOCK
side of the power door locking switch, in-
sert the key into the ignition switch and re-
move it again at least 6 times within 10
Page 98 of 365
Keys and doors 2-11
CONTINUED
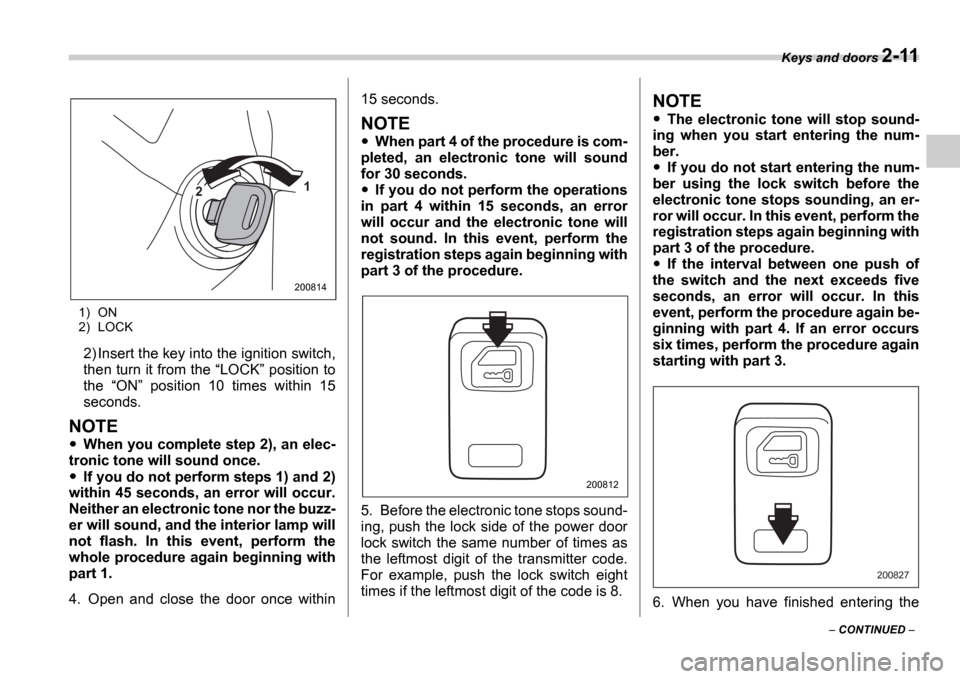
1) ON
2) LOCK
2) Insert the key into the ignition switch,
then turn it from the LOCK position to
the ON position 10 times within 15
seconds.
NOTE
When you complete step 2), an elec-
tronic tone will sound once.
If you do not perform steps 1) and 2)
within 45 seconds, an error will occur.
Neither an electronic tone nor the buzz-
er will sound, and the interior lamp will
not flash. In this event, perform the
whole procedure again beginning with
part 1.
4. Open and close the door once within 15 seconds.
NOTE
When part 4 of the procedure is com-
pleted, an electronic tone will sound
for 30 seconds.
If you do not perform the operations
in part 4 within 15 seconds, an error
will occur and the electronic tone will
not sound. In this event, perform the
registration steps again beginning with
part 3 of the procedure.
5. Before the electronic tone stops sound-
ing, push the lock side of the power door
lock switch the same number of times as
the leftmost digit of the transmitter code.
For example, push the lock switch eight
times if the leftmost digit of the code is 8.
NOTE
The electronic tone will stop sound-
ing when you start entering the num-
ber.
If you do not start entering the num-
ber using the lock switch before the
electronic tone stops sounding, an er-
ror will occur. In this event, perform the
registration steps again beginning with
part 3 of the procedure.
If the interval between one push of
the switch and the next exceeds five
seconds, an error will occur. In this
event, perform the procedure again be-
ginning with part 4. If an error occurs
six times, perform the procedure again
starting with part 3.
6. When you have finished entering the
1
2
200814
200812
200827