2006 SUBARU IMPREZA differential
[x] Cancel search: differentialPage 211 of 365
7-14 Starting and operating
tial LSD torque as desired. When this
mode is selected, the AUTO indicator
light in the combination meter goes off.
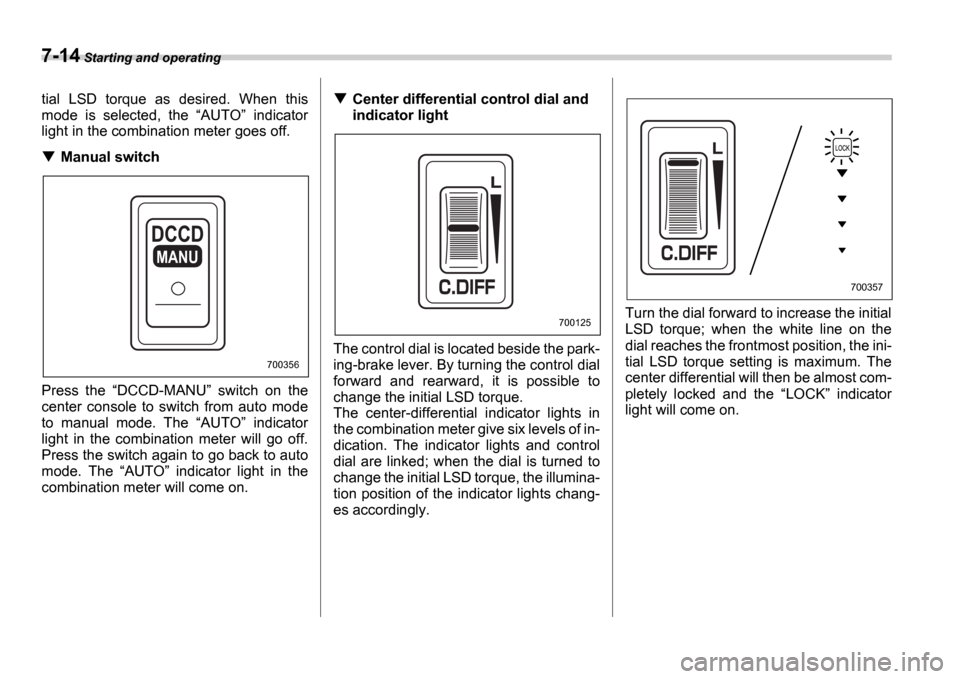
Manual switch
Press the DCCD-MANU switch on the
center console to switch from auto mode
to manual mode. The AUTO indicator
light in the combination meter will go off.
Press the switch again to go back to auto
mode. The AUTO indicator light in the
combination meter will come on.
Center differential control dial and
indicator light
The control dial is located beside the park-
ing-brake lever. By turning the control dial
forward and rearward, it is possible to
change the initial LSD torque.
The center-differential indicator lights in
the combination meter give six levels of in-
dication. The indicator lights and control
dial are linked; when the dial is turned to
change the initial LSD torque, the illumina-
tion position of the indicator lights chang-
es accordingly. Turn the dial forward to increase the initial
LSD torque; when the white line on the
dial reaches the frontmost position, the ini-
tial LSD torque setting is maximum. The
center differential will then be almost com-
pletely locked and the
LOCK indicator
light will come on.
MANU
700356
700125
700357
Page 212 of 365
Starting and operating 7-15
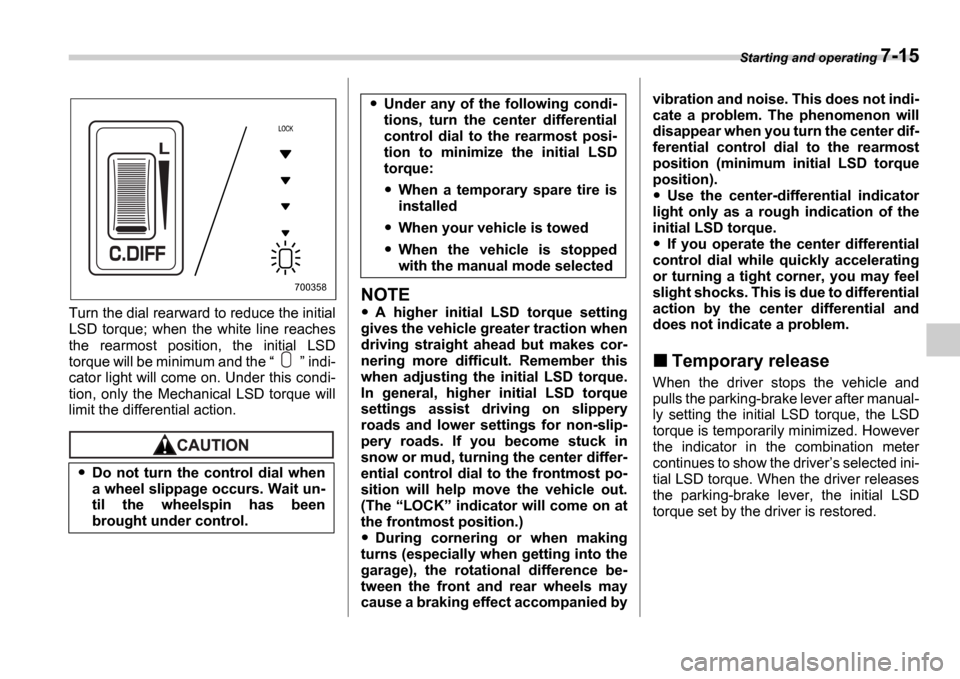
Turn the dial rearward to reduce the initial
LSD torque; when the white line reaches
the rearmost position, the initial LSD
torque will be minimum and the indi-
cator light will come on. Under this condi-
tion, only the Mechanical LSD torque will
limit the differential action.
NOTE
A higher initial LSD torque setting
gives the vehicle greater traction when
driving straight ahead but makes cor-
nering more difficult. Remember this
when adjusting the initial LSD torque.
In general, higher initial LSD torque
settings assist driving on slippery
roads and lower settings for non-slip-
pery roads. If you become stuck in
snow or mud, turning the center differ-
ential control dial to the frontmost po-
sition will help move the vehicle out.
(The LOCK indicator will come on at
the frontmost position.)
During cornering or when making
turns (especially when getting into the
garage), the rotational difference be-
tween the front and rear wheels may
cause a braking effect accompanied by vibration and noise. This does not indi-
cate a problem. The phenomenon will
disappear when you turn the center dif-
ferential control dial to the rearmost
position (minimum initial LSD torque
position).
Use the center-differential indicator
light only as a rough indication of the
initial LSD torque.
If you operate the center differential
control dial while quickly accelerating
or turning a tight corner, you may feel
slight shocks. This is due to differential
action by the center differential and
does not indicate a problem.
Temporary release
When the driver stops the vehicle and
pulls the parking-brake lever after manual-
ly setting the initial LSD torque, the LSD
torque is temporarily minimized. However
the indicator in the combination meter
continues to show the driver s selected ini-
tial LSD torque. When the driver releases
the parking-brake lever, the initial LSD
torque set by the driver is restored.
Do not turn the control dial when
a wheel slippage occurs. Wait un-
til the wheelspin has been
brought under control.
700358
Under any of the following condi-
tions, turn the center differential
control dial to the rearmost posi-
tion to minimize the initial LSD
torque:
When a temporary spare tire is
installed
When your vehicle is towed
When the vehicle is stopped
with the manual mode selected
Page 217 of 365
7-20 Starting and operating
gine.
Take your vehicle to the nearest SUBARU
dealer immediately to have the system re-
paired.Limited slip differential (LSD)
(if equipped)
The LSD provides optimum distribution of
power according to the difference in revo-
lutions between the right and left wheels
that may be caused by certain driving con-
ditions, thereby improving driving stability
on snow-covered, muddy or other slippery
roads or when high speed driving.
NOTE (WRX-STI)
The rear differential may emit a knock-
ing sound when the vehicle is driven
slowly with the steering wheel turned
fully to either side. This sound occurs
because of the design of the mechani-
cal LSD. It does not indicate a problem.
Never start the engine while a tire
on one side is jacked up, as the
vehicle may move.
If one tire is spinning in mud,
avoid continued spinning at high
speed as this could adversely af-
fect the LSD.
If you use a temporary spare tire
to replace a flat tire, be sure to use
the original temporary spare tire
stored in the vehicle. Using other
sizes will adversely affect the
LSD.
Page 247 of 365
8-20 Driving tips
required due to the additional load. (Refer
to Maintenance schedule under severe
driving conditions in the Warranty and
Maintenance Booklet .)
Under no circumstances should a trailer
be towed with a new vehicle or a vehicle
with any new powertrain component (en-
gine, transmission, differential, wheel
bearings, etc.) for the first 1,000 miles
(1,600 km) of driving.
Maximum load limits
Total trailer weight
Total trailer weight
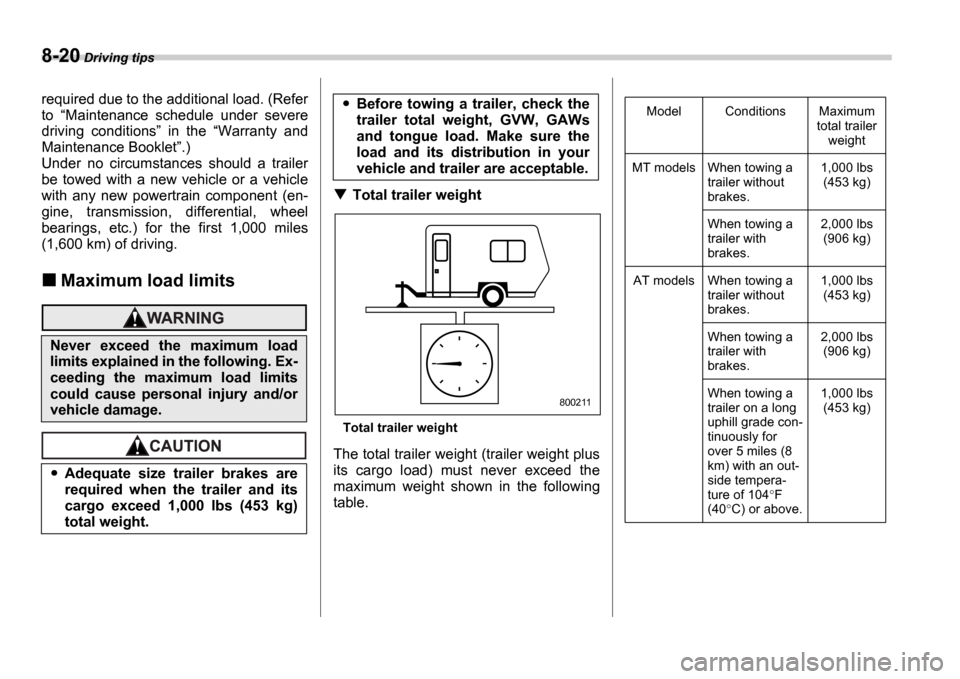
The total trailer weight (trailer weight plus
its cargo load) must never exceed the
maximum weight shown in the following
table.
Never exceed the maximum load
limits explained in the following. Ex-
ceeding the maximum load limits
could cause personal injury and/or
vehicle damage.
Adequate size trailer brakes are
required when the trailer and its
cargo exceed 1,000 lbs (453 kg)
total weight.
Before towing a trailer, check the
trailer total weight, GVW, GAWs
and tongue load. Make sure the
load and its distribution in your
vehicle and trailer are acceptable.
800211
Model Conditions Maximum total trailer weight
MT models When towing a trailer without
brakes. 1,000 lbs
(453 kg)
When towing a
trailer with
brakes. 2,000 lbs
(906 kg)
AT models When towing a trailer without
brakes. 1,000 lbs
(453 kg)
When towing a
trailer with
brakes. 2,000 lbs
(906 kg)
When towing a
trailer on a long
uphill grade con-
tinuously for
over 5 miles (8
km) with an out-
side tempera-
ture of 104 F
(40 C) or above. 1,000 lbs
(453 kg)
Page 266 of 365
In case of emergency 9-11
CONTINUED
Engine overheating
If the engine overheats, safely pull off the
road and stop the vehicle in a safe place.
If steam is coming from the
engine compartment
Turn off the engine and get everyone
away from the vehicle until it cools down.
If no steam is coming from
the engine compartment
1. Keep the engine running at idling
speed.
2. Open the hood to ventilate the engine
compartment.
Confirm that the cooling fan is turning. If
the fan is not turning, immediately turn off the engine and contact your authorized
dealer for repair.
3. After the engine coolant temperature
has dropped, turn off the engine.
If the temperature gauge stays at the
overheated zone, turn off the engine.
4. After the engine has fully cooled down,
check the coolant level in the reserve
tank.
If the coolant level is below the
LOW
mark, add coolant up to the FULL mark.
5. If there is no coolant in the reserve
tank, add coolant to the reserve tank.
Then remove the radiator cap and fill the
radiator with coolant.
If you remove the radiator cap from a hot
radiator, first wrap a thick cloth around the
radiator cap, then turn the cap counter-
clockwise slowly without pressing down
until it stops. Release the pressure from
the radiator. After the pressure has been
fully released, remove the cap by pressing
down and turning it.
Towing
If towing is necessary, it is best done by
your SUBARU dealer or a commercial
towing service. Observe the following pro-
cedures for safety.
Never attempt to remove the radia-
tor cap until the engine has been
shut off and has fully cooled down.
When the engine is hot, the coolant
is under pressure. Removing the
cap while the engine is still hot
could release a spray of boiling hot
coolant, which could burn you very
seriously.
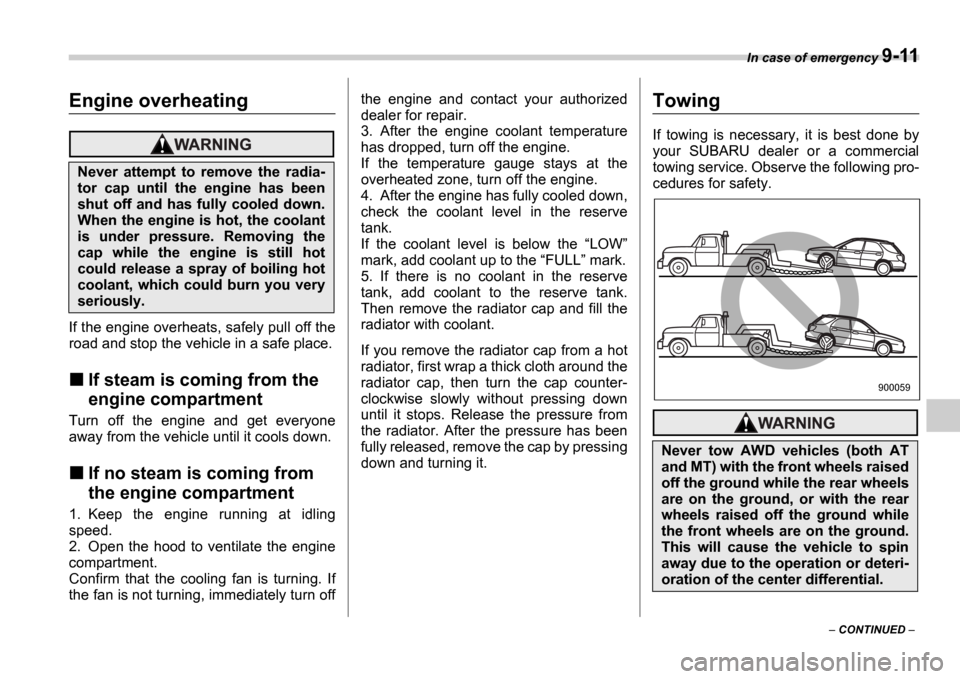
Never tow AWD vehicles (both AT
and MT) with the front wheels raised
off the ground while the rear wheels
are on the ground, or with the rear
wheels raised off the ground while
the front wheels are on the ground.
This will cause the vehicle to spin
away due to the operation or deteri-
oration of the center differential.
900059
Page 269 of 365
9-14 In case of emergency
or 1st for manual transmission vehicles.
2. Pull up the parking brake lever firmly.
3. Secure the vehicle onto the carrier
properly with safety chains. Each safety
chain should be equally tightened and
care must be taken not to pull the chains
so tightly that the suspension bottoms out.
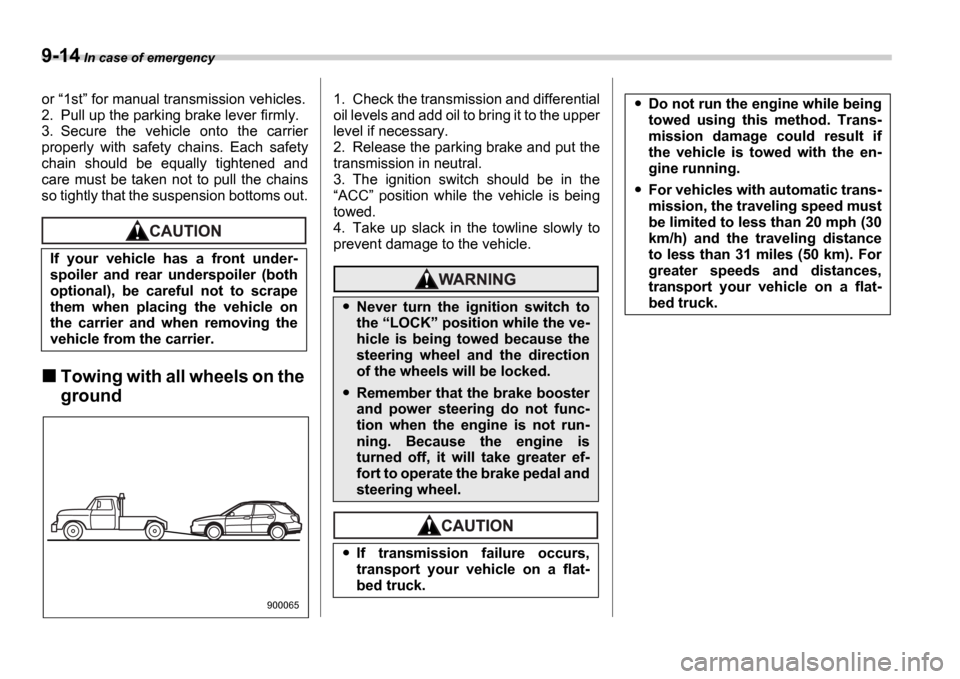
Towing with all wheels on the
ground
1. Check the transmission and differential
oil levels and add oil to bring it to the upper
level if necessary.
2. Release the parking brake and put the
transmission in neutral.
3. The ignition switch should be in the ACC position while the vehicle is being
towed.
4. Take up slack in the towline slowly to
prevent damage to the vehicle.
If your vehicle has a front under-
spoiler and rear underspoiler (both
optional), be careful not to scrape
them when placing the vehicle on
the carrier and when removing the
vehicle from the carrier.
900065
Never turn the ignition switch to
the LOCK position while the ve-
hicle is being towed because the
steering wheel and the direction
of the wheels will be locked.
Remember that the brake booster
and power steering do not func-
tion when the engine is not run-
ning. Because the engine is
turned off, it will take greater ef-
fort to operate the brake pedal and
steering wheel.
If transmission failure occurs,
transport your vehicle on a flat-
bed truck.
Do not run the engine while being
towed using this method. Trans-
mission damage could result if
the vehicle is towed with the en-
gine running.
For vehicles with automatic trans-
mission, the traveling speed must
be limited to less than 20 mph (30
km/h) and the traveling distance
to less than 31 miles (50 km). For
greater speeds and distances,
transport your vehicle on a flat-
bed truck.
Page 280 of 365
11
Maintenance and service
Maintenance schedule ....................................... 11-3
Maintenance precautions ........................... ....... 11-3
Before checking or servicing in the engine compartment ....................................... ................. 11-4
When you do checking or servicing in the engine
compartment while the engine is running ......... 11 -4
Engine hood ....................................... ................ 11-4
Engine compartment overview ....................... .. 11-6
Non-turbo models .................................. ................. 11-6
Turbo models ...................................... .................... 11-7
Engine oil ........................................ .................... 11-8
Checking the oil level ............................ ................. 11-8
Changing the oil and oil filter ................... ............. 11-8
Recommended grade and viscosity ................... .. 11-10
Recommended grade and viscosity under severe driving conditions ......................... ........... 11-11
Synthetic oil ..................................... ....................... 11-11
Cooling system .................................... .............. 11-12
Cooling fan, hose and connections ................. ..... 11-12
Engine coolant .................................... .................... 11-12
Air cleaner element ............................... ............. 11-15
Replacing the air cleaner element ................. ........ 11-15
Spark plugs ....................................... .................. 11-17
Recommended spark plugs ........................... ........ 11-17
Drive belts ....................................... .................... 11-18
Manual transmission oil ........................... ......... 11-18
Checking the oil level ............................ ................. 11-18
Recommended grade and viscosity ................... .. 11-19Automatic transmission fluid ......................
...... 11-20
Checking the fluid level .......................... ................ 11-20
Recommended fluid ................................. .............. 11-21
Front differential gear oil (AT vehicles) ......... ... 11-21
Checking the oil level ............................ ................. 11-21
Recommended grade and viscosity ................... .. 11-22
Rear differential gear oil ........................ ............ 11-22
Checking the gear oil level ....................... ............. 11-22
Recommended grade and viscosity ................... .. 11-23
Power steering fluid .............................. ............. 11-24
Checking the fluid level .......................... ................ 11-24
Recommended fluid ................................. .............. 11-24
Brake fluid ....................................... .................... 11-25
Checking the fluid level .......................... ................ 11-25
Recommended brake fluid ........................... .......... 11-25
Clutch fluid (MT vehicles) ........................ .......... 11-26
Checking the fluid level .......................... ................ 11-26
Recommended clutch fluid .......................... .......... 11-26
Brake booster ..................................... ................ 11-27
Brake pedal ....................................... .................. 11-27
Checking the brake pedal free play ................ ...... 11-27
Checking the brake pedal reserve distance ......... 11-27
Clutch pedal (MT vehicles) ........................ ........ 11-28
Checking the clutch function ...................... .......... 11-28
Checking the clutch pedal free play ............... ...... 11-28
Replacement of brake pad and lining ............... 11-28
Breaking-in of new brake pads and linings ......... . 11-29
Parking brake stroke .............................. ............ 11-29
Page 285 of 365

11-6 Maintenance and service
Engine compartment overview
Non-turbo models
1 2 3 4 5 6
7
8
9
10
11
13 12
B00464
1) Air cleaner element (page 11-15)
2) Manual transmission oil level gauge
(MT) (page 11-18) or Differential gear
oil level gauge (AT) (page 11-21)
3) Clutch fluid reservoir (page 11-26)
4) Automatic transmission fluid level gauge (page 11-20)
5) Brake fluid reservoir (page 11-25)
6) Fuse box (page 11-41)
7) Battery (page 11-40)
8) Windshield washer tank (page 11-36)
9) Engine coolant reservoir (page 11-
12)
10) Engine oil level gauge (page 11-8)
11) Engine oil filler cap (page 11-8)
12) Radiator cap (page 11-12)
13) Power steering fluid reservoir (page
11-24)