Page 71 of 274

Seats and Stowage
70
Head restraints
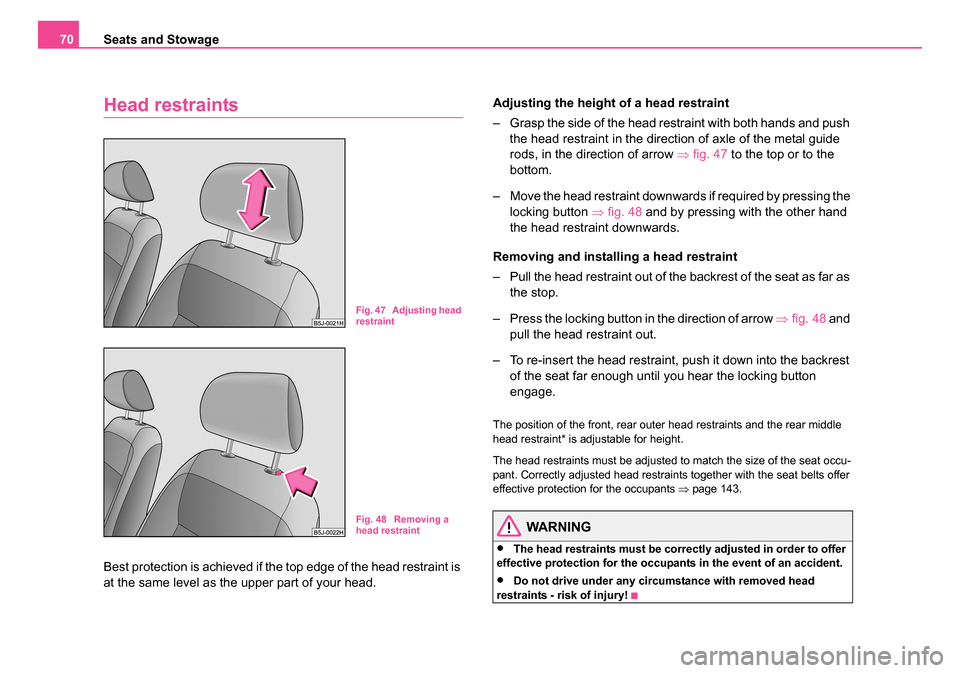
Best protection is achieved if the top edge of the head restraint is
at the same level as the upper part of your head. Adjusting the height of a head restraint
– Grasp the side of the head restraint with both hands and push
the head restraint in the direction of axle of the metal guide
rods, in the direction of arrow ⇒fig. 47 to the top or to the
bottom.
– Move the head restraint downwards if required by pressing the locking button ⇒fig. 48 and by pressing with the other hand
the head restraint downwards.
Removing and installing a head restraint
– Pull the head restraint out of the backrest of the seat as far as the stop.
– Press the locking button in the direction of arrow ⇒fig. 48 and
pull the head restraint out.
– To re-insert the head restraint, push it down into the backrest of the seat far enough until you hear the locking button
engage.
The position of the front, rear outer head restraints and the rear middle
head restraint* is adjustable for height.
The head restraints must be adjusted to match the size of the seat occu-
pant. Correctly adjusted head restraints together with the seat belts offer
effective protection for the occupants ⇒page 143.
WARNING
•The head restraints must be correctly adjusted in order to offer
effective protection for the occupants in the event of an accident.
•Do not drive under any circumstance with removed head
restraints - risk of injury!
Fig. 47 Adjusting head
restraint
Fig. 48 Removing a
head restraint
NKO 20 A05.book Page 70 Wednesday, June 21, 2006 1:42 PM
Page 73 of 274
Seats and Stowage
72
Rear seats
Adjusting seats in forward/back direction
To enlarge the luggage compartment, the outer rear seats can be
pushed forwards, folded fully forwards or the seats can be
removed.
Moving seats in forw ard/back direction
– Pull the lever ⇒fig. 50 up or on the release loop ⇒fig. 51 and
move the seat into the desired position.
Note
Please refer to the following guidelines ⇒page 145, “Correct seated posi-
tion for the occupants on the rear seats”.
Adjusting the seat backrest
Fig. 50 Release at the
front
Fig. 51 Release at the
rear
Fig. 52 Adjusting the
seat backrest
NKO 20 A05.book Page 72 Wednesday, June 21, 2006 1:42 PM
Page 75 of 274

Seats and Stowage
74
WARNING
•Immediately secure the folded forward seat with the aid of the
fixing belt to a guide rod of the head restraint for the front seat -
there is a risk of injury as soon as the vehicle starts off.
•If the seat is not in the rear end position, damage can occur to
the locking bolts if th e seat is unlocked.
Note
Please refer to the following guidelines ⇒page 145, “Correct seated posi-
tion for the occupants on the rear seats”.
Removing seatsUnlocking and re moving seats
– Unlock the folded forward seat by pressing the seat locks in the direction of arrow ⇒fig. 55 .
– Remove the seat with the carrying handle on the seat ⇒fig. 56 .
Note
The outer seats are not replaceable alternatively. In the rear area the left
seat is marked with the letter L and the right seat with the letter R.
Note
Please refer to the following guidelines ⇒page 145.Fig. 55 Unlocking the
folded forward seat
Fig. 56 Carrying
handle on the seat
NKO 20 A05.book Page 74 Wednesday, June 21, 2006 1:42 PM
Page 76 of 274

Seats and Stowage75
Using the systemSafetyDriving TipsGeneral MaintenanceBreakdown assistanceTechnical Data
Adjusting seats in crosswise direction
Moving seats in crosswise direction
– Remove the middle seat ⇒page 74.
– Fold the outer seat forwards ⇒page 73 and lock it
⇒ page 74, fig. 55 .
– Move the folded forward and unlocked seat on the guide towards the middle of the vehicle up to the stop.
– Lock the seat at the end of the guide ⇒fig. 57 .
Folding the seats back into position
Locking seats and folding back into position
– If the seat is removed, first of all position it on the guide and
lock the seat ⇒fig. 57 . Check for yourself that the seat is
correctly locked by pulling it up.
– Fold the seat into the horizontal position until it is heard to lock. Check for yourself that the seat is correctly locked by pulling it
up.
– Push the lever ⇒fig. 58 and fold the backrest back into posi-
tion. Check for yourself that the seat backrest is engaged.
– Take the belt tongue out of the safety holder.
– Close the guide loop of the seat belt on the side of the outer seats until it is heard to lock.
Fig. 57 Locking the
seatFig. 58 Folding the
seat backrest back into
position
NKO 20 A05.book Page 75 Wednesday, June 21, 2006 1:42 PM
Page 81 of 274

Seats and Stowage
80
Fixing floor covering of the luggage compartment
You can fix the raised floor cover between the backrests and the luggage
compartment cover, as if one needs to reach the spare wheel.
The luggage compartment cover
You can use the luggage compartment cover behind the
head restraints for storing light and soft items.
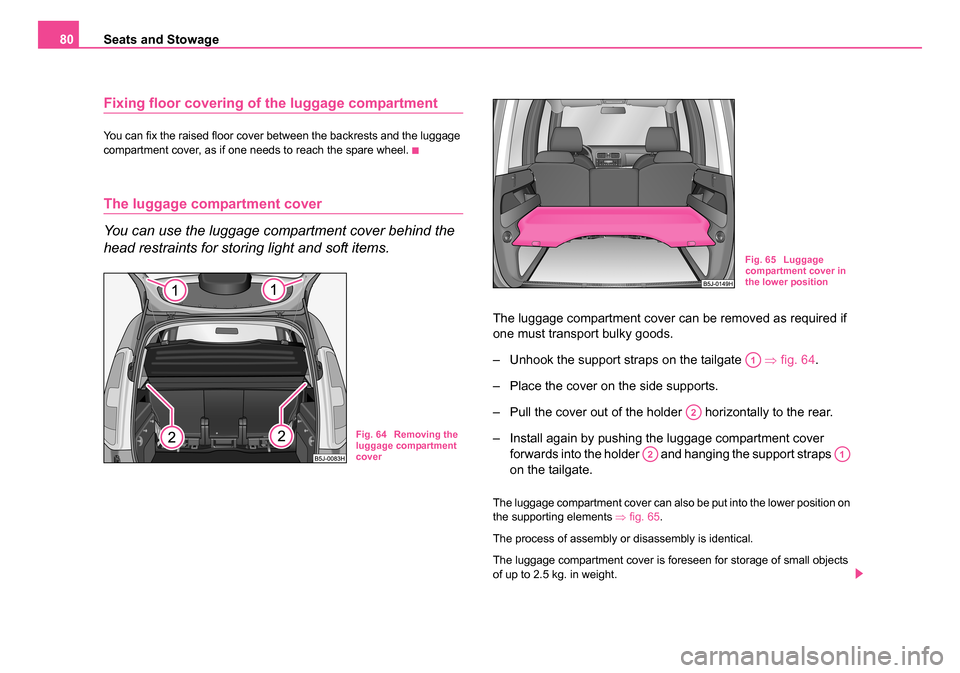
The luggage compartment cover can be removed as required if
one must transport bulky goods.
– Unhook the support straps on the tailgate ⇒fig. 64 .
– Place the cover on the side supports.
– Pull the cover out of the holder horizontally to the rear.
– Install again by pushing the luggage compartment cover forwards into the holder and hanging the support straps
on the tailgate.
The luggage compartment cover can also be put into the lower position on
the supporting elements ⇒fig. 65 .
The process of assembly or disassembly is identical.
The luggage compartment cover is foreseen for storage of small objects
of up to 2.5 kg. in weight.
Fig. 64 Removing the
luggage compartment
cover
Fig. 65 Luggage
compartment cover in
the lower position
A1
A2
A2A1
NKO 20 A05.book Page 80 Wednesday, June 21, 2006 1:42 PM
Page 82 of 274

Seats and Stowage81
Using the systemSafetyDriving TipsGeneral MaintenanceBreakdown assistanceTechnical Data
WARNING
No objects should be placed on the luggage compartment cover,
the vehicle occupants could be endangered if there is sudden
braking or the vehicle co llides with something.
Caution
Please ensure that the heating elements of the rear window heater are not
damaged as a result of objects placed in this area.
Note
When opening the tailgate, lift the luggage compartment cover - risk that
objects placed in this area can slip forward!
Bicycle carrier*
Install cross member
– Remove the rear seats or fold the seats fully forwards, in order
to make available the necessary space in the luggage
compartment ⇒page 74.
– Release the fixture at the ends of the cross member by slightly pulling up the securing screw .
– Position the cross member with the fixed part onto the right (in direction of travel) lashing eye and then the pull out part
onto the left lashing eye.
– Secure the fixture to both sides and lock the fixing screws in place.
– Tighten the fixing screws up to the stop.
Fig. 66 Install cross
member
AB
AC
AA
AB
AC
AC
NKO 20 A05.book Page 81 Wednesday, June 21, 2006 1:42 PM
Page 84 of 274
Seats and Stowage83
Using the systemSafetyDriving TipsGeneral MaintenanceBreakdown assistanceTechnical Data
Put bicycle into the bicycle carrier
– Remove the front wheel before putting the bicycle into the
vehicle. – Slacken the quick tension jack on the fixing axle of the bicycle
carrier and adjust according to the width of the bicycle fork.
– Fit the bicycle fork onto the fixing axle and tighten with the quick tension jack ⇒fig. 68 .
– Fasten the removed front wheel with the fixing strap in the vehicle interior so that it does not result in any damage to the
luggage compartment, bicycle or the stored items.
Note
If the front wheel is equipped with disc brake, attach the wheel in such a
way that the brake disc is opposite the frame.
Fig. 68 Put in the
bicycle
Fig. 69 Fastening the
front wheel
NKO 20 A05.book Page 83 Wednesday, June 21, 2006 1:42 PM
Page 88 of 274
Seats and Stowage87
Using the systemSafetyDriving TipsGeneral MaintenanceBreakdown assistanceTechnical Data
Note holder
The note holder is designed e.g. for attaching a car park ticket in parking
areas.
The attached note has to always be removed before starting off in order
not to restrict the driver's vision.
Ashtray*
Fig. 75 Windscreen:
Note holderFig. 76 Centre
console: Front ashtray
Fig. 77 Centre
console: Rear ashtray
NKO 20 A05.book Page 87 Wednesday, June 21, 2006 1:42 PM