2006 SKODA ROOMSTER buttons
[x] Cancel search: buttonsPage 12 of 274

Cockpit11
Using the systemSafetyDriving TipsGeneral MaintenanceBreakdown assistanceTechnical Data
Cockpit
General view
This general view is designed to help you to quickly
become familiar with the instruments, gauges and
controls.
Electric power-operated window* . . . . . . . . . . . . . . . . . . . .
Electric exterior mirror adjustment* . . . . . . . . . . . . . . . . . . .
Air outlet vents . . . . . . . . . . . . . . . . . . . . . . . . . . . . . . . . . . .
Multi-functional module* . . . . . . . . . . . . . . . . . . . . . . . . . . .
Lever for the multi-functional switch:
−Turn signal light, headlight and parking light, headlight
flasher . . . . . . . . . . . . . . . . . . . . . . . . . . . . . . . . . . . . . . .
− Speed regulating system* . . . . . . . . . . . . . . . . . . . . . . . .
Headlight flasher, driver airbag . . . . . . . . . . . . . . . . . . . . . .
Instrument cluster: Instruments and indicator lights . . . . . .
Lever for the multi-functional switch:
− Multi-functional indicator* . . . . . . . . . . . . . . . . . . . . . . . .
− Windshield wiper and wash system . . . . . . . . . . . . . . . . .
Switch for rear window heater . . . . . . . . . . . . . . . . . . . . . . .
Depending on equipment fitted:
− Switch for the ESP* . . . . . . . . . . . . . . . . . . . . . . . . . . . . .
− Switch for the TCS* . . . . . . . . . . . . . . . . . . . . . . . . . . . . .
Air outlet vents . . . . . . . . . . . . . . . . . . . . . . . . . . . . . . . . . . .
Switch for hazard warning lights . . . . . . . . . . . . . . . . . . . . .
Indicator light for a switched off front seat passenger airbag*
Depending on equipment fitted:
− Operating controls for the heating . . . . . . . . . . . . . . . . . . −
Operating controls for Climatic* . . . . . . . . . . . . . . . . . . .
− Operating controls for Climatronic* . . . . . . . . . . . . . . . .
Storage compartments on the front passenger side* . . . . .
Front passenger airbag* . . . . . . . . . . . . . . . . . . . . . . . . . . .
Switch for the front seat passenger airbag(s)* . . . . . . . . . .
Switch depending on equipment fitted:
− Unlock tailgate* . . . . . . . . . . . . . . . . . . . . . . . . . . . . . . . .
− Interior monitor* . . . . . . . . . . . . . . . . . . . . . . . . . . . . . . .
Fuse box in the dash panel . . . . . . . . . . . . . . . . . . . . . . . .
Light switch and control dial for the headlight beam range
regulation . . . . . . . . . . . . . . . . . . . . . . . . . . . . . . . . . . . . . .
Bonnet release lever . . . . . . . . . . . . . . . . . . . . . . . . . . . . . .
Lever for adjusting the steering wheel . . . . . . . . . . . . . . . .
Ignition lock . . . . . . . . . . . . . . . . . . . . . . . . . . . . . . . . . . . . .
Radio*
Rocker switch for heating on the driver's seat* . . . . . . . . .
Buttons for central locking* . . . . . . . . . . . . . . . . . . . . . . . . .
Depending on equipment fitted:
− Gearshift lever (manual gearbox) . . . . . . . . . . . . . . . . . .
− Selector lever (6-speed automatic gearbox)* . . . . . . . . .
Rocker switch for heating on the front passenger seat* . . .
Depending on equipment fitted:
− Ashtray* . . . . . . . . . . . . . . . . . . . . . . . . . . . . . . . . . . . . .
− Storage compartment . . . . . . . . . . . . . . . . . . . . . . . . . . .
CD changer* . . . . . . . . . . . . . . . . . . . . . . . . . . . . . . . . . . . . A151
A266
A398
A4126
A5
59
11 6
A6156
A713
A8
17
63
A962
A10
177
178
A1198
A1259
A13164
A14
96 99
104
A1590
A16156
A17164
A18
46
50
A19249
A2055, 58
A21209
A22109
A2311 0
A24
A2571
A2645
A27
11 3
120
A2871
A29
87
92
A30139
NKO 20 A05.book Page 11 Wednesday, June 21, 2006 1:42 PM
Page 43 of 274

Unlocking and locking
42
Note
•The opened door cannot be locked with the securing knob. This
prevents the possibility of forgetting the key in the locked vehicle.
•The opened side doors at the rear and the front passenger door are
locked by pressing in the securing knob and slamming the door closed.
•Please refer to the safety guidelines ⇒ in “Description” on
page 42.
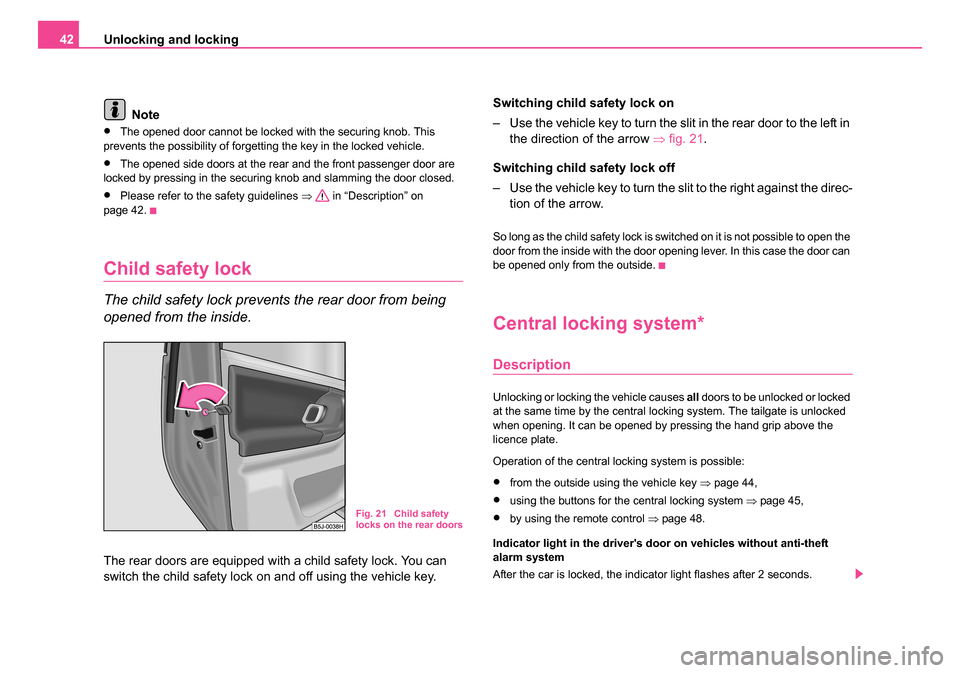
Child safety lock
The child safety lock prevents the rear door from being
opened from the inside.
The rear doors are equipped with a child safety lock. You can
switch the child safety lock on and off using the vehicle key. Switching child safety lock on
– Use the vehicle key to turn the slit in the rear door to the left in
the direction of the arrow ⇒fig. 21 .
Switching child safety lock off
– Use the vehicle key to turn the slit to the right against the direc- tion of the arrow.
So long as the child safety lock is switched on it is not possible to open the
door from the inside with the door opening lever. In this case the door can
be opened only from the outside.
Central locking system*
Description
Unlocking or locking the vehicle causes all doors to be unlocked or locked
at the same time by the central locking system. The tailgate is unlocked
when opening. It can be opened by pressing the hand grip above the
licence plate.
Operation of the central locking system is possible:
•from the outside using the vehicle key ⇒page 44,
•using the buttons for the central locking system ⇒page 45,
•by using the remote control ⇒page 48.
Indicator light in the driver's door on vehicles without anti-theft
alarm system
After the car is locked, the indicator light flashes after 2 seconds.Fig. 21 Child safety
locks on the rear doors
NKO 20 A05.book Page 42 Wednesday, June 21, 2006 1:42 PM
Page 46 of 274

Unlocking and locking45
Using the systemSafetyDriving TipsGeneral MaintenanceBreakdown assistanceTechnical Data
Note
The opened driver door cannot be locked. It must be locked separately
after closing it.
Button for the central locking system*
If the vehicle was not locked from outside, it can be unlocked or
locked with the buttons and , also if the ignition is switched
off.
Locking all doors and the tailgate
– Press button ⇒fig. 23 . The symbol
in the button comes
on. Unlocking all doors and the tailgate
– Press button
⇒fig. 23 . The symbol
goes out in the
button.
The following applies if you have locked your vehicle using the button :
•It is not possible to open the doors or the tailgate from the outside
(safety feature, e.g. when stopping at traffic lights etc.).
•You can unlock the doors from the inside and open them by pulling the
door opening lever.
•If the driver door is opened, it cannot be locked, in order to avoid inad-
vertently being locked out of the vehicle You then have to lock a door
separately after closing it.
•In the event of an accident in which the airbags are deployed, the
locked doors are automatically unlocked from the inside in order to enable
rescuers to gain access to the vehicle.
WARNING
The central locking system also operates if the ignition is switched
off. All the doors and the tailgate are locked. Children should never
be left unattended in the vehicle since it is difficult to provide
assistance from the outside when the doors are locked. Locked
doors make it difficult for rescuers to get into the vehicle in an
emergency - hazard!
Note
•The door opening lever and the buttons for the central locking system
do not always operate if the safe securing system is activated.
Fig. 23 Central locking
switch
A1A2
A1
A2
A1
NKO 20 A05.book Page 45 Wednesday, June 21, 2006 1:42 PM
Page 50 of 274

Unlocking and locking49
Using the systemSafetyDriving TipsGeneral MaintenanceBreakdown assistanceTechnical Data
Folding out of the key
– Press button .
Folding up of the key
– Press button and collapse the key bit in the housing.
The turn signal lights flash twice as confirmation that the vehicle has been
unlocked. The vehicle will lock again automatically if you unlock the
vehicle using button but do not open a door or the tailgate within the
next 30 seconds. This function is intended to prevent the car being
unlocked unintentionally.
The safe securing system along with the anti-theft alarm system* are,
however, deactivated during these 30 seconds.
When the vehicle is unlocked or locked, the interior lights in the door
contact are automatically switched on or off.
The turn signal lights flash once to confirm that the vehicle has been
correctly locked.
If the turn signal lights do not flash, check the doors, bonnet and tailgate
again to ensure that they are closed. If the doors, the bonnet or the tailgate
remain open when the anti-theft alarm system* is activated, the turn signal
lights do not flash until after they have been closed.
WARNING
If the vehicle is locked from the outside and the safe securing
system is activated, there must not be any person in the vehicle as
it is then not possible to open either a door or a window from the
inside. The locked doors make it more difficult for rescuers to get
into the vehicle in an emergency - hazard!
Note
•Operate the radio remote control only when the doors and tailgate are
closed and you have visual contact with the vehicle.
•Once in the car, you must not press the lock button of the master key
before inserting the key into the ignition lock in order to avoid the car being
inadvertently locked and, in addition, the anti-theft alarm system* being
switched on. Should this happen, press the unlock button
of the master
key.
Synchonisation of the remote control
If the vehicle cannot be unlocked by actuating the remote control system
then it is possible that the code in the key and the control unit in the vehicle
are no longer synchronised. This can occur when the buttons on the radio-
operated key are actuated a number of times outside of the operative
range of the equipment or the battery on the remote control was replaced.
This means it is necessary to synchronise the code as follows:
•Press any button on the remote control.
•pressing of the button means that the door will unlock with the key
within 1 minute.
Anti-theft alarm system*
The anti-theft alarm system increases the level of protection against
people seeking to break into the vehicle. The system triggers audible and
visual warning signals if an attempt is made to break into the vehicle.
A3
A3
A1
NKO 20 A05.book Page 49 Wednesday, June 21, 2006 1:42 PM
Page 52 of 274

Unlocking and locking51
Using the systemSafetyDriving TipsGeneral MaintenanceBreakdown assistanceTechnical Data
The interior monitor and the towing protection are operated with
the button
. You can switch the interior monitor and the towing
protection off if there is a possibility that movements from (e.g.
children or animals) inside the vehicle interior or if the vehicle
must be transported (e.g. by train or ship) or towed, might trigger
the alarm.
Switch off the interior monitor and towing protection
– Switch off the ignition.
– Press the button
on the driver door ⇒page 50, fig. 28 .
– Lock the vehicle within 30 seconds. The interior monitor and the towing protection are switched off.
The interior monitor and the towing protection are switched on again auto-
matically the next time the car is locked.
Note
•You can also switch off the interior monitor and the towing protection,
by deactivating the safe securing system ⇒page 43.
•When the ignition key is removed or a door is opened, the symbol in
the button lights up red.
•Lighting up of the symbol in the button does not confirm that the interior
monitor and the towing protection are switched on.
Power windows*
Switch for power windows
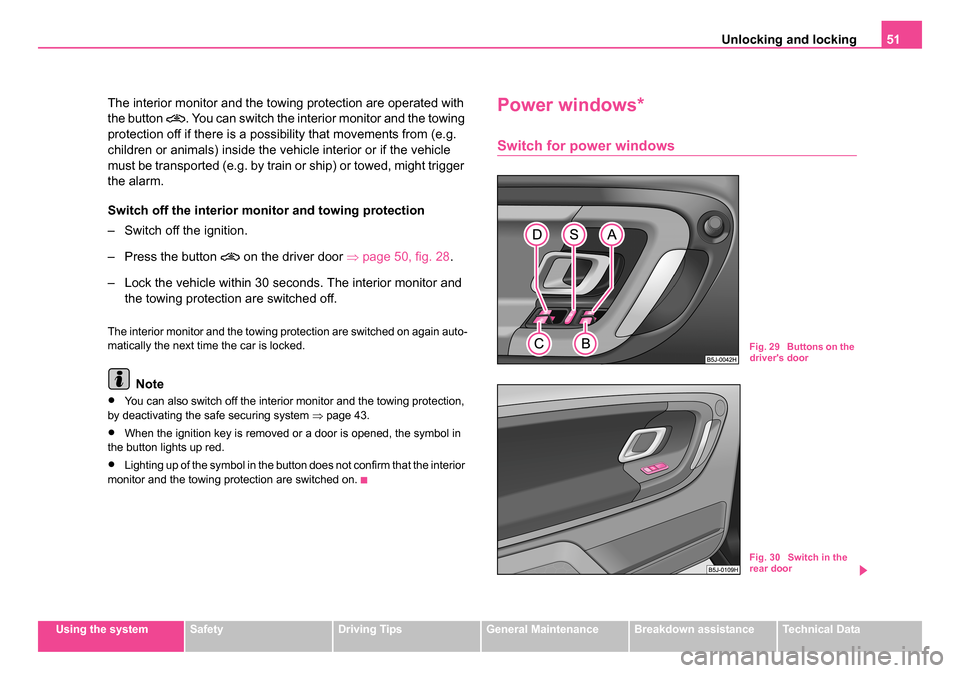
Fig. 29 Buttons on the
driver's door
Fig. 30 Switch in the
rear door
NKO 20 A05.book Page 51 Wednesday, June 21, 2006 1:42 PM
Page 53 of 274

Unlocking and locking
52
The power windows operate only when ignition is switched on.
Opening a window
– A window is opened by pressing lightly on the respective button in the door. The process stops when one releases the
button.
– Additionally you can open the window automatically (fully opened) by pressing the button up to the stop. Renewed
pressing of the button causes the window to stop immediately.
Closing a window
– A window is closed through pulling lightly on the respective button in the door. The closing process stops when one
releases the button.
– Additionally you can close the window automatically (fully closed) by pulling the button up to the stop. Renewed pulling
of the button causes the window to stop immediately.
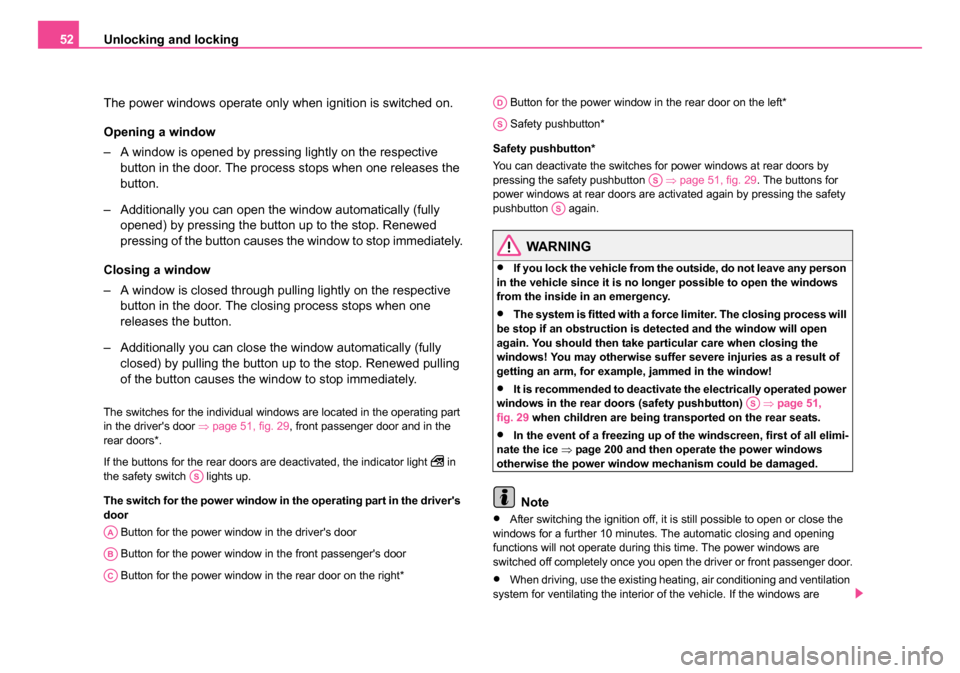
The switches for the individual windows are located in the operating part
in the driver's door ⇒page 51, fig. 29 , front passenger door and in the
rear doors*.
If the buttons for the rear doors are deactivated, the indicator light
in
the safety switch lights up.
The switch for the power window in the operating part in the driver's
door
Button for the power window in the driver's door
Button for the power window in the front passenger's door
Button for the power window in the rear door on the right* Button for the power window in the rear door on the left*
Safety pushbutton*
Safety pushbutton*
You can deactivate the switches for power windows at rear doors by
pressing the safety pushbutton ⇒page 51, fig. 29 . The buttons for
power windows at rear doors are activated again by pressing the safety
pushbutton again.
WARNING
•If you lock the vehicle from the outside, do not leave any person
in the vehicle since it is no longer possible to open the windows
from the inside in an emergency.
•The system is fitted with a force limiter. The closing process will
be stop if an obstruction is detected and the window will open
again. You should then take particular care when closing the
windows! You may otherwise suffer severe injuries as a result of
getting an arm, for example, jammed in the window!
•It is recommended to deactivate the electrically operated power
windows in the rear doors (safety pushbutton) ⇒page 51,
fig. 29 when children are being transported on the rear seats.
•In the event of a freezing up of the windscreen, first of all elimi-
nate the ice ⇒page 200 and then operate the power windows
otherwise the power window mechanism could be damaged.
Note
•After switching the ignition off, it is still possible to open or close the
windows for a further 10 minutes. The automatic closing and opening
functions will not operate during this time. The power windows are
switched off completely once you open the driver or front passenger door.
•When driving, use the existing heating, air conditioning and ventilation
system for ventilating the interior of the vehicle. If the windows are
AS
AA
AB
AC
AD
AS
AS
AS
AS
NKO 20 A05.book Page 52 Wednesday, June 21, 2006 1:42 PM
Page 105 of 274

Heating and air conditioning system
104
Climatronic (automatic air conditioning)*
Description
The Climatronic system is a combination of an automatic
heating, fresh air and cooling system which provides
optimal comfort for the occupants of the car.
The Climatronic maintains a constant temperature fully automatically,
once it has been set. This is achieved by automatically varying the
temperature of the outflowing air, the blower stages and the air distribu-
tion. The system also takes into account sunlight which eliminates the
need to alter the settings manually. The automatic mode ⇒ page 106
ensures maximum wellbeing of the occupants at all times of the year.
Description of Climatronic system
The cooling operates only if the following conditions are met:
•engine running,
•outside temperature above +2 °C,
•the button is not pressed.
If the cooling system is switched on, the temperature and air humidity
drops in the vehicle. The wellbeing of the occupants of the car is enhanced
as a result of this particularly at high outside temperatures and a high air
humidity. The system prevents the windows misting up during the cold
season of the year.
The heating effect is dependent upon the coolant temperature, thus full
heat output only occurs when the engine has reached its operating
temperature.
It is possible to briefly activate recirculated air mode in order to enhance
the cooling effect ⇒. The air inlet in front of the windscreen must be free of ice, snow or leaves
in order to ensure that the heating and cooling systems operate properly.
The AC compressor is switched off at a high coolant temperature in order
to provide cooling at a high load of the engine.
After switching on the cooling
Condensation from the evaporator of the
air conditioning may drip down and form a puddle below the vehicle. This
is quite normal and not an indication of a leak!
Recommended setting for all periods of the year:
•Set the temperature to 22 °C.
•Press the button ⇒page 105, fig. 96 .
•Move the air outlet vents 3 and 4 so that the air flow is directed slightly
upwards ⇒page 108, fig. 97 .
Switching over between degrees Celsius and degrees Fahrenheit
Press and hold the buttons and ⇒page 105, fig. 96 . The
information in the desired temperature measuring unit appears in the
display.
WARNING
•For your own safety and that of other road users, ensure that all
the windows are free of ice, snow and misting. Please familiarize
yourself about how to correctly operate the heating and ventilation
systems, how to demist and defrost the windows, as well as with
the cooling mode.
•You should not leave recirculated air mode on over a longer
period of time, as “stale” air may result in fatigue in the driver and
occupants, divert your attention and also cause the windows to
mist up. The risk of having an accident increases. Switch recircu-
lated air mode off as soon as the windows begin misting up.
ECON
AUTO
ECONAUTO
NKO 20 A05.book Page 104 Wednesday, June 21, 2006 1:42 PM
Page 106 of 274

Heating and air conditioning system 105
Using the systemSafetyDriving TipsGeneral MaintenanceBreakdown assistanceTechnical Data
Note
•If the cooling system has not been switched on for a lengthy period,
odours may be produced at the evaporator because of deposits. Switch
the cooling system on at least once a month for approximately 5 minutes
at the highest blower stage - also during the cold season of the year - in
order to remove such odours. Also open a window for a short time.
•We recommend that you do not smoke in the vehicle when the recir-
culating air mode is operating since the smoke which is drawn at the evap-
orator from the interior of the vehicle forms deposits in the evaporator of
the air conditioning system. This produces a permanent odour when the
air conditioning system is operating which can only be eliminated through
considerable effort and expense (replacement of compressor).
•The used air streams out through the air removal openings in the
luggage compartment.
•Using the cooling economically ⇒page 103.
•Operational problems ⇒page 103.
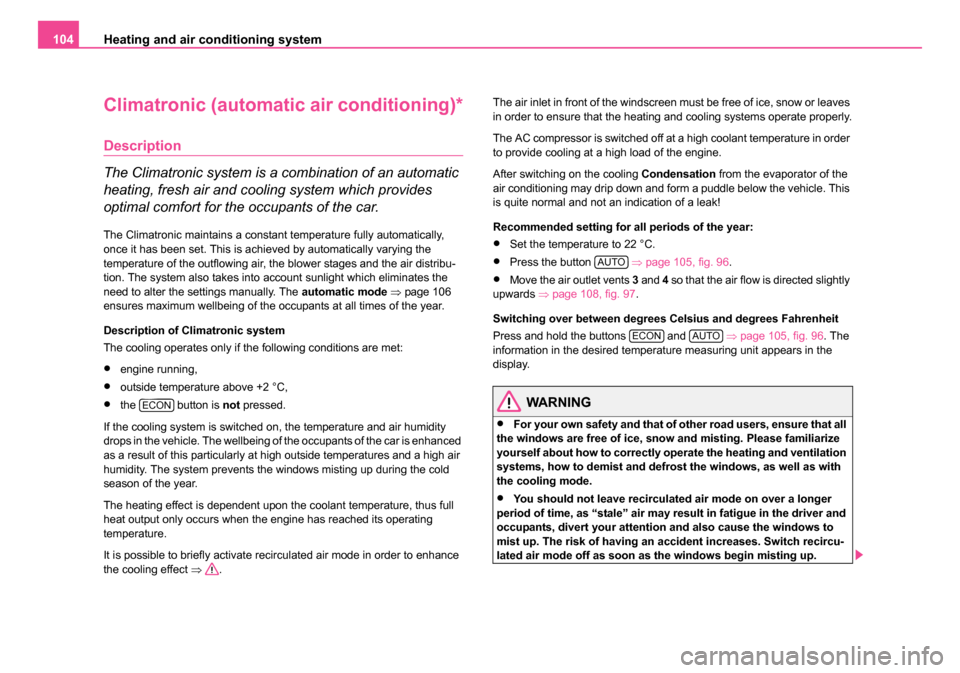
Overview of the control elements
Fig. 96 Climatronic: Control elements
Buttons / control dial
Setting the blower speed
The displays Set blower speed
The outside temperature
Climatronic fault, have the vehicle inspected by a specialist garage
Air flow to the windows
Recirculated air mode
Air flow to the head, upper body and feet
Display of selected interior temperature, here: +20 °C
Automatic mode
ECON mode
Buttons / control dial Setting the interior temperature
Air flow to the windows
A1
A2
A3
A4
A5
A6
A7
A8
A9
A10
A11
A12
NKO 20 A05.book Page 105 Wednesday, June 21, 2006 1:42 PM