2006 SKODA ROOMSTER ignition
[x] Cancel search: ignitionPage 60 of 274

Lights and Visibility59
Using the systemSafetyDriving TipsGeneral MaintenanceBreakdown assistanceTechnical Data
Switch for hazard warning lights
– Press switch ⇒ page 59, fig. 36 to switch the hazard
warning light system on or off.
All the turn signal lights on the vehicle flash at the same time when the
hazard warning light system is switched on. The indicator light for the turn
signals and the indicator light in the switch also flash at the same time. You
can also switch on the hazard warning light system if the ignition is
switched off.
Please comply with any legal requirements when using the hazard
warning light system.
Note
Switch on the hazard warning light system if, for example:
•you encounter traffic congestion,
•your vehicle breaks down or an emergency situation occurs.
The turn signal and main beam lever
The parking lights and headlight flasher are also switched
on and off using the turn signal and main beam lever.
The turn signal and main beam lever perform the following func-
tions:
Right
and left turn signal light
– Push the lever upwards or downwards ⇒fig. 37 .
– If you only wish to flash three times (the so-called conven- ience turn signal*), push the lever briefly up to the upper or
lower pressure point and release it.
– Turn signal for changing lanes - in order to only flash briefly, move the lever up or down to the pressure point and hold it in
this position.
Fig. 36 Dash panel:
Switch for hazard
warning lights
Fig. 37 Turn signal and
main beam lever
NKO 20 A05.book Page 59 Wednesday, June 21, 2006 1:42 PM
Page 61 of 274

Lights and Visibility
60
Main beam
– Switch on the low beam.
– Push the lever forwards - the main beam and warning light in the instrument cluster come on.
– Pull the lever back into the initial position in order to switch the main beam off again.
Headlight flasher
– Pull on the lever of the steering wheel (sprung position) - the main beam and warning light in the instrument cluster come
on.
Parking light
– Switch off the ignition.
– Push the lever up or down - the right-hand or left-hand parking light is switched on.
Information concerning the function of the lights.
•The turn signal system only operates when the ignition is switched
on. The corresponding indicator light or in the instrument cluster also
flashes.
•The turn signal is automatically cancelled after negotiating a curve.
•The side light and rear light on the appropriate side of the vehicle are
switched on when the parking light is selected. The parking light function
only operates if the ignition is switched off.
•An acoustic warning signal will sound when the driver's door is opened
if the lever is not in the middle position after removing the ignition key. The
acoustic warning signal will stop just as soon as the driver's door is closed.
Caution
Use main beam or the headlight flasher only if this does not risk dazzling
other road users.
Note
Use only in accordance with the legal requirements the described lighting
and signal systems.
Interior lighting
Front interior lighting and storage compartment on
front passenger side
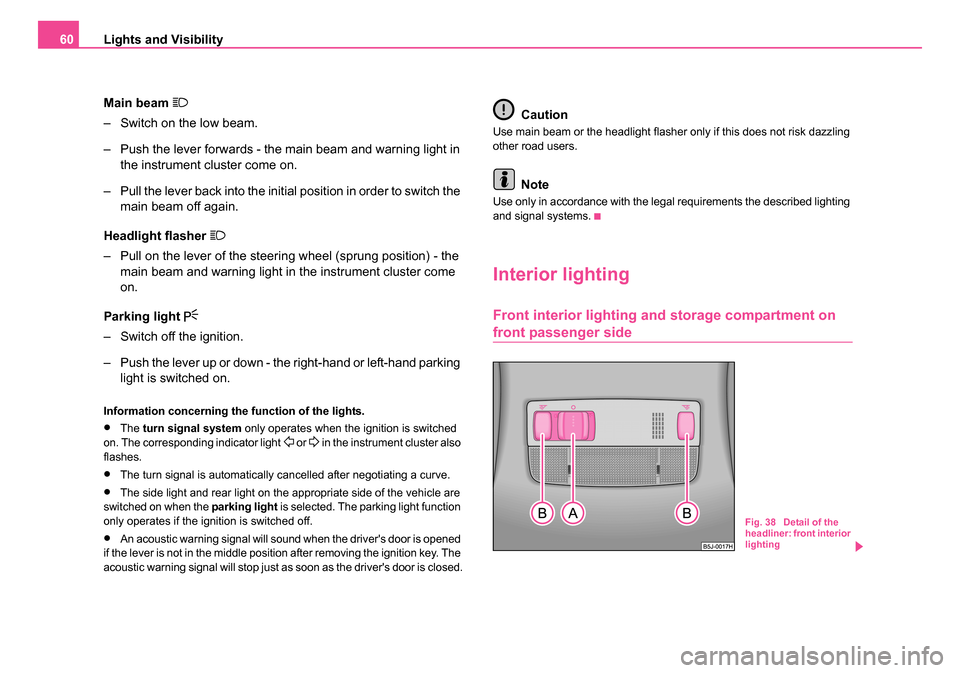
Fig. 38 Detail of the
headliner: front interior
lighting
NKO 20 A05.book Page 60 Wednesday, June 21, 2006 1:42 PM
Page 62 of 274

Lights and Visibility61
Using the systemSafetyDriving TipsGeneral MaintenanceBreakdown assistanceTechnical Data
Door contact switching mechan ism (on the front and rear*
door)
– Press the switch to the right into position
⇒ page 60,
fig. 38 .
– On the version without reading lights press the switch into the middle position
.
Switching the interior light on
– Press the switch to the left into position
.
Switching the interior light off
– Press the switch into the middle position O.
– On the version without reading lights press the switch to the right, the symbol O appears.
Reading lights
– Press on one of the switches ⇒page 60, fig. 38 in order to
switch the right or left reading light on or off.
Lighting of storage compar tment on the front passenger
side
– When opening the flap of the storage compartment on the front passenger side the lighting in the storage compartment
comes on.
– The light switches on automatically when the parking light is switched on and goes out when the flap is closed.
The interior light is switched on for about 20 seconds when a vehicle with
a central locking system is unlocked, when a door is opened or when the ignition key is removed. The requirement for this is that the switch is in the
door contact position. The inner light goes out out immediately after the
ignition is switched on.
A time delay switch* causes the inner lighting on vehicles without a central
locking system stays on for a few seconds after the doors have been
closed. The inner light goes out out immediately after the ignition is
switched on.
The interior lighting is switched off after about 30 minutes when a door has
been left open in order to avoid discharging the battery of the vehicle.
Rear interior lighting*
The rear interior lighting
⇒fig. 39 is actuated by moving the switch to the
symbol , O or to the middle position .
The same principles apply for the interior lighting at the rear as for the for
the interior lighting at the front ⇒page 60.
AA
AA
AA
AA
AA
AB
Fig. 39 Roof liner light
at the rear
NKO 20 A05.book Page 61 Wednesday, June 21, 2006 1:42 PM
Page 65 of 274

Lights and Visibility
64
Slow wipe
– Position the lever up into position .
Fast wipe
– Position the lever up into position .
Automatic wipe/wash for windscreen
– Pull the lever towards the steering wheel into position and the widescreen wiper and wash system will operate - in the
sprung position.
– Release the lever. The winds creen wash system stops and
the wiper continues for another 1 - 3 wiper strokes (depending
on the period of spraying of the windscreen).
Wiping the rear window pane*
– Push the lever away from the steering wheel into position ⇒page 63, fig. 42 , the widescreen wiper will operate every 6
seconds.
Automatic wipe/wash for the rear window pane*
– Push the lever away from the steering wheel into position - the widescreen wiper and wash system will operate - in the
sprung position.
– Letting go of the lever will cause the windscreen wash system to stop and the wiper to continue for another 1 - 3 wiper
strokes (depending on the period of spraying of the wind-
screen). The lever will stay in position after releasing it .
Switching windscreen wipers off
– Move the lever back into its home position .
The windscreen wipers and the windscreen washer system only operate
if the ignition is switched on.
The rear window will be wiped again if the front window wipers are on
when reverse gear is selected.
The windscreen washer nozzles are heated* when the ignition is switched
on.
Top up with wash liquid ⇒page 224.
WARNING
•Properly maintained windscreen wiper blades are essential for
clear visibility and safe driving ⇒page 65.
•Do not use the windscreen washer system at low temperatures,
without heating the windscreen beforehand. Otherwise the window
cleaner could freeze on the windscreen and restrict the view to the
front.
•In the event of a freezing up of the windscreen, first of all elimi-
nate the ice ⇒page 200 and then operate the windscreen wiper
otherwise the windscreen wiper blades could be damaged.
Caution
In frosty weather, please first of all check whether the windscreen wiper
blades are not frozen to the windscreen before switching them on.
Switching on windscreen wipers when the blades are frozen to the wind-
screen may result in damage both to the blades and the motor of the wind-
screen wipers!
A2
A3
A5
A6
A7
A6
A0
NKO 20 A05.book Page 64 Wednesday, June 21, 2006 1:42 PM
Page 72 of 274

Seats and Stowage71
Using the systemSafetyDriving TipsGeneral MaintenanceBreakdown assistanceTechnical Data
Heating the front seats*
The seating and leaning surfaces of the driver and front
passenger seat can be heated when the ignition is switched on.
Front seats
– By pressing the rocker switch in the position or switch
on the front seat heating to 25 % or 100 % of its power output
⇒fig. 49 .
– To switch off the heating shift the rocker switch into the hori- zontal position.
Caution
•You should not kneel on the seats or otherwise apply pressure at
specific points in order to avoid damaging the heating elements of the seat
heaters.
•Do not clean the seats moist ⇒page 203.
Note
The seat heating should only be switched on when the engine is running.
This has a significant effect of saving on the battery capacity.
Fig. 49 Rocker switch:
Front seat heating
A1A2
NKO 20 A05.book Page 71 Wednesday, June 21, 2006 1:42 PM
Page 90 of 274

Seats and Stowage89
Using the systemSafetyDriving TipsGeneral MaintenanceBreakdown assistanceTechnical Data
– Insert the plug of the electrical appliance into the socket of the
cigarette lighter.
The 12 volt power socket can also be used to supply power to electrical
accessories with a power uptake up to 180 watts.
WARNING
•Take care when using the cigarette lighter! Not paying proper
attention or incorrect use the cigarette lighter in an uncontrolled
manner may result in burns.
•The cigarette lighter and the power socket also operates when
the ignition is switched off or th e ignition key withdrawn. This is
why you should never leave children unattended in the vehicle!
Caution
Only use matching plugs, which fulfils the DIN - ISO Standard 4165, to
avoid damaging the power sockets.
Note
Connecting electrical components when the engine is not running
will drain the battery of the vehicle - risk of battery draining!
Power socket in the luggage compartment
– Open the cover of the power socket ⇒fig. 79 .
– Connect the plug of the electrical appliance to the socket.
It fulfils the requirements of DIN standard ISO 4165 and must only be used
for connecting approved electrical accessories with a power uptake of up
to 240 watts. The vehicle battery will be discharged in the process if the
engine is stationary.
The same remarks apply here as for ⇒page 88, “Cigarette lighter”.
Further information ⇒page 232, “Accessories, changes and replacement
of parts”.
Fig. 79 Luggage
compartment: Power
socket
NKO 20 A05.book Page 89 Wednesday, June 21, 2006 1:42 PM
Page 108 of 274

Heating and air conditioning system 107
Using the systemSafetyDriving TipsGeneral MaintenanceBreakdown assistanceTechnical Data
Defrosting windscreen - switching off
– Once again press the button or the button .
The temperature control is controlled automatically. More air flows out of
the air outlet vents 1 and 2.
Recirculated air mode
In recirculated air mode air is sucked out of the interior of
the vehicle and then fed back into the interior.
Recirculated air mode prevents polluted air outside the vehicle
from getting into the vehicle, for example when driving through a
tunnel or when standing in a traffic jam.
Switching recirculated air mode on
– Press button , the symbol
appears on the display.
Switching recirculated air mode off
– Once again press the button or the button , the symbol or the logo is no longer shown on the display.
WARNING
You should not leave recirculated air mode on over a longer period
of time, as “stale” air may result in fatigue in the driver and occu-
pants, divert your attention and also cause the windows to mist up.
The risk of having an accident increases. Switch recirculated air
mode off as soon as the windows begin misting up.
Note
If the windscreen mists up, press the button . After the windscreen has
been demisted, press the button .
Setting temperature
– You can set the desired interior temperature after switching on the ignition with the control dial .
You can set the interior temperature between +18°C and +29°C. The inte-
rior temperature is regulated automatically within this range. If you select
a temperature of less than +18 °C, “LO” is shown on the display. If you
select a temperature above +29 °C, “HI” is shown on the display. In both
limit positions the Climatronic operates at maximum cooling or heating
capacity, respectively. The temperature is not controlled in this case.
Lengthy and uneven distribution of the air flow out of the vents (in partic-
ular at the leg area) and large differences in temperature, for example
when getting out of the vehicle, can result in chills in sensitive persons.
Controlling blower
There are a total of seven blower stages available.
The Climatronic system controls the blower stages automatically
in line with the interior temperature. You can also, however, adapt
the blower stages manually to suit your particular needs.
– Turn the control dial ⇒page 105, fig. 96 to the left (reduce
blower speed) or right (increase blower speed).
AUTO
AUTO
AUTO
A11
A1
NKO 20 A05.book Page 107 Wednesday, June 21, 2006 1:42 PM
Page 111 of 274

Starting-off and Driving
110
the steering wheel firmly in the 12 o'clock position or in another
way (e.g. in the middle of the steering wheel or at the inner steering
wheel edge). In such cases, injuries to the arms, the hands and the
head can occur when the driver airbag is deployed.
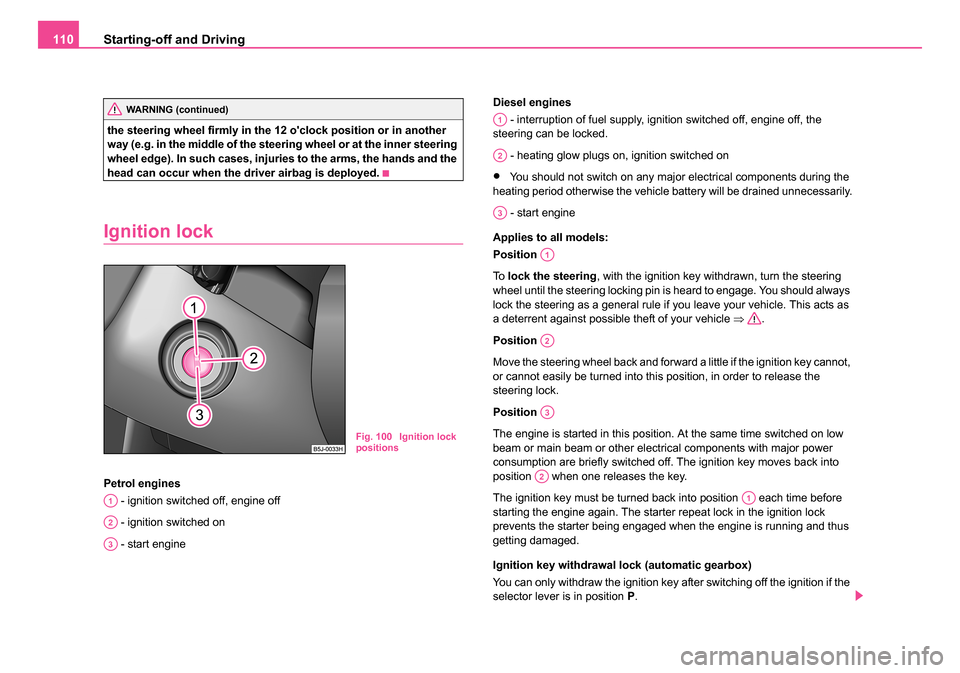
Ignition lock
Petrol engines
- ignition switched off, engine off
- ignition switched on
- start engine Diesel engines
- interruption of fuel supply, ignition switched off, engine off, the
steering can be locked.
- heating glow plugs on, ignition switched on
•You should not switch on any major electrical components during the
heating period otherwise the vehicle battery will be drained unnecessarily.
- start engine
Applies to all models:
Position
To lock the steering , with the ignition key withdrawn, turn the steering
wheel until the steering locking pin is heard to engage. You should always
lock the steering as a general rule if you leave your vehicle. This acts as
a deterrent against possible theft of your vehicle ⇒.
Position
Move the steering wheel back and forward a little if the ignition key cannot,
or cannot easily be turned into this position, in order to release the
steering lock.
Position
The engine is started in this position. At the same time switched on low
beam or main beam or other electrical components with major power
consumption are briefly switched off. The ignition key moves back into
position when one releases the key.
The ignition key must be turned back into position each time before
starting the engine again. The starter repeat lock in the ignition lock
prevents the starter being engaged when the engine is running and thus
getting damaged.
Ignition key withdrawal lock (automatic gearbox)
You can only withdraw the ignition key after switching off the ignition if the
selector lever is in position P.
WARNING (continued)
Fig. 100 Ignition lock
positions
A1
A2
A3
A1
A2
A3
A1
A2
A3
A2
A1
NKO 20 A05.book Page 110 Wednesday, June 21, 2006 1:42 PM