Page 19 of 281

REAR SEAT ADJUSTMENT
Folding1. Store the rear cup holder in the center con-
sole.
2. Secure the seat belt on the clip.
3. Remove the head restraints. (The removed
head restraints can be stored on the reclining
lock plate.)
4. Pull the strap forward and bring up the seat
cushion
�1.
5. After removing the tonneau cover (if so
equipped) from each rear seatback, pull up
the knoband fold the seatback down
�2.6. When resetting the seat, be sure to hold the
seat belt buckles so that they do not fall
between the seatback and the seat cushion
and install the head restraints.
WARNING
�Never allow anyone to ride in the
cargo area or on the rear seat when it
is in the fold-down position. Use of
these areas by passengers without
proper restraints could result in seri-
ous injury in an accident or suddenstop.
�It is extremely dangerous to ride in a
cargo area inside of a vehicle. In a
collision, people riding in these areas
are more likely to be seriously in-
jured or killed.
�Do not allow people to ride in any
area of your vehicle that is not
equipped with seats and seat
belts. Be sure everyone in your ve-
hicle is in a seat and using a seat belt
properly.
�Do not fold down the rear seats when
occupants are in the rear seat area or
any luggage is on the rear seat.
�Head restraints should be adjusted
properly as they may provide signifi-
cant protection against injury in an
accident. Always replace and adjust
them properly if they have been re-
moved for any reason.
�If the head restraints are removed for
any reason, they should be securely
stored to prevent them from causing
SPA1348A
1-6
Safety — Seats, seat belts and supplemental restraint system
�
06.4.14/T30-J/V5.0
�
Page 20 of 281

injury to passengers or damage to
the vehicle in case of sudden braking
or an accident.
�Properly secure all cargo to help pre-
vent it from sliding or shifting. Do not
place cargo higher than the seat-
backs. In a sudden stop or collision,
unsecured cargo could cause per-
sonal injury.
�When returning the seatbacks to the
upright position, be certain they are
completely secured in the latched po-
sition. If they are not completely se-
cured, passengers may be injured in
an accident or sudden stop.
RecliningPull the knob
�1
to remove it from the lock plate
and lean back until the desired angle is obtained.
To bring the seatback forward, pull the knob and
move your body forward.
The reclining feature allows adjustment of the
seatback for occupants of different sizes to help
obtain proper seat belt fit. (See “Precautions on
seat belt usage” later in this section.) The seat-
back may also be reclined to allow occupants to
rest when the vehicle is parked.
WARNING
�Do not ride in a moving vehicle when
the seatback is reclined. This can be
dangerous. The shoulder belt will not
be against your body. In an accident
you could be thrown into it and re-
ceive neck or other serious injuries.
You could also slide under the lap
belt and receive serious internal inju-
ries.
�For the most effective protection
when the vehicle is in motion, the
seat should be upright. Always sit
well back in the seat and adjust the
seat belt properly. See “PRECAU-
TIONS ON SEAT BELT USAGE” later
in this section.
�After adjustment, check to be sure
the seat is securely locked.
SPA1349A
Safety — Seats, seat belts and supplemental restraint system
1-7
�
06.4.14/T30-J/V5.0
�
Page 21 of 281
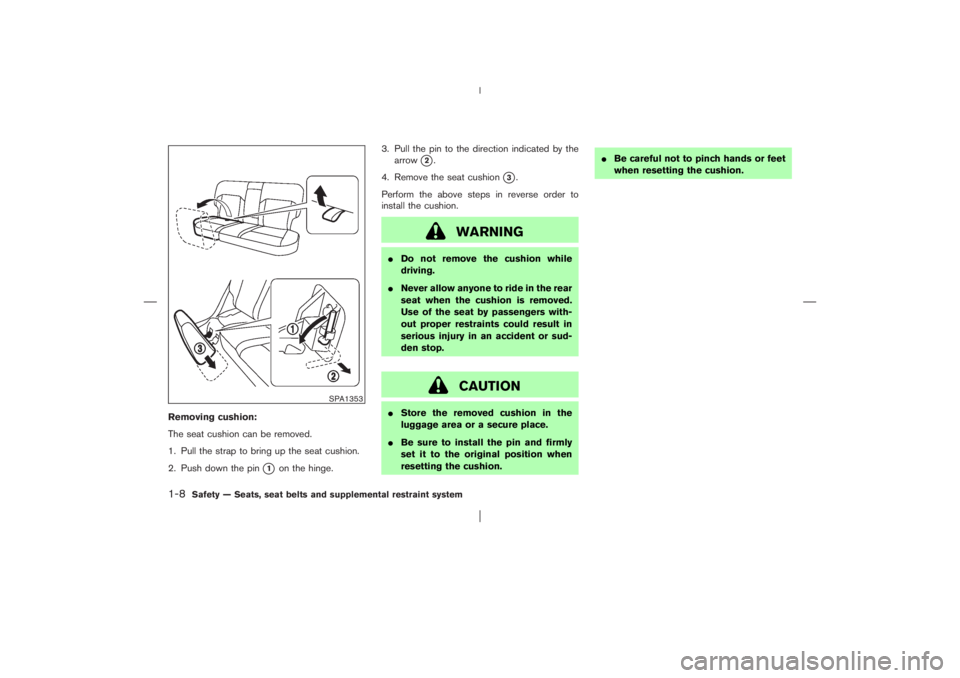
Removing cushion:
The seat cushion can be removed.
1. Pull the strap to bring up the seat cushion.
2. Push down the pin
�1
on the hinge.3. Pull the pin to the direction indicated by the
arrow
�2.
4. Remove the seat cushion
�3.
Perform the above steps in reverse order to
install the cushion.
WARNING
�Do not remove the cushion while
driving.
�Never allow anyone to ride in the rear
seat when the cushion is removed.
Use of the seat by passengers with-
out proper restraints could result in
serious injury in an accident or sud-
den stop.
CAUTION
�Store the removed cushion in the
luggage area or a secure place.
�Be sure to install the pin and firmly
set it to the original position when
resetting the cushion.�Be careful not to pinch hands or feet
when resetting the cushion.
SPA1353
1-8
Safety — Seats, seat belts and supplemental restraint system
�
06.4.14/T30-J/V5.0
�
Page 22 of 281
To raise the head restraint, just pull it up. To
lower, push the lock knob
�1and push the head
restraint down.
When removing the rear head restraint for seat")
HEAD RESTRAINT ADJUSTMENT
(for front seats)To raise the head restraint, just pull it up. To
lower, push the lock knob
�1and push the head
restraint down.
When removing the rear head restraint for seat
folding etc., push the lock knoband pull up the
head restraint. The removed head restraint
should be securely stored.
WARNING
�Head restraints should be adjusted
properly as they may provide signifi-
cant protection against injury in an
accident. Check the adjustment after
someone else uses the seat.
�Do not remove the head restraints
except when folding down the rear
seat or using certain child restraints.
Always replace and adjust them
properly if they have been removed
for any reason.
�If the head restraints are removed for
any reason, they should be securely
stored to prevent them from causing
injury to passengers or damage to
the vehicle in case of sudden braking
or an accident.Adjust the head restraints so the center is level
with the center of your ears.
SSS0288
SSS0287
Safety — Seats, seat belts and supplemental restraint system
1-9
�
06.4.14/T30-J/V5.0
�
Page 24 of 281

Removing the armrestThe armrest can be removed.
1. Pull down the seatback and the pocket.
2. Remove the clip
�1
from the hinge.3. Slide the armrest and pocket toward the clip
side.
4. Shift the armrest and pocket
�2, sliding them
to the right side
�3
to remove from the pin.
CAUTION
Do not sit in the rear center seat posi-
tion when the armrest is removed.
PRECAUTIONS ON SEAT BELT
USAGEIf you are wearing your seat belt properly ad-
justed and you are sitting upright and well back
in your seat, your chances of being injured or
killed in an accident and/or the severity of injury
may be greatly reduced. NISSAN strongly en-
courages you and all of your passengers to
buckle up every time you drive, even if your
seating position includes a supplemental air bag.
Most states, provinces or territories re-
quire that seat belts be worn at all times
when a vehicle is being driven.
SPA1354B
SEAT BELTS
Safety — Seats, seat belts and supplemental restraint system
1-11
�
06.4.14/T30-J/V5.0
�
Page 35 of 281

Front facingWhen you install a child restraint in a rear
outboard or center seat, follow these steps:
1. Position the child restraint on the seat. Al-
ways follow the restraint manufacturer’s in-
structions.
The back of the child restraint should be
secured against the vehicle seatback. If nec-
essary, adjust or remove the head restraint to
obtain the correct child restraint fit. See
“Head restraint adjustment” earlier in this
section. If the head restraint is removed, store
it in a secure place. Be sure to install thehead restraint when the child restraint is
removed. If the seating position does not
have an adjustable head restraint and it is
interfering with the proper child restraint fit,
try another seating position or a different
child restraint.2. Route the seat belt tongue through the child
restraint and insert it into the buckle until you
hear and feel the latch engage.
Be sure to follow the child restraint manufac-
turer’s instructions for belt routing.
SSS0252A
Rear outboard seat
SSS0320
Rear center seat
SSS0253E
1-22
Safety — Seats, seat belts and supplemental restraint system
�
06.4.14/T30-J/V5.0
�
Page 36 of 281
. It reverts back to emergency
locking m")
3. Pull on the shoulder belt until all of the belt is
fully extended. At this time, the belt retractor
is in the automatic locking mode (child re-
straint mode). It reverts back to emergency
locking mode when the belt is fully retracted.4. Allow the belt to retract. Pull up on the belt to
remove any slack in the belt.5. Before placing the child in the child restraint,
use force to tilt the child restraint from side to
side, and tug it forward to make sure that it is
securely held in place. It should not move
more than 25 mm (1 inch). If it does move
more than 25 mm (1 inch), pull again on the
shoulder belt to further tighten the child
restraint. If unable to properly secure the
restraint, move the restraint to another rear
seating position and try again, or try a differ-
ent child restraint. Not all child restraints fit in
all types of vehicles.
6. Check that the retractor is in the automatic
locking mode by trying to pull more belt out of
the retractor. If you cannot pull any more belt
SSS0422
SSS0423
SSS0333
Safety — Seats, seat belts and supplemental restraint system
1-23
�
06.4.14/T30-J/V5.0
�
Page 37 of 281
webbing out of the retractor, the belt is in the
automatic locking mode.
7. Check to make sure that the child restraint is
properly secured prior to each use. If the belt
is not locked, repeat steps 3 through 6.
After the child restraint is removed and the seat
belt is allowed to wind back into the retractor,
the automatic locking mode (child restraint
mode) is canceled.
Rear facingWhen you install a child restraint in a rear
outboard or center seat, follow these steps:
1. Position the child restraint on the seat. Al-
ways follow the restraint manufacturer’s in-
structions.
SSS0392
Rear outboard seat
SSS0358
Rear center seat
1-24
Safety — Seats, seat belts and supplemental restraint system
�
06.4.14/T30-J/V5.0
�