Page 112 of 281

1. Pull the hood lock release handle
�1
located
below the instrument panel; the hood will
then spring up slightly.
2. Move the lever
�2
at the front of the hood
with your fingertips and raise the hood.
3. Insert the assist bar�3
into the slot in the
front edge of the hood.
4. When closing the hood, reset the assist bar
to its original position, then slowly close the
hood and make sure it locks into place.
WARNING
�Make sure the hood is completely
closed and latched before driving.
Failure to do so could cause the hood
to fly open and result in an accident.
�If you see steam or smoke coming
from the engine compartment, to
avoid injury do not open the hood.�The power door lock system allows you to
lock or unlock all doors including the back
door simultaneously.
�Pull the opener handle to open the back door.
WARNING
Do not drive with the back door open.
This could allow dangerous exhaust
gases to be drawn into the vehicle. See
“Precautions when starting and driving”
in the “5. Starting and driving” section
SPA1817
SPA1722A
HOODBACK DOOR
Pre-driving checks and adjustments
3-7
�
06.4.14/T30-J/V5.0
�
Page 113 of 281
for exhaust gas.
Secondary back door releaseIf the back door cannot be locked or unlocked
with the power door lock switch or keyfobdue to
a discharged battery, follow the next steps.
1. Remove the cover inside of the back door
with a suitable tool.
2. Move the lever as illustrated to lock
�1
or
unlock
�2.
Contact a NISSAN dealer as soon as possible.
WARNING
�Always check the back door has been
closed securely to prevent it from
opening while driving.
�Do not drive with the back door open.
This could allow dangerous exhaust
gases to be drawn into the vehicle.
SPA2023
3-8
Pre-driving checks and adjustments
�
06.4.14/T30-J/V5.0
�
Page 114 of 281

OPENING FUEL-FILLER DOORTo open the fuel-filler door, pull up the opener
lever. To lock, close the fuel-filler door securely.
FUEL-FILLER CAPThe fuel-filler cap is a ratcheting type. Turn the
cap counterlockwise
�1
to remove. Tighten the
cap clockwise
�2
until ratcheting clicks, more
than twice, after refueling.
Put the fuel-filler cap on the cap holder while
refueling.WARNING
�Gasoline is extremely flammable and
highly explosive under certain condi-tions. You could be burned or seri-
ously injured if it is misused or mis-
handled. Always stop the engine and
do not smoke or allow open flames
or sparks near the vehicle when refu-
eling.
�Fuel may be under pressure. Turn the
cap a third of a turn, and wait for any
hissing sound to stop to prevent fuel
from spraying out and possible per-
sonal injury. Then remove the cap.
�Do not attempt to top off the fuel
tank after the fuel pump nozzle shuts
off automatically.
Continued refueling may cause fuel
overflow, resulting in fuel spray and
possibly a fire.
�Use only an original equipment type
fuel-filler cap as a replacement. It has
a built-in safety valve needed for
proper operation of the fuel system
and emission control system. An in-
correct cap can result in a serious
malfunction and possible injury. It
could also cause the
malfunc-
SPA1298A
SPA1809
FUEL-FILLER DOOR
Pre-driving checks and adjustments
3-9
�
06.4.14/T30-J/V5.0
�
Page 115 of 281

tion indicator lamp to come on.
�Do not fill a portable fuel container in
the vehicle or trailer. Static electricity
can cause an explosion of flammable
liquid, vapor or gas in any vehicle or
trailer. To reduce the risk of serious
injury or death when filling portable
fuel containers:
— Always place the container on the
ground when filling.
— Do not use electronic devices
while filling.
— Keep the pump nozzle in contact
with the container while you are
filling it.
— Use only approved portable fuel
containers for flammable liquid.
�Never pour fuel into the throttle body
to attempt to start your vehicle.
CAUTION
�If fuel is spilled on the car body, flushit away with water to avoid paint
damage.
�Tighten until the fuel-filler cap clicks.
Failure to tighten the fuel-filler cap
properly may cause the
mal-
function indicator lamp (MIL) to illu-
minate. If the
lamp illuminates
because the fuel-filler cap is loose or
missing, tighten or install the cap and
continue to drive the vehicle. The
lamp should turn off after a few
driving trips. If the
lamp does
not turn off after a few driving trips,
have the vehicle inspected by an au-
thorized NISSAN dealer.
�For additional information, see the
“Malfunction indicator lamp (MIL)” in
the “2. Instruments and controls”
section.
TILT OPERATIONPull the lock lever
�1
and adjust the steering
wheel up or down
�2
to the desired position.
Push the lock lever back�3
securely to lock the
steering wheel in place.
WARNING
�Do not adjust the steering wheel
while driving. You could lose control
of your vehicle and cause an
accident.
SPA1810
STEERING WHEEL
3-10
Pre-driving checks and adjustments
�
06.4.14/T30-J/V5.0
�
Page 116 of 281
�Do not put anything on or near the
steering wheel when tilting.
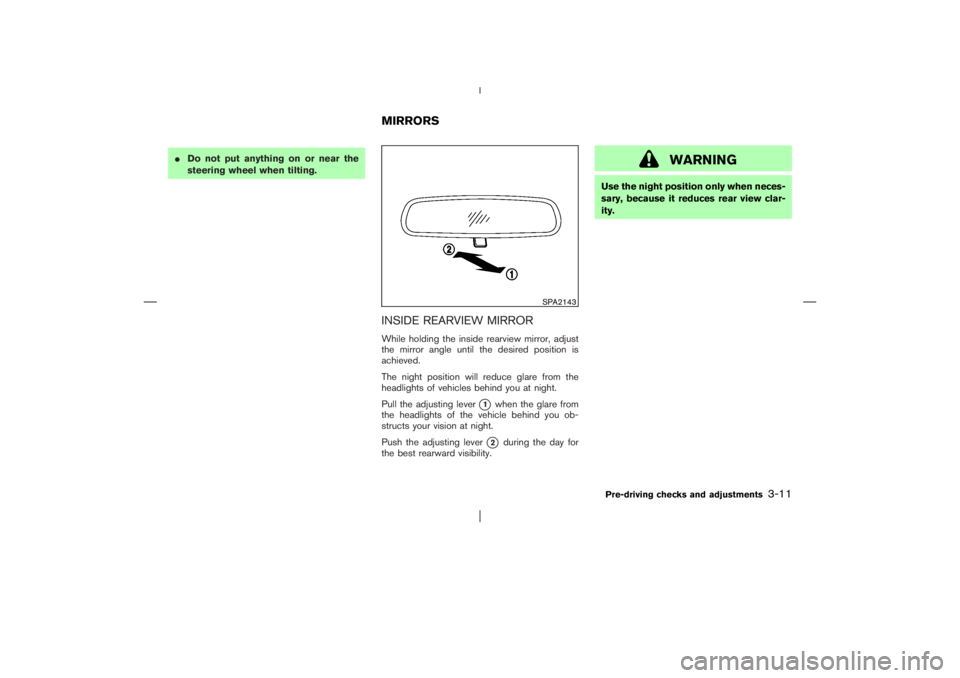
INSIDE REARVIEW MIRRORWhile holding the inside rearview mirror, adjust
the mirror angle until the desired position is
achieved.
The night position will reduce glare from the
headlights of vehicles behind you at night.
Pull the adjusting lever
�1
when the glare from
the headlights of the vehicle behind you ob-
structs your vision at night.
Push the adjusting lever�2
during the day for
the best rearward visibility.
WARNING
Use the night position only when neces-
sary, because it reduces rear view clar-
ity.
SPA2143
MIRRORS
Pre-driving checks and adjustments
3-11
�
06.4.14/T30-J/V5.0
�
Page 117 of 281
OUTSIDE REARVIEW MIRRORS
WARNING
Objects viewed in the outside mirror on
the passenger side are closer than they
appear. Be careful when moving to the
right. Using only this mirror could cause
an accident. Use inside mirror or glance
over your shoulder to properly judge
distances to other objects.
The outside mirror will operate only when theignition switch is in the ACC or ON position.
Move the switch to right
�A
or left
�B
to select
the right or left outside mirror, then adjust the
mirror to the desired position by pushing the
button
�C. After adjustment, move the select
switch to the center position.
Foldable outside mirrorsFold the outside mirror by pushing it toward the
rear of the vehicle.
SPA1449A
SPA1829
3-12
Pre-driving checks and adjustments
�
06.4.14/T30-J/V5.0
�
Page 121 of 281

WARNING
�Positioning of the heating or air con-
ditioning controls and display con-
trols should not be done while driv-
ing, in order that full attention may
be given to driving operation.
�Do not disassemble or modify this
system. If you do, it may result in
accidents, fire, or electric shock.
�Do not use this system if you notice
any abnormality, such as a frozen
screen or lack of sound. Continued
use of the system may result in acci-
dent, fire or electric shock.
�In case you notice any foreign object
in the system hardware, spill liquid
on it, or notice smoke or smell com-
ing from it, stop using the system
immediately and contact a NISSAN
dealer. Ignoring such conditions may
lead to accidents, fire, or electric
shock.When you use this system, make sure the engine
is running.
If you use the system with the engine not
running (ignition ONor ACC) for a long
time, it will use up all the battery power,
and the engine will not start.
Reference symbols:
“ENTER”button
This is a button on the control panel.
“Display”key
This is a select key on the screen. By selecting
this key you can proceed to the next function.
NAMES OF THE COMPONENTS1. “SETTING” button
2. “INFO” button
3. “
” brightness control button
4. “PREVIOUS” button
5. JOYSTICK and “ENTER” button
For navigation system control buttons (other
than above); refer to the separate Navigation
System Owner’s Manual.
SAA1275
SAFETY NOTE
CONTROL PANEL BUTTONS —
WITH NAVIGATION SYSTEM4-2
Heater, air conditioner and audio systems
�
06.4.14/T30-J/V5.0
�
Page 122 of 281

HOW TO USE JOYSTICK AND
“ENTER” BUTTONChoose an item on the display using the joystick
and push the “ENTER” button for operation.HOW TO USE “PREVIOUS”
BUTTONThis button has two functions.
To return to the previous screen:
When this button is pressed during setup, setup
will be canceled, and the screen will return to the
previous screen.
To finish the set-up:
When this button is pressed after setup is
completed, the settings will be renewed as
directed, and the screen will return to the map.
INFO:
When the “PREVIOUS” button must be
pressed, (for example, after the setup is finished)
instructions are given in the operation procedure
of each section in this manual. If the “PREVI-
OUS” button is pressed when not finished with
the setup, the setting will be canceled, and the
screen will return to the previous screen.
SETTING UP THE START-UP
SCREENWhen you turn the ignition key to ACC, the
SYSTEM START-UP warning is displayed on
the screen. Read the warning and select the
“I AGREE” (English) or “ENTER” (Franc¸ ais) key
then push the “ENTER” button.
If you do not push the “ENTER” button, this
system will not proceed to the next step display.
To proceed to the next step, refer to the separate
Navigation System Owner’s Manual.
HOW TO USE THE “INFO” BUTTONWhen the “INFO” button is pushed, the “MAIN-
TENANCE INFO.” screen will be displayed.Maintenance informationTo set the maintenance interval for the Engine
Oil or Oil Filter, choose an item using the joystick
and push the “ENTER” button.
You can also set to display a message to remind
you that the maintenance needs to be per-
formed.
The following example shows how to set the
engine oil change interval. Use the same steps
to set the other maintenance information.
SAA1276
Heater, air conditioner and audio systems
4-3
�
06.4.14/T30-J/V5.0
�