Page 2357 of 2896

CHASSIS AND BODY MAINTENANCE
MA-23
C
D
E
F
G
H
I
J
K
MA
B
MA
Revision: June 20062007 Versa
2. Check for A/T fluid leakage.
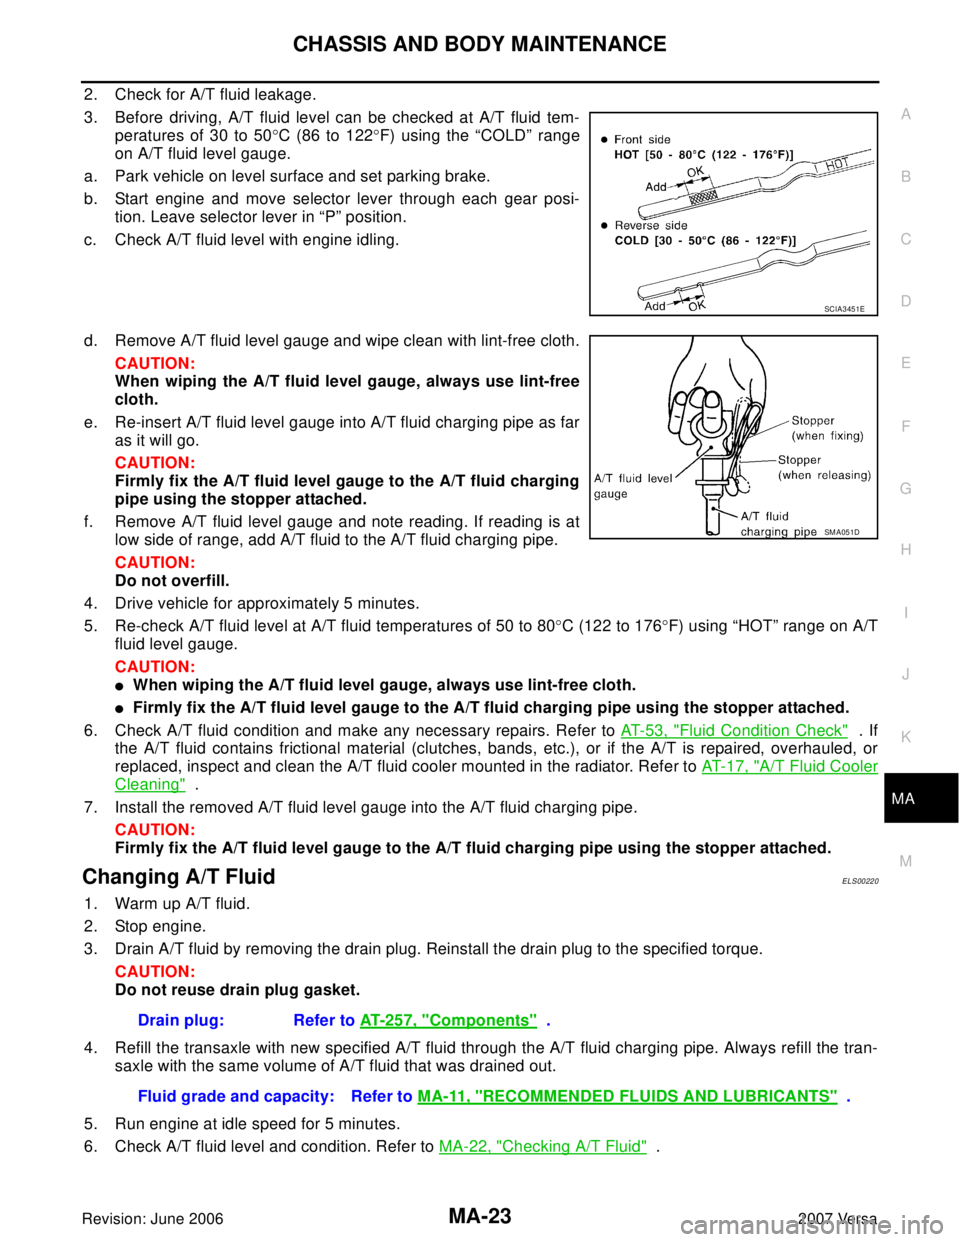
3. Before driving, A/T fluid level can be checked at A/T fluid tem-
peratures of 30 to 50°C (86 to 122°F) using the “COLD” range
on A/T fluid level gauge.
a. Park vehicle on level surface and set parking brake.
b. Start engine and move selector lever through each gear posi-
tion. Leave selector lever in “P” position.
c. Check A/T fluid level with engine idling.
d. Remove A/T fluid level gauge and wipe clean with lint-free cloth.
CAUTION:
When wiping the A/T fluid level gauge, always use lint-free
cloth.
e. Re-insert A/T fluid level gauge into A/T fluid charging pipe as far
as it will go.
CAUTION:
Firmly fix the A/T fluid level gauge to the A/T fluid charging
pipe using the stopper attached.
f. Remove A/T fluid level gauge and note reading. If reading is at
low side of range, add A/T fluid to the A/T fluid charging pipe.
CAUTION:
Do not overfill.
4. Drive vehicle for approximately 5 minutes.
5. Re-check A/T fluid level at A/T fluid temperatures of 50 to 80°C (122 to 176°F) using “HOT” range on A/T
fluid level gauge.
CAUTION:
�When wiping the A/T fluid level gauge, always use lint-free cloth.
�Firmly fix the A/T fluid level gauge to the A/T fluid charging pipe using the stopper attached.
6. Check A/T fluid condition and make any necessary repairs. Refer to AT-53, "
Fluid Condition Check" . If
the A/T fluid contains frictional material (clutches, bands, etc.), or if the A/T is repaired, overhauled, or
replaced, inspect and clean the A/T fluid cooler mounted in the radiator. Refer to AT-17, "
A/T Fluid Cooler
Cleaning" .
7. Install the removed A/T fluid level gauge into the A/T fluid charging pipe.
CAUTION:
Firmly fix the A/T fluid level gauge to the A/T fluid charging pipe using the stopper attached.
Changing A/T FluidELS00220
1. Warm up A/T fluid.
2. Stop engine.
3. Drain A/T fluid by removing the drain plug. Reinstall the drain plug to the specified torque.
CAUTION:
Do not reuse drain plug gasket.
4. Refill the transaxle with new specified A/T fluid through the A/T fluid charging pipe. Always refill the tran-
saxle with the same volume of A/T fluid that was drained out.
5. Run engine at idle speed for 5 minutes.
6. Check A/T fluid level and condition. Refer to MA-22, "
Checking A/T Fluid" .
SCIA3451E
SM A05 1D
Drain plug: Refer to AT- 2 5 7 , "Components" .
Fluid grade and capacity: Refer to MA-11, "
RECOMMENDED FLUIDS AND LUBRICANTS" .
Page 2358 of 2896

MA-24
CHASSIS AND BODY MAINTENANCE
Revision: June 20062007 Versa
Balancing WheelsELS0022E
Adjust wheel balance using road wheel center.
CAUTION:
�Be careful not to scratch the road wheel during removal.
�Use clip-on type wheel balance weights only.
Wheel balance (Maximum allowable unbalance):
RotationELS0022F
�Follow the maintenance schedule for tire rotation service inter-
vals. Refer to MA-7, "
PERIODIC MAINTENANCE" .
�Do not include the T-type spare tire when rotating tires.
CAUTION:
�When installing wheels, tighten them diagonally by divid-
ing the work two to three times in order to prevent the
wheels from developing any distortion.
�Be careful not to tighten wheel nut at torque exceeding
the specification to prevent damage of disc rotor.
Checking Brake Fluid Level and LeaksELS0022G
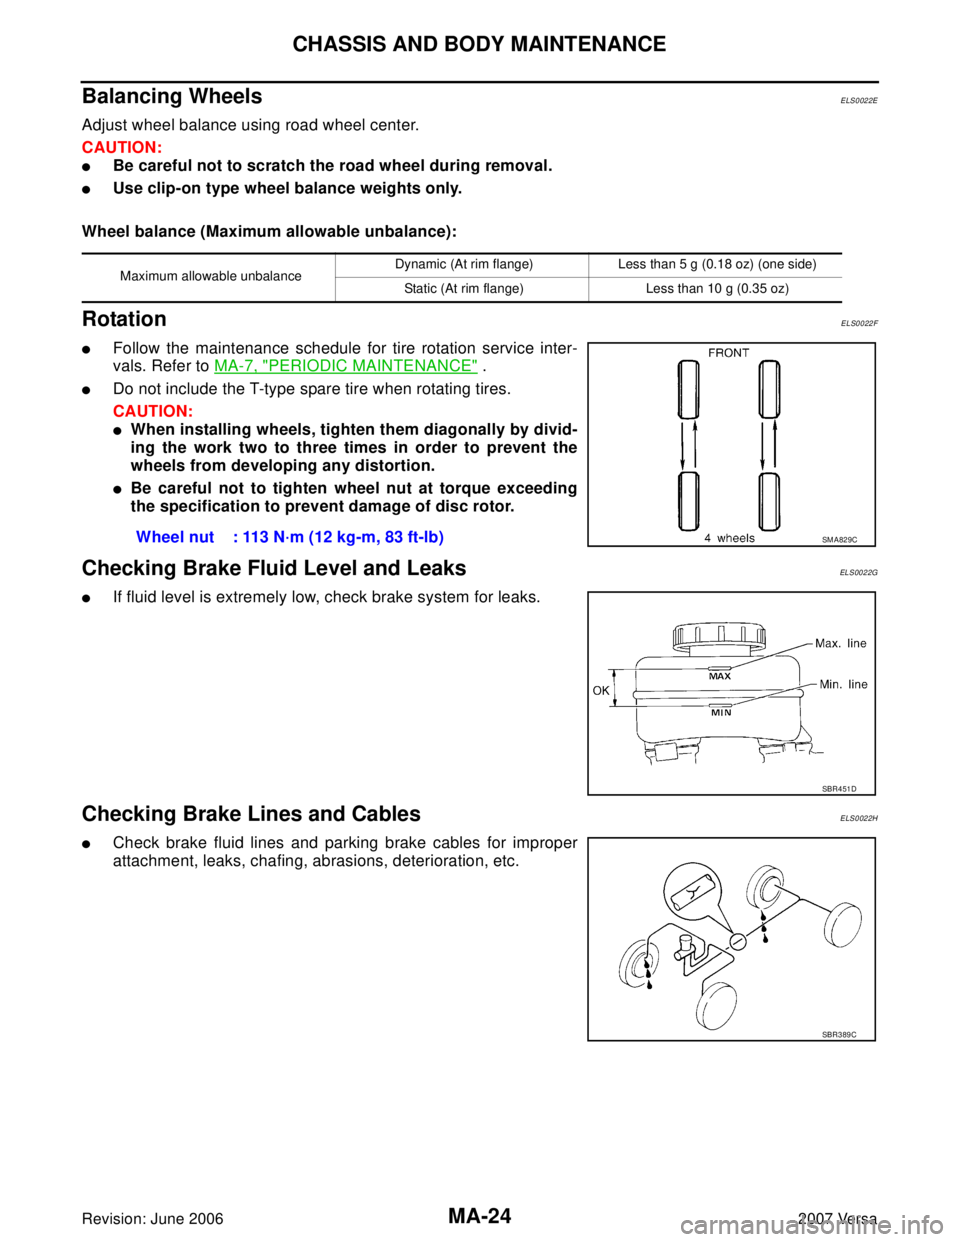
�If fluid level is extremely low, check brake system for leaks.
Checking Brake Lines and CablesELS0022H
�Check brake fluid lines and parking brake cables for improper
attachment, leaks, chafing, abrasions, deterioration, etc.
Maximum allowable unbalanceDynamic (At rim flange) Less than 5 g (0.18 oz) (one side)
Static (At rim flange) Less than 10 g (0.35 oz)
Wheel nut : 113 N·m (12 kg-m, 83 ft-lb)SM A82 9C
SBR4 51 D
SBR3 89 C
Page 2509 of 2896

PB-1
PARKING BRAKE SYSTEM
F BRAKES
CONTENTS
C
D
E
G
H
I
J
K
L
M
SECTION PB
A
B
PB
Revision: June 20062007 Versa PRECAUTIONS .......................................................... 2
Precautions for Supplemental Restraint System
(SRS) “AIR BAG” and “SEAT BELT PRE-TEN-
SIONER” .................................................................. 2
PREPARATION ........................................................... 3
Commercial Service Tools ........................................ 3
PARKING BRAKE CONTROL ................................... 4
On-Vehicle Service ................................................... 4
INSPECTION ........................................................ 4COMPONENTS INSPECTION .............................. 4
ADJUSTMENT ...................................................... 4
Components ............................................................. 5
Removal and Installation .......................................... 6
REMOVAL ............................................................. 6
INSTALLATION ..................................................... 6
SERVICE DATA AND SPECIFICATIONS (SDS) ........ 7
Parking Brake Control .............................................. 7
Page 2512 of 2896

PB-4
PARKING BRAKE CONTROL
Revision: June 20062007 Versa
PARKING BRAKE CONTROLPFP:36010
On-Vehicle ServiceEFS006K3
INSPECTION
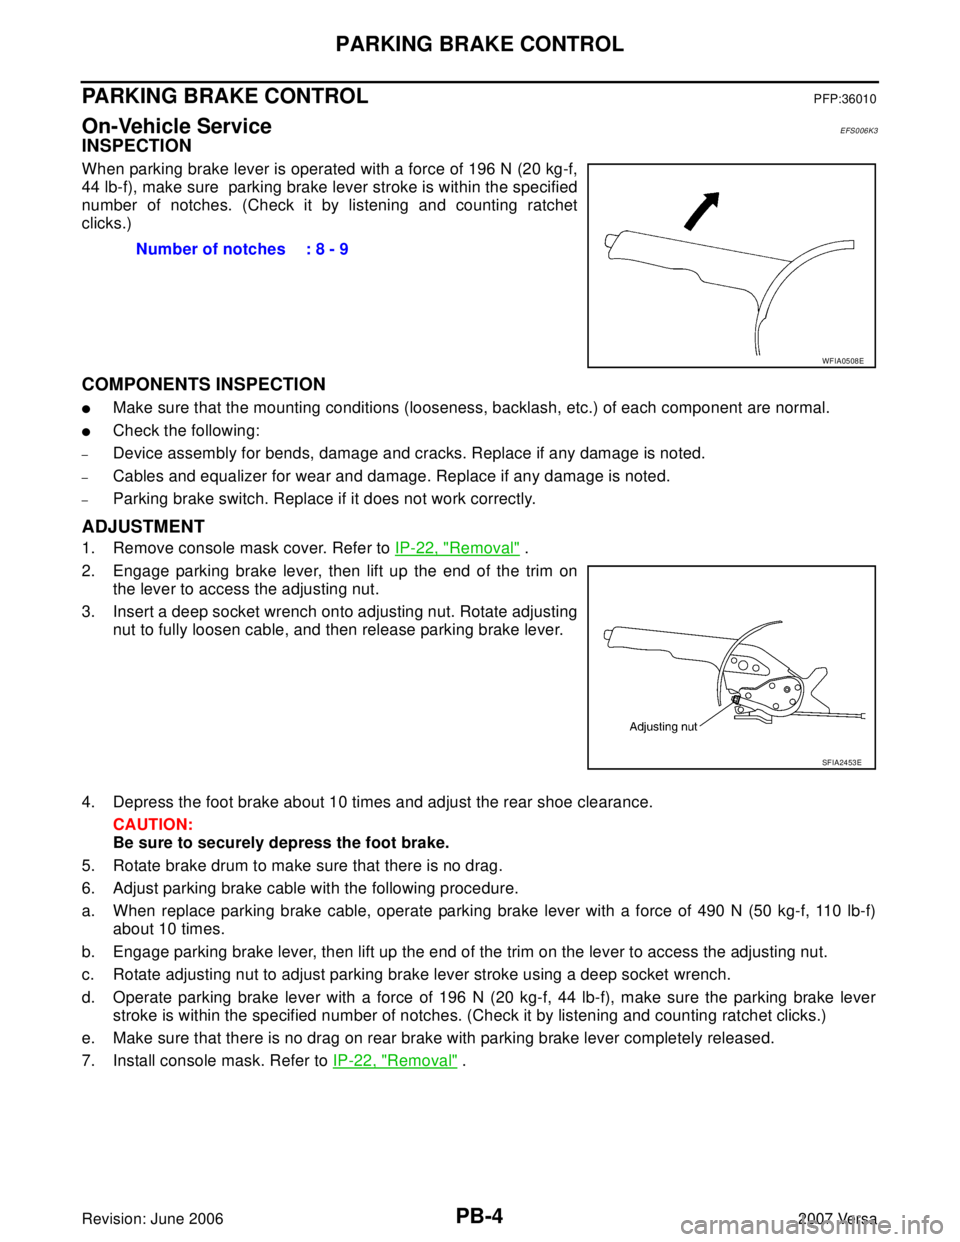
When parking brake lever is operated with a force of 196 N (20 kg-f,
44 lb-f), make sure parking brake lever stroke is within the specified
number of notches. (Check it by listening and counting ratchet
clicks.)
COMPONENTS INSPECTION
�Make sure that the mounting conditions (looseness, backlash, etc.) of each component are normal.
�Check the following:
–Device assembly for bends, damage and cracks. Replace if any damage is noted.
–Cables and equalizer for wear and damage. Replace if any damage is noted.
–Parking brake switch. Replace if it does not work correctly.
ADJUSTMENT
1. Remove console mask cover. Refer to IP-22, "Removal" .
2. Engage parking brake lever, then lift up the end of the trim on
the lever to access the adjusting nut.
3. Insert a deep socket wrench onto adjusting nut. Rotate adjusting
nut to fully loosen cable, and then release parking brake lever.
4. Depress the foot brake about 10 times and adjust the rear shoe clearance.
CAUTION:
Be sure to securely depress the foot brake.
5. Rotate brake drum to make sure that there is no drag.
6. Adjust parking brake cable with the following procedure.
a. When replace parking brake cable, operate parking brake lever with a force of 490 N (50 kg-f, 110 lb-f)
about 10 times.
b. Engage parking brake lever, then lift up the end of the trim on the lever to access the adjusting nut.
c. Rotate adjusting nut to adjust parking brake lever stroke using a deep socket wrench.
d. Operate parking brake lever with a force of 196 N (20 kg-f, 44 lb-f), make sure the parking brake lever
stroke is within the specified number of notches. (Check it by listening and counting ratchet clicks.)
e. Make sure that there is no drag on rear brake with parking brake lever completely released.
7. Install console mask. Refer to IP-22, "
Removal" . Number of notches : 8 - 9
WFIA0508E
SFIA2453E
Page 2513 of 2896
PARKING BRAKE CONTROL
PB-5
C
D
E
G
H
I
J
K
L
MA
B
PB
Revision: June 20062007 Versa
ComponentsEFS006K4
1. Device assembly 2. Adjusting nut 3. Parking brake switch
4. Front cable 5. Equalizer 6. LH rear cable
7. RH rear cable : Multi-purpose grease
Refer to GI section GI-10, "
Components" for symbol marks except as shown above.
SFIA3063E
Page 2514 of 2896

PB-6
PARKING BRAKE CONTROL
Revision: June 20062007 Versa
Removal and InstallationEFS006K5
REMOVAL
1. Remove center console assembly. Refer to IP-22, "CENTER CONSOLE ASSEMBLY" .
2. Disconnect parking brake switch connector.
3. Loosen adjusting nut.
4. Remove equalizer from rear cable terminal ends.
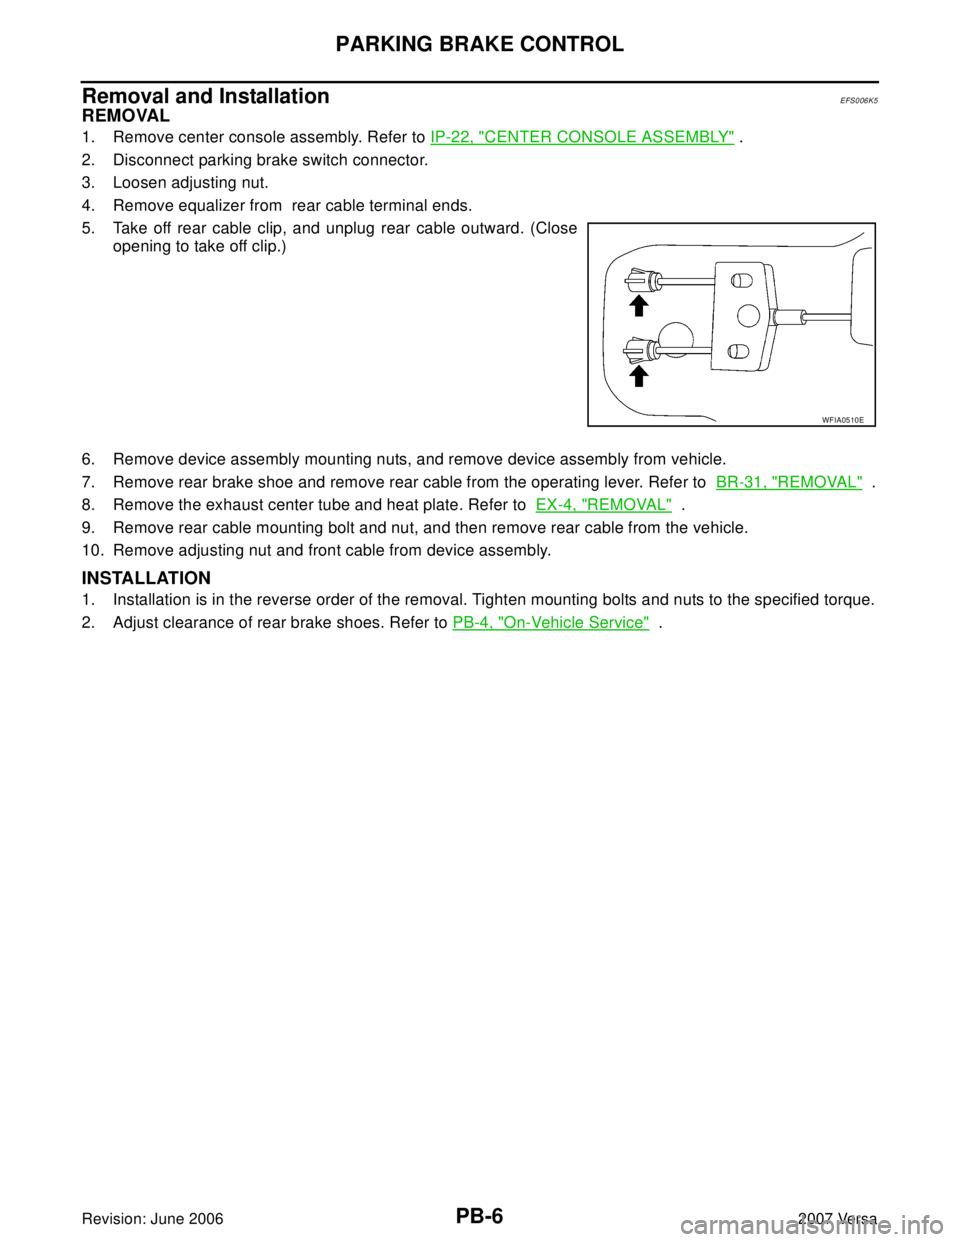
5. Take off rear cable clip, and unplug rear cable outward. (Close
opening to take off clip.)
6. Remove device assembly mounting nuts, and remove device assembly from vehicle.
7. Remove rear brake shoe and remove rear cable from the operating lever. Refer to BR-31, "
REMOVAL" .
8. Remove the exhaust center tube and heat plate. Refer to EX-4, "
REMOVAL" .
9. Remove rear cable mounting bolt and nut, and then remove rear cable from the vehicle.
10. Remove adjusting nut and front cable from device assembly.
INSTALLATION
1. Installation is in the reverse order of the removal. Tighten mounting bolts and nuts to the specified torque.
2. Adjust clearance of rear brake shoes. Refer to PB-4, "
On-Vehicle Service" .
WFIA0510E
Page 2515 of 2896
SERVICE DATA AND SPECIFICATIONS (SDS)
PB-7
C
D
E
G
H
I
J
K
L
MA
B
PB
Revision: June 20062007 Versa
SERVICE DATA AND SPECIFICATIONS (SDS)PFP:00030
Parking Brake ControlEFS006K6
Control typeHand lever
Number of notches [under a force of 196 N (20 kg-f, 44lb-f)] 8 −9
Number of notches when warning lamp switch comes on 1
Page 2558 of 2896

PG-42
HARNESS
Revision: June 20062007 Versa
G1 M1 W/16 : To R1 G1 M47 BR/2 : Front tweeter RH
B3 M2 B/5 : Passenger select unlock relay B2 M48 L/4 : Heated mirror relay
B2 M3 W/1 : Fuse block (J/B) E2 M52 W/40 : Intelligent key unit
B3 M4 W/1 : Fuse block (J/B) B2 M53 W/16 : EPS control unit
B3 M5 W/3 : Illumination control switch B3 M54 B/2 : EPS control unit
C2 M6 W/4 : Steering lock solenoid C3 M55 W/4 : Hazard switch
B3 M7 W/16 : Door mirror remote control switch B2 M57 — : Body ground
A3 M8 W/16 : To D2 F2 M59 W/2 : Glove box lamp
A3 M9 W/16 : To D1 C1 M60 L/2 : EPS control unit
E2 M10 GR/2 : Instrument panel antenna F1 M61 — : Body ground
G3 M11 W/4 : To B106 E2 M62 W/2 : Front blower motor
G4 M12 W/16 : To B101 C1 M63 W/4 : Torque sensor
G3 M13 W/24 : To B102 A2 M69 SMJ : To E7
G3 M14 W/24 : To B120 G3 M74 W/12 : To D102
B4 M15 W/16 : To B23 G3 M75 W/12 : To D101
B4 M16 W/24 : To B24 F2 M77 Y/4 : Front passenger air bag module
D5 M17 B/1 : Parking brake switch A2 M78 B/2 : To E11
F2 M18 W/40 : BCM (body control module) B1 M79 — : Body ground
F2 M19 W/15 : BCM (body control module) D3 M150 W/4 : To M32
F3 M20 B/15 : BCM (body control module) C3 M151 W/4 : Front blower motor resistor
C2 M21 W/4 : NATS antenna amp.
B3 M22 W/16 : Data link connector
E3 M23 W/4 : Remote keyless entry receiver
C1 M24 W/40 : Combination meter
C3 M25 /2 : Diode-1
B2 M26 W/6 : Ignition switch
C2 M27 GR/6 : Key switch and key lock solenoid
C2 M28 W/16 : Combination switch
C3 M29 Y/6 : Combination switch (spiral cable)
C3 M30 GR/8 : Combination switch (spiral cable)
E3 M32 W/4 : To M150
D2 M33 B/15 : Front air control
D4 M35 Y/28 : Air bag diagnosis sensor unit
D2 M36 W/3 : Front passenger air bag OFF indicator
D4 M38 W/6 : A/T device
D4 M38 W/6 : CVT device (without intelligent key)
D4 M38 W/8 : CVT device (with intelligent key)
B3 M39 W/2 : Tire pressure warning check connector
D2 M41 W/2 : Defrost A/C switch
D3 M42 W/3 : Thermo control amp.
D2 M43 W/20 : Audio unit
D2 M44 W/16 : Audio unit
D2 M45 W/12 : Audio unit
A1 M46 BR/2 : Front tweeter LH