Page 1333 of 2896
EC-164Revision: June 2006
DTC P0031, P0032 A/F SENSOR 1 HEATER
2007 Versa
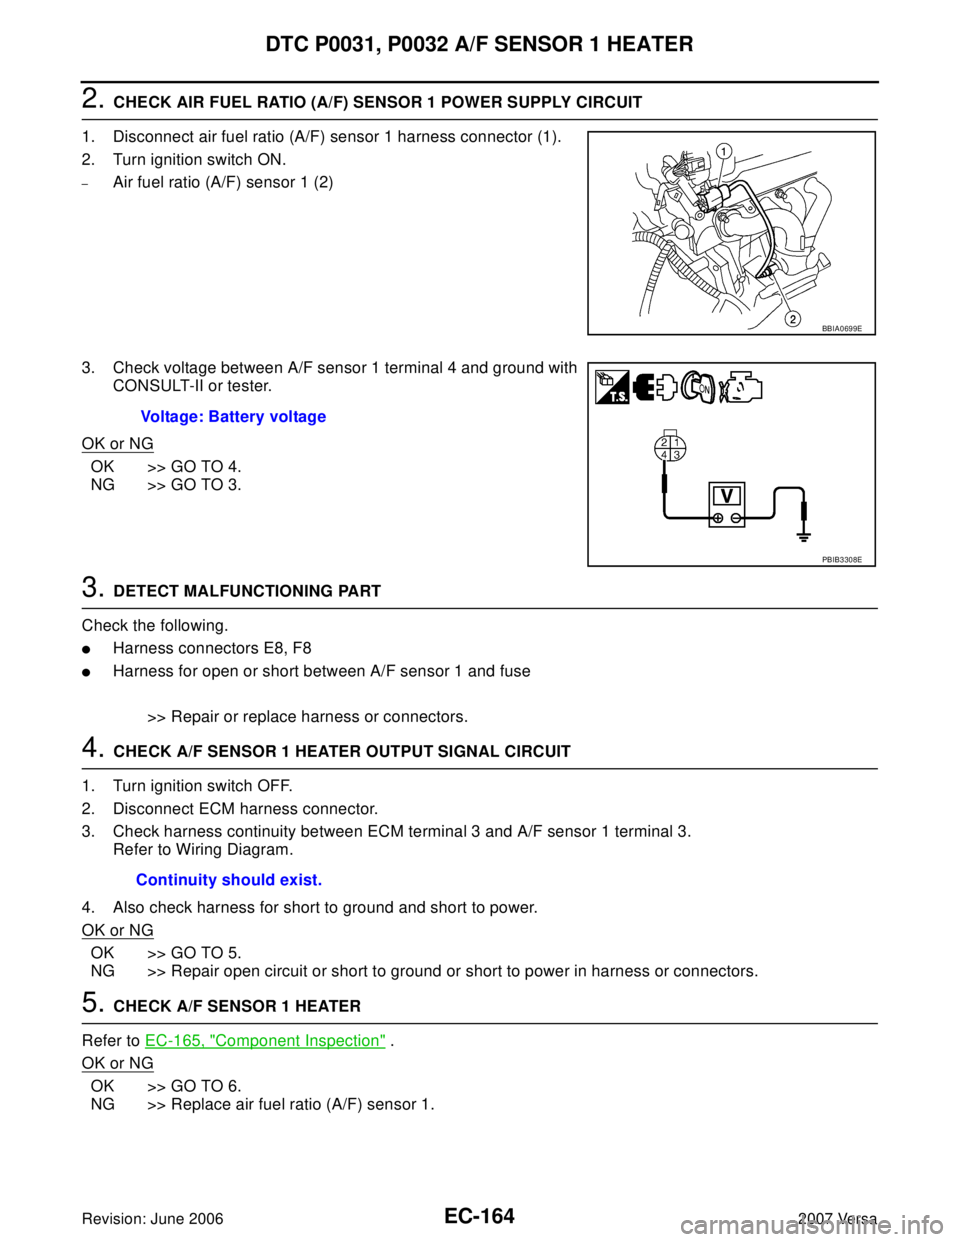
2. CHECK AIR FUEL RATIO (A/F) SENSOR 1 POWER SUPPLY CIRCUIT
1. Disconnect air fuel ratio (A/F) sensor 1 harness connector (1).
2. Turn ignition switch ON.
–Air fuel ratio (A/F) sensor 1 (2)
3. Check voltage between A/F sensor 1 terminal 4 and ground with
CONSULT-II or tester.
OK or NG
OK >> GO TO 4.
NG >> GO TO 3.
3. DETECT MALFUNCTIONING PART
Check the following.
�Harness connectors E8, F8
�Harness for open or short between A/F sensor 1 and fuse
>> Repair or replace harness or connectors.
4. CHECK A/F SENSOR 1 HEATER OUTPUT SIGNAL CIRCUIT
1. Turn ignition switch OFF.
2. Disconnect ECM harness connector.
3. Check harness continuity between ECM terminal 3 and A/F sensor 1 terminal 3.
Refer to Wiring Diagram.
4. Also check harness for short to ground and short to power.
OK or NG
OK >> GO TO 5.
NG >> Repair open circuit or short to ground or short to power in harness or connectors.
5. CHECK A/F SENSOR 1 HEATER
Refer to EC-165, "
Component Inspection" .
OK or NG
OK >> GO TO 6.
NG >> Replace air fuel ratio (A/F) sensor 1.
BBIA0699E
Voltage: Battery voltage
PBIB3308E
Continuity should exist.
Page 1336 of 2896
DTC P0037, P0038 HO2S2 HEATER
EC-167
C
D
E
F
G
H
I
J
K
L
MA
EC
Revision: June 20062007 Versa
DTC Confirmation ProcedureUBS00QCO
NOTE:
If DTC Confirmation Procedure has been previously conducted, always turn ignition switch OFF and wait at
least 10 seconds before conducting the next test.
TESTING CONDITION:
Before performing the following procedure, confirm that battery voltage is between 10.5V and 16V at
idle.
WITH CONSULT-II
1. Turn ignition switch ON and select “DATA MONITOR” mode with CONSULT-II.
2. Start engine and warm it up to the normal operating temperature.
3. Turn ignition switch OFF and wait at least 10 seconds.
4. Start engine and keep the engine speed between 3,500 and
4,000 rpm for at least 1 minute under no load.
5. Let engine idle for 1 minute.
6. If 1st trip DTC is detected, go to EC-170, "
Diagnostic Procedure"
.
WITH GST
Follow the procedure “WITH CONSULT-II” above.
SEF 1 74 Y
Page 1338 of 2896
DTC P0037, P0038 HO2S2 HEATER
EC-169
C
D
E
F
G
H
I
J
K
L
MA
EC
Revision: June 20062007 Versa
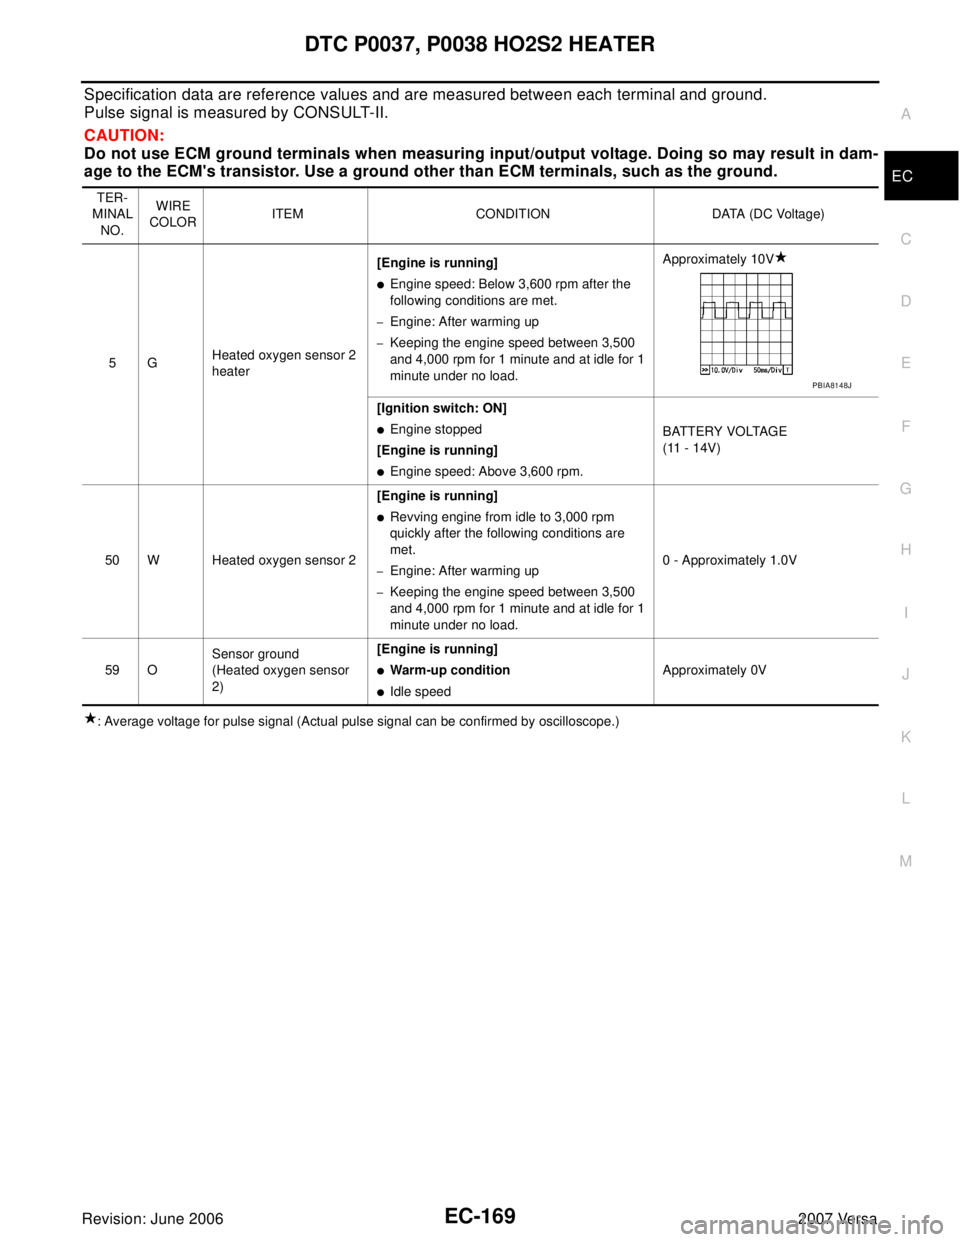
Specification data are reference values and are measured between each terminal and ground.
Pulse signal is measured by CONSULT-II.
CAUTION:
Do not use ECM ground terminals when measuring input/output voltage. Doing so may result in dam-
age to the ECM's transistor. Use a ground other than ECM terminals, such as the ground.
: Average voltage for pulse signal (Actual pulse signal can be confirmed by oscilloscope.) TER-
MINAL
NO.WIRE
COLORITEM CONDITION DATA (DC Voltage)
5GHeated oxygen sensor 2
heater[Engine is running]
�Engine speed: Below 3,600 rpm after the
following conditions are met.
–Engine: After warming up
–Keeping the engine speed between 3,500
and 4,000 rpm for 1 minute and at idle for 1
minute under no load.Approximately 10V
[Ignition switch: ON]
�Engine stopped
[Engine is running]
�Engine speed: Above 3,600 rpm.BATTERY VOLTAGE
(11 - 14V)
50 W Heated oxygen sensor 2[Engine is running]
�Revving engine from idle to 3,000 rpm
quickly after the following conditions are
met.
–Engine: After warming up
–Keeping the engine speed between 3,500
and 4,000 rpm for 1 minute and at idle for 1
minute under no load.0 - Approximately 1.0V
59 OSensor ground
(Heated oxygen sensor
2)[Engine is running]
�Warm-up condition
�Idle speedApproximately 0V
PBIA8148J
Page 1339 of 2896
EC-170Revision: June 2006
DTC P0037, P0038 HO2S2 HEATER
2007 Versa
Diagnostic ProcedureUBS00QCQ
1. CHECK GROUND CONNECTIONS
1. Turn ignition switch OFF.
2. Loosen and retighten ground screw on the body.
Refer to EC-150, "
Ground Inspection" .
OK or NG
OK >> GO TO 2.
NG >> Repair or replace ground connections.
2. CHECK HO2S2 POWER SUPPLY CIRCUIT
1. Disconnect heated oxygen sensor 2 harness connector (2).
– : Vehicle front
–Heated oxygen sensor 2 (1)
2. Turn ignition switch ON.
3. Check voltage between HO2S2 terminal 2 and ground with
CONSULT-II or tester.
OK or NG
OK >> GO TO 4.
NG >> GO TO 3.
:Vehicle front
1. Body ground E24 2. Engine ground F9 3. Engine ground F16
4. Body ground E15
BBIA0698E
BBIA0700E
Voltage: Battery voltage
MBIB0186E
Page 1340 of 2896
DTC P0037, P0038 HO2S2 HEATER
EC-171
C
D
E
F
G
H
I
J
K
L
MA
EC
Revision: June 20062007 Versa
3. DETECT MALFUNCTIONING PART
Check the following.
�Harness connectors E8, F8
�Harness for open or short between heated oxygen sensor 2 and fuse
>> Repair open circuit or short to ground or short to power in harness or connectors.
4. CHECK HO2S2 OUTPUT SIGNAL CIRCUIT FOR OPEN AND SHORT
1. Turn ignition switch OFF.
2. Disconnect ECM harness connector.
3. Check harness continuity between ECM terminal 5 and HO2S2 terminal 3.
Refer to Wiring Diagram.
4. Also check harness for short to ground and short to power.
OK or NG
OK >> GO TO 5.
NG >> Repair open circuit or short to ground or short to power in harness or connectors.
5. CHECK HEATED OXYGEN SENSOR 2 HEATER
Refer to EC-172, "
Component Inspection" .
OK or NG
OK >> GO TO 6.
NG >> Replace heated oxygen sensor 2.
6. CHECK INTERMITTENT INCIDENT
Refer to EC-143, "
TROUBLE DIAGNOSIS FOR INTERMITTENT INCIDENT" .
>>INSPECTION END Continuity should exist.
Page 1342 of 2896
DTC P0075 IVT CONTROL SOLENOID VALVE
EC-173
C
D
E
F
G
H
I
J
K
L
MA
EC
Revision: June 20062007 Versa
DTC P0075 IVT CONTROL SOLENOID VALVEPFP:23796
Component DescriptionUBS00QCT
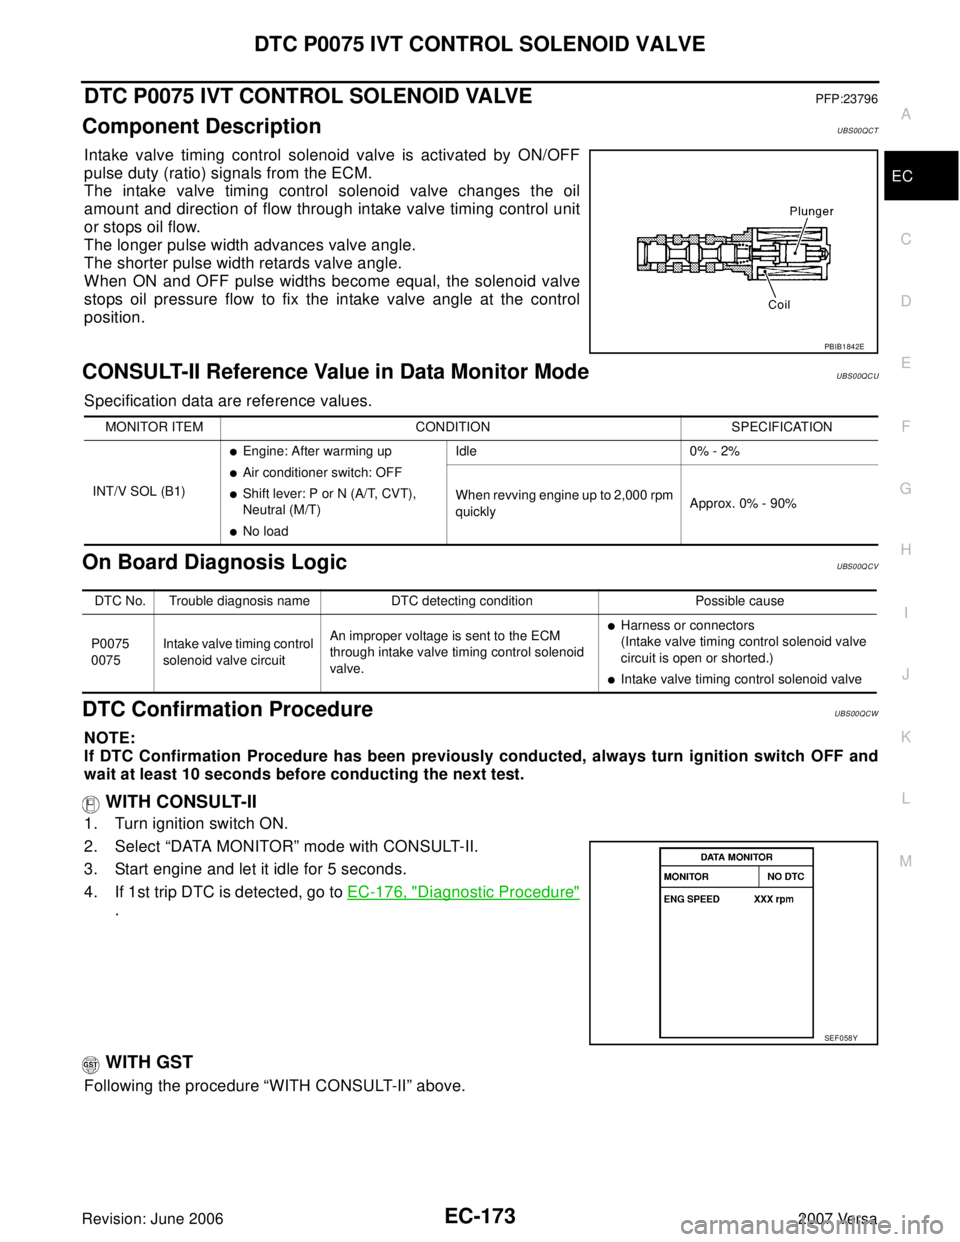
Intake valve timing control solenoid valve is activated by ON/OFF
pulse duty (ratio) signals from the ECM.
The intake valve timing control solenoid valve changes the oil
amount and direction of flow through intake valve timing control unit
or stops oil flow.
The longer pulse width advances valve angle.
The shorter pulse width retards valve angle.
When ON and OFF pulse widths become equal, the solenoid valve
stops oil pressure flow to fix the intake valve angle at the control
position.
CONSULT-II Reference Value in Data Monitor ModeUBS00QCU
Specification data are reference values.
On Board Diagnosis LogicUBS00QCV
DTC Confirmation ProcedureUBS00QCW
NOTE:
If DTC Confirmation Procedure has been previously conducted, always turn ignition switch OFF and
wait at least 10 seconds before conducting the next test.
WITH CONSULT-II
1. Turn ignition switch ON.
2. Select “DATA MONITOR” mode with CONSULT-II.
3. Start engine and let it idle for 5 seconds.
4. If 1st trip DTC is detected, go to EC-176, "
Diagnostic Procedure"
.
WITH GST
Following the procedure “WITH CONSULT-II” above.
PBIB1842E
MONITOR ITEM CONDITION SPECIFICATION
INT/V SOL (B1)
�Engine: After warming up
�Air conditioner switch: OFF
�Shift lever: P or N (A/T, CVT),
Neutral (M/T)
�No loadIdle 0% - 2%
When revving engine up to 2,000 rpm
quicklyApprox. 0% - 90%
DTC No. Trouble diagnosis name DTC detecting condition Possible cause
P0075
0075Intake valve timing control
solenoid valve circuitAn improper voltage is sent to the ECM
through intake valve timing control solenoid
valve.
�Harness or connectors
(Intake valve timing control solenoid valve
circuit is open or shorted.)
�Intake valve timing control solenoid valve
SEF 0 58 Y
Page 1344 of 2896
DTC P0075 IVT CONTROL SOLENOID VALVE
EC-175
C
D
E
F
G
H
I
J
K
L
MA
EC
Revision: June 20062007 Versa
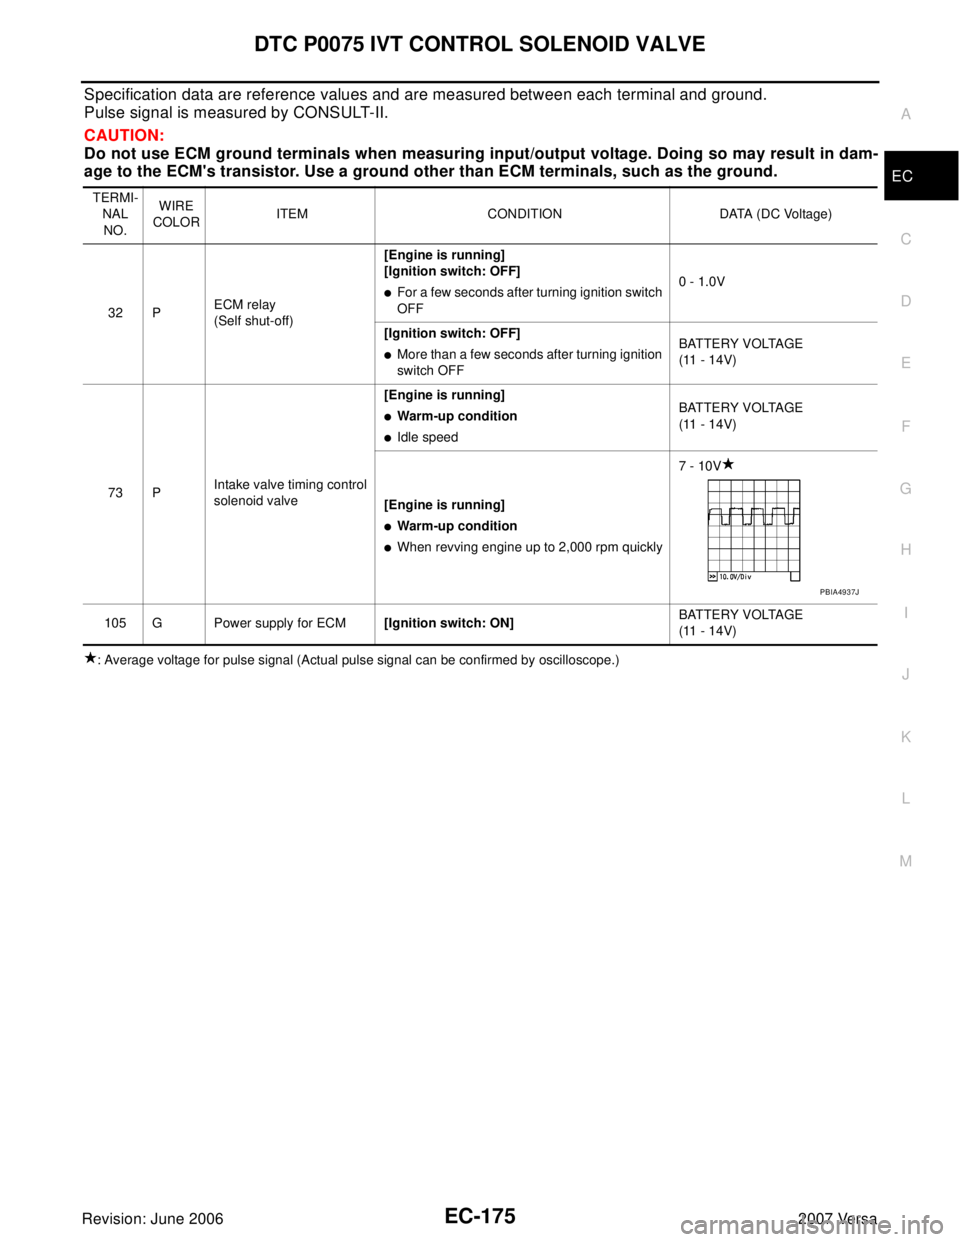
Specification data are reference values and are measured between each terminal and ground.
Pulse signal is measured by CONSULT-II.
CAUTION:
Do not use ECM ground terminals when measuring input/output voltage. Doing so may result in dam-
age to the ECM's transistor. Use a ground other than ECM terminals, such as the ground.
: Average voltage for pulse signal (Actual pulse signal can be confirmed by oscilloscope.) TERMI-
NAL
NO.WIRE
COLORITEM CONDITION DATA (DC Voltage)
32 PECM relay
(Self shut-off)[Engine is running]
[Ignition switch: OFF]
�For a few seconds after turning ignition switch
OFF0 - 1.0V
[Ignition switch: OFF]
�More than a few seconds after turning ignition
switch OFFBATTERY VOLTAGE
(11 - 14V)
73 PIntake valve timing control
solenoid valve[Engine is running]
�Warm-up condition
�Idle speedBATTERY VOLTAGE
(11 - 14V)
[Engine is running]
�Warm-up condition
�When revving engine up to 2,000 rpm quickly7 - 10V
105 G Power supply for ECM[Ignition switch: ON]BATTERY VOLTAGE
(11 - 14V)
PBIA4937J
Page 1345 of 2896
EC-176Revision: June 2006
DTC P0075 IVT CONTROL SOLENOID VALVE
2007 Versa
Diagnostic ProcedureUBS00QCY
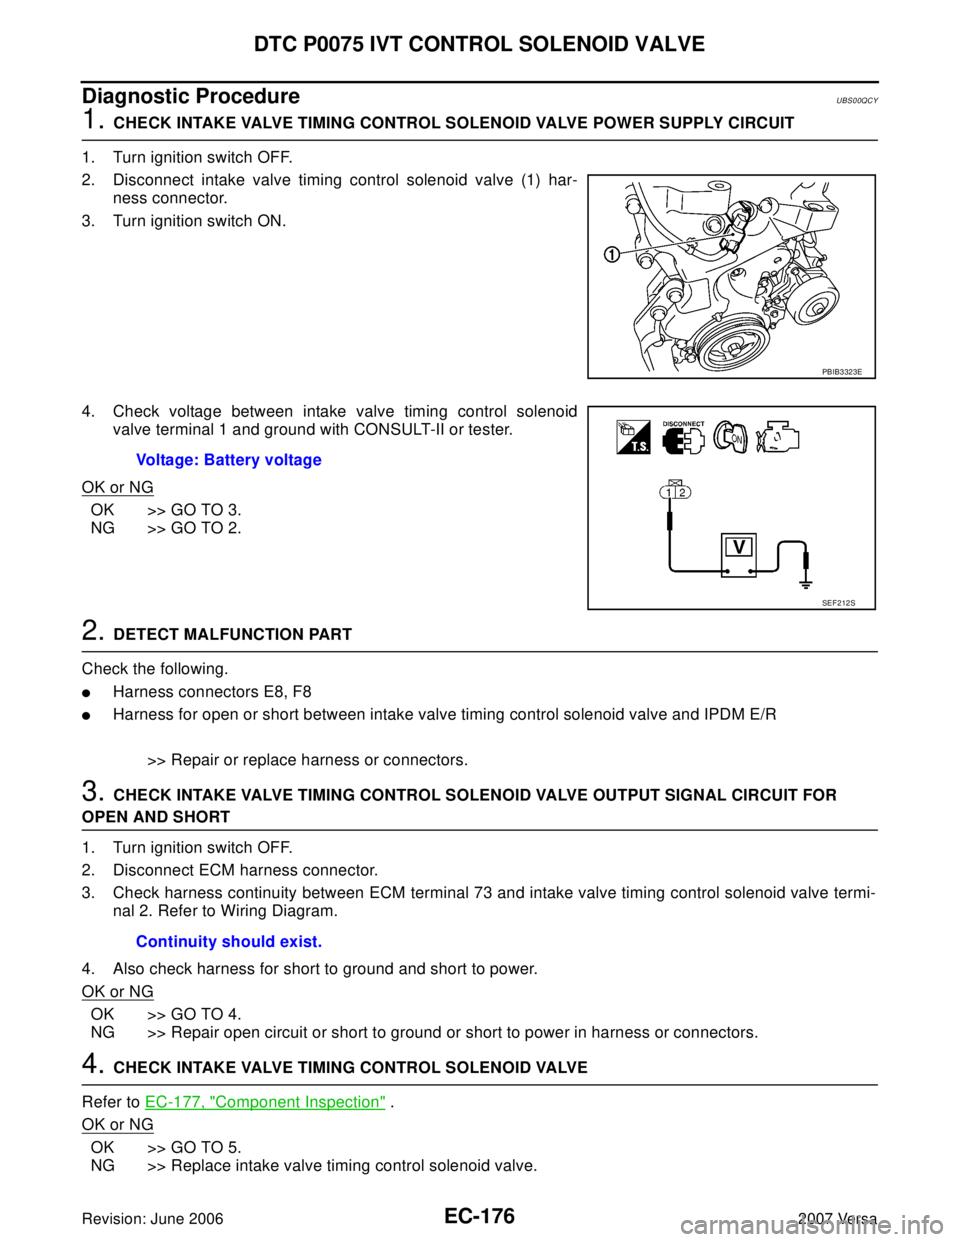
1. CHECK INTAKE VALVE TIMING CONTROL SOLENOID VALVE POWER SUPPLY CIRCUIT
1. Turn ignition switch OFF.
2. Disconnect intake valve timing control solenoid valve (1) har-
ness connector.
3. Turn ignition switch ON.
4. Check voltage between intake valve timing control solenoid
valve terminal 1 and ground with CONSULT-II or tester.
OK or NG
OK >> GO TO 3.
NG >> GO TO 2.
2. DETECT MALFUNCTION PART
Check the following.
�Harness connectors E8, F8
�Harness for open or short between intake valve timing control solenoid valve and IPDM E/R
>> Repair or replace harness or connectors.
3. CHECK INTAKE VALVE TIMING CONTROL SOLENOID VALVE OUTPUT SIGNAL CIRCUIT FOR
OPEN AND SHORT
1. Turn ignition switch OFF.
2. Disconnect ECM harness connector.
3. Check harness continuity between ECM terminal 73 and intake valve timing control solenoid valve termi-
nal 2. Refer to Wiring Diagram.
4. Also check harness for short to ground and short to power.
OK or NG
OK >> GO TO 4.
NG >> Repair open circuit or short to ground or short to power in harness or connectors.
4. CHECK INTAKE VALVE TIMING CONTROL SOLENOID VALVE
Refer to EC-177, "
Component Inspection" .
OK or NG
OK >> GO TO 5.
NG >> Replace intake valve timing control solenoid valve.
PBIB3323E
Voltage: Battery voltage
SEF 2 12 S
Continuity should exist.