Page 93 of 341
, start the engine
and push the switch on
�1. The indicator light
�A
will come on. Push the switch again to turn
the defroste")
To defog/defrost the rear window glass and
outside mirrors (if so equipped), start the engine
and push the switch on
�1. The indicator light
�A
will come on. Push the switch again to turn
the defroster off.
It will automatically turn off in approximately 15
minutes.
CAUTION
When cleaning the inner side of the rear
window, be careful not to scratch or
damage the rear window defroster.
XENON HEADLIGHTS (if so
equipped)
WARNINGHIGH VOLTAGE
�When xenon headlights are on, they
produce a high voltage. To prevent an
electric shock, never attempt to
modify or disassemble. Always have
your xenon headlights replaced at a
NISSAN dealer.
�Xenon headlights provide consider-
ably more light than conventional
headlights. If they are not correctly
aimed, they might temporarily blind
an oncoming driver or the driver
ahead of you and cause a serious
accident. If headlights are not aimed
correctly, immediately take your ve-
hicle to a NISSAN dealer and have
the headlights adjusted correctly.
When the xenon headlight is initially turned on,
its brightness or color varies slightly. However,
the color and brightness will soon stabilize.�The life of xenon headlights will be
shortened by frequent on-off operation.
It is generally desirable not to turn off
the headlights for short intervals (for
example, when the vehicle stops at a
traffic signal). Even when the daytime
running lights are active (Canada only),
the xenon headlights do not turn on.
This way the life of the xenon headlights
is not reduced.
�If the xenon headlight bulb is close to
burning out, the brightness will drasti-
cally decrease, the light will start blink-
ing, or the color of the light will become
reddish. If one or more of the above
signs appear, contact a NISSAN dealer.
SIC2046
REAR WINDOW AND OUTSIDE
MIRROR DEFROSTER SWITCHHEADLIGHT AND TURN SIGNAL
SWITCH2-22
Instruments and controls
�
05.8.26/Z50-D/V5.0
�
Page 94 of 341
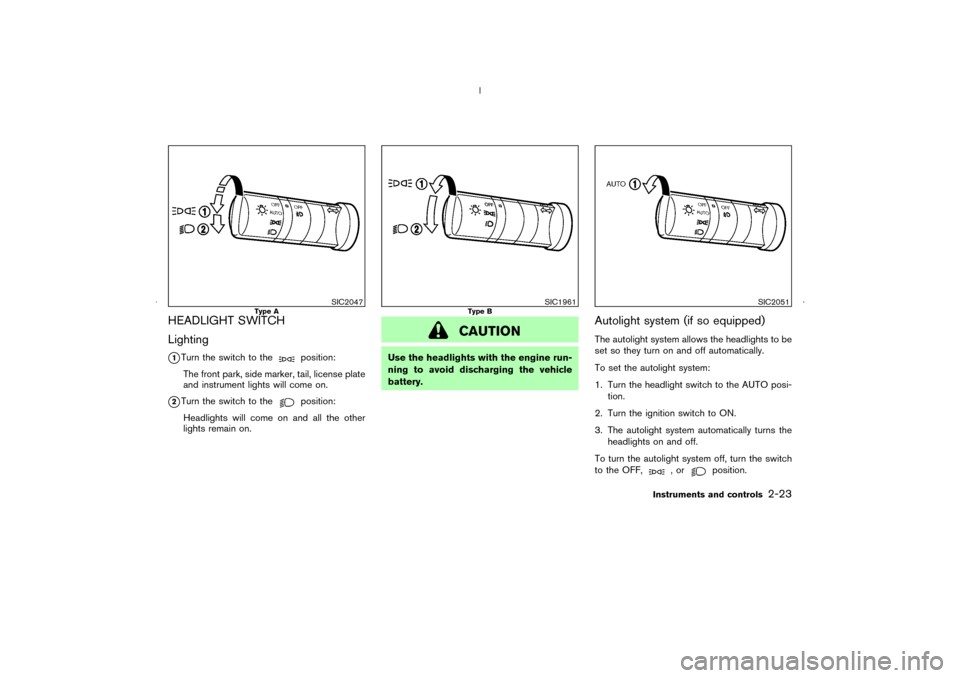
HEADLIGHT SWITCH
Lighting
�1Turn the switch to the
position:
The front park, side marker, tail, license plate
and instrument lights will come on.
�2Turn the switch to the
position:
Headlights will come on and all the other
lights remain on.
CAUTION
Use the headlights with the engine run-
ning to avoid discharging the vehicle
battery.
Autolight system (if so equipped)The autolight system allows the headlights to be
set so they turn on and off automatically.
To set the autolight system:
1. Turn the headlight switch to the AUTO posi-
tion.
2. Turn the ignition switch to ON.
3. The autolight system automatically turns the
headlights on and off.
To turn the autolight system off, turn the switch
to the OFF,
,or
position.
SIC2047
Type A
SIC1961
Type B
SIC2051
Instruments and controls
2-23
�
05.8.26/Z50-D/V5.0
�
Page 96 of 341

Battery saver system�When the headlight switch is in the
or
position while the ignition switch is in
the ON position, the lights will automatically
turn off 5 minutes after the ignition switch has
been turned to the OFF position.
�When the headlight switch remains in theor
position after the lights auto-
matically turn off, the lights will turn on for 5
minutes when the headlight switch is turned
to the OFF position and then turned to the
or
position.CAUTION
Even though the battery saver feature
automatically turns off the headlights
after a period of time, you should turn
the headlight switch to the OFF position
when the engine is not running to avoid
discharging the vehicle battery.
Headlight aiming control (if so
equipped)Depending on the number of occupants in the
vehicle and the load it is carrying, the headlight
axis may be higher than desired. If the vehicle is
traveling on a hilly road, the headlights may
directly hit the rearview mirror of the vehicle
ahead or the windshield of the oncoming vehicle.
The light axis can be lowered with the operation
of the switch.
The larger the number designated on the switch,
the lower the axis.When traveling with no heavy load or on a flat
road, select position 0.
WARNING
Xenon headlights are extremely bright
compared to conventional headlights. If
the xenon headlights hit the rearview
mirror of the vehicle ahead or the wind-
shield of oncoming vehicle, the driver of
these vehicles may have difficulty driv-
ing because of the brightness. Use the
headlight aiming control switch to lower
the light axis. See “Xenon headlights”
earlier in this section for additional in-
formation.DAYTIME RUNNING LIGHT SYSTEM
(CANADA ONLY)The daytime running lights automatically illumi-
nate when the engine is started with parking
brake released. The daytime running lights op-
erate with the headlight switch in the OFF
position or in the
position.
The daytime running lights may come on after
turning the switch to the OFF position and
SIC1911
Instruments and controls
2-25
�
05.8.26/Z50-D/V5.0
�
Page 99 of 341

�Do not use the hazard warning flash-
ers while moving on the highway un-
less unusual circumstances force you
to drive so slowly that your vehicle
might become a hazard to other traf-
fic.
�Turn signals do not work when the
hazard warning flasher lights are on.
The flasher will operate with the ignition switch in
any position.
To sound the horn, push the center pad upper
area of the steering wheel.
WARNING
Do not disassemble the horn. Doing so
could affect proper operation of the
supplemental front air bag system. Tam-
pering with the supplemental front air
bag system may result in serious per-
sonal injury.The front seats are warmed by built-in heaters.
The switches located on the center console can
be operated independently (driver side seat
�A
and front passenger side seat
�B) of each other.
1. Start the engine.
2. Select heat range.
�1For high heat, push the
(High) side
of the switch.
�2For low heat, push the
(Low) side of
the switch.
�3For no heat, the switch has a center OFF
position between low and high.
SIC2627
SIC2056
HORNHEATED SEATS (if so equipped)
2-28
Instruments and controls
�
05.8.26/Z50-D/V5.0
�
Page 100 of 341

The indicator light in the switch
�C
will
illuminate when low or high is selected.
The heater is controlled by a thermostat,
automatically turning the heater on and off.
The indicator light will remain on as long as
the switch is on.
3. When the vehicle’s interior is warmed, or
before you leave the vehicle, be sure to turn
the switch to the off position (center)
�3.
CAUTION
�The battery could run down if the
seat heater is operated while the en-
gine is not running.
�Do not use the seat heater for ex-
tended periods or when no one is
using the seat.
�Do not put anything on the seat
which insulates heat, such as a blan-
ket, cushion, seat cover, etc. Other-
wise, the seat may become over-
heated.
�Do not place anything hard or heavy
on the seat or pierce it with a pin orsimilar object. This may result in
damage to the heater.
�Any liquid spilled on the heated seat
should be removed immediately with
a dry cloth.
�When cleaning the seat, never use
gasoline, benzine, thinner, or any
similar materials.
�If any abnormalities are found or the
heated seat does not operate, turn
the switch off and have the system
checked by a NISSAN dealer.
The vehicle should be driven with the Vehicle
Dynamic Control (VDC) system ON for most
driving conditions.
If the vehicle is stuck in mud or snow, the VDC
system reduces the engine output to reduce
wheel spin. The engine speed will be reduced
even if the accelerator is depressed to the floor.
If maximum engine power is needed to free a
stuck vehicle, turn the VDC system off.
To turn off the Vehicle Dynamic Control (VDC)
system, push the VDC OFF switch. The
in-
dicator light will come on.
Push the VDC OFF switch again or restart the
engine to turn ON the system. See “Vehicle
SIC1881
VEHICLE DYNAMIC CONTROL
(VDC) OFF SWITCH (if so
equipped)
Instruments and controls
2-29
�
05.8.26/Z50-D/V5.0
�
Page 101 of 341
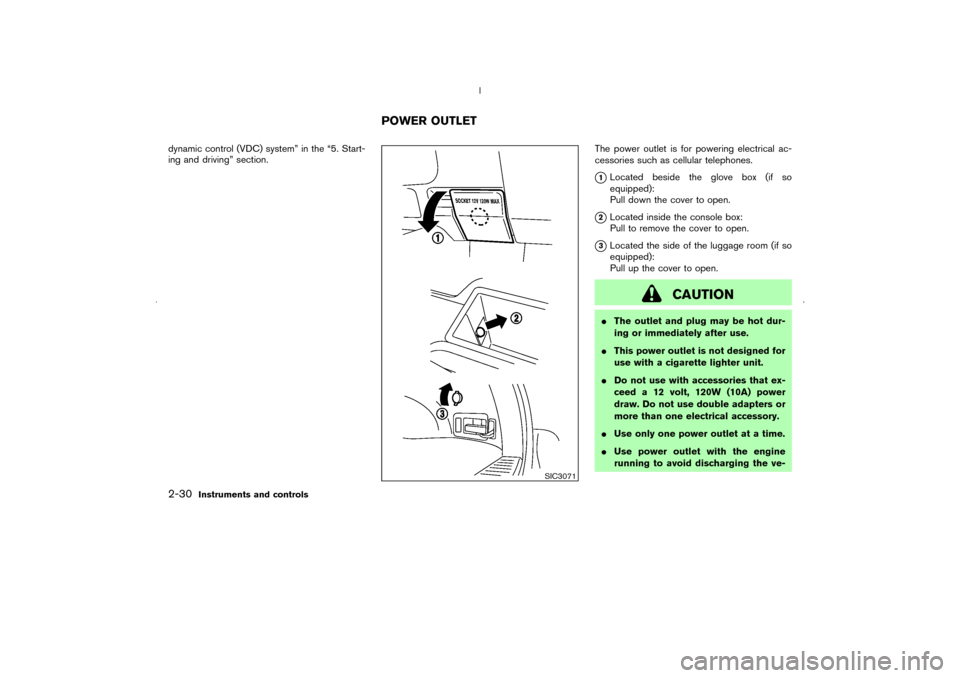
dynamic control (VDC) system” in the “5. Start-
ing and driving” section.The power outlet is for powering electrical ac-
cessories such as cellular telephones.
�1Located beside the glove box (if so
equipped):
Pull down the cover to open.
�2Located inside the console box:
Pull to remove the cover to open.
�3Located the side of the luggage room (if so
equipped):
Pull up the cover to open.
CAUTION
�The outlet and plug may be hot dur-
ing or immediately after use.
�This power outlet is not designed for
use with a cigarette lighter unit.
�Do not use with accessories that ex-
ceed a 12 volt, 120W (10A) power
draw. Do not use double adapters or
more than one electrical accessory.
�Use only one power outlet at a time.
�Use power outlet with the engine
running to avoid discharging the ve-
SIC3071
POWER OUTLET
2-30
Instruments and controls
�
05.8.26/Z50-D/V5.0
�
Page 112 of 341

of the following with the ignition switch in the
ACC or OFF position:
�Opening or closing any door
�Locking or unlocking with the remote keyless
entry system, a key, the lock-unlock switch or
the ignition switch is turned to the LOCK
position (Intelligent Key system).
�Inserting or removing a key from the ignition
switch
These lights will turn on again when any of the
above operations is performed after the lights
have turned off automatically. (The lights will turn
off 30 minutes after the latest operation of the
above as well.)
CAUTION
�Turn off the ceiling, map, rear and
vanity mirror lights when you leave
the vehicle.
�Do not use for extended periods of
time with the engine stopped. This
could result in a discharged battery.
MAP LIGHTTo turn on the light, push the plastic surface
�A
of the light. Push it again to turn off the light.
REAR PERSONAL LIGHTThe rear personal light has a three-position
switch. (
�A: DOOR,
�B: OFF,
�C: ON)
When the switch is in the DOOR position
�A,
the light will illuminate when a door is opened.
When the ceiling light or the map light
switch or rear personal light switch is in the
ONposition
�C, the ceiling, map, rear per-
sonal and vanity mirror lights will auto-
matically turn off 30 minutes after the ig-
nition switch has been turned to the OFF
position
�B. To turn on the light again, turn
the ignition switch to the ONposition.
SIC2068
Front
SIC2069
Rear
Instruments and controls
2-41
�
05.8.26/Z50-D/V5.0
�
Page 113 of 341
CAUTION
�Turn off the ceiling, map, rear and
vanity mirror lights when you leave
the vehicle.
�Do not use for extended periods of
time with the engine stopped. This
could result in a discharged battery.
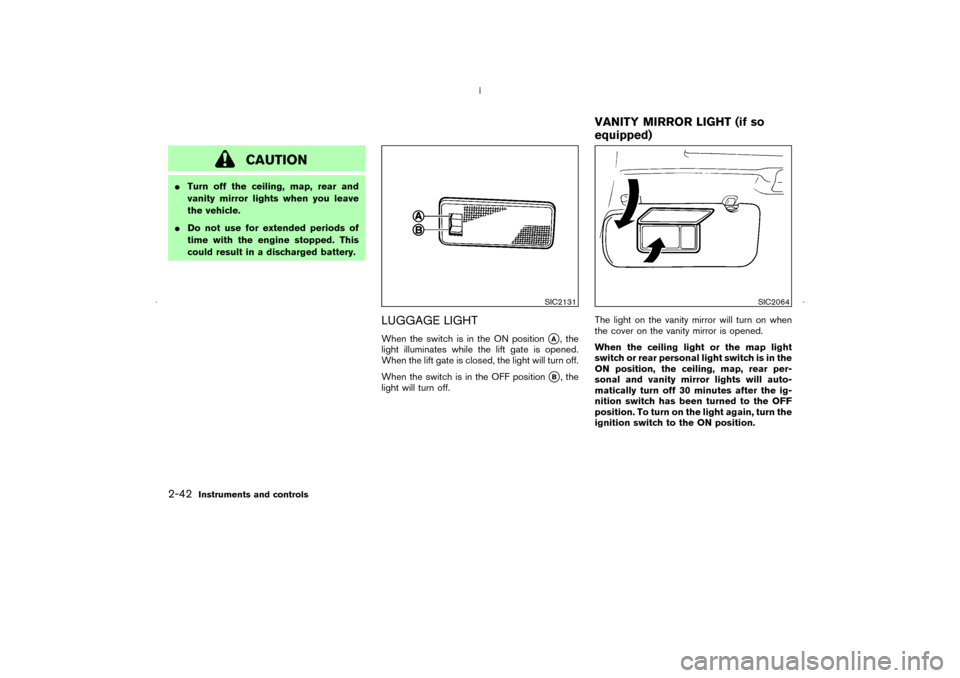
LUGGAGE LIGHTWhen the switch is in the ON position
�A, the
light illuminates while the lift gate is opened.
When the lift gate is closed, the light will turn off.
When the switch is in the OFF position
�B, the
light will turn off.The light on the vanity mirror will turn on when
the cover on the vanity mirror is opened.
When the ceiling light or the map light
switch or rear personal light switch is in the
ONposition, the ceiling, map, rear per-
sonal and vanity mirror lights will auto-
matically turn off 30 minutes after the ig-
nition switch has been turned to the OFF
position. To turn on the light again, turn the
ignition switch to the ONposition.
SIC2131
SIC2064
VANITY MIRROR LIGHT (if so
equipped)
2-42
Instruments and controls
�
05.8.26/Z50-D/V5.0
�