Page 7 of 272

2 Getting startedControl buttons and functions............................... 2-2
Control panel ................................................ 2-3
Opening/closing the cover of the Liquid Crystal
Display (LCD) (350Z only). ................................... 2-5
How to open the cover of the LCD .................... 2-5
How to close the cover of the LCD .................... 2-6
Start-up screen ................................................. 2-7
Menu screen types and how to operate ................... 2-8
Menu screens and their purposes ...................... 2-8
Using controls to adjust values, levels, etc. ......... 2-10
Map menu screen ........................................ 2-11
Functions disabled while driving .......................... 2-14
Operating maps ............................................... 2-15
How to view map screen ............................... 2-15
Map screen types ........................................ 2-16
Switching map view ...................................... 2-17 Moving around within a map
........................... 2-19
Changing the scale of a map .......................... 2-20
Storing your home location/address ...................... 2-21
How to store your home ................................ 2-21
Character (letter and number) input screen ........ 2-24
Phone number input screen ............................ 2-26
List screen ................................................. 2-28
Setting a destination ......................................... 2-29
Searching for a destination ............................. 2-29
Starting route guidance ................................. 2-32
Deleting a route ........................................... 2-34
Setting the voice guidance ................................. 2-36
Turning voice guidance on/off ......................... 2-36
Adjusting voice guidance volume ..................... 2-38
Page 17 of 272

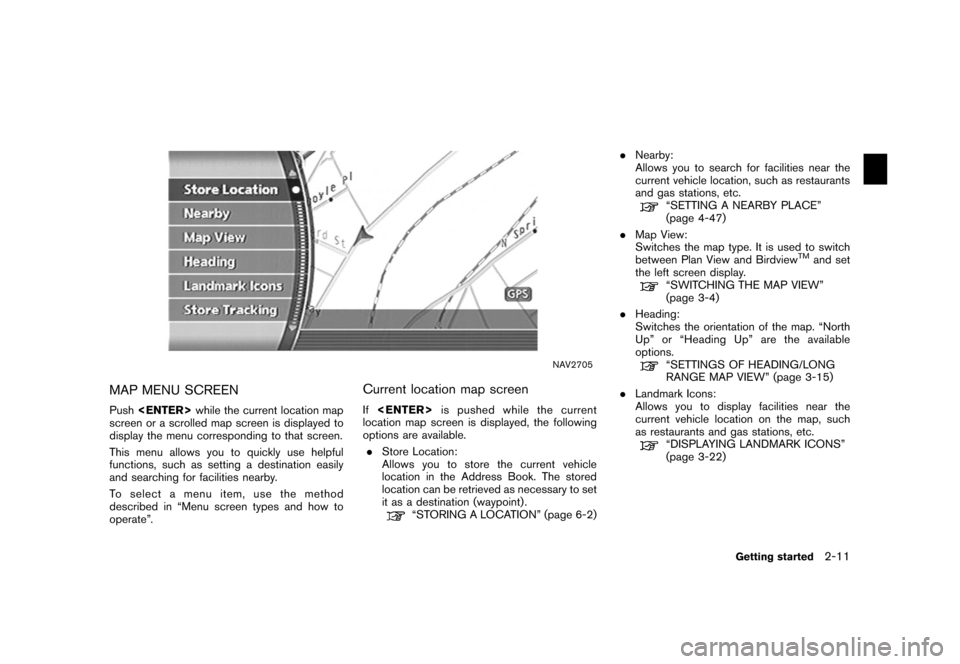
NAV2705
MAP MENU SCREENPush while the current location map
screen or a scrolled map screen is displayed to
display the menu corresponding to that screen.
This menu allows you to quickly use helpful
functions, such as setting a destination easily
and searching for facilities nearby.
To select a menu item, use the method
described in “Menu screen types and how to
operate”.
Current location map screenIf is pushed while the current
location map screen is displayed, the following
options are available.
. Store Location:
Allows you to store the current vehicle
location in the Address Book. The stored
location can be retrieved as necessary to set
it as a destination (waypoint) .
“STORING A LOCATION” (page 6-2) .
Nearby:
Allows you to search for facilities near the
current vehicle location, such as restaurants
and gas stations, etc.
“SETTING A NEARBY PLACE”
(page 4-47)
. Map View:
Switches the map type. It is used to switch
between Plan View and Birdview
TM
and set
the left screen display.
“SWITCHING THE MAP VIEW”
(page 3-4)
. Heading:
Switches the orientation of the map. “North
Up” or “Heading Up” are the available
options.“SETTINGS OF HEADING/LONG
RANGE MAP VIEW” (page 3-15)
. Landmark Icons:
Allows you to display facilities near the
current vehicle location on the map, such
as restaurants and gas stations, etc.“DISPLAYING LANDMARK ICONS”
(page 3-22)
Getting started
2-11
Page 18 of 272
.Store Tracking:
Allows you to store in the Address Book the
route that you have travelled from the
starting point to the current location.
“STORING A TRACKED ROUTE”
(page 6-14)
2-12
Getting started
Page 19 of 272

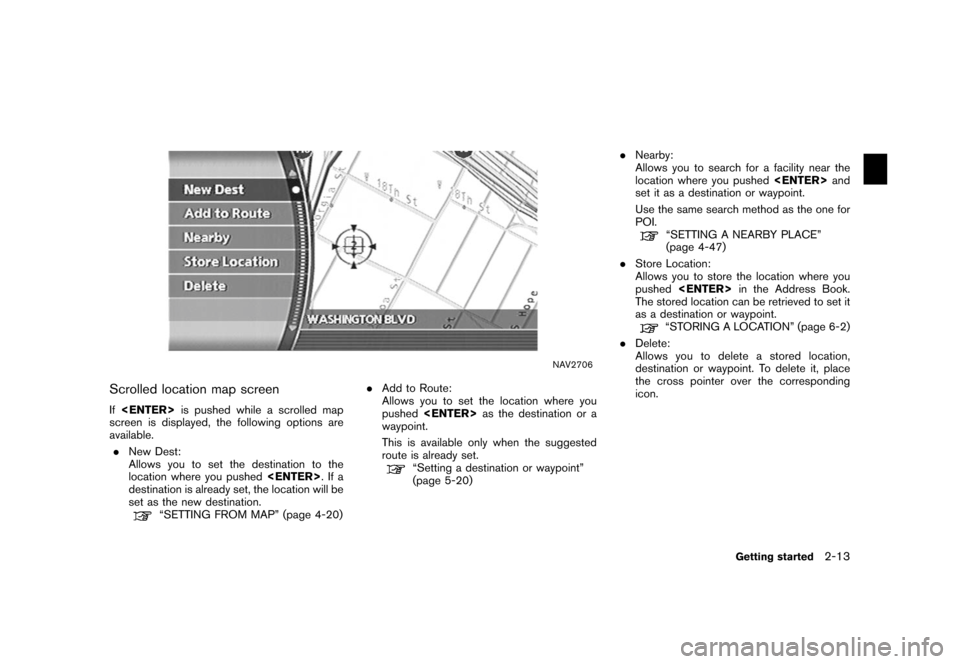
NAV2706
Scrolled location map screenIf is pushed while a scrolled map
screen is displayed, the following options are
available.
. New Dest:
Allows you to set the destination to the
location where you pushed
.Ifa
destination is already set, the location will be
set as the new destination.
“SETTING FROM MAP” (page 4-20) .
Add to Route:
Allows you to set the location where you
pushed as the destination or a
waypoint.
This is available only when the suggested
route is already set.
“Setting a destination or waypoint”
(page 5-20) .
Nearby:
Allows you to search for a facility near the
location where you pushed and
set it as a destination or waypoint.
Use the same search method as the one for
POI.
“SETTING A NEARBY PLACE”
(page 4-47)
. Store Location:
Allows you to store the location where you
pushed
in the Address Book.
The stored location can be retrieved to set it
as a destination or waypoint.“STORING A LOCATION” (page 6-2)
. Delete:
Allows you to delete a stored location,
destination or waypoint. To delete it, place
the cross pointer over the corresponding
icon.
Getting started
2-13
Page 27 of 272
HOW TO STORE YOUR HOMEIf your home location is already stored in the
Address Book, it can be easily retrieved to set
the route to your home.
The procedure to store your home location is the
same as for storing any other location.
“4. Setting a destination”
As an example, the procedure for storing your
home location by searching for a destination by
address is described here.
NAI0410
1. Push
.
NAV2714
2. Highlight [Address Book] and push
.
STORING YOUR HOME LOCATION/
ADDRESS
Getting started
2-21
Page 28 of 272
NAV2715
3. Highlight [Home Location (Add New)] andpush .
NAV3023
4. A confirmation message is displayed. Con-
firm the contents of the message, highlight
[Yes] and push .
NAV3048
5. Highlight [Street Address] and push
. A character input screen is
displayed.
2-22
Getting started
Page 29 of 272
NAV3049
6. Enter the address of your home, highlight[OK] and push .
The map screen is displayed.
“SETTING A STREET ADDRESS”
(page 4-5)
NAV3050
7. Using the joystick, adjust your home loca- tion.
8. After adjusting the location, push .
NAV3051
9. A message is displayed and your home
location is stored.
10. Push
Page 57 of 272
NAV2753
4. Highlight the preferred information item andpush . The indicator of the
selected information item illuminates.
Available information items:
.
Address Book Icons
.
Destination/Waypoint Icons
.
Latitude/Longitude Info
NAV2754
5. Push