Page 227 of 409
226 Controls in detailUseful features�
To remove the dust cover, follow the
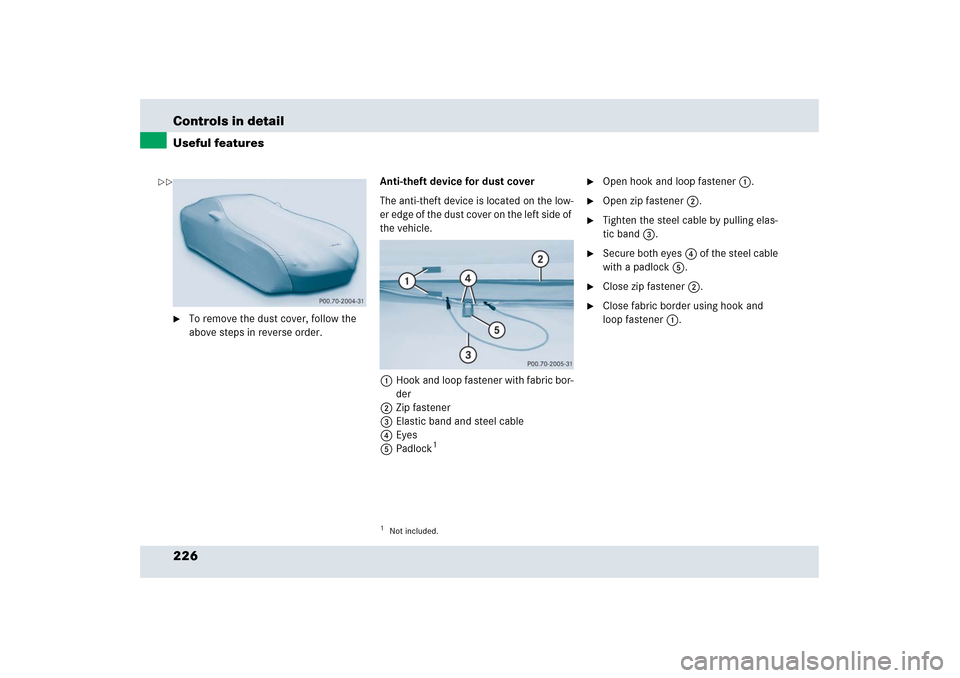
above steps in reverse order.Anti-theft device for dust cover
The anti-theft device is located on the low-
er edge of the dust cover on the left side of
the vehicle.
1Hook and loop fastener with fabric bor-
der
2Zip fastener
3Elastic band and steel cable
4Eyes
5Padlock
1�
Open hook and loop fastener 1.
�
Open zip fastener 2.
�
Tighten the steel cable by pulling elas-
tic band 3.
�
Secure both eyes4 of the steel cable
with a padlock5.
�
Close zip fastener 2.
�
Close fabric border using hook and
loop fastener 1.
1Not included.
��
Page 235 of 409

234 OperationDriving instructionsAfter hard braking, it is advisable to drive
on for some time, rather than immediately
park, so the air stream will cool down the
brakes faster.Driving off
Apply the brakes to test them briefly after
driving off. Perform this procedure only
when the road is clear of other traffic.
Warm up the engine smoothly. Do not
place full load on the engine until the
operating temperature has been reached
(�page 303).When starting off on a slippery surface, do
not allow a drive wheel to spin for an
extended period with the ESP
® switched
off. Doing so may cause serious damage to
the drivetrain which is not covered by the
Mercedes-Benz Limited Warranty.
Parking
!When driving down long and steep
grades, relieve the load on the brakes
by shifting into a lower gear to use the
engine’s braking power. This helps pre-
vent overheating of the brakes and re-
duces brake pad wear.
!Simultaneously depressing the
accelerator pedal and applying the
brake reduces engine performance and
causes premature brake and drivetrain
wear.!Set the parking brake whenever park-
ing or leaving the vehicle. In addition,
move gear selector lever to positionP.
When parking on hills, always turn front
wheels towards the road curb.
Warning!
G
Do not park this vehicle in areas where com-
bustible materials such as grass, hay or
leaves can come into contact with the hot
exhaust system, as these materials could be
ignited and cause a vehicle fire.
To reduce the risk of personal injury as a re-
sult of vehicle movement, before turning off
the engine and leaving the vehicle always:�
Keep right foot on brake pedal.
�
Pull the parking brake lever up as many
notches as possible.
�
Move the gear selector lever to
positionP.
�
Slowly release brake pedal.
�
When parked on an incline, turn front
wheels towards the road curb.
�
Turn the SmartKey in the starter switch
to position0 and remove the SmartKey
from the starter switch.
�
Take the SmartKey with you and lock
the vehicle when leaving.
Page 242 of 409

241 Operation
At the gas station
�At the gas station
Refueling
The fuel filler flap is located on the
right-hand side of the vehicle towards the
rear. Locking/unlocking the vehicle with
the SmartKey automatically locks/unlocks
the fuel filler flap.
�
Remove the SmartKey from the starter
switch.
�
Open the fuel filler flap by pushing at
the point indicated by arrow.
The fuel filler flap opens.
�
Turn fuel cap counterclockwise and
hold on to it until possible pressure is
released.
�
Take off cap and set it in the recess on
the fuel filler flap.
To prevent fuel vapors from escaping
into open air, fully insert filler nozzle
unit.
�
Only fill your tank until the filler nozzle
unit cuts out – do not top up or
overfill.
Warning!
G
Gasoline is highly flammable and poisonous.
It burns violently and can cause serious
injury. Whenever you are around gasoline,
avoid inhaling fumes and skin contact,
extinguish all smoking materials. Never
allow sparks, flame or smoking materials
near gasoline!
iOnly use premium unleaded gasoline
with a minimum Posted Octane Rating
of 91 (average of 96 RON/86 MON).
Information on gasoline quality can
normally be found on the fuel pump.Warning!
G
Overfilling of the fuel tank may create
pressure in the system which could cause a
gas discharge. This could cause the gas to
spray back out when removing the fuel
pump nozzle, which could cause personal
injury.
��
Page 243 of 409

242 OperationAt the gas station�
Replace fuel cap by turning it clockwise
until it audibly engages.
�
Close the fuel filler flap until you hear
the latch close shut.
Check regularly and before a long trip
1Coolant
2Engine oil
3Brake fluidCoolant
For normal replenishing, use water (pota-
ble water quality). For more information,
see “Coolant” (
�page 250) and see “Fu-
els, coolants, lubricants, etc.”
(
�page 377).
Engine oil level
For more information on engine oil level,
see “Engine oil” (
�page 247).
Brake fluid
iMore information on gasoline can be
found in the Factory Approved Service
Products pamphlet.
Leaving the engine running and the fuel
cap open can cause theú malfunc-
tion indicator lamp (USA only) or
the± malfunction indicator lamp
(Canada only) to illuminate.
For more information, see “Practical
hints” (
�page 301).
iOpening the hood, see (
�page 244).
!If you find that the brake fluid in the
brake fluid reservoir has fallen to the
minimum mark or below, have the
brake system checked for brake pad
thickness and leaks immediately.
Notify an authorized Mercedes-Benz
Center immediately. Do not add brake
fluid as this will not solve the problem.
For more information, see “Practical
hints” (
�page 300).
��
Page 248 of 409

247 Operation
Engine compartment
Closing�
Pull the hood upwards in the center,
against the resistance of the gas-filled
spring struts.
�
Hold the front center part of the hood
with both hands and push it back-
wards. After pushing the hood back-
wards about half-way, you will feel the
hood passing a crest and the resulting
force pulling the hood away from you.
At that point, let go of the hood and let
it fall onto the latches.
The hood should now be locked and en-
tirely closed.
�
Check that the hood is properly closed.
If the hood is not properly engaged, re-
peat the closing procedure.
Engine oil
The amount of oil your engine needs will
depend on a number of factors, including
driving style. Higher oil consumption can
occur when�
the vehicle is new
�
the vehicle is driven frequently at
higher engine speeds
Engine oil consumption checks should only
be made after the vehicle break-in period.
Oil consumption of the SLR is slightly high-
er than other vehicles. Please check the
engine oil level frequently.
Warning!
G
Be careful that you do not close the hood on
anyone.
!Make sure the rollers at the rear of the
hood are engaged and the guide pins
line up with the guide holes. Otherwise
the hood may be damaged.
!Do not use any special lubricant addi-
tives, as these may damage the drive
assemblies. Using special additives not
approved by Mercedes-Benz may
cause damage not covered by the
Mercedes-Benz Limited Warranty.
Page 253 of 409

252 OperationTrunkWindshield washer system and head-lamp cleaning system
Fluid for the windshield washer system and
the headlamp cleaning system is supplied
from the windshield washer reservoir. It
has a capacity of approximately
7.4USqt(7l).
During all seasons, add MB Windshield
Washer Concentrate “S” to water. Premix
the windshield washer fluid in a suitable
container.�
Refill the reservoir with MB Windshield
Washer Concentrate and water (or
commercially available premixed
windshield washer solvent/antifreeze,
depending on ambient temperatures).
Always use washer solvent/antifreeze
where temperatures may fall below the
freezing point. Failure to do so could
result in damage to the washer
system/reservoir.The washer fluid reservoir is located in the
trunk underneath the floor on the left hand
side.
1Quick-release fasteners
2Loop
�
Lift up the interior floor panel by
loop2.
�
Turn the quick-release fasteners
counterclockwise1 and remove the
cover.
!Only use washer fluid which is suitable
for plastic lenses. Improper washer
fluid can damage the plastic lenses of
the headlamps.Warning!
G
Washer solvent/antifreeze is highly flamma-
ble. Do not spill washer solvent/antifreeze
on hot engine parts, because it may ignite
and burn. You could be seriously burned.
Page 297 of 409
Practical hintsWhat to do if ...
Where will I find ...?
Unlocking in an emergency
Replacing SmartKey batteries
Replacing bulbs
Replacing the wiper blades
Flat tire
Batteries
Towing the vehicle
Fuses
Page 300 of 409

299 Practical hints
What to do if ...
Problem
Possible cause/consequence
Suggested solutions
-
The yellow ABS indicator
lamp comes on while driving.
The ABS has detected a malfunction and
has switched off. The BAS and the ESP
®
are also switched off (see messages in dis-
play).
The electrohydraulic brake system is still
functioning normally but without ABS
available.
If the ABS control unit is malfunctioning
the automatic transmission may also be
malfunctioning.
�
Continue driving with added caution. Wheels
may lock during hard braking, reducing
steering capability.
�
Read and observe messages in the multi-
function display (
�page 307).
�
Have the system checked at an authorized
Mercedes-Benz Center immediately.
Failure to follow these instructions increases
the risk of an accident.
The charging voltage has fallen below
10 volts and the ABS was switched off.
When the voltage is above this value again, the
ABS is operational again.�
If necessary, have the generator and battery
checked.