Page 135 of 409

134 Controls in detailControl system�
Move the selection marker with button
æ or ç to the
Lighting
sub-
menu.
�
Press button j or k repeatedly
until you see this message in the left
display:
Locator lighting
.
The selection marker is on the current
setting.
�
Press button æ or ç to switch
the locator lighting function
On.
�
Turn the exterior lamp switch to
positionU when exiting the vehicle
(�page 105).
The locator lighting feature is
activated.Setting night security illumination
(Headlamps delayed switch-off)
Use this function to set whether or not the
exterior lamps to illuminate during dark-
ness after exiting the vehicle and all doors
closed.
With the delayed shut-off feature activated
and the exterior lamp switch in
positionU before the engine is turned
off, the following lamps will switch on
when the engine is turned off and remain
lit for approximately 15 seconds:
�
Parking lamps
�
Tail lamps
�
License plate lamps
�
Side marker lamps
�
Front fog lamps
If after turning off the engine you do not
open a door or do not close an opened
door, the lamps will automatically switch
off after 60 seconds.
�
Move the selection marker with button
æ or ç to the
Lighting
sub-
menu.
�
Press button j or k repeatedly
until you see this message in the left
display:
Headlamps delayed
switch-off
.
The selection marker is on the current
setting.
�
Press button æ or ç to switch
the function
On or
Off
.
iYou can reactivate this function within
10 minutes by opening a door.
Page 172 of 409

171 Controls in detail
Automatic transmission
Gear selector lever positions
Effect
ì
Park position
Gear selector lever position
when the vehicle is parked. Place
gear selector lever in positionP
only when vehicle is stopped.
The park position is not intended
to serve as a brake when the
vehicle is parked. Rather, the
driver should always set the
parking brake in addition to
placing the gear selector lever in
positionP to secure the vehicle.
EffectThe SmartKey can only be
removed from the starter switch
with the gear selector lever in
positionP. With the SmartKey
removed, the gear selector lever
is locked in positionP.
If the vehicle’s electrical system
is malfunctioning, the gear
selector lever could remain
locked in positionP.
í
Reverse gear
Place gear selector lever in
positionR only when vehicle is
stopped.
Effect
ë
Neutral
No power is transmitted from the
engine to the drive axle. When
the brakes are released, the
vehicle can be moved freely
(pushed or towed).
To avoid damage to the trans-
mission, never engageN while
driving.
If the ESP
® is deactivated or
malfunctioning:
Move gear selector lever toN
only if the vehicle is in danger of
skidding, e.g. on icy roads.
ê
Drive
The transmission shifts
automatically. All five forward
gears are available.
Page 201 of 409
200 Controls in detailUseful featuresMap pocket in passenger footwell
Storage compartments Armrest storage compartment
�
Reach into the recess and lift armrest.
The armrest opens automatically.
Warning!
G
Do not place heavy or fragile objects, or ob-
jects having sharp edges in the map pocket.
In an accident, during hard braking or sud-
den maneuvers, they could be thrown
around inside the vehicle, and cause injury
to vehicle occupants.
Warning!
G
To help avoid personal injury during a colli-
sion or sudden maneuver, exercise care
when storing objects in the vehicle. Put lug-
gage or cargo in the trunk. Do not pile lug-
gage or cargo higher than the seat backs.
Do not place anything on the shelf below the
rear window.
Luggage nets cannot secure hard or heavy
objects.
Keep compartment lids closed. This will help
to prevent stored objects from being thrown
about and injuring vehicle occupants during
an accident.
Page 224 of 409
223 Controls in detail
Useful features
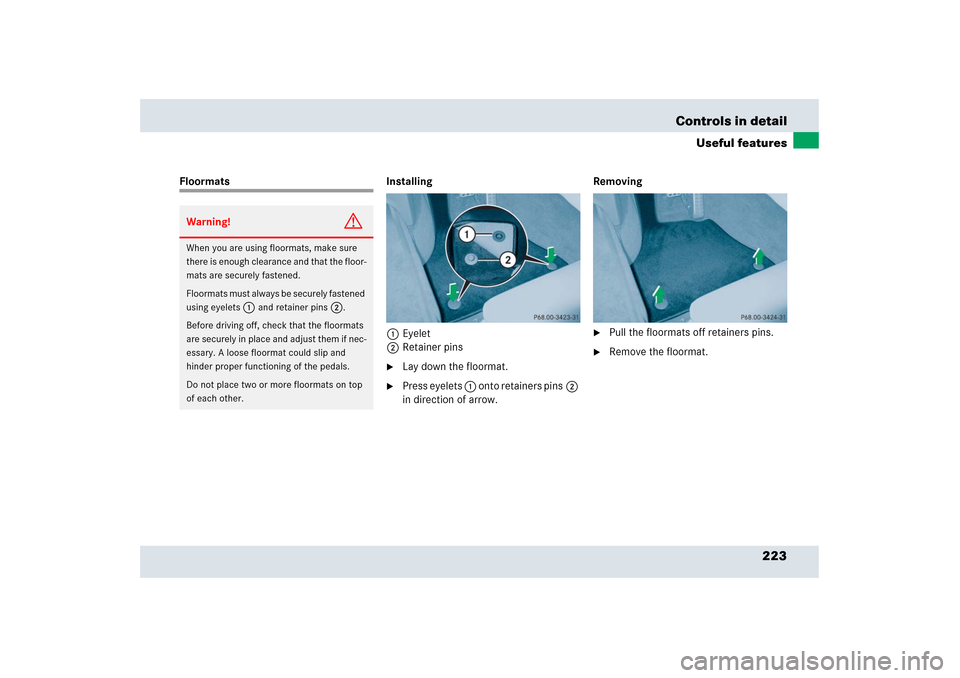
Floormats Installing
1Eyelet
2Retainer pins
�
Lay down the floormat.
�
Press eyelets 1 onto retainers pins2
in direction of arrow. Removing
�
Pull the floormats off retainers pins.
�
Remove the floormat.
Warning!
G
When you are using floormats, make sure
there is enough clearance and that the floor-
mats are securely fastened.
Floormats must always be securely fastened
using eyelets
1
and retainer pins
2
.
Before driving off, check that the floormats
are securely in place and adjust them if nec-
essary. A loose floormat could slip and
hinder proper functioning of the pedals.
Do not place two or more floormats on top
of each other.
Page 227 of 409
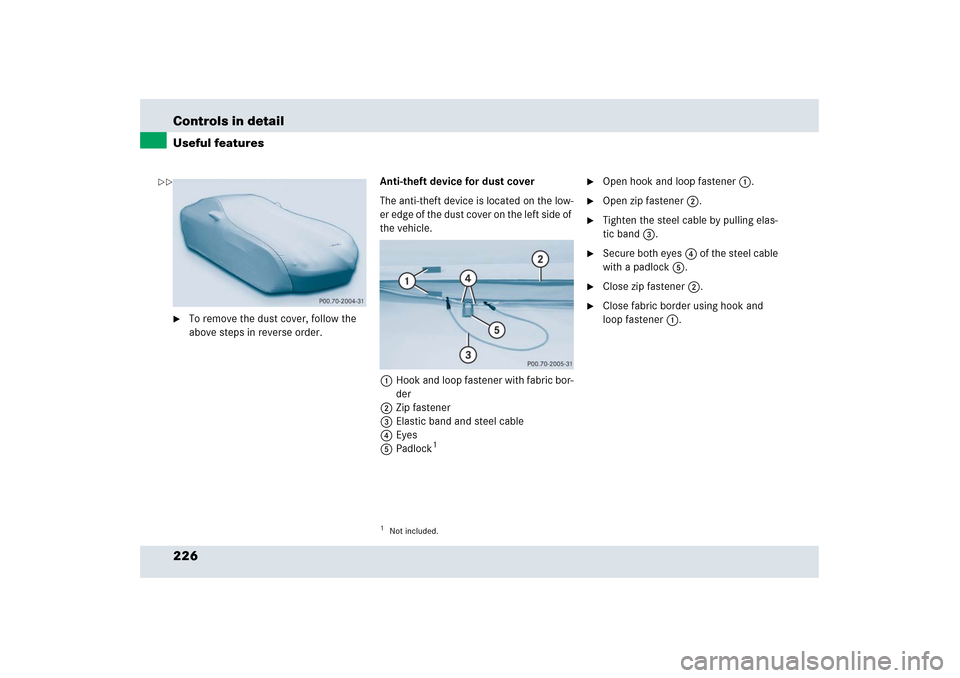
226 Controls in detailUseful features�
To remove the dust cover, follow the
above steps in reverse order.Anti-theft device for dust cover
The anti-theft device is located on the low-
er edge of the dust cover on the left side of
the vehicle.
1Hook and loop fastener with fabric bor-
der
2Zip fastener
3Elastic band and steel cable
4Eyes
5Padlock
1�
Open hook and loop fastener 1.
�
Open zip fastener 2.
�
Tighten the steel cable by pulling elas-
tic band 3.
�
Secure both eyes4 of the steel cable
with a padlock5.
�
Close zip fastener 2.
�
Close fabric border using hook and
loop fastener 1.
1Not included.
��
Page 228 of 409
227 Controls in detail
Useful features
Roof and trunk lid racks
!To avoid damage to the vehicle and the
dust cover, observe the following:�
Once you have secured the dust
cover with the anti-theft device, the
dust cover can be removed only by
using force. This can cause damage
to the dust cover (tearing) or to the
paintwork.
�
The dust cover anti-theft device will
not prevent burglary or vehicle
theft.
Warning!
G
This vehicle has not been designed to
accommodate any type of roof or trunk lid
rack. Therefore do not fit such accessories.
Otherwise the rack could fall off and cause
serious personal injury.!Do not use any type of roof or trunk lid
rack. Otherwise you will damage the
bodywork or paintwork of your SLR.
Page 239 of 409

238 OperationDriving instructionsStanding water
Passenger compartmentDriving abroad
Abroad, there is an extensive
Mercedes-Benz service network at your
disposal. If you plan to drive into areas
which are not listed in the index of your
Mercedes-Benz Center directory, you
should request pertinent information from
an authorized Mercedes-Benz Center.Control and operation of radio
transmitters
Radio and telephone
!Do not drive through flooded areas or
water of unknown depth. Before driving
through water, determine its depth.
Never accelerate before driving into
water. The bow wave could force water
into the engine and auxiliary equip-
ment, thus damaging them.
If you must drive through standing wa-
ter, drive slowly to prevent water from
entering the passenger compartment
or the engine compartment. Water in
these areas could cause damage to
electrical components or wiring of the
engine or transmission, or could result
in water being ingested by the engine
through the air intake causing severe
internal engine damage. Any such
damage is not covered by the
Mercedes-Benz Limited Warranty.
Warning!
G
Always fasten items being carried as
securely as possible.
In an accident, during hard braking or sud-
den maneuvers, loose items will be thrown
around inside the vehicle, and cause injury
to vehicle occupants unless the items are
securely fastened in the vehicle.
The trunk is the preferred place to carry
objects.
Warning!
G
Please do not forget that your primary
responsibility is to drive the vehicle safely.
Only operate the radio or telephone
1 if road,
weather and traffic conditions permit.
Bear in mind that at a speed of just 30 mph
(approximately 50 km/h), your vehicle is
covering a distance of 44 feet
(approximately 14 m) every second.
1Observe all legal requirements.
Page 363 of 409
.1Towing eye bolt
�
Remove cover from the access hole.")
362 Practical hintsTowing the vehicleInstalling/reinstalling towing eye bolt�
Take the towing eye bolt1 from its
storage compartment (
�page 342).1Towing eye bolt
�
Remove cover from the access hole.
�
Screw towing eye bolt1 in to its stop.
�
Remove the towing eye bolt when you
no longer need it. To do this, carry out
the above steps in reverse order.
Points to bear in mind�
The vehicle must not be tow-started.
�
If the vehicle is to be towed, only tow it
with all wheels on the ground.
�
If the vehicle has suffered transmission
damage, only tow it with the propeller
shaft disconnected.
�
Before towing the vehicle, make sure
the battery is connected and charged.
Otherwise you will not be able to switch
on the ignition and move the selector
lever to N. There will then be no power
assistance when steering and braking.
Transporting the vehicle
The towing eye bolt can be used to pull the
vehicle onto a trailer or transporter for
transporting purposes.�
Move the selector lever to N.
iThe gear selector lever will remain
locked in positionP and the SmartKey
will not turn in the starter switch if the
battery is disconnected or discharged.
See notes on the battery (
�page 356).
!Only secure the tow bar to the towing
eye bolt. The vehicle could otherwise
be damaged.!Your vehicle is equipped with a front
towing eye bolt only (
�page 362).
You cannot tow other vehicles with
your vehicle.
!Due to the low clearance height of the
SLR, care must be taken when loading
and unloading from a transporter to
avoid damaging the vehicle body work.
To secure the vehicle, only tie it down
by the wheels or tires. Otherwise it
could be damaged.