Page 163 of 481

162 Controls in detailAutomatic transmission*Driving tips
Accelerator position
Your driving style influences the
transmission’s shifting behavior:
Less throttle Earlier upshifting
More throttle Later upshifting
Kickdown
Use kickdown when you want maximum
acceleration.�
Press the accelerator past the point of
resistance.
The transmission shifts into a lower
gear.
�
Ease on the accelerator when you have
reached the desired speed.
The transmission shifts up again.Stopping
When you stop briefly, e.g. at traffic lights:
�
Leave the transmission in gear.
�
Hold the vehicle with the brake.
When you stop longer with the engine
idling and/or on a hill:
�
Set the parking brake.
�
Move the gear selector lever to
positionP.
Maneuvering
When you maneuver in tight areas,
e.g. when pulling into a parking space:
�
Control the vehicle speed by gradually
releasing the brakes.
�
Accelerate gently.
�
Never abruptly step on the accelerator.Working on the vehicle
Warning!
G
When working on the vehicle, set the
parking brake and move gear selector lever
to positionP. Otherwise the vehicle could
roll away.
Page 175 of 481

174 Controls in detailGood visibilityAuto-dimming mirrors*
The reflection brightness of the exterior
rear view mirrors and the interior rear view
mirror will respond automatically to glare
when�
ignition is switched on
and
�
incoming light from headlamps falls on
the sensor in the interior rear view
mirror
The rear view mirrors will not react if
�
reverse gearR is engaged
�
interior lighting is switched on
Warning!
G
The auto-dimming function does not react if
incoming light is not aimed directly at sen-
sors in the interior rear view mirror.
The interior rear view mirror and the exterior
rear view mirror on the driver’s side do not
react, for example, if the wind screen is in-
stalled.
Glare can endanger you and others.Warning!
G
In case of an accident, liquid electrolyte may
escape from the mirror housing if the mirror
glass breaks.
Electrolyte has an irritating effect. Do not al-
low the liquid to come into contact with
eyes, skin, clothing, or the respiratory sys-
tem. In case it does, immediately flush af-
fected area with water, and seek medical
help if necessary.
!Electrolyte drops coming into contact
with the vehicle paint finish can only be
completely removed while in their
liquid state and by applying plenty of
water.Warning!
G
Exercise care when using the passen-
ger-side exterior rear view mirror. The mirror
surface is convex (outwardly curved surface
for a wider field of view). Objects in mirror
are closer than they appear. Check your in-
terior rear view mirror or glance over your
shoulder before changing lanes.
Page 177 of 481
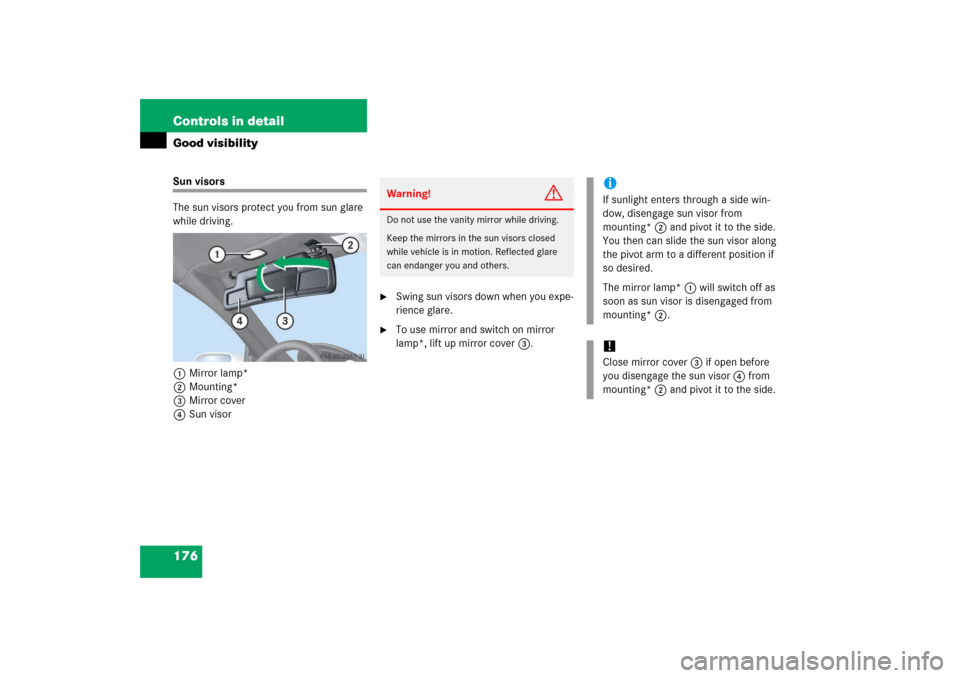
176 Controls in detailGood visibilitySun visors
The sun visors protect you from sun glare
while driving.
1Mirror lamp*
2Mounting*
3Mirror cover
4Sun visor
�
Swing sun visors down when you expe-
rience glare.
�
To use mirror and switch on mirror
lamp*, lift up mirror cover3.Warning!
G
Do not use the vanity mirror while driving.
Keep the mirrors in the sun visors closed
while vehicle is in motion. Reflected glare
can endanger you and others.
iIf sunlight enters through a side win-
dow, disengage sun visor from
mounting*2 and pivot it to the side.
You then can slide the sun visor along
the pivot arm to a different position if
so desired.
The mirror lamp*1 will switch off as
soon as sun visor is disengaged from
mounting*2.!Close mirror cover3 if open before
you disengage the sun visor4 from
mounting*2 and pivot it to the side.
Page 182 of 481
.
�
Set air volume control2 to any speed
(�page 179).
The previous setti")
181 Controls in detail
Climate control
Switching climate control system on/off
Switching on�
Switch on the ignition (
�page 36).
�
Set air volume control2 to any speed
(�page 179).
The previous settings are once again in
effect.
Switching off
�
Set air volume control2 (
�page 179)
to position0.
Setting the temperature
Use temperature controls1 and4
(�page 179) to separately adjust the air
temperature on each side of the passenger
compartment. You should raise or lower
the temperature setting in small incre-
ments, preferably starting at 72°F (22°C).
The climate control will adjust to the set
temperature as fast as possible.Increasing
�
Turn temperature control
1and/or4 (
�page 179) slightly
clockwise.
The climate control system will corre-
spondingly adjust the interior air tem-
perature.
Decreasing
�
Turn temperature control
1and/or4 (
�page 179) slightly
counterclockwise.
The climate control system will corre-
spondingly adjust the interior air tem-
perature.
iWhen the climate control system is
switched off, the outside air supply and
circulation are also switched off. Only
choose this setting for a short time.
Otherwise the windows could fog up.
Page 221 of 481

220 Controls in detailAudio systemDo not use CDs with an 8 cm diameter, not
even with a CD adapter. Attempting to play
CDs with an 8 cm diameter or playing such
CDs with an adapter may cause damage to
the CD drive. Such damage is not covered
by the Mercedes-Benz Limited Warranty.
Should excessively high or low tempera-
tures occur while in CD changer mode*, CD TEMP
will appear in the display, and the
CD will be muted until the temperature has
reached an acceptable level for the system
to continue operation.
The single CD player and the CD changer*
play audio CDs.Tips on handling CDs
�
Handle CDs carefully to prevent
interference during playback.
�
Avoid scratches, fingerprints and dust
on the CDs.
�
Do not write on CDs or apply any labels
or other material to them.
�
Clean CDs from time to time with a
commercially available cleaning cloth.
Never wipe the CD in a circular motion;
instead, wipe it in a straight line start-
ing in the center and moving outward.
Do not use solvents, anti-static sprays,
etc. for cleaning.
�
Replace the CD in its case after use.
�
Protect CDs from heat and direct
sunlight.MP3
The CD changer* can play audio CDs as
well as CDs with MP3 files.
Information on MP3 data carriers
iCD media, CD burning software and
CD writers are available in great vari-
ety. Due to this variety, it cannot be
guaranteed that the CD changer will be
able to play every user-written CD.
The burning process can lead to data
errors and aging of the medium may re-
sult in data loss. Therefore, the
CD changer may be restricted in its
a bi li ty to p la y MP3 da ta c a rri ers ; it m a y
play them with reduced sound quality,
or it ma y not b e a bl e t o pla y them a t a ll .
Problems may be encountered during
playback of user-written CDs with a
storage capacity of more than 700 MB.
These CDs do not meet valid standards
as of this printing.
Page 223 of 481

222 Controls in detailAudio systemMP3 playback
You can play an MP3 CD on the
CD changer* as you would any standard
audio CD. All of the functions described for
the CD changer also apply for the playback
of MP3 CDs. Keep in mind that the single
CD player in the audio system unit is not
able to read MP3 CDs.
The first 99 tracks on the CD, including
tracks in subdirectories, are recognized
and played. Any additional tracks will not
be played.Operating the single CD player in the
audio system unit
Loading a CD
The single CD player in the audio system
unit has capacity for one CD. The CD slot
for loading the drive is located underneath
the soft keys.
�
Make sure the system is switched on.
�
Insert CD into CD slot. The label side of
the CD must face upwards.
The system automatically pulls the CD
into the CD slot. The audio CD begins
to play.Ejecting a CD
�
Make sure the system is switched on.
�
Press gbutton.
The system ejects the CD.
Remove CD0
will appear in the display.
�
Remove CD from slot.
With the CD removed,
NO CD
will appear
in the display.
iDue to the branched data structure,
playback of the first track may be de-
layed slightly.
!If a CD is already loaded, it must be
ejected before inserting a new CD.
Inserting a second CD in the slot with
another CD still loaded will cause dam-
age to the CD drive not covered by the
Mercedes-Benz Limited Warranty.
iIf a CD has been inserted incorrectly or
cannot be read,
WRONG CD0
will appear
in the display.
iIf you do not take the CD out of the CD
slot within approx. 15 seconds, the
system automatically pulls the CD back
in and plays it.
If a CD is pulled back in, press
gbutton, the CD will then be
ejected.
Page 224 of 481

223 Controls in detail
Audio system
Operational readiness of CD changer*
If a CD changer has been installed in the
vehicle, it can be operated from the front
control panel of the audio system.
The CD changer is located in the glove box.
1CD loading slot
2Magazine slot button
A magazine is integrated into the CD
changer as a fixed element. It holds a max-
imum of six CDs.
The CD changer features six magazine slot
buttons2 for controlling the loading pro-
cedure.A light-emitting diode in the buttons shows
the status of the corresponding magazine
slot.
CD loading slot1 is above buttons2
and is used to load CDs.Loading the CD magazine
Loading single CDs
�
Open the glove box.
1CD loading slot
2Magazine slot button
LEDsno LED is lit
Magazine slot is
empty.
green LED flashes
CD can be loaded.
red LED is lit
Magazine slot is in
use.
red LED flashes
CD is being ejected.
iIf a CD has been inserted incorrectly or
cannot be read,
WRONG CD0
will appear
in the display.
Loading one or more CDs interrupts the
CD playback.
��
Page 225 of 481

224 Controls in detailAudio system�
Briefly press button2 for the empty
magazine slot that you would like to
use.
The light-emitting diode in the maga-
zine slot button flashes in green. INSERT CD
appears in the display along
with the slot number.
The flashing light indicates that the CD
changer is ready to receive a CD.
�
Insert an audio CD into CD loading
slot1 within 5 seconds, label side up.
The CD is pulled in and played.
�
Close the glove box.
Loading several CDs
�
Open the glove box.
�
Press button2 of an empty magazine
slot for more than 2 seconds.
The light-emitting diodes in all the mag-
azine slot buttons light up several
times in green, and
ALL LOAD
appears
in the display.
�
Wait until the light-emitting diode for
the first magazine slot flashes in green.
The flashing light indicates that the CD
changer is ready to receive a CD.
�
Insert an audio CD into CD loading
slot1 within 5 seconds, label side up.
The CD is pulled in and the light-emit-
ting diode in the magazine slot button
lights up in red. The magazine slot is
loaded.
The light-emitting diode in the next
available magazine slot button flashes
in green. The CD changer is ready to re-
ceive the next CD.
�
Repeat the previous step until all six
magazine slots are loaded.
Once all magazine slots are loaded, the
CD in the sixth magazine slot is played.
�
Close the glove box.iIf, for example, you only want to load
magazine slots 1 - 4 instead of all six,
simply do not insert a fifth CD into the
CD loading slot. The CD changer will
first try to load a CD but will then can-
cel the procedure, after which the radio
will play the fourth CD.
��