Page 42 of 481
41 Getting started
Adjusting
Backrest tilt�
Press the vertical switch forward or
backward in direction of arrow3 until
your arms are slightly angled when
holding the steering wheel.
Seat cushion tilt
�
Press the horizontal switch up or down
in direction of arrow4 until your up-
per legs are lightly supported.Head restraint height
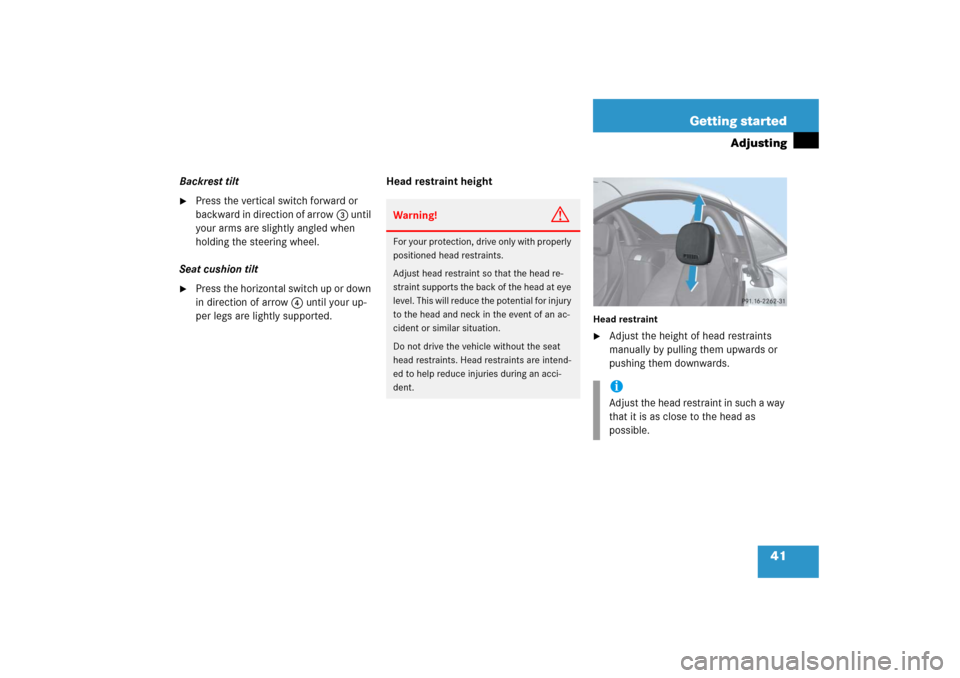
Head restraint�
Adjust the height of head restraints
manually by pulling them upwards or
pushing them downwards.
Warning!
G
For your protection, drive only with properly
positioned head restraints.
Adjust head restraint so that the head re-
straint supports the back of the head at eye
level. This will reduce the potential for injury
to the head and neck in the event of an ac-
cident or similar situation.
Do not drive the vehicle without the seat
head restraints. Head restraints are intend-
ed to help reduce injuries during an acci-
dent.
iAdjust the head restraint in such a way
that it is as close to the head as
possible.
Page 44 of 481
.
1Adjusting steering column")
43 Getting started
Adjusting
Steering wheel adjustment, electrical*
The lever for the electrical steering wheel
adjustment is located on the steering col-
umn (lower left).
1Adjusting steering column, in or out
2Adjusting steering column, up or down�
Switch on the ignition (
�page 36).
or
�
Open the driver’s door.Adjusting steering column in or out
�
Move the lever in direction of
arrows1 until a comfortable steering
wheel position is reached with your
arms slightly bent at the elbow.
Adjusting steering column up or down
�
Move the lever in direction of
arrows2.
Make sure your legs can move freely
and all the displays (including malfunc-
tion and indicator lamps) on the instru-
ment cluster are clearly visible.Easy-entry/exit feature*
This feature allows for easier entry into and
exit from the vehicle.
The easy-entry/exit feature can be activat-
ed or deactivated in the
Convenience
submenu of the control system
(
�page 147).
iThe memory function* (
�page 107)
lets you store the settings for the steer-
ing wheel together with the settings for
the exterior rear view mirrors and the
driver’s seat position.
Page 54 of 481

53 Getting started
Driving
1Parking brake lever
2Release button�
Pull up slightly on parking brake
lever1 and press release button2.
�
Push parking brake lever1 down to
its original position.
The brake warning lamp; (USA
only) or3 (Canada only) in the
speedometer dial goes out.
DrivingWarning!
G
On slippery road surfaces, never downshift
in order to obtain braking action. This could
result in drive wheel slip and reduced vehi-
cle control. Your vehicle’s ABS will not pre-
vent this type of loss of control.!If you hear a warning signal and the
message
Release parking brake
ap-
pears in the multifunction display when
driving off, you have forgotten to re-
lease the parking brake.
!Simultaneously depressing the acceler-
ator pedal and the brake pedal reduces
engine performance and causes pre-
mature brake and drivetrain wear.iOnce the vehicle is in motion, the auto-
matic central locking system engages
and the locking knobs drop down.
For more information, see “Automatic
central locking” (
�page 101).
Page 56 of 481
55 Getting started
Driving
Switching on headlamps
Low beam headlamps
The exterior lamp switch is located on the
dashboard to the left of the steering wheel.Exterior lamp switch1Off
2Low beam headlamps on�
Turn exterior lamp switch to
positionB.High beam
The combination switch is located on the
left of the steering column.
Combination switch1High beam
2High beam flasher�
Push combination switch in direction of
arrow1.
The high beam headlamp indicator
lampA in the instrument cluster
comes on (
�page 24).
For more information on headlamps, see
“Lighting” (
�page 110).
Turn signals
The combination switch is located on the
left of the steering column.Combination switch1Turn signals, right
2Turn signals, left
Page 61 of 481
.
For more information, see “Lighting”
(
�page 110).
Warning!
G
Getting out of your vehicle")
60 Getting startedParking and locking
Switching off headlamps�
Turn exterior lamp switch toM
(�page 55).
For more information, see “Lighting”
(
�page 110).
Warning!
G
Getting out of your vehicle with the gear se-
lector lever* not fully engaged in positionP
(manual transmission: first or reverse gear)
is dangerous. Also, when parked on an in-
cline, positionP (manual transmission: first
or reverse gear) alone may not prevent your
vehicle from moving, possibly hitting people
or objects.
Always set the parking brake in addition to
shifting to positionP (manual transmission:
first or reverse gear).
When parked on an incline, turn the front
wheels towards the road curb.
Warning!
G
When leaving the vehicle, always remove the
SmartKey from the starter switch, take it
with you, and lock the vehicle. Do not leave
children unattended in the vehicle, or with
access to an unlocked vehicle. Children
could release the parking brake and/or
move the gear selector lever* from
positionP (manual transmission: into
Neutral), either of which could result in an
accident and/or serious injury.
Page 62 of 481

61 Getting started
Parking and locking
Turning off engine �
Manual transmission: Move the gear-
shift lever into first or reverse gear.
�
Automatic transmission*: Place the
gear selector lever in positionP.
�
Turn the SmartKey in the starter switch
to position0 and remove the SmartKey
from the starter switch.
The immobilizer is activated.
�
Press the seat belt release button
(�page 49).
�
Guide the latch plate to allow the re-
tractor to completely rewind the seat
belt.
iAlways set the parking brake in addi-
tion to shifting into first or reverse gear
(automatic transmission*: gear selec-
tor lever in positionP).
On slopes, turn the front wheels to-
wards the road curb.
iVehicles with automatic transmission*:
The SmartKey can only be removed
from the starter switch with the gear
selector lever in positionP.
!Make sure the seat belt retracts fully so
that the seat belt and/or latch plate
cannot get caught or pinched in the
door or in the seat mechanism. This
can damage the seat belt and impair
the effectiveness of the seat belt,
and/or cause damage to the door
and/or door trim panel. Such damage
is not covered by the Mercedes-Benz
Limited Warranty.
Damaged seat belts must be replaced.
Contact an authorized Mercedes-Benz
Center.iWith the SmartKey removed from the
starter switch and the driver’s door
open, a warning sounds if the parking
lamps or low beam headlamps are
switched on (
�page 110).
The message Turn off lights
appears
in the multifunction display.
Page 63 of 481
.
With the trunk and all doors closed, all
turn signal lam")
62 Getting startedParking and locking
Locking
�
Exit the vehicle and close all doors.
�
Press the lock button‹ on the
SmartKey (
�page 34).
With the trunk and all doors closed, all
turn signal lamps flash three times. The
locking knobs on the doors move
down.
The anti-theft alarm system is armed
now (
�page 87).
For more information, see “Locking and
unlocking” (�page 92).
iOpening a door causes the windows on
that side of the car to open slightly.
They will return to the up position when
the door is closed.!The side windows will not open or close
if the battery is discharged or the win-
dows are covered with ice. As a result,
you may no longer be able to properly
close the door. Do not attempt to force
the door shut. Doing so may damage
the door or the side window. Correct
the condition that prevents the
windows from operating before
attempting to close the door.
Warning!
G
To prevent possible personal injury, always
keep hands and fingers away from the door
openings when closing the doors. Be espe-
cially careful when small children are
around.
Before closing doors, make sure there is no
possibility of someone getting caught in a
door during closing.Warning!
G
When leaving the vehicle, always remove the
SmartKey from the starter switch, take it
with you, and lock the vehicle. Do not leave
children unattended in the vehicle, or with
access to an unlocked vehicle. Unsuper-
vised use of vehicle equipment may cause
an accident and/or serious personal injury.
iWithout the antenna on the left rear
side of the vehicle installed, the
SmartKey signaling range is consider-
ably reduced. Hold the SmartKey in
close proximity towards the antenna
base when locking or unlocking the
vehicle.
Page 83 of 481

�
BAS (B
rake A
ssist S
ystem)
�
ESP
®")
82 Safety and SecurityDriving safety systemsIn this section you will find information on
the following driving safety systems:�
ABS (A
ntilock B
rake S
ystem)
�
BAS (B
rake A
ssist S
ystem)
�
ESP
® (E
lectronic S
tability P
rogram)
ABS
The Antilock Brake System (ABS) regulates
the brake pressure so that the wheels do
not lock during braking. This allows you to
maintain the ability to steer your vehicle.
The ABS is functional above a speed of
approximately 5 mph (8 km/h) indepen-
dent of road surface conditions.
On slippery road surfaces, the ABS will
respond even to light brake pressure.
The -indicator lamp in the speedome-
ter dial (
�page 24) comes on when you
switch on the ignition. It goes out when the
engine is running.
iIn winter operation, the maximum
effectiveness of the ABS, the BAS, and
the ESP
® is only achieved with winter
tires (
�page 348), or snow chains as
required.
Warning!
G
The following factors increase the risk of
accidents:�
Excessive speed, especially in turns
�
Wet and slippery road surfaces
�
Following another vehicle too closely
The ABS, BAS, and ESP
® cannot reduce this
risk.
Always adjust your driving style to the pre-
vailing road and weather conditions.
Warning!
G
Do not pump the brake pedal. Use firm,
steady brake pedal pressure instead. Pump-
ing the brake pedal defeats the purpose of
the ABS and significantly reduces braking
effectiveness.