Page 35 of 481
34 Getting startedThe “Getting started” section provides an
overview of the vehicle’s most basic func-
tions. First-time Mercedes-Benz owners
should pay special attention to the infor-
mation given here.
If you are already familiar with the basic
functions described here, the “Controls in
detail” section (
�page 91) will provide you
with further information. The correspond-
ing page references are located at the end
of each segment.
Unlocking
Unlocking with the SmartKeySmartKey with remote control1‹Lock button
2ŠUnlock button for trunk lid
3ŒUnlock button
4ÂPanic button (
�page 80)
�
Press unlock buttonΠon the
SmartKey.
All turn signal lamps flash once. The
locking knobs in the doors move up.
The anti-theft alarm system is dis-
armed.
�
Get in the vehicle and insert the
SmartKey in the starter switch.
Page 93 of 481

92 Controls in detailIn the “Controls in detail” section you will
find detailed information on how to oper-
ate the equipment installed in your vehicle.
If you are already familiar with the basic
functions of your vehicle, this section will
be of particular interest to you.
To quickly familiarize yourself with the ba-
sic functions of the vehicle, refer to the
“Getting started” section of this manual.
The corresponding page numbers are giv-
en at the beginning of each segment.
For more information on unlocking and
locking, see (
�page 34) and (
�page 59).
Locking and unlocking
SmartKey
Your vehicle comes supplied with two
SmartKeys, each with remote control and
a removable mechanical key.
The locking tabs for the mechanical key
portion of the two SmartKeys are a differ-
ent color to help distinguish each
SmartKey unit.
The SmartKey provides an extended oper-
ating range. To prevent theft, however, it is
advisable to only unlock the vehicle when
you are in close proximity to it.
The SmartKey centrally locks and unlocks:�
the doors
�
the trunk lid
�
the fuel filler flap
�
the glove box
�
the storage compartment under the
armrest
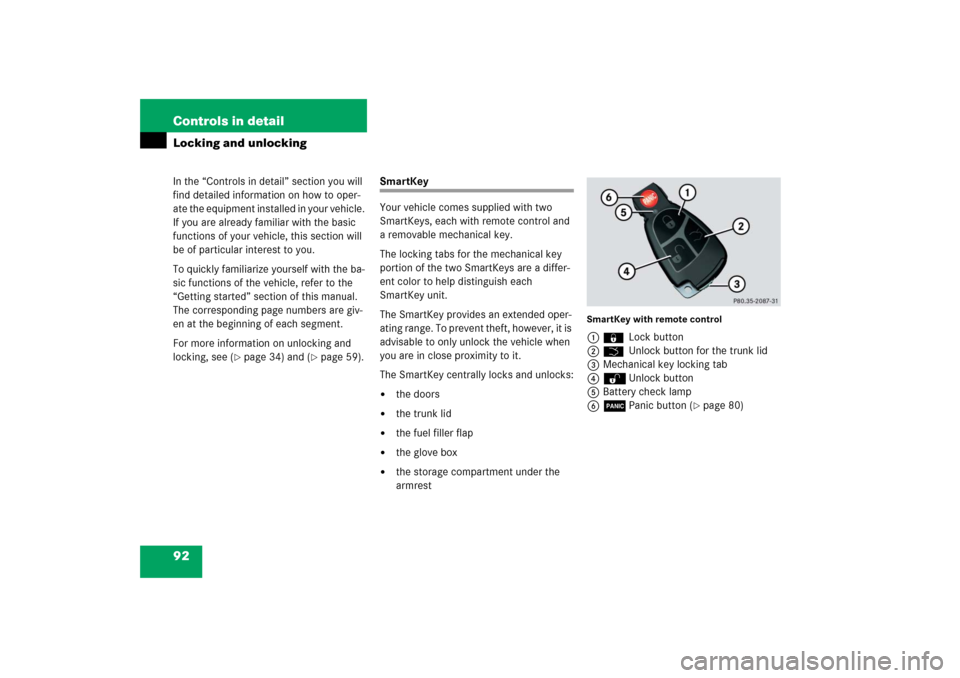
SmartKey with remote control1
‹
Lock button
2
Š
Unlock button for the trunk lid
3Mechanical key locking tab
4ŒUnlock button
5Battery check lamp
6ÂPanic button (
�page 80)
Page 284 of 481

283 Controls in detail
Useful features
Step 5:�
After the indicator lamp1 changes
from a slow to a rapidly flashing light,
release the hand-held remote control
button and the signal transmitter but-
ton.
Step 6:
�
Press and hold the just-trained signal
transmitter button (2, 3 or4) and
observe the indicator lamp1.If the indicator lamp1 stays on
constantly, programming is complete
and your device should activate when
the respective signal transmitter
button (2, 3 or4) is pressed and re-
leased.
Step 7:
�
To program the remaining two signal
transmitter buttons, repeat the steps
above starting with step 3.Rolling code programming
To train a garage door opener (or other
rolling code devices) with the rolling code
feature, follow these instructions after
completing the “Programming” portion
(steps 1 through 6) of this text. (A second
person may make the following training
procedures quicker and easier.)
Step 8:
�
Locate “training” button on the garage
door opener motor head unit.
Exact location and color of the button
may vary by garage door opener brand.
Depending on manufacturer, the
“training” button may also be referred
to as “learn”or “smart” button. If there
is difficulty locating the transmitting
button, refer to the garage door opener
operator’s manual.
iThe indicator lamp1 flashes immedi-
ately the first time the signal transmit-
ter button is programmed. If this button
has already been programmed, the in-
dicator lamp will only start flashing af-
ter 20 seconds.
iIf the indicator lamp1 flashes rapidly
for about 2 seconds and then turns to a
constant light, continue with
programming steps 8 through 12 as
your garage door opener may be
equipped with the “rolling code”
feature.
��
Page 286 of 481

285 Controls in detail
Useful features
If you live in Canada or if you are having
difficulties programming a gate operator
(regardless of where you live) by using the
programming procedures, replace step 4
with the following:
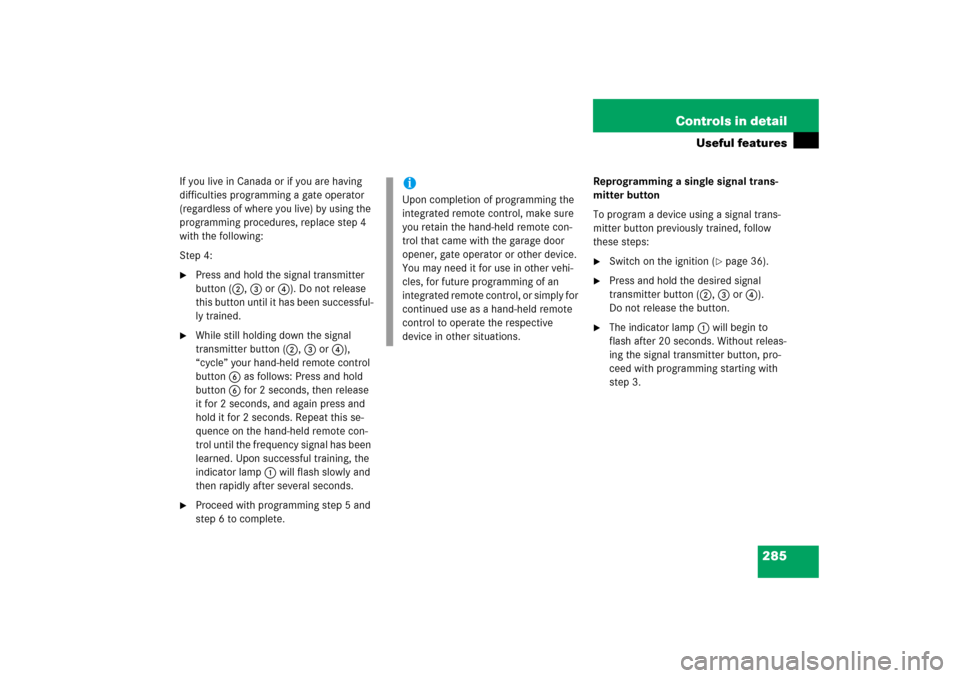
Step 4:�
Press and hold the signal transmitter
button (2, 3 or4). Do not release
this button until it has been successful-
ly trained.
�
While still holding down the signal
transmitter button (2, 3 or4),
“cycle” your hand-held remote control
button6 as follows: Press and hold
button6 for 2 seconds, then release
it for 2 seconds, and again press and
hold it for 2 seconds. Repeat this se-
quence on the hand-held remote con-
trol until the frequency signal has been
learned. Upon successful training, the
indicator lamp1 will flash slowly and
then rapidly after several seconds.
�
Proceed with programming step 5 and
step 6 to complete.Reprogramming a single signal trans-
mitter button
To program a device using a signal trans-
mitter button previously trained, follow
these steps:
�
Switch on the ignition (
�page 36).
�
Press and hold the desired signal
transmitter button (2, 3 or4).
Do not release the button.
�
The indicator lamp1 will begin to
flash after 20 seconds. Without releas-
ing the signal transmitter button, pro-
ceed with programming starting with
step 3.
iUpon completion of programming the
integrated remote control, make sure
you retain the hand-held remote con-
trol that came with the garage door
opener, gate operator or other device.
You may need it for use in other vehi-
cles, for future programming of an
integrated remote control, or simply for
continued use as a hand-held remote
control to operate the respective
device in other situations.
Page 476 of 481

475 Index
Service
Information 12
Maintenance Booklet 12
Service and warranty
Booklet 435
Information 10
Service life (Tires) 318
Service system
Maintenance service indicator 350
Parts service 434
Settings menu (Control system) 134
Shelf behind roll bar 268
Shelf below rear window, cleaning 360
Shift lock* 462
Side marker lamps 401
Side windows see Power windows
Sidewall 345
SmartKey 92
Checking batteries 97
Factory setting 94
Global locking 95
Global unlocking 94
Locking and unlocking 92Loss of SmartKey or mechanical
key 97
Mechanical key 394
Panic button 80
Positions in starter switch 36
Power windows,
opening/closing* 249
Remote control 92
Replacing batteries 398
Restoring to factory setting 96
Retractable hardtop,
opening/closing* 257
Selective setting 95
Starting engine 50
Turning off engine 61
Unlocking the trunk lid 96
Snow chains 349
Spare fuses (Vehicle tool kit) 388
Spare parts see Parts service
Spare wheel 391
SRS 73, 462
Display message 372
Indicator lamp 366Standard display menu (Control
system) 128
Standing lamps 110, 401
Standing water, driving instructions 300
Starter switch positions 36
Starting 36, 50
Difficulties with 52
Position in starter switch 36
Steering column see Steering wheel
Steering wheel
Adjusting 42
Heating* 288
Steering wheel gearshift control
SLK 280* 165
SLK 350* 165
SLK 55 AMG 167
Stolen vehicle, Recovery services
(Tele Aid) 280
Storage compartments 266
Storing tires 319
Summer opening*
Power windows 249
Retractable hardtop 257
Sun visors 176
Supplemental Restraint System see SRS
Symbols in display 374