Page 400 of 561

399 Operation
Vehicle care
Ornamental moldings
For regular cleaning and care of ornamen-
tal moldings, use a use damp cloth.Headlamps, tail lamps, side markers,
turn signal lenses
�
Use a mild car wash detergent, such as
Mercedes-Benz approved Car Sham-
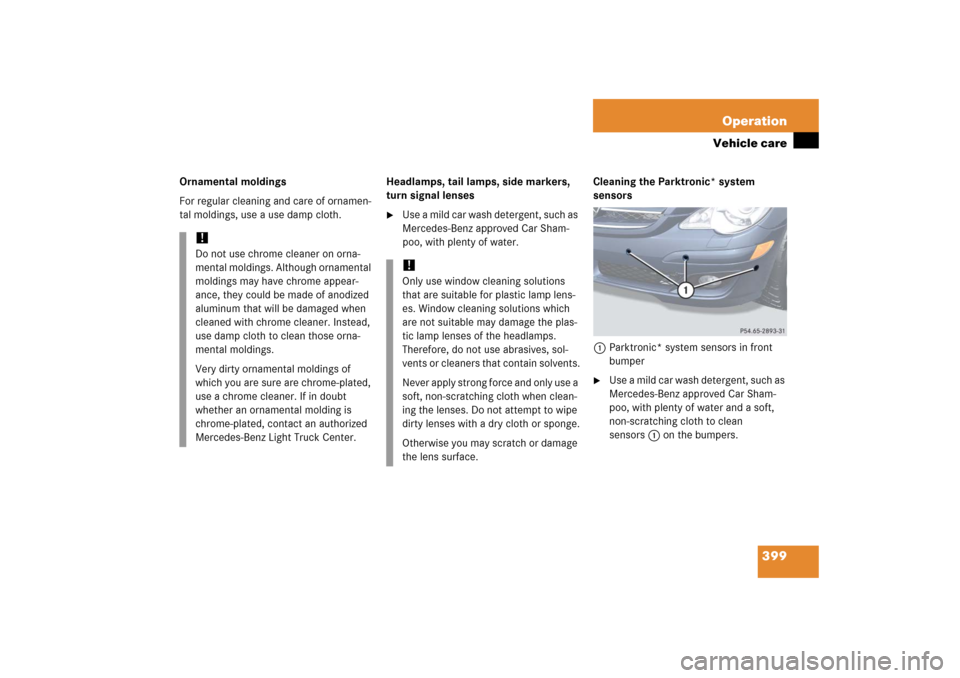
poo, with plenty of water.Cleaning the Parktronic* system
sensors
1Parktronic* system sensors in front
bumper
�
Use a mild car wash detergent, such as
Mercedes-Benz approved Car Sham-
poo, with plenty of water and a soft,
non-scratching cloth to clean
sensors1 on the bumpers.
!Do not use chrome cleaner on orna-
mental moldings. Although ornamental
moldings may have chrome appear-
ance, they could be made of anodized
aluminum that will be damaged when
cleaned with chrome cleaner. Instead,
use damp cloth to clean those orna-
mental moldings.
Very dirty ornamental moldings of
which you are sure are chrome-plated,
use a chrome cleaner. If in doubt
whether an ornamental molding is
chrome-plated, contact an authorized
Mercedes-Benz Light Truck Center.
!Only use window cleaning solutions
that are suitable for plastic lamp lens-
es. Window cleaning solutions which
are not suitable may damage the plas-
tic lamp lenses of the headlamps.
Therefore, do not use abrasives, sol-
vents or cleaners that contain solvents.
Never apply strong force and only use a
soft, non-scratching cloth when clean-
ing the lenses. Do not attempt to wipe
dirty lenses with a dry cloth or sponge.
Otherwise you may scratch or damage
the lens surface.
Page 466 of 561
465 Practical hints
Replacing bulbs
�Replacing bulbs
Bulbs
Safe vehicle operation depends on proper
exterior lighting and signaling. It is there-
fore essential that all bulbs and lamp as-
semblies are in good working order at all
times.
Correct headlamp adjustment is extremely
important. Have headlamps checked and
readjusted at regular intervals and when a
bulb has been replaced. See an authorized
Mercedes-Benz Light Truck Center for
headlamp adjustment.
iIf the headlamps or front fog lamps are
fogged up on the inside as a result of
high humidity, driving the vehicle a dis-
tance with the lights on should clear up
the fogging.
iBackup bulbs will be brought into use
when the following lamps malfunction:�
Turn signal lamps
�
Brake lamps
�
Parking lamps
�
Tail lamps
Read and observe messages in the
multifunction display (
�page 442).
Page 467 of 561
466 Practical hintsReplacing bulbsFront lamps Rear lamps
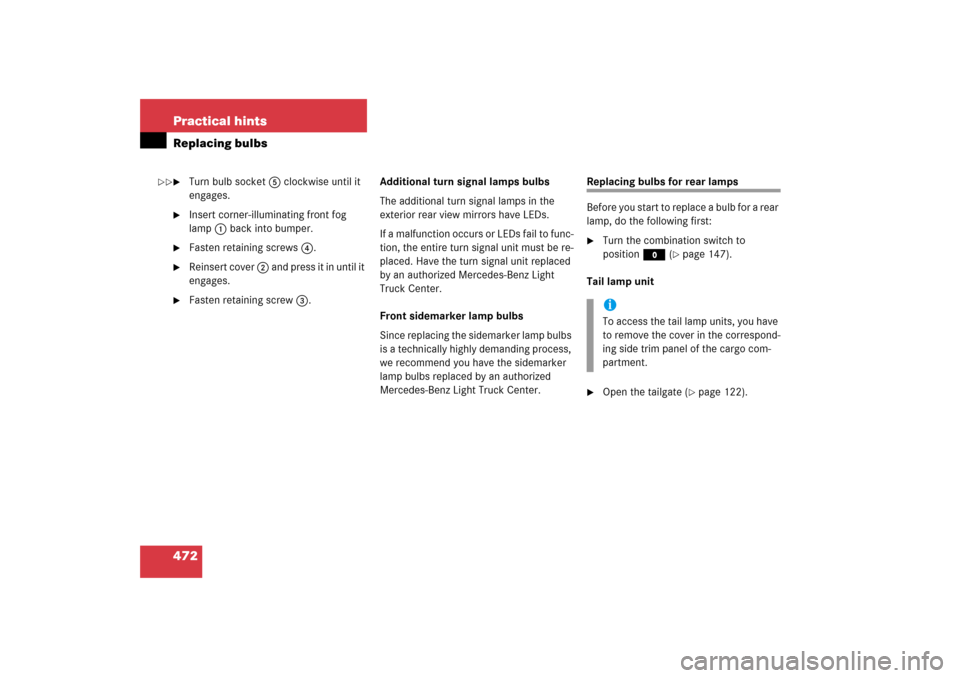
Lamp
Type
1
Parking/standing lamp
W 5 W
2
Turn signal lamp
PY 21 W
3
Additional turn signal
lamp
LED
4
Headlamps:
Low beam
H7 (55W)
Bi-Xenon headlamps*:
Low beam
1
1Vehicles with Bi-Xenon* headlamps: Do not
replace the Bi-Xenon bulbs yourself. Contact an
authorized Mercedes-Benz Light Truck Center.
D2S-35 W
5
Headlamps:
High beam/high beam
flasher
H7 (55W)
Bi-Xenon headlamps*:
High beam/high beam
flasher spot lamp
H7 (55W)
6
Sidemarker lamp
WY 5 W
7
Corner-illuminating
front fog lamp*
H11 (55W)
Lamp
Type
8
High-mounted brake
lamp
LED
9
Tail, brake, and
sidemarker lamp
P 21 W
a
Turn signal lamp
PY 21 W
b
Backup lamp
P 21 W
c
Rear fog lamp (driver’s
side only)
P 21 W
d
License plate lamps
C 5 W
Page 473 of 561

472 Practical hintsReplacing bulbs�
Turn bulb socket 5 clockwise until it
engages.
�
Insert corner-illuminating front fog
lamp 1 back into bumper.
�
Fasten retaining screws4.
�
Reinsert cover 2 and press it in until it
engages.
�
Fasten retaining screw3.Additional turn signal lamps bulbs
The additional turn signal lamps in the
exterior rear view mirrors have LEDs.
If a malfunction occurs or LEDs fail to func-
tion, the entire turn signal unit must be re-
placed. Have the turn signal unit replaced
by an authorized Mercedes-Benz Light
Truck Center.
Front sidemarker lamp bulbs
Since replacing the sidemarker lamp bulbs
is a technically highly demanding process,
we recommend you have the sidemarker
lamp bulbs replaced by an authorized
Mercedes-Benz Light Truck Center.
Replacing bulbs for rear lamps
Before you start to replace a bulb for a rear
lamp, do the following first:�
Turn the combination switch to
positionM (
�page 147).
Tail lamp unit
�
Open the tailgate (
�page 122).
iTo access the tail lamp units, you have
to remove the cover in the correspond-
ing side trim panel of the cargo com-
partment.
��
Page 538 of 561

537 Index
B
Backup lamps
Replacing bulbs 466
Bar 386, 529
BAS 99, 529
Batteries, SmartKey
Check lamp 113, 119
Batteries, vehicle
Messages in display 430
Battery discharged
Jump starting 496
Battery, SmartKey 463
Battery, vehicle 487
Charging 495
Dis-/reconnecting 489
Removing/installing 489
Bead 386, 529
Bi-Xenon* headlamps 529
Replacing bulbs 466
Block heater (Canada only) 391
Blocking
Rear door window operation 93
Bottle opener 300
Brake assist system (BAS) 529
Brake fluid 523
Message in display 432Brake lamps
Replacing bulbs 466
Brake pads
Message in display 430
Brakes 332
Warning lamp 405
Break-in period 330
Bulbs, replacing 465
Additional turn signal lamps 466
Backup lamps 466
Bi-Xenon* headlamps 466
Brake lamps 466
Front fog lamp 471
Front fog lamps* 466
Front lamps 466
Headlamps 466
License plate lamps 466, 474
Parking lamps 466
Rear fog lamps 472
Rear side marker lamp bulbs 472
Sidemarker lamps 466
Standing lamps 466
Tail lamp assemblies 472
Tail lamps 466
Turn signal lamps 466C
CAC (Customer Assistance Center) 529
California
Important notice 11
Call priority
Tele Aid* 318
Calling up
Range (distance to empty) 193
Service indicator 393
CAN system 529
Capacities
Fuels, coolants, lubricants, etc. 521
Card holder 300
Cargo compartment
Extending 283
Fuse box 504
Lamp 157
Tie-down rings 281
Cargo compartment cover blind* 288
Closing 288
Installing 289
Opening 288
Removing 288
Cargo tie-down rings 281
Carpets, cleaning 402
Page 539 of 561

538 IndexCatalytic converter 340
CD player
Operating 171
CD-changer* 294
Center console 29
Lower part 30
PASS AIR BAG OFF indicator
lamp 414
Upper part 29
Central locking
Automatic 130
Switch 131
Switching on/off (control
system) 188
Unlocking from inside 131
Central locking switch 131
Certification label 510
Changing
SmartKey setting 189
Charging
Vehicle battery 495
CHECK ENGINE malfunction indicator
lamp 407, 408Checking
Coolant level 351
Oil level 346
Tire inflate pressure 344
Vehicle lighting 344
Checking tire pressure electronically with
the Advanced Tire Pressure Monitoring
System* (Advanced TPMS*) 371
Checking tire pressure electronically with
the Tire Pressure Monitoring System
(TPMS) 368
Child safety 82
Air bags 72
Infant and child restraint systems 78,
82
LATCH child seat mounts 92
Child safety switch see Blocking of rear
door window operation
Cigarette lighter
Front center console 303
Cigarette lighter* 305Cleaning
Headlamps 208
Headliner 402
Light alloy wheels 401
Plastic and rubber parts 402
Steering wheel 402
Windows 400
Windshield 60
Cleaning tires 355
Climate control 216
Adjusting 222
Adjusting air volume 222
deactivating 220
Front defroster 223
Rear passenger compartment 228
Setting the temperature 222
Clock 180
Closing
Glove box 294
Hood 346
Panorama sliding/pop-up roof 260
Power tilt/sliding sunroof* 462
Side windows 249
Tailgate 124, 128, 129
Tilt/sliding sunroof* 255
Windows 248
Page 540 of 561

539 Index
Closing the tailgate from the inside
electrically* 124
Closing the tailgate from the outside (vehi-
cles without KEYLESS-GO*) 126
Closing tilt/sliding sunroof*
In an emergency 462
Cockpit 22, 529
Cold tire inflation pressure 386, 529
Collapsible tire 457, 530
Collapsible wheel chock 457
Combination switch
High beam flasher 58
Turn signals 58
Windshield wipers 59
Compass 186, 327
Adjustment 186
Calibration 187
Setting the compass zone 186
Control and operation of radio
transmitters 339Control system 530
AUDIO menu 170
Convenience submenu 189
Display digital speedometer 169
Functions 165
Instrument cluster submenu 178,
180
Lighting submenu 182
Malfunction memory menu 173
Menus 164, 165
Selecting radio system 170
Selecting satellite radio* system 171
Settings menu 174
Standard display menu 168
Submenus 163, 165
TEL* menu 194
Trip computer menu 192
Vehicle submenu 186
Convenience submenu 189
Activating easy-entry/exit
feature* 189Coolant 351, 525
Adding 351
Anticorrosion/antifreeze
quantity 526
Checking level 351
Messages in display 433, 436
Temperature 341
Coolant level
Checking 351
Corner-illuminating front fog lamps* 152
Cruise control 264, 530
Canceling 266
Driving downhill 265
Driving uphill 265
Setting current speed 265
Setting speeds 269
Cruise control lever 264
Cup holder
Front center console 299
In rear center console 301
Cup holders 299
Cleaning 401
Curb weight 386, 530
Customer Assistance Center (CAC) 529
Page 545 of 561

544 IndexHeadliner
Cleaning 402
Height adjustment
Head restraints 44
Seat belts 52
Steering wheel 45
High beam flasher 58, 152
High beam headlamps
Messages in display 443
Switching on 151
Hood 345
Closing 346
Message in display 439
Opening 345
Hooks
Loading 282
Hydroplaning 335
I
Identification labels 510
Certification label 510
Vehicle identification number
(VIN) 511
Ignition 38
Switching on 54Immobilizer 104
Activating 104
Deactivating 104
Infant and child restraint systems 82
Installing 90
LATCH child seat mounts 92
Information
About service and warranty 10
Button for Tele Aid* 317
Infrared reflecting windshield* 328
Inside rear view mirror
Antiglare 209
Installing
Front wiper blades 476, 477
Infant and child restraint systems 90
Vehicle battery 489
Instrument cluster 24, 158, 531
Cleaning 401
Illumination 158
Lamps in 409
Outside temperature indicator 159
Selecting language 178
Instruments and controls see CockpitInterior lighting 154
Activating automatic control 155
Deactivating automatic control 155
Delayed switch-off 185
Manual operation 155
Interior rear view mirror
Adjusting 48
Intermittent wiping 60
J
Jump starting 496
K
Key, Mechanical 459
KEYLESS-GO*
Closing tailgate 128, 129
Loss of SmartKey with
KEYLESS-GO* 121
Starting the engine 54
Turning off engine 66
Unlocking and opening, tailgate 120
Unlocking with 37
Kickdown 203, 531
Kilometers/miles in speedometer 178
Kilopascal 386
Kilopascal (kPa) 531
Km/h or mph in speedometer 178