Page 157 of 561
156 Controls in detailLightingSwitching front reading lamps on and off�
Press button1 or 5.
The corresponding front reading lamp
comes on.
�
Press button1 or 5 again.
The corresponding reading lamp goes
out.Switching second-row reading lamps on
and off
The second row reading lamps are located
above the side windows.
1Second-row reading lamp
�
Press on reading lamp 1 in direction
of arrow.
The reading lamp comes on.
�
Press on reading lamp 1 in direction
of arrow once more.
The reading lamp goes out.Switching third-row reading lamps* on
and off
The switches for the third-row reading
lamps are located in the rear overhead
control panel.
1Rear right reading lamp, on/off
2Rear left reading lamp, on/off
3Rear left reading lamp lens
4Rear interior lamp lens
5Rear right reading lamp lens
Page 158 of 561
157 Controls in detail
Lighting
�
Press button 1 or 2.
The corresponding reading lamp
comes on.
�
Press button 1 or 2 once more.
The corresponding reading lamp goes
out.
Door entry lamps
The corresponding door entry lamp comes
on if a door is opened and if the interior
lighting is switched to automatic mode.
The entry lamp goes out automatically
when the door is closed.
Cargo compartment lamp
The cargo compartment lamp comes on
when the tailgate is opened.
If you leave the tailgate open for an extend-
ed period of time, the cargo compartment
lamp will switch off automatically after ap-
proximately 10 minutes.
iThe rear interior lighting is switched on
and off using the button on the front
overhead control panel (
�page 154).
iIf you turn the SmartKey in the starter
switch to position0 or remove the
SmartKey from the starter switch, the
door entry lamps will remain lit for
approximately 5 minutes.
Page 159 of 561
.
1Dimming instrument cluster illumina-
tion
2Reset button
3Bri")
158 Controls in detailInstrument clusterFor a full view illustration of the instrument
cluster, see “Instrument cluster”
(�page 24).
1Dimming instrument cluster illumina-
tion
2Reset button
3Brightening instrument cluster illumi-
nationThe instrument cluster is activated when
you
�
open a door
�
switch on the ignition (
�page 38)
�
press reset button 2
�
switch on the exterior lamps
(�page 147)
You can modify the instrument cluster set-
tings in the instrument cluster submenu of
the control system (
�page 178).
Instrument cluster illumination
Use button 1 or 3 to adjust the illumina-
tion brightness for the instrument cluster.
To brighten illumination�
Press and hold button 3 until the
desired level of illumination is reached.
To dim illumination
�
Press and hold button 1 until the
desired level of illumination is reached.
Warning!
G
If the instrument cluster or the multifunction
display, or both, are inoperative or malfunc-
tioning, warning messages will not be re-
layed when potential danger exists. This
may cause you and others to be unaware of
certain risks, which may result in an acci-
dent and/or personal injury.
Contact the nearest authorized
Mercedes-Benz Light Truck Center as soon
as possible.
iThe instrument cluster illumination is
dimmed or brightened automatically to
suit ambient light conditions.
The instrument cluster illumination will
also be adjusted automatically when
you switch on the vehicle’s exterior
lamps.
Page 183 of 561

182 Controls in detailControl systemLighting submenu
Access the
Lighting
submenu via the
Settings
menu. Use the
Lighting
submenu to change the lamp and lighting
settings on your vehicle.
The following functions are available:Setting daytime running lamp mode
(USA only)
�
Move the selection marker with
buttonæ orç to the
Lighting
submenu.
�
Press buttonj ork repeatedly
until the message
Lamp circuit
headlamp
appears in the multifunction
display.
The selection marker is on the current
setting.
�
Press buttonæ orç to select
manual operation (
manual
) or daytime
running lamp mode (
constant
).
With daytime running lamp mode activated
and the exterior lamp switch at
positionM orU, the low beam
headlamps are switched on when the
engine is running.
Function
Page
Setting daytime running lamp
mode (USA only)
182
Setting locator lighting
183
Setting night security
illumination
184
Setting interior lighting delayed
shut-off
185
iThis function is not available in
countries where the daytime running
lamp mode is mandatory and therefore
in a constant mode.
Page 184 of 561

183 Controls in detail
Control system
In low ambient light conditions the
following lamps will switch on additionally:�
Parking lamps
�
Tail lamps
�
License plate lamps
�
Side marker lamps
For more information on the daytime
running lamp mode, see “Lighting”
(
�page 147).Setting locator lighting
With the locator lighting feature activated,
the exterior lamp switch in positionU
(
�page 148) and the interior lighting in
automatic mode (
�page 155), the follow-
ing lamps will switch on during darkness
when the vehicle is unlocked with the
SmartKey:
�
Parking lamps
�
Tail lamps
�
License plate lamps
�
Side marker lamps
�
Corner-illuminating front fog lamps*
The locator lighting switches off when the
driver’s door is opened.
If you do not open a door after unlocking
the vehicle with the SmartKey, the lamps
will switch off automatically after approxi-
mately 40 seconds.
�
Move the selection marker with
buttonæ orç to the
Lighting
submenu.
�
Press buttonj ork repeatedly
until the message
Function Surround
lighting
appears in the multifunction
display.
The selection marker is on the current
setting.
�
Press buttonæ orç to switch
the locator lighting function to
on.
�
Turn the exterior lamp switch to
positionU (
�page 147) when
exiting the vehicle.
The locator lighting feature is
activated.
iFor safety reasons, resetting the Lighting
submenu to factory settings
while driving (
�page 176) will not
deactivate the daytime running lamp
mode.
The following message appears in the
multifunction display:
Lighting
Cannot be completely reset
to factory settings while driving
Page 185 of 561

Use this function to set whether and for
how long you would like the exterior lamps
to remain on")
184 Controls in detailControl systemSetting night security illumination
(Headlamps delayed shut-off)
Use this function to set whether and for
how long you would like the exterior lamps
to remain on during darkness after exiting
the vehicle and the doors closed.
With the delayed shut-off feature activated
and the exterior lamp switch in
positionU before the engine is turned
off, the following lamps will switch on
when the engine is turned off:�
Parking lamps
�
Tail lamps
�
License plate lamps
�
Side marker lamps
�
Front fog lamps*
If after turning off the engine you do not
open a door, the lamps will switch off auto-
matically after 60 seconds.
�
Move the selection marker with
buttonæ orç to the
Lighting
submenu.
�
Press buttonj ork repeatedly
until the message
Headlmp. delayed
shut-off
appears in the multifunction
display.
The selection marker is on the current
setting.
�
Press buttonæ orç to select
the desired lamp-on period.
You can select:�
0 sec.
, the delayed shut-off feature
is deactivated.
�
15 sec.
, 30 sec.
, 45 sec.
or
60 sec.
, select the desired lamp-on
period.
�
Turn the exterior lamp switch to
positionU (
�page 147) before
turning off the engine.
The headlamps delayed shut-off
feature is activated.
Page 209 of 561
208 Controls in detailGood visibilityFor information on the windshield wipers,
see “Windshield wipers” (
�page 59).
Headlamp cleaning system*
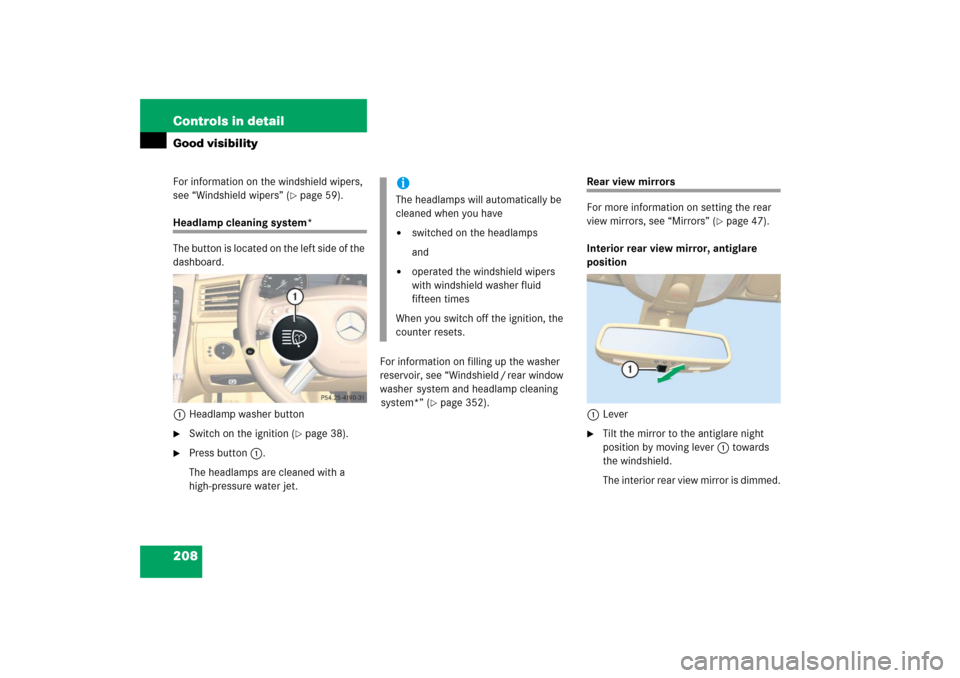
The button is located on the left side of the
dashboard.
1Headlamp washer button�
Switch on the ignition (
�page 38).
�
Press button1.
The headlamps are cleaned with a
high-pressure water jet.For information on filling up the washer
reservoir, see “Windshield / rear window
washer system and headlamp cleaning
system*” (
�page 352).
Rear view mirrors
For more information on setting the rear
view mirrors, see “Mirrors” (
�page 47).
Interior rear view mirror, antiglare
position
1Lever
�
Tilt the mirror to the antiglare night
position by moving lever1 towards
the windshield.
The interior rear view mirror is dimmed.
iThe headlamps will automatically be
cleaned when you have�
switched on the headlamps
and
�
operated the windshield wipers
with windshield washer fluid
fifteen times
When you switch off the ignition, the
counter resets.
Page 210 of 561

209 Controls in detail
Good visibility
Auto-dimming rear view mirrors*
The reflection brightness of the exterior
rear view mirror on the driver’s side and
the interior rear view mirror will respond
automatically to glare when�
the ignition is switched on
�
incoming light from headlamps falls on
the sensor in the interior rear view
mirror
The rear view mirror will not react if
�
reverse gearR is engaged
�
the interior light is turned on
Warning!
G
The auto-dimming function does not react if
incoming light is not aimed directly at sen-
sors in the interior rear view mirror.
The interior rear view mirror and the exterior
rear view mirror on the driver’s side do not
react, for example, when transporting cargo
which covers the rear window.
Glare can endanger you and others.Warning!
G
In case of an accident liquid electrolyte may
escape from the mirror housing if the mirror
glass breaks.
Electrolyte has an irritating effect. Do not
allow the liquid to come into contact with
eyes, skin, clothing, or respiratory system.
In case it does, immediately flush affected
area with water, and seek medical help if
necessary.
!Electrolyte drops coming into contact
with the vehicle paint finish can be
completely removed only while in the
liquid state and by applying plenty of
water.Warning!
G
Exercise care when using the passen-
ger-side exterior rear view mirror. The mirror
surface is convex (outwardly curved surface
for a wider field of view). Objects in mirror
are closer than they appear. Check your
interior rear view mirror or glance over your
shoulder before changing lanes.