Page 113 of 561

112 Controls in detailLocking and unlockingFactory setting
Global unlocking�
Press buttonŒ.
All turn signal lamps flash once. The
locking knobs in the doors move up.
The anti-theft alarm system is
disarmed.
The vehicle will lock again automatically
and reactivate the anti-theft alarm system
within approximately 40 seconds of un-
locking if
�
neither door nor tailgate is opened
�
the SmartKey is not inserted in the
starter switch
�
the central locking switch is not
activatedGlobal locking
�
Press button‹.
With the tailgate and all doors closed,
the turn signal lamps flash three times.
The locking knobs on the doors move
down. The anti-theft alarm system is
armed.
Selective setting
If you frequently travel alone, you may wish
to reprogram the SmartKey so that
pressingŒ only unlocks the driver’s
door and the fuel filler flap.
�
Press and hold buttonsŒ and‹
simultaneously for about 5 seconds
until battery check lamp5
(�page 110) flashes twice.
The SmartKey will then function as fol-
lows:Unlocking driver’s door and fuel filler
flap
�
Press buttonΠonce.
All turn signal lamps flash once. The
locking knob in the driver’s door moves
up. The anti-theft alarm system is
disarmed.
Global unlocking
�
Press buttonΠtwice.
All turn signal lamps flash once. The
locking knobs in the doors move up.
The anti-theft alarm system is
disarmed.
Page 114 of 561
113 Controls in detail
Locking and unlocking
Global locking�
Press button‹.
With the tailgate and all doors closed,
the turn signal lamps flash three times.
The locking knobs on the doors move
down. The anti-theft alarm system is
armed.
Restoring to factory setting
�
Press and hold buttonsŒ and‹
simultaneously for about 6 seconds
until battery check lamp5
(�page 110) flashes twice.Checking the batteries
�
Press button‹orŒ.
Battery check lamp5 (
�page 110)
comes on briefly to indicate that the
SmartKey batteries are in order.
!If you cannot lock or unlock the vehicle
with the SmartKey, then either the bat-
teries in the SmartKey are discharged,
the SmartKey is malfunctioning, or the
vehicle battery is drained.�
Check the batteries in the
SmartKey and replace them if
necessary (
�page 463).
�
Use the mechanical key to unlock
the driver’s door (
�page 459).
�
Lock the vehicle as described in the
“Practical hints” section
(�page 460).
�
Have the vehicle battery and the
vehicle battery connections
checked (
�page 487).
If the SmartKey is malfunctioning, con-
tact an authorized Mercedes-Benz
Light Truck Center.
iIf battery check lamp5 does not
come on briefly during check, the
SmartKey batteries are discharged.
Replace the batteries (
�page 463).
You can obtain the required batteries
at any authorized Mercedes-Benz Light
Truck Center.
iIf the batteries are checked within
signal range of the vehicle, pressing the
button‹orŒ will lock or un-
lock the vehicle accordingly.
Page 119 of 561
118 Controls in detailLocking and unlockingFactory setting
Global unlocking�
Grasp an outside door handle.
All turn signal lamps flash once. The
locking knobs in the doors move up.
The anti-theft alarm system is dis-
armed.
The vehicle will lock again automatically
and reactivate the anti-theft alarm system
within approximately 40 seconds of
unlocking if
�
neither door nor tailgate is opened
�
the central locking switch is not
activatedGlobal locking
�
Press the lock button at an outside
door handle (
�page 68) or the tailgate
(
�page 120).
With the tailgate and all doors closed,
the turn signal lamps flash three times.
The locking knobs on the doors move
down. The anti-theft alarm system is
armed.Selective setting
If you frequently travel alone, you may wish
to reprogram the SmartKey with
KEYLESS-GO so when you grasp the driv-
er’s door handle only the driver’s door and
the fuel filler flap unlocks.
�
Press and hold buttonsŒ and‹
simultaneously for about 6 seconds
until battery check lamp5
(�page 115) flashes twice.
The SmartKey with KEYLESS-GO will
then function as follows:
Unlocking driver’s door and fuel filler
flap
�
Grasp the driver’s outside door handle.
All turn signal lamps flash once. The
locking knob in the driver’s door moves
up. The anti-theft alarm system is dis-
armed.
i If the vehicle has been parked for more
than 72 hours, you must pull an outside
door handle in order to activate the
KEYLESS-GO function.
iThe vehicle could be inadvertently
unlocked if the SmartKey with
KEYLESS-GO is within 3 ft (1 m) of the
vehicle and�
an outside door handle is splashed
with water
or
�
you attempt to clean the outside
door handle
Page 120 of 561
119 Controls in detail
Locking and unlocking
Global unlocking�
Grasp any outside door handle other
than the driver’s outside door handle.
All turn signal lamps flash once. The
locking knobs in the doors move up.
The anti-theft alarm system is dis-
armed.
Global locking
�
Press the lock button on an outside
door handle (
�page 68) or the tailgate
(
�page 120).
All turn signal lamps flash three times.
The locking knobs in the doors move
down. The anti-theft alarm system is
armed.
Restoring to factory setting
�
Press and hold buttonsŒ and‹
simultaneously for about 6 seconds
until battery check lamp5
(�page 115) flashes twice.Checking the battery
�
Press button‹orŒ.
Battery check lamp5 (
�page 115)
comes on briefly to indicate that the
SmartKey with KEYLESS-GO battery is
in order.
!If you can no longer lock or unlock the
vehicle with the SmartKey with
KEYLESS-GO, then the battery in the
SmartKey is discharged, the SmartKey
with KEYLESS-GO is malfunctioning or
the vehicle battery is drained.�
Check the battery in the SmartKey
with KEYLESS-GO (
�page 119)
and replace it if necessary
(
�page 463).
�
Use the mechanical key to unlock
the driver’ door (
�page 459).
�
Lock the vehicle as described in the
“Practical hints” section
(�page 460).
�
Have the vehicle battery and the
vehicle battery connections
checked (
�page 487).
If the SmartKey with KEYLESS-GO is
malfunctioning, contact an authorized
Mercedes-Benz Light Truck Center.
iIf battery check lamp5 (
�page 115)
does not come on briefly during check,
the SmartKey with KEYLESS-GO bat-
tery is discharged.
Replace the battery (
�page 463).
You can obtain the required battery at
any authorized Mercedes-Benz Light
Truck Center.
iIf the battery is checked within signal
range of the vehicle, pressing the
button‹orŒ will lock or un-
lock the vehicle accordingly.
Page 142 of 561
141 Controls in detailSeats
Installing head restraints�
Insert head restraint 1 into openings
on the seat backrest.
�
Push head restraint 1 down until it au-
dibly engages.
�
Push release button2 and adjust
head restraint 1 to the desired posi-
tion (
�page 139).Armrests
The second-row seat armrests can be fold-
ed up, when loading for example, and ad-
justed.
Folding up
�
Move the armrest into a vertical posi-
tion until it engages.
Adjusting
�
With the armrest folded up, disengage
the armrest by pushing it towards the
rear slightly.
�
Fold the armrest down to the lowest
and then to the desired position until it
engages.
�
To readjust the armrest to a higher
position, move armrest up to the
desired position until it engages.
Seat heating*
Front-seat heating
The switches for front-seat heating are lo-
cated in the center console. The red indica-
tor lamps in the switch come on to show
which heating level you have selected.
iOn the second-row seats, the guide bar
with the detent must be on the left.
iIf you wish to readjust the armrest to a
lower position, you must first fold up
the armrest again and repeat the steps
above.
Page 143 of 561
142 Controls in detailSeats
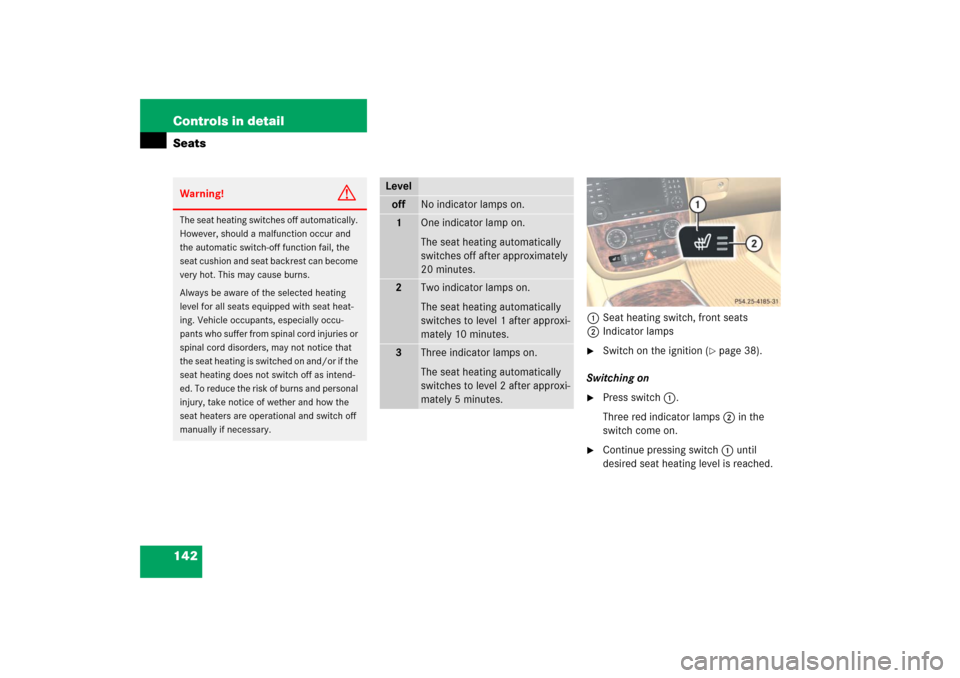
1Seat heating switch, front seats
2Indicator lamps�
Switch on the ignition (
�page 38).
Switching on
�
Press switch1.
Three red indicator lamps2 in the
switch come on.
�
Continue pressing switch1 until
desired seat heating level is reached.
Warning!
G
The seat heating switches off automatically.
However, should a malfunction occur and
the automatic switch-off function fail, the
seat cushion and seat backrest can become
very hot. This may cause burns.
Always be aware of the selected heating
level for all seats equipped with seat heat-
ing. Vehicle occupants, especially occu-
pants who suffer from spinal cord injuries or
spinal cord disorders, may not notice that
the seat heating is switched on and/or if the
seat heating does not switch off as intend-
ed. To reduce the risk of burns and personal
injury, take notice of wether and how the
seat heaters are operational and switch off
manually if necessary.
Leveloff
No indicator lamps on.
1
One indicator lamp on.
The seat heating automatically
switches off after approximately
20 minutes.
2
Two indicator lamps on.
The seat heating automatically
switches to level 1 after approxi-
mately 10 minutes.
3
Three indicator lamps on.
The seat heating automatically
switches to level 2 after approxi-
mately 5 minutes.
Page 144 of 561
143 Controls in detailSeats
Switching off�
Press switch1 repeatedly until all
indicator lamps2 go out.Second-row seat heating
The switches for the second-row seats are
located in the rear center console.
1Seat heating switch
2Indicator lamps
�
Operate the seat heating for the
second-row seats as described in
“Front-seat heating” (
�page 141).
iIf one or more of the indicator
lamps2 on seat heating switch 1 are
flashing, there is insufficient voltage
due to too many electrical consumers
being switched on. The seat heating
switches off automatically.
The seat heating will switch back on
again automatically as soon as
sufficient voltage is available.
Page 148 of 561
147 Controls in detail
Lighting
�Lighting
For information on how to switch on the
headlamps and use the turn signals, see
“Switching on headlamps” (
�page 58)
and “Turn signals” (
�page 58).
Exterior lamp switch
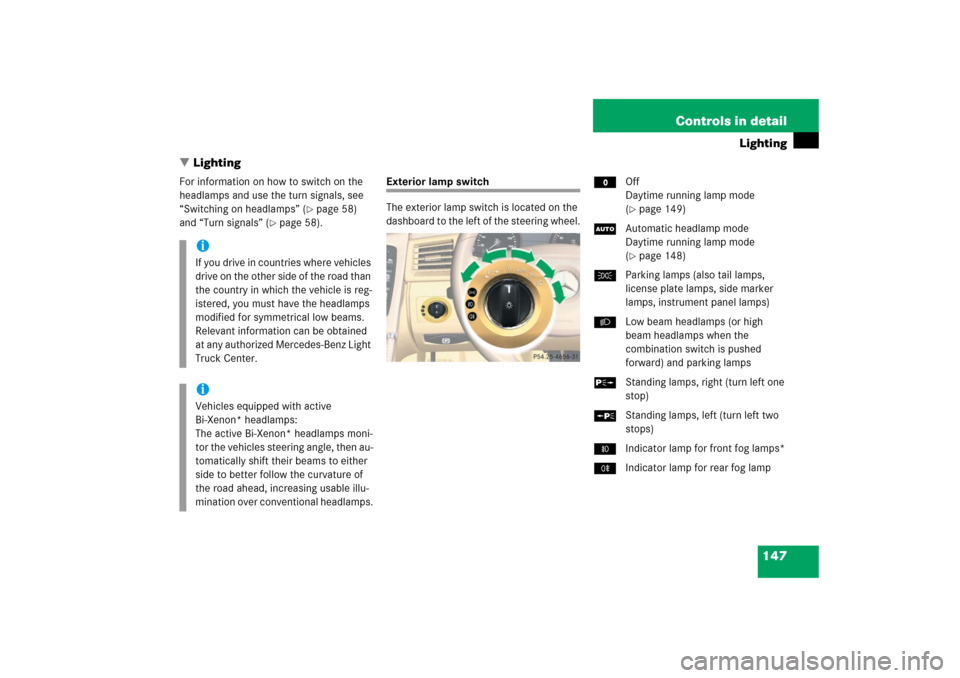
The exterior lamp switch is located on the
dashboard to the left of the steering wheel.MOff
Daytime running lamp mode
(
�page 149)
UAutomatic headlamp mode
Daytime running lamp mode
(�page 148)
CParking lamps (also tail lamps,
license plate lamps, side marker
lamps, instrument panel lamps)
BLow beam headlamps (or high
beam headlamps when the
combination switch is pushed
forward) and parking lamps
ˆStanding lamps, right (turn left one
stop)
‚Standing lamps, left (turn left two
stops)
‡Indicator lamp for front fog lamps*
†Indicator lamp for rear fog lamp
iIf you drive in countries where vehicles
drive on the other side of the road than
the country in which the vehicle is reg-
istered, you must have the headlamps
modified for symmetrical low beams.
Relevant information can be obtained
at any authorized Mercedes-Benz Light
Truck Center.iVehicles equipped with active
Bi-Xenon* headlamps:
The active Bi-Xenon* headlamps moni-
tor the vehicles steering angle, then au-
tomatically shift their beams to either
side to better follow the curvature of
the road ahead, increasing usable illu-
mination over conventional headlamps.