Page 321 of 561

320 Controls in detailUseful features
Garage door opener*
The integrated remote control is capable of
operating up to three separately controlled
devices. It provides a convenient way to
replace up to three hand-held remote
controls used to operate devices such as
garage door openers, gate openers, or
other devices compatible with HomeLink
®
or some other systems.
Before the integrated remote control can
be used, it must be programmed to the
garage door opener, gate operator or other
device you wish to operate. See the follow-
ing instructions for programming informa-
tion.
Interior rear view mirror with integrated
remote control1Indicator lamp
2 3 4Signal transmitter button
Needed for programming (not part of vehi-
cle equipment):
5Hand-held remote control of ga-
rage door opener, gate operator
or other device
6Hand-held remote control but-
ton
iWhen the anti-theft alarm or the
tow-away alarm stays on for more than
30 seconds, a call is initiated automat-
ically to the Response Center. See
anti-theft alarm system (
�page 104)
and tow-away alarm (
�page 106).
Page 335 of 561
 are required by
law. These indicators are located in six
places on the tread circumference and
become visible at a tread de")
334 OperationDriving instructionsParking
Tires
Treadwear indicators (TWI) are required by
law. These indicators are located in six
places on the tread circumference and
become visible at a tread depth of
approximately
1/16
in (1.6 mm), at which
point the tire is considered worn and
should be replaced.
!Set the parking brake whenever park-
ing or leaving the vehicle. In addition,
set the automatic transmission to
positionP.
When parking on hills, always turn front
wheels towards the curb.Warning!
G
To reduce the risk of personal injury, or
damage to the vehicle powertrain, as a
result of vehicle movement, before turning
off the engine and leaving the vehicle al-
ways:�
Keep right foot on brake pedal.
�
Firmly depress parking brake pedal.
�
Set the automatic transmission to
positionP.
�
When parked on an incline, turn front
wheel towards the road curb.
�
Turn the SmartKey to starter switch
position0 and remove, or press
KEYLESS-GO* start / stop button (vehi-
cles with KEYLESS-GO*).
�
Take the SmartKey or the SmartKey with
KEYLESS-GO* with you and lock vehicle
when leaving.
Warning!
G
If you feel a sudden significant vibration or
ride disturbance, or you suspect that possi-
ble damage to your vehicle has occurred,
you should turn on the hazard warning flash-
ers, carefully slow down, and drive with cau-
tion to an area which is a safe distance from
the road.
Inspect the tires and the vehicle underbody
for possible damage. If the vehicle or tires
appear unsafe, have the vehicle towed to
the nearest Mercedes-Benz Light Truck
Center or tire dealer for repairs.
Page 343 of 561

342 OperationAt the gas stationRefueling
The fuel filler flap is located on the
right-hand side of the vehicle towards the
rear. Locking/unlocking the vehicle with
the remote control automatically
locks/unlocks the fuel filler flap.
�
Remove the SmartKey from the starter
switch.
�
Push on fuel filler flap at the position in-
dicated the arrow and open fuel filler
flap.
�
Turn the fuel cap to the left and hold on
to it until possible pressure is released.
�
Take off the fuel cap.
�
Only fill your tank until the filler nozzle
unit cuts out – do not top up or overfill.
Warning!
G
Gasoline is highly flammable and poisonous.
It burns violently and can cause serious inju-
ry. Whenever you are around gasoline, avoid
inhaling fumes and skin contact, extinguish
all smoking materials. Never allow sparks,
flame or smoking materials near gasoline!
!The fuel filler cap is tethered to the fuel
filler neck. Do not drop the cap. It could
damage the vehicle paint finish.!To prevent damaging the lens of the
plastic tail lamp, make certain that no
gasoline comes into contact with it.Warning!
G
Overfilling of the fuel tank may create pres-
sure in the system which could cause a gas
discharge. This could cause the gas to spray
back out when removing the fuel pump noz-
zle, which could cause personal injury.
Page 361 of 561
360 OperationTires and wheelsStep 6 (if applicable)�
If your vehicle will be towing a trailer,
load from your trailer will be trans-
ferred to your vehicle. Consult this
manual to determine how this reduces
the available cargo and luggage load
capacity of your vehicle (
�page 362).
The following table shows examples on
how to calculate total and cargo load
capacities with varying seating configura-
tions and number and size of occupants.
The following examples use a load limit
of 1 500 lbs. This is for illustration
purposes only. Make sure you are using
the actual load limit for your vehicle stated
on the vehicle’s placard (
�page 357).
��
Page 363 of 561

(�page 362) as to not ex")
362 OperationTires and wheelsCertification label
Even after careful determination of the
combined weight of all occupants, cargo
and the trailer tongue load (if applicable)
(�page 362) as to not exceed the permis-
sible load limit, you must make sure that
your vehicle never exceeds the Gross Vehi-
cle Weight Rating (GVWR) and the Gross
Axle Weight Rating (GAWR) for either the
front or rear axle. You can obtain the
GVWR and GAWR from the Certification la-
bel. The Certification Label can be found
on the driver’s door B-pillar, see “Technical
data” (
�page 510).Gross Vehicle Weight Rating (GVWR): The
total weight of the vehicle, all occupants,
all cargo, and the trailer tongue load
(
�page 362) must never exceed the
GVWR.
Gross Axle Weight Rating (GAWR): The to-
tal allowable weight that can be carried by
a single axle (front or rear).
To assure that your vehicle does not ex-
ceed the maximum permissible weight
limits (GVWR and GAWR for front and rear
axle), have the loaded vehicle (including
driver, passengers and all cargo and, if ap-
plicable, trailer fully loaded) weighed on a
suitable commercial scale.Trailer tongue load
The tongue load of any trailer is an impor-
tant weight to measure because it affects
the load you can carry in your vehicle. If a
trailer is towed, the tongue load must be
added to the weight of all occupants riding
and any cargo you are carrying in the
vehicle. The tongue load typically is
between 10% and 15% of the trailer weight
and everything loaded in it.
Page 399 of 561

398 OperationVehicle careHand-wash
Do not use hot water or wash your vehicle
in direct sunlight. �
Only use a mild car wash detergent,
such as Mercedes-Benz approved Car
Shampoo.
�
Thoroughly spray the vehicle with a dif-
fused jet of water.
Direct only a very weak spray towards
the ventilation intake.
�
Use plenty of water and rinse the
sponge and chamois frequently.
�
Rinse with clean water and thoroughly
dry with a chamois.
Do not allow cleaning agents to dry on
the finish.Automatic car wash
You can have your car washed in an auto-
matic car wash from the start. Automatic
car washes without brushes are prefera-
ble.
If the vehicle is very dirty, prewash it be-
fore running it through the automatic car
wash.
!If you want the gear position to remain
inN (for example when the vehicle is
pulled through a car wash)
�
do not remove the SmartKey from
the starter switch
or, when using KEYLESS-GO*
�
do not turn off the engine using the
KEYLESS-GO start/stop button*
and open the driver’s door
Otherwise, the transmission will shift
toP and lock the wheels, preventing
the vehicle from being pulled through a
car wash.
!Due to the width of the vehicle, fold in
exterior rear view mirrors prior to run-
ning the vehicle through an automatic
car wash to prevent damage to the
mirrors.
Make sure that the windshield wiper
switch is set to0 (
�page 59). Other-
wise, the rain sensor could activate and
cause the wipers to move unintention-
ally. This may lead to vehicle damage.
iAfter running the vehicle through an au-
tomatic car wash, wipe any wax off of
the windshield (
�page 400). This will
prevent smears and reduce wiping
noise which can be caused by residual
wax on the windshield.
When leaving the car wash, make sure
that the mirrors are folded out. Other-
wise they may vibrate.
Page 404 of 561
403 Practical hints
What to do if …
Where will I find ...?
Unlocking / locking in an emergency
Opening / closing in an emergency
Replacing SmartKey batteries
Replacing bulbs
Replacing wiper blades
Flat tire
Battery
Jump starting
Towing the vehicle
Fuses
Page 455 of 561
454 Practical hintsWhere will I find ...?First aid kit
The first aid kit is stored under the cargo
compartment floor, see “Vehicle tool kit”
(�page 454).
Vehicle tool kit
The vehicle tool kit is stored under the car-
go compartment floor.
The vehicle tool kit includes:�
Towing eye bolt
�
Wheel wrench
�
Alignment bolt
�
Vehicle jack
�
Fuse chart
�
Spare fuses
�
Fuse extractor
�
Collapsible wheel chock
�
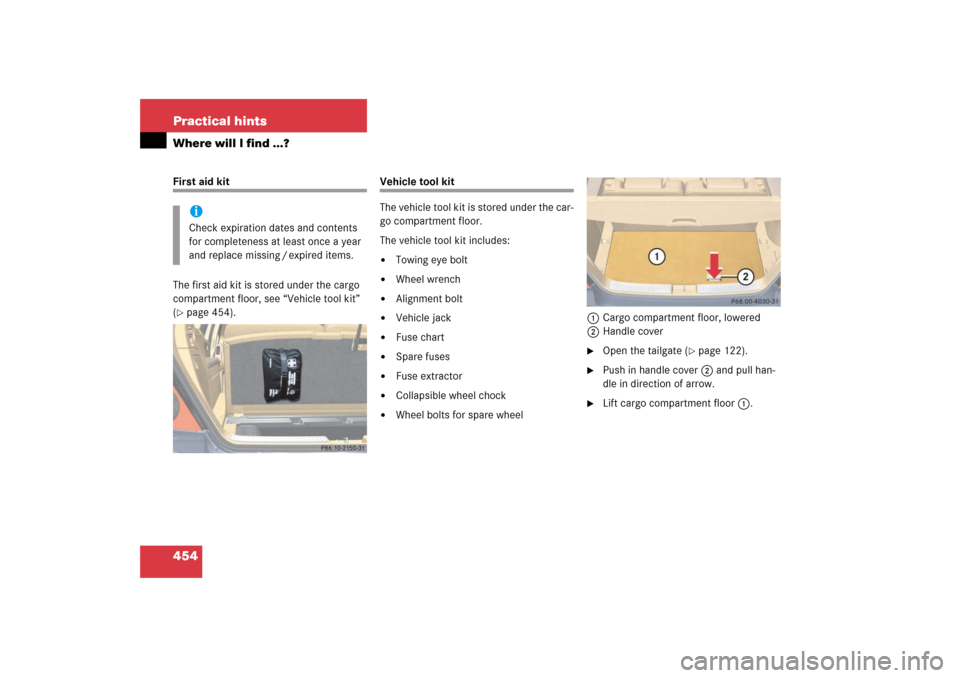
Wheel bolts for spare wheel1Cargo compartment floor, lowered
2Handle cover
�
Open the tailgate (
�page 122).
�
Push in handle cover2 and pull han-
dle in direction of arrow.
�
Lift cargo compartment floor 1.
iCheck expiration dates and contents
for completeness at least once a year
and replace missing / expired items.