Page 456 of 561
455 Practical hints
Where will I find ...?
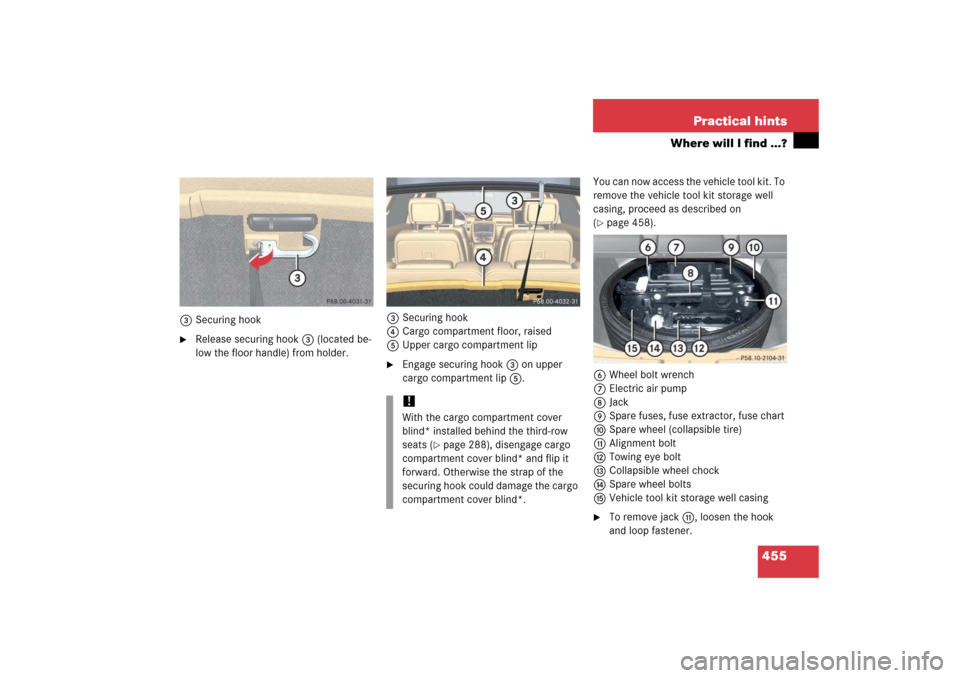
3Securing hook�
Release securing hook 3 (located be-
low the floor handle) from holder.3Securing hook
4Cargo compartment floor, raised
5Upper cargo compartment lip
�
Engage securing hook 3 on upper
cargo compartment lip 5.You can now access the vehicle tool kit. To
remove the vehicle tool kit storage well
casing, proceed as described on
(
�page 458).
6Wheel bolt wrench
7Electric air pump
8Jack
9Spare fuses, fuse extractor, fuse chart
aSpare wheel (collapsible tire)
bAlignment bolt
cTowing eye bolt
dCollapsible wheel chock
eSpare wheel bolts
fVehicle tool kit storage well casing
�
To remove jackb, loosen the hook
and loop fastener.
!With the cargo compartment cover
blind* installed behind the third-row
seats (
�page 288), disengage cargo
compartment cover blind* and flip it
forward. Otherwise the strap of the
securing hook could damage the cargo
compartment cover blind*.
Page 477 of 561

476 Practical hintsReplacing wiper bladesInstalling
1Wiper blade
2Attachment
3Guide tab
4Opening�
With guide tab 3 sliding into opening
4, place wiper blade 1 onto wiper
arm in direction of arrow.
�
Fold wiper blade 1 towards wiper
arm.
Tabs 2 must engage into both recess-
es of attachment 2.
�
Check whether the wiper blade is
securely fastened.
�
Fold the wiper arm backward to rest on
the windshield.
Make sure to hold on to the wiper when
folding the wiper arm back.
Rear wiper bladeWarning!
G
For safety reasons, switch off wipers and
remove SmartKey from starter switch
(vehicles with KEYLESS-GO*: Make sure the
vehicle’s on-board electronics have
status0) before replacing a wiper blade.
Otherwise the motor could suddenly turn on
and cause injury.!Hold on to the wiper when folding the
wiper arm back. If released, the force
of the impact from the tensioning
spring could crack the rear window.
Do not allow the wiper arms to contact
the rear window glass without a wiper
blade inserted.
Page 499 of 561
498 Practical hintsJump startingYou can now turn on the electrical con-
sumers. Do not turn on the lights under
any circumstances.�
Remove the jumper cables first from
negative terminals1 and 3 and then
from the positive terminals2 and 4.
You can now turn on the lights.
�
Have the battery checked at the near-
est authorized Mercedes-Benz Light
Truck Center.!Do not tow-start the vehicle.
Page 500 of 561

499 Practical hints
Towing the vehicle
�Towing the vehicle
Mercedes-Benz recommends that the
vehicle be transported with all wheels off
the ground using flatbed or appropriate
wheel lift/dolly equipment. This method is
preferable to other types of towing.When circumstances do not permit the
recommended towing methods, the
vehicle may be towed with all wheels on
the ground only so far as necessary to have
the vehicle moved to a safe location where
the recommended towing methods can be
employed.
!Use flatbed or wheel lift/dolly equip-
ment, with the SmartKey in starter
switch turned to position0.
Do not tow with sling-type equipment.
Towing with sling-type equipment over
bumpy roads will damage radiator and
supports.
To prevent damage during transport,
do not tie down vehicle by its chassis or
suspension parts. Use the towing eyes.
Switch off the ESP
® (�page 101),
tow-away alarm (
�page 107) and the
automatic central locking
(
�page 130).
Do not tow-start the vehicle.
!Do not tow with one axle raised. Doing
so could damage the transfer case,
which is not covered by the
Mercedes-Benz Limited Warranty.
All wheels must be on or off the ground.
Observe instructions for towing the ve-
hicles with all wheels on the ground.
!When towing the vehicle with all wheels
on the ground, the automatic transmis-
sion must be in positionN and the
SmartKey must be in starter switch
position2.
When towing the vehicle with all wheels
on the ground, the vehicle may be
towed only for distances up to 30 miles
(50 km) and at a speed not to exceed
30 mph (50 km / h).
If the vehicle is towed with the front
axle raised (observe instructions re-
garding flexible drive shaft), the engine
must be shut off (SmartKey in starter
switch position1). Otherwise, the
4-ETS may become engaged which may
cause loss of towing control.
Page 501 of 561

500 Practical hintsTowing the vehicle
!
To be certain to avoid additional dam-
age to the vehicle powertrain, however
you should observe the following:�
With damage to the front axle�
raise front axle
�
remove flexible drive shaft be-
tween rear axle and transfer
case
�
With damage to the rear axle�
raise rear axle
�
tow vehicle with wheel lift or
dolly placed under front wheels
�
With damage to the transfer case�
remove flexible drive shaft to
the drive axles
Always install new self-locking nuts
when reinstalling flexible drive shaft.
Warning!
G
If circumstances require towing the vehicle
with all wheels on the ground, always tow
with a tow bar if:�
the engine will not run
�
there is a malfunction in the power
supply or in the vehicle’s electrical sys-
tem
Prior to towing the vehicle with all wheels on
the ground, make sure the SmartKey is in
starter switch position2.
If the SmartKey is left in starter switch
position0 for an extended period of time, it
can no longer be turned in the switch. In this
case, the steering is locked. To unlock,
remove SmartKey from starter switch and
reinsert.
Warning!
G
With the engine not running, there is no
power assistance for the brake and steering
systems. In this case, it is important to keep
in mind that a considerably higher degree of
effort is necessary to brake and steer the
vehicle. Adapt your driving accordingly.iTo signal turns while being towed with
hazard warning flasher in use, turn the
SmartKey in starter switch to
position2 and activate combination
switch for left or right turn signal in
usual manner – only the selected turn
signal will operate.
Upon canceling the turn signal, the
hazard warning flasher will operate
again.
Page 502 of 561

501 Practical hints
Towing the vehicle
Installing towing eye bolts
The front towing eye is located behind a
cover on the passenger side below the
front bumper.
1Towing eye cover
iThe vehicle cannot be started via
tow-start.iIf the battery is disconnected or dis-
charged, the automatic transmission
will remain locked in positionP and the
SmartKey will not turn in the starter
switch. For more information, see “Bat-
tery” (
�page 487) and “Jump starting”
(
�page 496).
!When towing the vehicle with all wheels
on the ground, note the following:
With the automatic central locking
activated and the ignition in position2
(�page 38), the vehicle doors lock if
the left front wheel is turning at a speed
of approx. 9 mph (15 km / h) or above.
To prevent the vehicle doors from
locking, deactivate the automatic
central locking (
�page 130).
Switch off the tow-away alarm
(
�page 107).
Towing of the vehicle should only be
done using the towing eye. Never
attach tow cable, tow rope or tow rod
to vehicle chassis, frame or suspension
parts.
Page 503 of 561

502 Practical hintsTowing the vehicleThe rear towing eye is located behind the
right side cover in the rear bumper panel.
1Towing eye cover
�
Press mark on cover1 as indicated by
the arrow.
�
Lift off cover1 to reveal the threaded
hole for towing eye bolt.
�
Take the towing eye bolt and wheel
wrench from the vehicle toolkit
(�page 455).
�
Screw towing eye bolt in to its stop and
tighten with wheel wrench.
�
After use, unscrew towing eye bolt.
�
Store the towing eye bolt and wheel
wrench back into the vehicle toolkit
(�page 455).
�
Engage cover1 at top and press at
bottom.
Stranded vehicle
Freeing a stranded vehicle, on which the
wheels are dug into sand or mud, should
be done with the greatest of care, especial-
ly if the vehicle is heavily loaded.
Avoid pulling the vehicle abruptly or diago-
nally, since it could result in damage to the
chassis alignment.
Never try to free a vehicle that is still cou-
pled to a trailer.
If possible, a vehicle equipped with trailer
hitch receiver should be pulled backward
in its own previously made tracks.
Warning!
G
In order to avoid possible serious burns or
injury, use extreme caution when removing
the cover, because the rear exhaust pipe is
extremely hot.
Page 536 of 561

535 Index
A
ABS 97, 529
ABS control 97
Malfunction indicator lamp 404
Messages in display 418
Warning lamp 404
Accelerator position, automatic
transmission 203
Accessory weight 385, 529
Accident
In case of 63
Activating
Air circulation mode 242
Air conditioning (cooling) 226
Air recirculation mode 225, 239
Anti-theft alarm system 105
Central locking (control system) 188
Defrosting 223
Easy-entry/exit feature* 189
Electric air pump 483
ESP
®
102
Exterior headlamps 58
Hazard warning flasher 154
Headlamps 58
High beams 151
Ignition 38Immobilizer 66, 104
Rear window defroster 215
Rear window wiper 62
Residual heat 243
Residual heat* 228
Seat heating* 142
Tow-away alarm 107
Warning indicators (Parktronic*) 276
Windshield wipers 59
Adding
Coolant 351
Engine oil 349
Additional turn signal lamps
Replacing bulbs 466
Adjusting 42
Air distribution 222, 236
Air volume 222, 237
Backrest tilt 44
Exterior rear view mirror 48
Head restraint height 44
Head restraint tilt 45
Instrument cluster illumination 158
Interior rear view mirror 48
Mirrors 47
Multicontour seat* 136
Seat cushion depth 136Seat cushion tilt 44
Seat fore and aft adjustment 43
Seat height 44
Seats 42
Steering column height 47
Steering wheel 45
Adjusting steering column in or out 47
Adjusting steering column up or down 47
Air bags 71
Children 72
Front 75
Passenger 75
Safety guidelines 74
Side impact 76
Window curtain 76
Air conditioning
Turning off 226
Turning on 226
Air conditioning refrigerant 523
Air distribution
Adjusting 222, 236
Air pressure 385, 529
Air pressure see Tire inflation pressure
Air pump, electric
Turning on 483