Page 321 of 561
320 Controls in detailUseful features
Garage door opener*
The integrated remote control is capable of
operating up to three separately controlled
devices. It provides a convenient way to
replace up to three hand-held remote
controls used to operate devices such as
garage door openers, gate openers, or
other devices compatible with HomeLink
®
or some other systems.
Before the integrated remote control can
be used, it must be programmed to the
garage door opener, gate operator or other
device you wish to operate. See the follow-
ing instructions for programming informa-
tion.
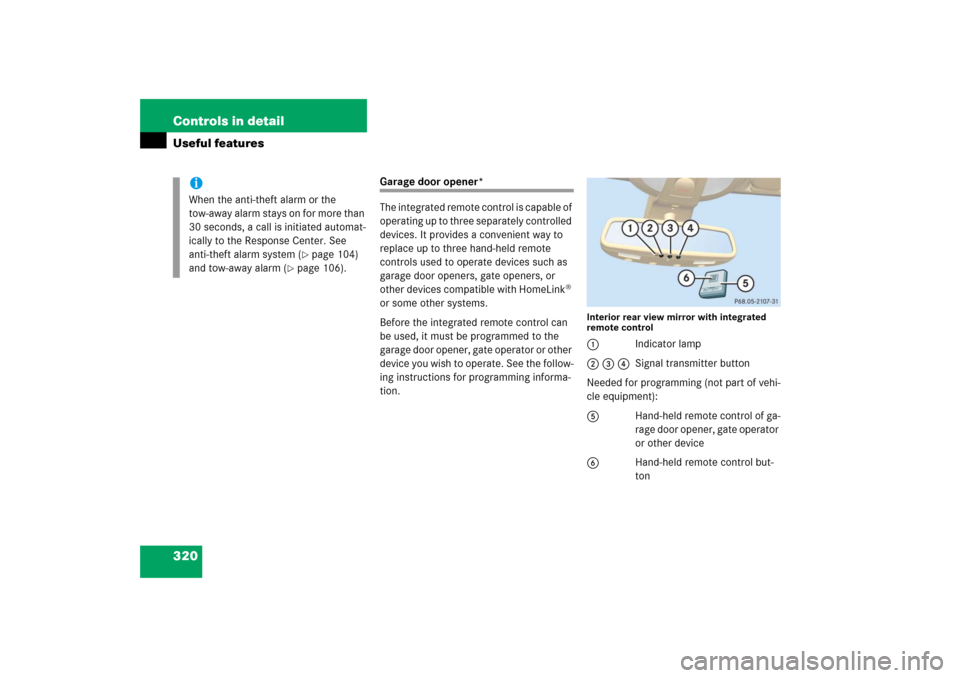
Interior rear view mirror with integrated
remote control1Indicator lamp
2 3 4Signal transmitter button
Needed for programming (not part of vehi-
cle equipment):
5Hand-held remote control of ga-
rage door opener, gate operator
or other device
6Hand-held remote control but-
ton
iWhen the anti-theft alarm or the
tow-away alarm stays on for more than
30 seconds, a call is initiated automat-
ically to the Response Center. See
anti-theft alarm system (
�page 104)
and tow-away alarm (
�page 106).
Page 399 of 561
398 OperationVehicle careHand-wash
Do not use hot water or wash your vehicle
in direct sunlight. �
Only use a mild car wash detergent,
such as Mercedes-Benz approved Car
Shampoo.
�
Thoroughly spray the vehicle with a dif-
fused jet of water.
Direct only a very weak spray towards
the ventilation intake.
�
Use plenty of water and rinse the
sponge and chamois frequently.
�
Rinse with clean water and thoroughly
dry with a chamois.
Do not allow cleaning agents to dry on
the finish.Automatic car wash
You can have your car washed in an auto-
matic car wash from the start. Automatic
car washes without brushes are prefera-
ble.
If the vehicle is very dirty, prewash it be-
fore running it through the automatic car
wash.
!If you want the gear position to remain
inN (for example when the vehicle is
pulled through a car wash)
�
do not remove the SmartKey from
the starter switch
or, when using KEYLESS-GO*
�
do not turn off the engine using the
KEYLESS-GO start/stop button*
and open the driver’s door
Otherwise, the transmission will shift
toP and lock the wheels, preventing
the vehicle from being pulled through a
car wash.
!Due to the width of the vehicle, fold in
exterior rear view mirrors prior to run-
ning the vehicle through an automatic
car wash to prevent damage to the
mirrors.
Make sure that the windshield wiper
switch is set to0 (
�page 59). Other-
wise, the rain sensor could activate and
cause the wipers to move unintention-
ally. This may lead to vehicle damage.
iAfter running the vehicle through an au-
tomatic car wash, wipe any wax off of
the windshield (
�page 400). This will
prevent smears and reduce wiping
noise which can be caused by residual
wax on the windshield.
When leaving the car wash, make sure
that the mirrors are folded out. Other-
wise they may vibrate.
Page 448 of 561
447 Practical hints
What to do if …
Display symbol
Display messages
Possible cause/consequence
Possible solution
.
Turn signal in
mirror, left
The left turn signal in the side
mirror is malfunctioning. This
message will only appear if all
light emitting diodes have
stopped working.
�
Visit an authorized Mercedes-Benz Light
Truck Center as soon as possible.
Turn signal in
mirror, right
The right turn signal in the side
mirror is malfunctioning. This
message will only appear if all
light emitting diodes have
stopped working.
�
Visit an authorized Mercedes-Benz Light
Truck Center as soon as possible.
Page 468 of 561
467 Practical hints
Replacing bulbs
Notes on bulb replacement�
Only use 12-volt bulbs of the same type
and with the specified watt rating.
�
Switch the lights off before changing a
bulb to prevent short circuits.
�
Always use a clean lint-free cloth when
handling bulbs.
�
Your hands should be dry and free of oil
and grease.
�
If the newly installed bulb does not
come on, visit an authorized
Mercedes-Benz Light Truck Center.Have the LEDs and bulbs for the following
lamps replaced by an authorized
Mercedes-Benz Light Truck Center:
�
the additional turn signal lamps in the
exterior rear view mirrors
�
the high mounted brake lamp
�
the Bi-Xenon* low beam lamps
�
the Bi-Xenon high beam flasher spot-
light*
�
the front sidemarker lamps
Warning!
G
Bulbs and bulb sockets can be very hot.
Allow the lamp to cool down before chang-
ing a bulb.
Keep bulbs out of reach of children.
Halogen lamps contain pressurized gas.
A bulb can explode if you:�
touch or move it when hot
�
drop the bulb
�
scratch the bulb
Wear eye and hand protection.
Because of high voltage in Xenon lamps, it is
dangerous to replace the bulb or repair the
lamp and its components. We recommend
that you have such work done by a qualified
technician.
Page 473 of 561
472 Practical hintsReplacing bulbs�
Turn bulb socket 5 clockwise until it
engages.
�
Insert corner-illuminating front fog
lamp 1 back into bumper.
�
Fasten retaining screws4.
�
Reinsert cover 2 and press it in until it
engages.
�
Fasten retaining screw3.Additional turn signal lamps bulbs
The additional turn signal lamps in the
exterior rear view mirrors have LEDs.
If a malfunction occurs or LEDs fail to func-
tion, the entire turn signal unit must be re-
placed. Have the turn signal unit replaced
by an authorized Mercedes-Benz Light
Truck Center.
Front sidemarker lamp bulbs
Since replacing the sidemarker lamp bulbs
is a technically highly demanding process,
we recommend you have the sidemarker
lamp bulbs replaced by an authorized
Mercedes-Benz Light Truck Center.
Replacing bulbs for rear lamps
Before you start to replace a bulb for a rear
lamp, do the following first:�
Turn the combination switch to
positionM (
�page 147).
Tail lamp unit
�
Open the tailgate (
�page 122).
iTo access the tail lamp units, you have
to remove the cover in the correspond-
ing side trim panel of the cargo com-
partment.
��
Page 495 of 561
494 Practical hintsBattery�
Carry out step 8 to reconnect the bat-
tery (
�page 493).
�
Carry out steps 6 to 1 in reverse order
to complete reinstall the battery,
(�page 492) to (
�page 490).
Step 11 (Reconnecting)
�
If the battery has been removed, carry
out step 9 (
�page 493) first and then
step 7 (
�page 493), both in reverse
order, before starting the connecting
procedure.
�
Open the driver’s door.
�
Make sure the SmartKey is removed
from the starter switch.
Vehicles with KEYLESS-GO*:�
Make sure the vehicle’s on-board
electronics have status 0.
With the driver’s door opened, the
vehicle’s on-board electronics have
status 0, same as SmartKey re-
moved from the starter switch
(�page 39).
�
Connect the positive lead to the posi-
tive terminal and fasten it’s cover
(�page 493).
�
Connect the negative lead to the nega-
tive terminal (
�page 493).
!Never invert the terminal connections!
iThe following procedures must be car-
ried out following any interruption of
battery power (e.g. due to disconnec-
tion):�
Set the clock (
�page 180).
Vehicles with Modular COMAND
system with navigation module*:
Time and date are set automatical-
ly.
�
Synchronize the door windows
(�page 251).
�
Synchronize the power tilt/sliding
sunroof* (
�page 258).
�
Synchronize the power tilt/sliding
panel* (
�page 262).
�
Synchronize the power folding
exterior rear view mirrors*
(�page 211).
��
Page 533 of 561
532 Technical termsMemory function*
Used to store three individual seat,
steering wheel and mirror positions.
MON
(M
otor O
ctane N
umber)
The Motor Octane Number for gasoline
as determined by a standardized meth-
od. It is an indication of a gasoline's
ability to resist undesired detonation
(knocking). The average of both the
MON (Motor Octane Number) and
->RON (Research Octane Number) is
posted at the pump, also known as
ANTI-KNOCK INDEX.
Multifunction display
The display field in the instrument clus-
ter used to present information provid-
ed by the control system.
Multifunction steering wheel
Steering wheel with buttons for operat-
ing the control system.Normal occupant weight
(
�page 387)
Overspeed range
Engine speeds within the red marking
on the tachometer dial. Avoid this en-
gine speed range, as it may result in se-
rious engine damage that is not
covered by the Mercedes-Benz Limited
Warranty.
Occupant distribution
(�page 387)
Parktronic (Parking assist)*
System which uses visual and acoustic
signals to assist the driver during park-
ing maneuvers.
Poly-V-belt drive
Drives engine-components (alternator,
AC compressor, etc.) from the engine.Power train
Collective term designating all compo-
nents used to generate and transmit
motive power to the drive axles, includ-
ing
�
engine
�
clutch / torque converter
�
transmission
�
transfer case
�
drive shaft
�
differential
�
axle shafts / axles
PRE-SAFE
®*
(Pre
ventive Occupant Safe
ty System)
Vehicles equipped with PRE-SAFE
®*
take preventive measures when the
system senses certain driving dynam-
ics suggesting a possible accident.
Production options weight
(
�page 387)
Page 536 of 561
535 Index
A
ABS 97, 529
ABS control 97
Malfunction indicator lamp 404
Messages in display 418
Warning lamp 404
Accelerator position, automatic
transmission 203
Accessory weight 385, 529
Accident
In case of 63
Activating
Air circulation mode 242
Air conditioning (cooling) 226
Air recirculation mode 225, 239
Anti-theft alarm system 105
Central locking (control system) 188
Defrosting 223
Easy-entry/exit feature* 189
Electric air pump 483
ESP
®
102
Exterior headlamps 58
Hazard warning flasher 154
Headlamps 58
High beams 151
Ignition 38Immobilizer 66, 104
Rear window defroster 215
Rear window wiper 62
Residual heat 243
Residual heat* 228
Seat heating* 142
Tow-away alarm 107
Warning indicators (Parktronic*) 276
Windshield wipers 59
Adding
Coolant 351
Engine oil 349
Additional turn signal lamps
Replacing bulbs 466
Adjusting 42
Air distribution 222, 236
Air volume 222, 237
Backrest tilt 44
Exterior rear view mirror 48
Head restraint height 44
Head restraint tilt 45
Instrument cluster illumination 158
Interior rear view mirror 48
Mirrors 47
Multicontour seat* 136
Seat cushion depth 136Seat cushion tilt 44
Seat fore and aft adjustment 43
Seat height 44
Seats 42
Steering column height 47
Steering wheel 45
Adjusting steering column in or out 47
Adjusting steering column up or down 47
Air bags 71
Children 72
Front 75
Passenger 75
Safety guidelines 74
Side impact 76
Window curtain 76
Air conditioning
Turning off 226
Turning on 226
Air conditioning refrigerant 523
Air distribution
Adjusting 222, 236
Air pressure 385, 529
Air pressure see Tire inflation pressure
Air pump, electric
Turning on 483