Page 208 of 561

207 Controls in detail
Automatic transmission
The transmission will shift to the next
higher gear as permitted by the shift
program. This action simultaneously
extends the gear range of the
transmission.
Canceling gear range limit�
Press and hold the outside2 of one of
the buttons on the steering wheel
until
Dreappears in the multifunction
display.
The transmission will shift from the current
gear range directly to gear rangeD.
Shifting into optimal gear range
�
Press and hold the inside1 of one of
the buttons on the steering wheel.
The transmission will automatically select
the gear range suited for optimal
acceleration and deceleration. This will
involve shifting down one or more gears.Emergency operation (Limp Home
Mode)
If vehicle acceleration becomes less re-
sponsive or sluggish or the transmission
no longer shifts, the transmission is most
likely operating in limp home (emergency
operation) mode. In this mode only second
gear and reverse gear can be selected.�
Stop the vehicle in a safe location.
�
Shift to park positionP.
�
Turn off the engine.
�
Wait at least 10 seconds before
restarting.
�
Restart the engine.
�
Shift to drive positionD (for second
gear) or reverse gearR.
�
Have the transmission checked at an
authorized Mercedes-Benz Light Truck
Center as soon as possible.
Page 211 of 561

210 Controls in detailGood visibilityActivating exterior rear view mirror
parking position*
Follow these steps to activate the exterior
rear view mirror parking position, so that
the passenger-side exterior rear view mir-
ror will be turned downward to the stored
position.�
Make sure that you have stored a park-
ing position for the passenger-side
exterior rear view mirror (
�page 146).
�
Make sure the
Mirror adjustment
parking aid function in the
Convenience
submenu of the control
system is set to
on (�page 190).
�
Start the engine (
�page 53).1Driver’s side exterior rear view mirror
button
2Passenger-side exterior rear view
mirror button
�
Set the automatic transmission in
reverse gear R.
The passenger-side exterior rear view
mirror turns downward to the stored
position (
�page 146) if the passen-
ger-side exterior rear view mirror is se-
lected.
The indicator lamp in button 2 should
come on when you select reverse
gearR.
�
If the passenger-side exterior rear view
mirror is not selected, press button 2.
The exterior rear view mirror returns to its
previous stored driving position:
�
when you switch off the ignition
�
10 seconds after you have put the
automatic transmission out of reverse
gear R
Approximately 15 seconds later, the
indicator lamp in button 2 goes out.
�
immediately once your vehicle exceeds
a speed of approximately
6mph(10km/h)
�
immediately when you press button 1
for driver’s side exterior rear view
mirror
iWith the automatic transmission in re-
verse gear R, the previously selected
rear view mirror is activated. The indi-
cator lamp in the respective button
comes on.
iWith the automatic transmission in re-
verse gear R, you can deactivate the
exterior rear mirror parking position by
pressing button 1 or activate it by
pressing button 2. The indicator lamp
of the selected button is on.
Page 267 of 561

266 Controls in detailDriving systemsCanceling cruise control
There are several ways to cancel the cruise
control:�
Step on the brake pedal.
The cruise control is canceled. The last
speed set is stored for later use.
or
�
Briefly push the cruise control lever in
direction of arrow3 (
�page 265).
The cruise control is canceled. The last
speed set is stored for later use.
iThe last stored speed is canceled when
you turn off the engine.
iThe cruise control switches off auto-
matically when�
you step on the brake pedal
�
you depress the parking brake
pedal
The cruise control also switches off au-
tomatically when
�
the vehicle speed is below 20 mph
(30 km/h)
�
the ESP
® is in operation or switched
off with the ESP
® switch
(
�page 101)
�
you set the automatic transmission
toN while driving
An acoustic warning sounds and the
message
Cruise control off
appears
in the multifunction display.
!Setting the automatic transmission
toN while driving cancels the cruise
control. However, the automatic trans-
mission should not be set toN while
driving except to coast when the vehi-
cle is in danger of skidding (e.g. on icy
roads).iDepressing the accelerator pedal does
not deactivate the cruise control. After
brief acceleration (e.g. for passing), the
cruise control will resume the last
speed set.
Page 275 of 561

The Parktronic system is an electronic aid
designed to assist the driver during
parking maneuvers. It visually and audibly
indicate")
274 Controls in detailDriving systemsParktronic* (Parking assist)
The Parktronic system is an electronic aid
designed to assist the driver during
parking maneuvers. It visually and audibly
indicates the relative distance between the
vehicle and an obstacle.
The Parktronic system is automatically
activated when you switch on the ignition,
release the parking brake, and set the
automatic transmission to positionD,R,
orN.
The Parktronic system deactivates at
vehicle speeds exceeding approximately
11 mph (18 km/h). At lower vehicle
speeds, the Parktronic system turns on
again.The Parktronic system also deactivates
when you set the automatic transmission
to positionP or depress the parking brake
pedal.
The Parktronic system monitors the sur-
roundings of your vehicle with six sensors
in the front bumper and four sensors in the
rear bumper.
1Sensors in the front bumperWarning!
G
Parktronic is a supplemental system. It is
not intended to, nor does it replace, the
need for extreme care. The responsibility
during parking and other critical maneuvers
always rests with the driver.
Special attention must be paid to objects
with smooth surfaces or low silhouettes
(e.g. trailer couplings, painted posts, or road
curbs). Such objects may not be detected by
the system and can damage the vehicle.
The operational function of the Parktronic
system can be affected by dirty sensors,
especially at times of snow and ice. See
“Cleaning the Parktronic system sensors”
(�page 399).
Interference caused by other ultrasonic
signals (e.g. working jackhammers, car
wash, or the air brakes of trucks) can cause
the system to send erratic indications, and
should be taken into consideration.
Warning!
G
Make sure no persons or animals are in the
area in which you are maneuvering. Other-
wise you run the risk of causing injury.
Page 278 of 561

277 Controls in detail
Driving systems
As your vehicle approaches an object, one
or more distance segments will illuminate,
depending on the distance. When the
seventh distance segment illuminates, you
have reached the minimum distance.�
Front area: An intermittent acoustic
warning will sound as the first red
distance segment illuminates and a
constant acoustic warning lasting a
maximum of 2 seconds will sound for
the second red distance segment. The
signal is canceled when the automatic
transmission is set to positionP or the
parking brake is set.
�
Rear area: An intermittent acoustic
warning will sound as the first red
distance segment illuminates and a
constant acoustic warning lasting a
maximum of 2 seconds will sound for
the second red distance segment. The
signal is canceled when the automatic
transmission is set to positionD, P, or
the parking brake is set.Switching the Parktronic system
on/off
You can switch off the Parktronic system
manually.
The Parktronic switch is located in the
upper part of the center console.
1Parktronic switch
2Indicator lampSwitching off the Parktronic system
�
Press Parktronic switch1.
Indicator lamp2 comes on.
Switching on the Parktronic system
�
Press Parktronic switch1 once more.
Indicator lamp2 goes out.iThe Parktronic system switches on
automatically when you switch on the
ignition (
�page 38).
Page 304 of 561
303 Controls in detail
Useful features
Ashtray in the front center console
Opening the ashtray
1Cover
2Chrome label�
Tab lightly on chrome label 2 of
cover1.
Cover 1 swings open.Removing ashtray insert
1Cover plate
2Ashtray insert
�
Grip ashtray insert 2 on the sides and
pull it out upwards.
Reinstalling ashtray insert
�
Insert ashtray insert 2 and push down
until the ball catch engages.
�
Close ashtray cover plate 1.
Warning!
G
Remove ashtray only with vehicle standing
still. Set the parking brake to secure vehicle
from movement. Set automatic transmis-
sion toP. With the automatic transmission
set toP, turn off the engine.
Page 335 of 561
 are required by
law. These indicators are located in six
places on the tread circumference and
become visible at a tread de")
334 OperationDriving instructionsParking
Tires
Treadwear indicators (TWI) are required by
law. These indicators are located in six
places on the tread circumference and
become visible at a tread depth of
approximately
1/16
in (1.6 mm), at which
point the tire is considered worn and
should be replaced.
!Set the parking brake whenever park-
ing or leaving the vehicle. In addition,
set the automatic transmission to
positionP.
When parking on hills, always turn front
wheels towards the curb.Warning!
G
To reduce the risk of personal injury, or
damage to the vehicle powertrain, as a
result of vehicle movement, before turning
off the engine and leaving the vehicle al-
ways:�
Keep right foot on brake pedal.
�
Firmly depress parking brake pedal.
�
Set the automatic transmission to
positionP.
�
When parked on an incline, turn front
wheel towards the road curb.
�
Turn the SmartKey to starter switch
position0 and remove, or press
KEYLESS-GO* start / stop button (vehi-
cles with KEYLESS-GO*).
�
Take the SmartKey or the SmartKey with
KEYLESS-GO* with you and lock vehicle
when leaving.
Warning!
G
If you feel a sudden significant vibration or
ride disturbance, or you suspect that possi-
ble damage to your vehicle has occurred,
you should turn on the hazard warning flash-
ers, carefully slow down, and drive with cau-
tion to an area which is a safe distance from
the road.
Inspect the tires and the vehicle underbody
for possible damage. If the vehicle or tires
appear unsafe, have the vehicle towed to
the nearest Mercedes-Benz Light Truck
Center or tire dealer for repairs.
Page 351 of 561
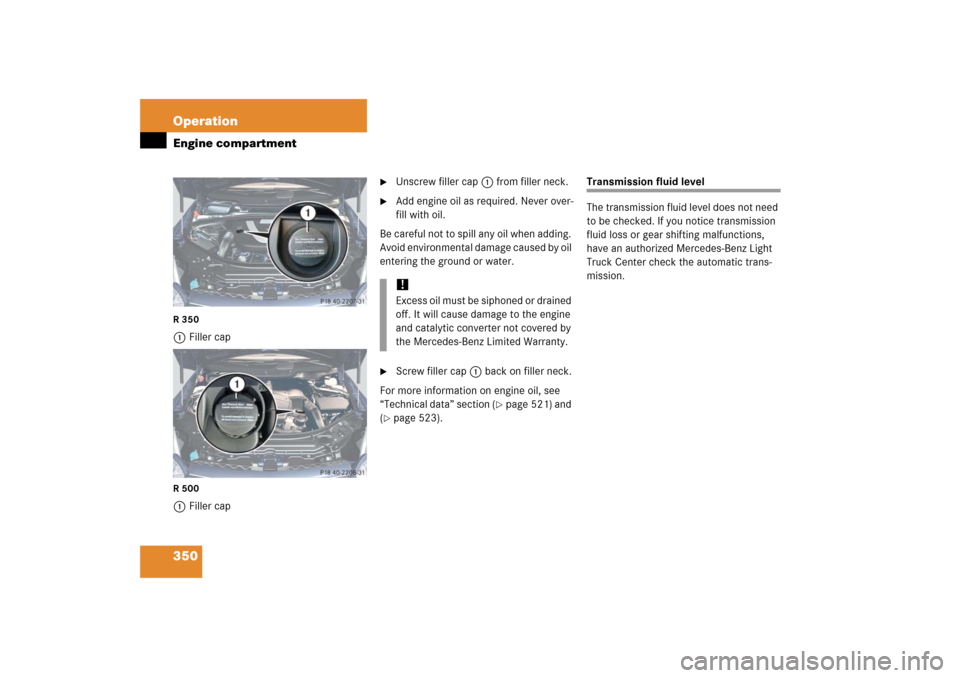
350 OperationEngine compartmentR3501Filler capR5001Filler cap
�
Unscrew filler cap1 from filler neck.
�
Add engine oil as required. Never over-
fill with oil.
Be careful not to spill any oil when adding.
Avoid environmental damage caused by oil
entering the ground or water.
�
Screw filler cap1 back on filler neck.
For more information on engine oil, see
“Technical data” section (
�page 521) and
(
�page 523).
Transmission fluid level
The transmission fluid level does not need
to be checked. If you notice transmission
fluid loss or gear shifting malfunctions,
have an authorized Mercedes-Benz Light
Truck Center check the automatic trans-
mission.
!Excess oil must be siphoned or drained
off. It will cause damage to the engine
and catalytic converter not covered by
the Mercedes-Benz Limited Warranty.