Page 195 of 417

194 Controls in detail
Useful features
Storage compartments
Glove box
1Unlocked position
2Locked position
3HandleOpening the glove box
�Pull handle to open.
The glove box is illuminated with SmartKey
in starter switch position1 or2 when
opening the lid.
Closing the glove box
�Push lid up to close.
Warning!G
To help avoid personal injury during a colli-
sion or sudden maneuver, exercise care
when storing objects in the vehicle. Put lug-
gage or cargo in the cargo compartment if
possible. Do not pile luggage or cargo higher
than the seat backs.
Luggage nets cannot secure hard or heavy
objects.
Warning!G
Do not load items on the roof. It may cause
instability during some maneuvers which
could result in an accident.
Warning!G
Keep compartment lids closed. This will help
to prevent stored objects from being thrown
about and injuring vehicle occupants during
an accident and sudden maneuvers.
i
The glove box can be locked and un-
locked with the mechanical key.
i
The glove box lid contains two cup
holders.
Page 196 of 417
195 Controls in detail
Useful features
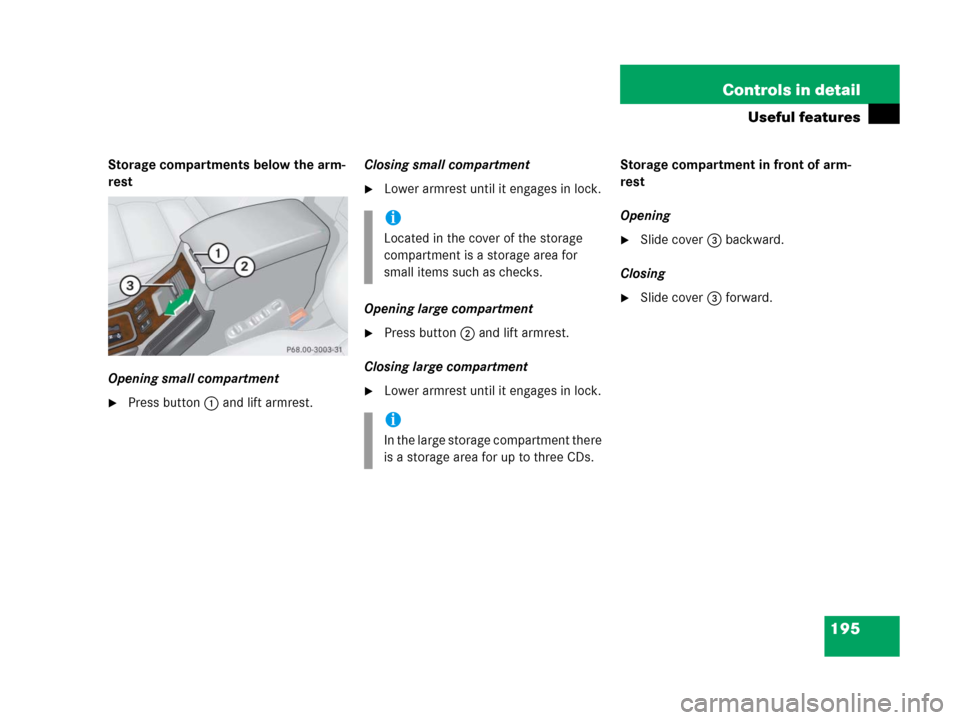
Storage compartments below the arm-
rest
Opening small compartment
�Press button1 and lift armrest.Closing small compartment
�Lower armrest until it engages in lock.
Opening large compartment
�Press button2 and lift armrest.
Closing large compartment
�Lower armrest until it engages in lock.Storage compartment in front of arm-
rest
Opening
�Slide cover3 backward.
Closing
�Slide cover3 forward.
i
Located in the cover of the storage
compartment is a storage area for
small items such as checks.
i
In the large storage compartment there
is a storage area for up to three CDs.
Page 201 of 417
200 Controls in detail
Useful features
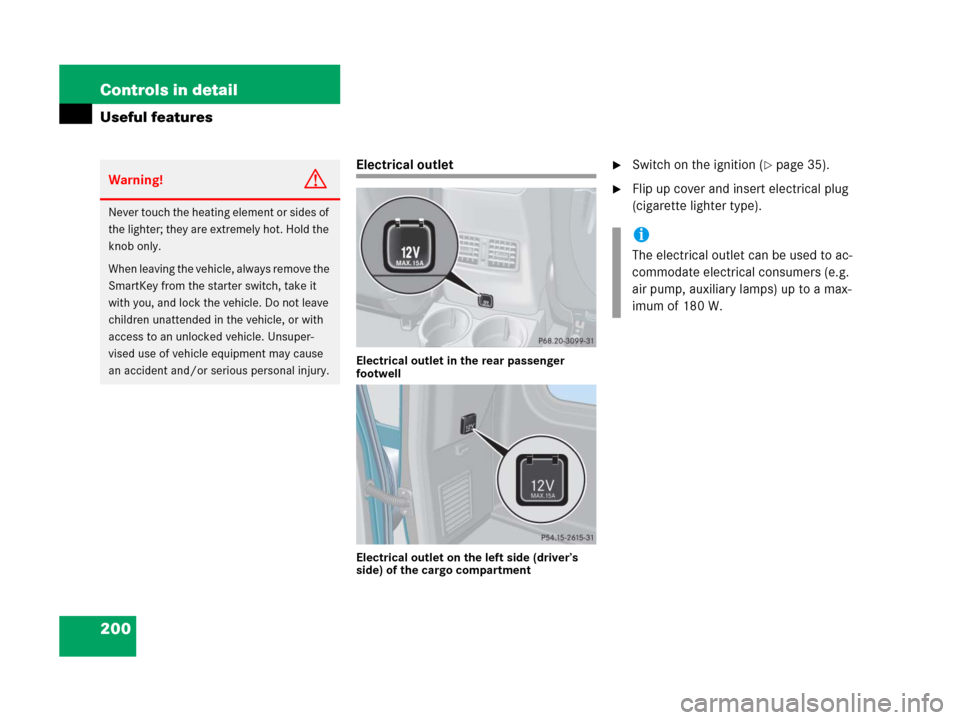
Electrical outlet
Electrical outlet in the rear passenger
footwell
Electrical outlet on the left side (driver’s
side) of the cargo compartment
�Switch on the ignition (�page 35).
�Flip up cover and insert electrical plug
(cigarette lighter type).Warning!G
Never touch the heating element or sides of
the lighter; they are extremely hot. Hold the
knob only.
When leaving the vehicle, always remove the
SmartKey from the starter switch, take it
with you, and lock the vehicle. Do not leave
children unattended in the vehicle, or with
access to an unlocked vehicle. Unsuper-
vised use of vehicle equipment may cause
an accident and/or serious personal injury.
N
N
i
The electrical outlet can be used to ac-
commodate electrical consumers (e.g.
air pump, auxiliary lamps) up to a max-
imum of 180 W.
Page 204 of 417

203 Controls in detail
Useful features
Shortly after the completion of your ac-
quaintance call, you will receive a user ID
and password.
By visiting www.mbusa.com and selecting
“Tele Aid” (USA only), you will have access
to account information, remote door un-
lock, profile and more.System self-check
Initially, after switching on ignition, mal-
functions are detected and indicated (the
indicator lamps in the SOS button, the
Roadside Assistance button• and the
Information button¡ stay on longer
than 10 seconds or do not come on). The
message
TELE AID – DRIVE TO WORKSHOP!
appears for approx. ten seconds in the
multifunction display.
i
The SOS button is located above the in-
terior rear view mirror.
The Roadside Assistance button•
and the Information button¡ are
located below the center armrest
cover.
!
The Tele Aid system utilizes the cellular
network for communication and the
GPS (Global Positioning System) satel-
lites for vehicle location. If either of
these signals are unavailable, the
Tele Aid system may not function and if
this occurs, assistance must be sum-
moned by other means.
Warning!G
If the indicator lamps in the SOS button, in
the Roadside Assistance button and/or in
the Information button do not come on dur-
ing the system self-check or if any of these
indicators remain illuminated constantly in
red and/or the message
TELE AID -
DRIVE TO WORKSHOP
is displayed in the
multifunction display after the system
self-check, a malfunction in the system has
been detected.
If a malfunction is indicated as outlined
above, the system may not operate as ex-
pected. Have the system checked at the
nearest Mercedes-Benz Light Truck Center
as soon as possible.
Page 210 of 417
,
and the reserve key is not handy:
�Contact the Mercede")
209 Controls in detail
Useful features
Remote door unlock
In case you have locked your vehicle unin-
tentionally (e.g. SmartKey inside vehicle),
and the reserve key is not handy:
�Contact the Mercedes-Benz Response
Center at 1-800-756-9018 (in the USA)
or 1-888-923-8367 (in Canada).
You will be asked to provide your pass-
word which you provided when you
completed the subscriber agreement.
�Then return to your vehicle and press
the tailgate lock for minimum of
20 seconds until the SOS button is
flashing.
The message
EMERGENCY CALL –
CALL CONNECTED
appears in the multi-
function display.
As an alternative, you may unlock the vehi-
cle via Internet using the ID and password
sent to you shortly after the completion of
your acquaintance call.
!
If the indicator lamp continues to flash
or the system does not reset, contact
the Response Center at
1-800-756-9018 (in the USA) or
1-888-923-8367 (in Canada), or
Mercedes-Benz Customer Assistance
at 1-800-FOR-MERCedes
(1-800-367-6372) in the USA or
Customer Service at 1-800-387-0100
in Canada.
i
When a Tele Aid call has been initiated,
the COMAND system audio is muted
and the selected mode (radio or CD)
pauses. The optional cellular phone (if
installed) switches off. If you must use
this phone, the vehicle must be parked.
Disconnect the coiled cord and place
the call. The navigation system (if en-
gaged) will continue to run. The display
in the instrument cluster is available for
use and spoken commands are only
available by pressing the RPT button on
the COMAND unit. A pop-up window
will appear in the COMAND display to
indicate that a Tele Aid call is in
progress.
Page 211 of 417

210 Controls in detail
Useful features
The Response Center will then unlock your
vehicle with the remote door unlocking
feature.Stolen Vehicle Recovery services
In the event your vehicle was stolen:
�Report the incident to the police.
The police will issue a numbered inci-
dent report.
�Pass this number on to the
Mercedes-Benz Response Center along
with your password issued to you when
you subscribed to the service.
The Response Center will then attempt
to covertly contact the vehicle’s
Tele Aid system. Once the vehicle is lo-
cated, the Response Center will con-
tact the local law enforcement and you.
The vehicle’s location will only be pro-
vided to law enforcement.
Garage door opener
The built-in remote control is capable of
operating up to three separately controlled
devices, for example garage door openers,
gate openers, or other devices compatible
with HomeLink
® or some other systems.
You can program the signal transmitter
buttons.
i
The remote door unlock feature is avail-
able if the relevant cellular phone net-
work is available.
The SOS button will flash and the mes-
sage
EMERGENCY CALL –
CALL CONNECTED
will appear in the mul-
tifunction display to indicate receipt of
the door unlock command.
Once the vehicle is unlocked, a
Response Center specialist will at-
tempt to establish voice contact with
the vehicle occupants.
If the tailgate lock was pressed for
more than 20 seconds before door un-
lock authorization was received by the
Response Center, you must wait
15 minutes before pressing the tailgate
lock again.
Page 220 of 417
219 Operation
The first 1000 miles (1500 km)
All of the above instructions, as may apply
to your vehicle type, also apply when driv-
ing the first 1000 miles (1500 km) after the
engine, the transfer case, the front differ-
ential or the rear differential has been re-
placed.i
G55AMG:
For better protection of the front and
rear differential, the oil must be
changed after a break-in period of
1900 miles (3000 km).
Changing oil in the front and rear
differential increases the service life
and helps reduce noise from the
differential locks.
See Maintenance Booklet for additional
information and Factory Approved
Service Products pamphlet for informa-
tion on the approved service product
required to perform the front and rear
axle oil change.
i
Always obey applicable speed limits.
Page 223 of 417

222 Operation
Driving instructions
After hard braking, it is advisable to drive
on for some time, rather than immediately
park, so the air stream will cool down the
brakes faster.
Driving off
Apply the brakes to test them briefly after
driving off. Perform this procedure only
when the road is clear of other traffic.
Warm up the engine smoothly. Do not
place full load on the engine until the oper-
ating temperature has been reached.
When starting off on a slippery surface, do
not allow a drive wheel to spin for an ex-
tended period with the ESP switched off.
Doing so may cause serious damage to the
drivetrain which is not covered by the
Mercedes-Benz Limited Warranty.
To ensure sufficient traction during
off-road driving, activate differential locks
as needed (
�page 161).
Parking
Warning!G
If other than recommended brake pads are
installed, or other than recommended brake
fluid is used, the braking properties of the
vehicle can be degraded to an extent that
safe braking is substantially impaired. This
could result in an accident.
!
When driving down long and steep
grades, relieve the load on the brakes
by selecting gear range3,2, or1 on
the automatic transmission to use the
engine’s braking power (
�page 154).
This helps prevent overheating of the
brakes and reduces brake pad wear.
Warning!G
Do not park this vehicle in areas where com-
bustible materials such as grass, hay or
leaves can come into contact with the hot
exhaust system, as these materials could be
ignited and cause a vehicle fire.
To reduce the risk of personal injury as a re-
sult of vehicle movement, before
turning off
the engine and leaving the vehicle always:
�Keep right foot on brake pedal.
�Pull the parking brake lever up as many
notches as possible.
�Move the selector lever to positionP.
�Slowly release brake pedal.
�When parked on an incline, turn front
wheel towards the road curb.

All of the above instructions, as may apply
to your vehicle type, also apply when driv-
ing the first 1000 miles (1500 km) after the
engine, the transfer")