Page 335 of 417
334 Practical hints
Replacing SmartKey batteries
SmartKey
Replacement batteries: Lithium, type
CR 2025 or equivalent.
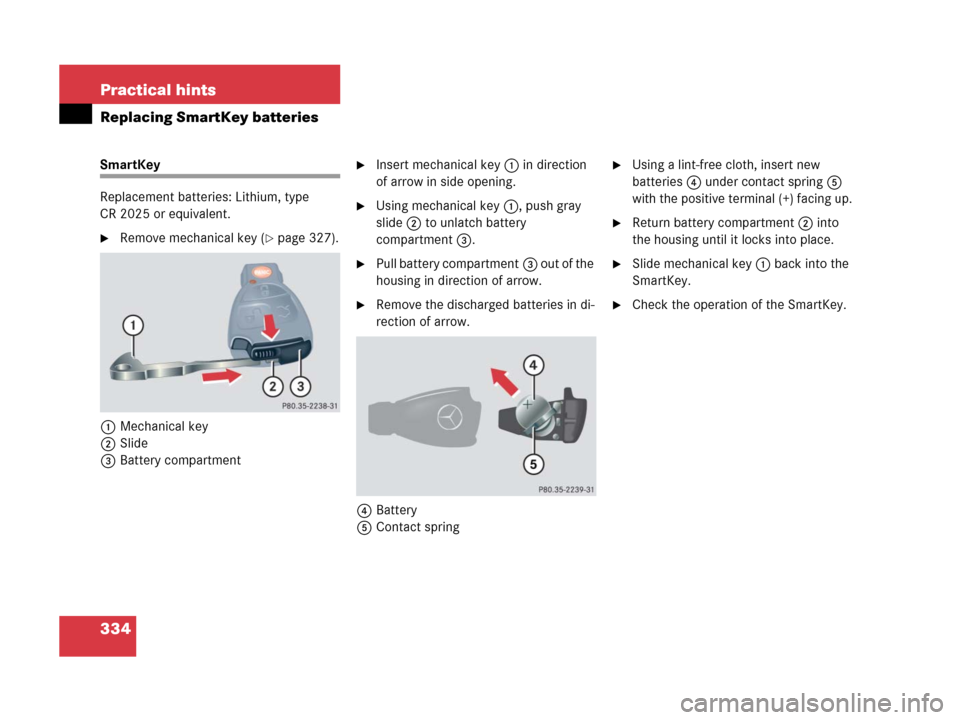
�Remove mechanical key (�page 327).
1Mechanical key
2Slide
3Battery compartment
�Insert mechanical key1 in direction
of arrow in side opening.
�Using mechanical key1, push gray
slide2 to unlatch battery
compartment3.
�Pull battery compartment3 out of the
housing in direction of arrow.
�Remove the discharged batteries in di-
rection of arrow.
4Battery
5Contact spring
�Using a lint-free cloth, insert new
batteries4 under contact spring5
with the positive terminal (+) facing up.
�Return battery compartment2 into
the housing until it locks into place.
�Slide mechanical key1 back into the
SmartKey.
�Check the operation of the SmartKey.
Page 341 of 417
340 Practical hints
Replacing bulbs
High and low beam bulb
�Remove protection cover1.
�Pull off electrical connector3.
�Unclip retainer spring4.
�Remove bulb5.
�Insert the new bulb so that its socket
locates in the recess of the lamp
housing.
�Clip on retainer spring4.
�Plug electrical connector3 onto
bulb5.
�Reinstall protection cover1.Parking and standing lamp bulb
�Pull off electrical connector2 from
bulb socket6.
�Turn bulb socket6 counterclockwise
out of the lamp housing.
�Insert a new bulb into bulb socket6.
�Insert bulb socket6 into the lamp
housing and turn clockwise until it
engages.
�Plug electrical connector2 onto bulb
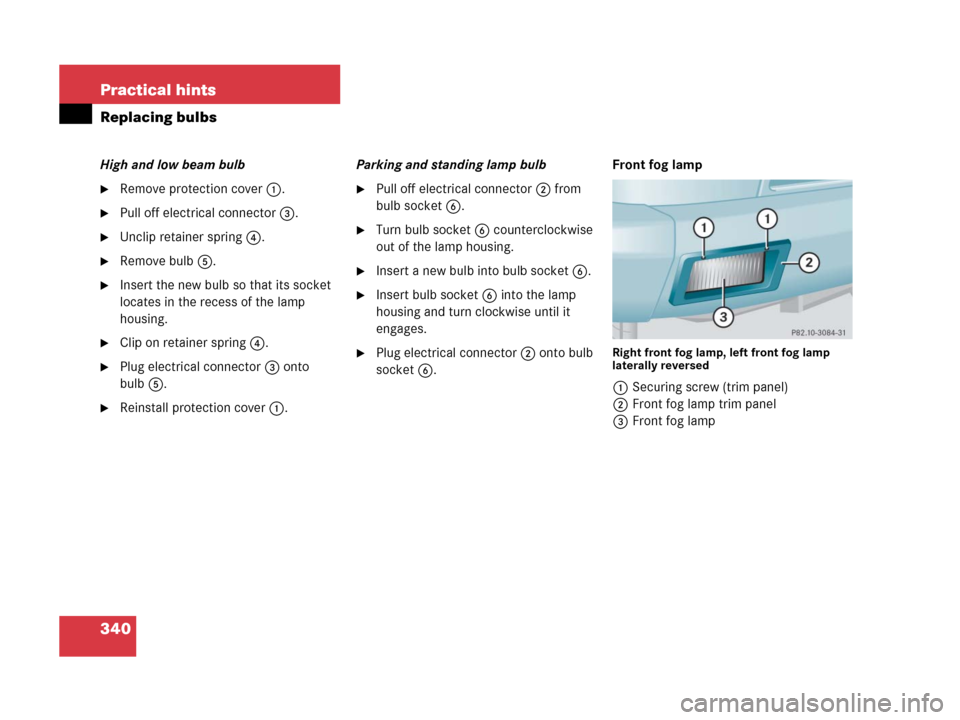
socket6.Front fog lampRight front fog lamp, left front fog lamp
laterally reversed
1Securing screw (trim panel)
2Front fog lamp trim panel
3Front fog lamp
Page 343 of 417
342 Practical hints
Replacing bulbs
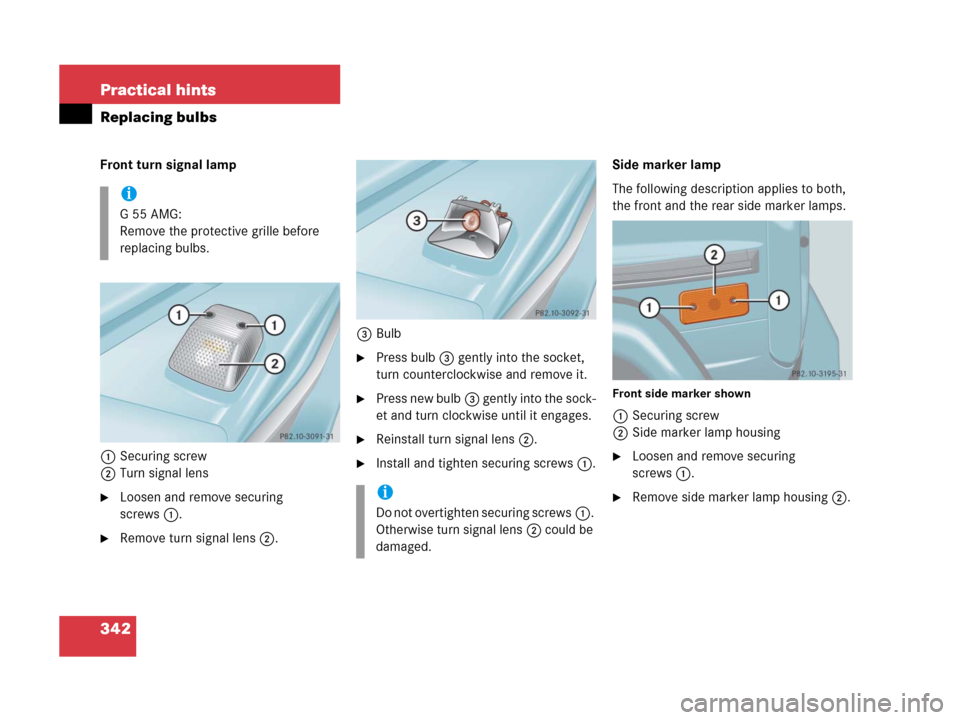
Front turn signal lamp
1Securing screw
2Turn signal lens
�Loosen and remove securing
screws1.
�Remove turn signal lens2.3Bulb
�Press bulb3 gently into the socket,
turn counterclockwise and remove it.
�Press new bulb3 gently into the sock-
et and turn clockwise until it engages.
�Reinstall turn signal lens2.
�Install and tighten securing screws1.Side marker lamp
The following description applies to both,
the front and the rear side marker lamps.
Front side marker shown
1Securing screw
2Side marker lamp housing
�Loosen and remove securing
screws1.
�Remove side marker lamp housing2.
i
G55AMG:
Remove the protective grille before
replacing bulbs.
i
Do not overtighten securing screws1.
Otherwise turn signal lens2 could be
damaged.
Page 344 of 417
343 Practical hints
Replacing bulbs
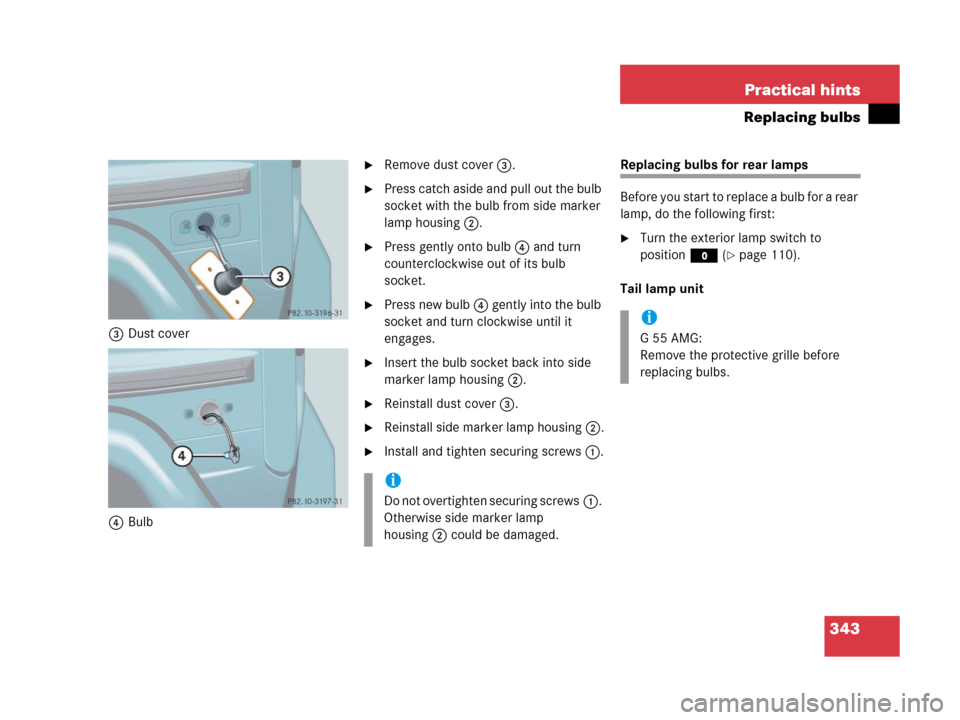
3Dust cover
4Bulb
�Remove dust cover3.
�Press catch aside and pull out the bulb
socket with the bulb from side marker
lamp housing2.
�Press gently onto bulb4 and turn
counterclockwise out of its bulb
socket.
�Press new bulb4 gently into the bulb
socket and turn clockwise until it
engages.
�Insert the bulb socket back into side
marker lamp housing2.
�Reinstall dust cover3.
�Reinstall side marker lamp housing2.
�Install and tighten securing screws1.
Replacing bulbs for rear lamps
Before you start to replace a bulb for a rear
lamp, do the following first:
�Turn the exterior lamp switch to
positionM (
�page 110).
Tail lamp unit
i
Do not overtighten securing screws1.
Otherwise side marker lamp
housing2 could be damaged.
i
G55AMG:
Remove the protective grille before
replacing bulbs.
Page 345 of 417
344 Practical hints
Replacing bulbs
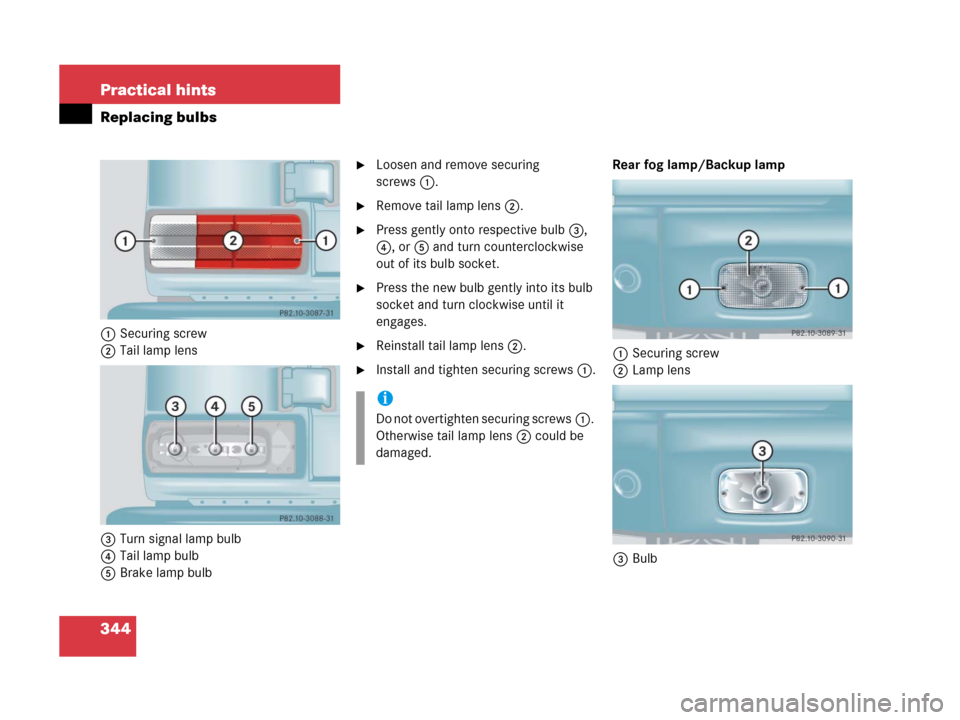
1Securing screw
2Tail lamp lens
3Turn signal lamp bulb
4Tail lamp bulb
5Brake lamp bulb
�Loosen and remove securing
screws1.
�Remove tail lamp lens2.
�Press gently onto respective bulb3,
4, or5 and turn counterclockwise
out of its bulb socket.
�Press the new bulb gently into its bulb
socket and turn clockwise until it
engages.
�Reinstall tail lamp lens2.
�Install and tighten securing screws1.Rear fog lamp/Backup lamp
1Securing screw
2Lamp lens
3Bulb
i
Do not overtighten securing screws1.
Otherwise tail lamp lens2 could be
damaged.
Page 346 of 417
345 Practical hints
Replacing bulbs
�Loosen and remove securing
screws1.
�Remove lamp lens2.
�Press gently onto bulb3 and turn
counterclockwise out of its bulb
socket.
�Press new bulb3 gently into the bulb
socket and turn clockwise until it
engages.
�Reinstall lamp lens2.
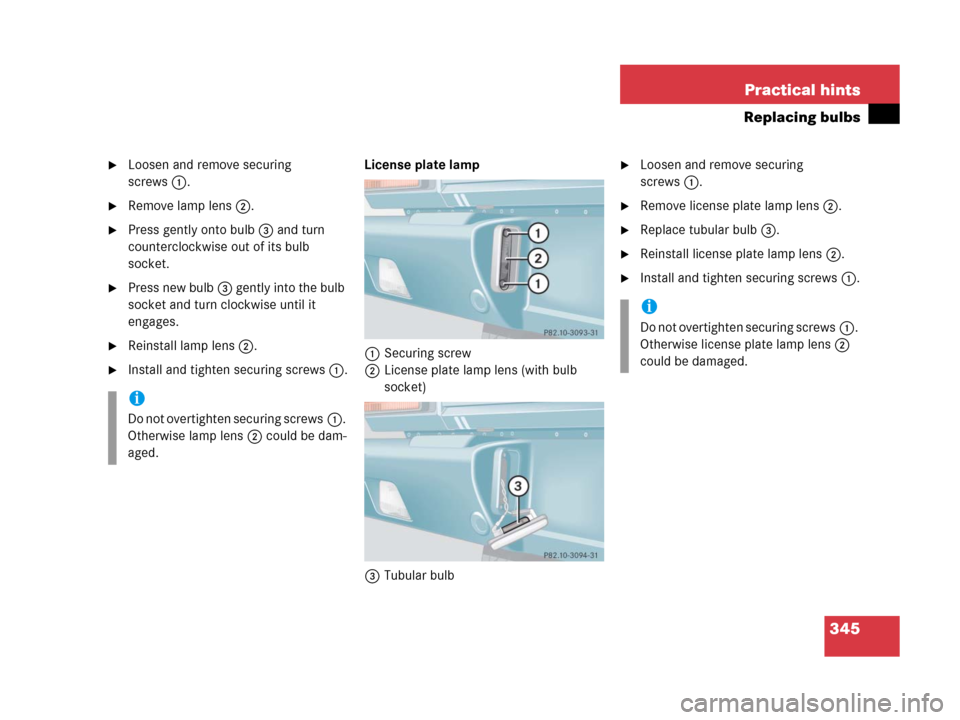
�Install and tighten securing screws1.License plate lamp
1Securing screw
2License plate lamp lens (with bulb
socket)
3Tubular bulb
�Loosen and remove securing
screws1.
�Remove license plate lamp lens2.
�Replace tubular bulb3.
�Reinstall license plate lamp lens2.
�Install and tighten securing screws1.
i
Do not overtighten securing screws1.
Otherwise lamp lens2 could be dam-
aged.
i
Do not overtighten securing screws1.
Otherwise license plate lamp lens2
could be damaged.
Page 350 of 417
.
Lifting the vehicle
�Prevent the vehicle from rolling away
by blocking wheels with wheel chocks
(not included")
349 Practical hints
Flat tire
Mounting the spare wheel
�Prepare the vehicle (�page 348).
Lifting the vehicle
�Prevent the vehicle from rolling away
by blocking wheels with wheel chocks
(not included) or other sizable objects.
When changing wheel on a level surface:
�Place one chock in front of and one be-
hind the wheel that is diagonally oppo-
site to the wheel being changed.
Always try lifting the vehicle using the jack
on a level surface. However, should cir-
cumstances require you to do so on a hill,
place the wheel chocks as follows:
�Place chocks on the downhill side
blocking both wheels of the axle not
being worked on.
Wheel wrench
�On wheel to be changed, loosen but do
not yet remove the wheel bolts (ap-
proximately one full turn with wrench).
Warning!G
The jack is designed exclusively for jacking
up the vehicle under the axle housing. To
help avoid personal injury, use the jack only
to lift the vehicle during a wheel change.
Never get beneath the vehicle while it is sup-
ported by the jack. Keep hands and feet
away from the area under the lifted vehicle.
Always firmly set parking brake and block
wheels before raising vehicle with jack.
Do not disengage parking brake while the
vehicle is raised. Be certain that the jack is
always vertical (plumb line) when in use, es-
pecially on hills. Always try to use the jack
on level surface. Make sure the jack is posi-
tioned correctly under the axle housing. Al-
ways lower the vehicle onto sufficient
capacity jackstands before working under
the vehicle.
If the vehicle is not raised as described, it
could slip off the jack as a result of vibra-
tions (e.g. opening or closing a door or the
tailgate).
Page 355 of 417

354 Practical hints
Battery
Have the battery removed at a
Mercedes-Benz Light Truck Center.
If you charge the battery yourself, make
sure to comply with the operating instruc-
tions for your battery charger.Disconnecting the battery
�Read and observe safety instructions
and precautions (
�page 251) and
(
�page 353).
�Turn off all electrical consumers.
�Disconnect the battery negative lead.
�Remove the cover from the positive ter-
minal.
�Disconnect the battery positive lead.
�Remove the breather hose from the
battery.
!
Have the battery checked regularly by
an authorized Mercedes-Benz Light
Truck Center.
Refer to Maintenance Booklet for main-
tenance intervals or contact an autho-
rized Mercedes-Benz Light Truck
Center for further information.
!
Never loosen or detach battery termi-
nal clamps while the engine is running
or the SmartKey is in the starter switch.
Otherwise the alternator and other
electronic components could be se-
verely damaged.
Warning!G
With a disconnected battery
�you will no longer be able to turn the
SmartKey in the starter switch
�the gear selector lever will remain
locked in position
P