Page 117 of 417

116 Controls in detail
Lighting
Interior lighting
The controls are located in the overhead
control panel.
1Cargo compartment lamps
2Right reading lamp
3Rocker switch for automatic control
system
4Left reading lampAutomatic control
Activating
�Move rocker switch3 to center
position.
The interior lighting switches on in
darkness when you
�unlock the vehicle
�open a door
�remove the SmartKey from the
starter switch
Additionally, entry lamps in the door
trays will come on when you open
a door.
The interior lighting switches off automati-
cally following an adjustable time delay.
For more information, see “Setting interior
lighting delayed shut-off” (
�page 141).Deactivating
�Press the = symbol on rocker
switch3.
The interior lighting and the entry
lamps remain switched off in darkness,
even when you
�unlock the vehicle
�open a door
�remove the SmartKey from the
starter switch
i
Leaving an interior light switch in the
ON position for extended periods of
time with the engine turned off could
result in a discharged battery.
i
If the door remains open, the interior
lamps switch off automatically after
approximately five minutes.
Page 119 of 417
118 Controls in detail
Lighting
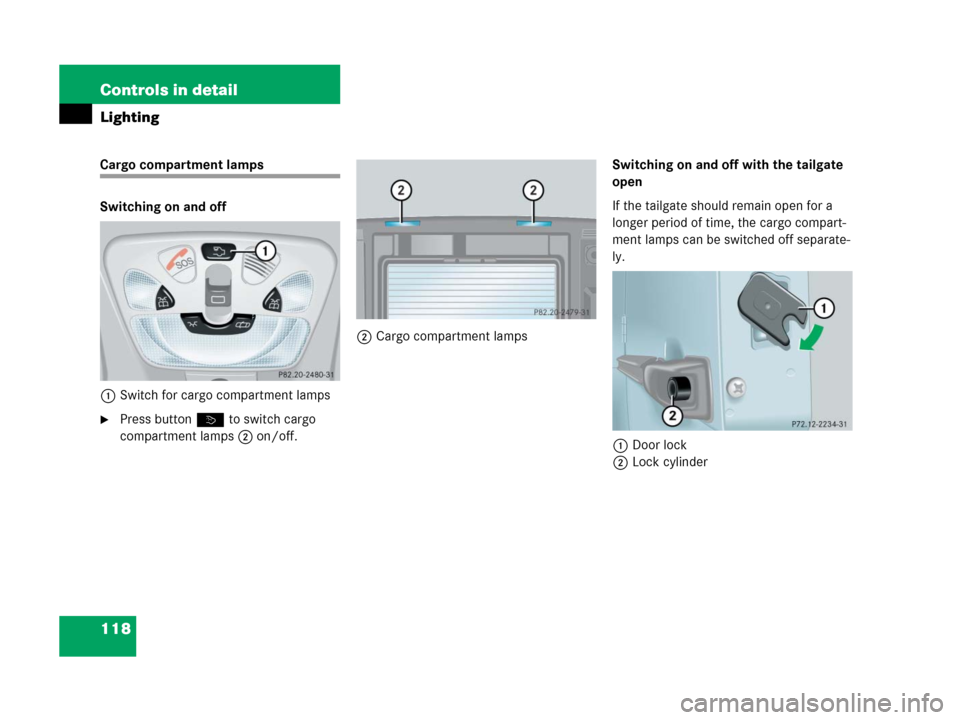
Cargo compartment lamps
Switching on and off
1Switch for cargo compartment lamps
�Press button ò to switch cargo
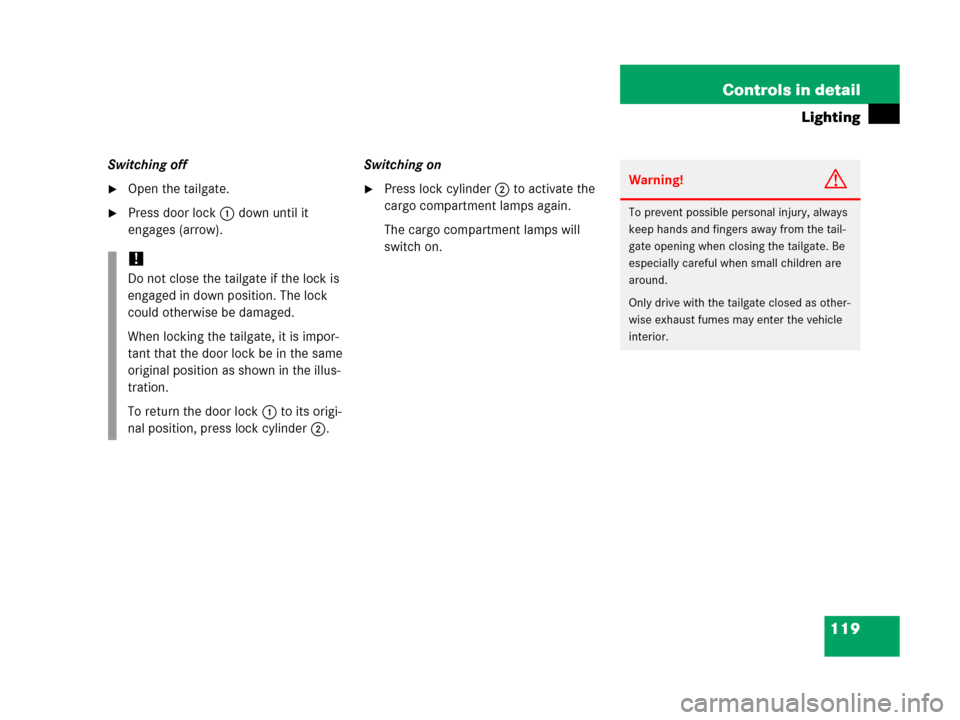
compartment lamps2 on/off.2Cargo compartment lampsSwitching on and off with the tailgate
open
If the tailgate should remain open for a
longer period of time, the cargo compart-
ment lamps can be switched off separate-
ly.
1Door lock
2Lock cylinder
Page 120 of 417
119 Controls in detail
Lighting
Switching off
�Open the tailgate.
�Press door lock1 down until it
engages (arrow).Switching on
�Press lock cylinder2 to activate the
cargo compartment lamps again.
The cargo compartment lamps will
switch on.
!
Do not close the tailgate if the lock is
engaged in down position. The lock
could otherwise be damaged.
When locking the tailgate, it is impor-
tant that the door lock be in the same
original position as shown in the illus-
tration.
To return the door lock1 to its origi-
nal position, press lock cylinder2.
Warning!G
To prevent possible personal injury, always
keep hands and fingers away from the tail-
gate opening when closing the tailgate. Be
especially careful when small children are
around.
Only drive with the tailgate closed as other-
wise exhaust fumes may enter the vehicle
interior.
Page 121 of 417
.
1Reset button
The instrument cl")
120 Controls in detail
Instrument cluster
A full view illustration of the instrument
cluster can be found in the “At a glance”
section of this manual (
�page 24).
1Reset button
The instrument cluster is activated when
you:
�Open a door.
�Switch on ignition.
�Press reset button1.
�Switch on the exterior lamps.
You can change the instrument cluster set-
tings in the Instrument cluster submenu of
the control system (
�page 136).
Instrument cluster illumination
Use the reset button to adjust the illumina-
tion brightness for the instrument cluster.
To brighten illumination
�Turn reset button1 in the instrument
cluster clockwise.
The instrument cluster illumination will
brighten.To dim illumination
�Turn reset button1 in the instrument
cluster counterclockwise.
The instrument cluster illumination will
dim.
Coolant temperature display
i
The instrument cluster illumination is
dimmed or brightened automatically to
suit ambient light conditions.
The instrument cluster illumination will
also be adjusted automatically when
you switch on the vehicle’s exterior
lamps.
Warning!G
�Driving when your engine is badly over-
heated can cause some fluids which
may have leaked into the engine com-
partment to catch fire. You could be se-
riously burned.
�Steam from an overheated engine can
cause serious burns and can occur just
by opening the hood. Stay away from
the engine if you see or hear steam com-
ing from it.
Turn off the engine, get out of the vehicle
and do not stand near the vehicle until the
engine has cooled down.
Page 124 of 417

123 Controls in detail
Control system
�Control system
The control system is activated as soon as
the SmartKey in the starter switch is
turned to position1. The control system
enables you to
�call up information about your vehicle
�change vehicle settings
For example, you can use the control sys-
tem to find out when your vehicle is next
due for service, to set the language for
messages in the instrument cluster display
and much more.
The control system relays information to
the multifunction display.
Multifunction display
1Trip odometer
2Main odometer
3Outside temperature
4Clock
1
5Current gear selector lever position
6Transfer case program mode
Warning!G
A driver’s attention to the road and traffic
conditions must always be his /her primary
focus when driving.
For your safety and the safety of others, se-
lecting features through the multifunction
steering wheel should only be done by the
driver when traffic and road conditions per-
mit it to be done safely.
Bear in mind that at a speed of just 30 mph
(approximately 50 km/h), your vehicle is
covering a distance of 44 feet
(approximately 14 m) every second.
1See separate operating instructions for the
COMAND system for clock setting.
Page 136 of 417
135 Controls in detail
Control system
The table below shows what settings can
be changed within the various menus.
Detailed instructions on making individual
settings can be found on the following
pages.
INSTRUMENT CLUSTERLIGHTINGVEHICLECONVENIENCE
(�page 136)(�page 138)(�page 142)(�page 143)
Select time display modeSet daytime running lamp mode
(USA only)Set station selection mode
(radio)Activate easy-entry/exit feature
Select temperature display
modeSet locator lightingSet automatic lockingSet key-dependency
Select speedometer display
modeSet night security illuminationSet parking position for exterior
rear view mirror
Select languageSet interior lighting delayed
shut-off
Select display (speed display or
outside temperature)
Page 140 of 417
 activated.
With daytime runnin")
139 Controls in detail
Control system
The selection marker is on the current
setting.
�Pressæ orç to select manual
operation or daytime running lamp
mode (constant) activated.
With daytime running lamp mode activated
and the exterior lamp switch in
positionMorU, the low beam
headlamps are switched on when the en-
gine is running.In low ambient light conditions the follow-
ing lamps will switch on additionally:
�Parking lamps
�Tail lamps
�License plate lamps
�Side marker lamps
For more information on the daytime run-
ning lamp mode, see “Lighting”
(
�page 110).Setting locator lighting
With the locator lighting feature activated
and the exterior lamp switch in position
U, the following lamps will switch on
during darkness when the vehicle is un-
locked with the SmartKey:
�Parking lamps
�Tail lamps
�License plate lamps
�Side marker lamps
�Front fog lamps
The locator lighting switches off when the
driver’s door is opened.
If you do not open a door after unlocking
the vehicle with the SmartKey, the lamps
will switch off automatically after approxi-
mately 40 seconds.i
For safety reasons, resetting the
LIGHTING submenu to factory settings
while driving (
�page 132) will not de-
activate the daytime running lamp
mode.
The following message appears in the
multifunction display:
LIGHTING – CANNOT BE TOTALLY RESET
TO FACTORY SETTINGS WHILE DRIVING
Page 143 of 417

142 Controls in detail
Control system
Vehicle submenu
Access the
VEHICLE submenu via the
SETTINGS menu. Use the VEHICLE submenu
to make general vehicle settings. The fol-
lowing functions are available:
Setting station selection mode
Use the
PRESS BUTTON IN AUDIO MODE
function to select the manual or memory
station selection mode for the radio.
�Move the selection marker with
theæ orç button to the
VEHICLE submenu.
�Press buttonj ork repeatedly
until you see this message in the dis-
play:
PRESS BUTTON IN AUDIO MODE.
The selection marker is on the current
setting.
�Pressæ orç to select the
desired station selection mode. You
can select:
�STATION SEARCH
�MEMORY selects next stored stationSetting automatic locking
Use this function to activate or deactivate
the automatic central locking. With the au-
tomatic central locking system activated,
the vehicle is centrally locked at vehicle
speeds of approximately 9 mph
(15 km/h).
�Move the selection marker with
theæ orç button to the
VEHICLE submenu.
�Press buttonj ork repeatedly
until you see this message in the dis-
play:
AUTOMATIC DOOR LOCK.
The selection marker is on the current
setting.
�Pressæ orç to switch function
ON or OFF.
FunctionPage
Set station selection mode
(radio)142
Set automatic locking142