Page 240 of 417

239 Operation
At the gas station
�At the gas station
Refueling
The fuel filler flap is located on the
right-hand side of the vehicle towards the
rear.
Locking/unlocking the vehicle with the re-
mote control automatically locks/unlocks
the fuel filler flap.1Fuel filler flap (including a placard on
the inner side with supplemental tire
inflation pressure information)
2Fuel cap
�Turn off the engine.
�Remove the SmartKey from the starter
switch.
�Open fuel filler flap1 by pushing at
the point indicated by the arrow.
�Turn fuel cap2 to the left and hold on
to it until possible pressure is released.
�Take off fuel cap2 and set it in the re-
cess on fuel filler flap1.
�To prevent fuel vapors from escaping
into open air, fully insert filler nozzle
unit.
�Only fill your tank until the filler nozzle
unit cuts out – do not top up or over-
fill.
�Replace fuel cap2 by turning it clock-
wise until it audibly engages.
�Close fuel filler flap1.
Warning!G
Gasoline is highly flammable and poisonous.
It burns violently and can cause serious inju-
ry. Whenever you are around gasoline, avoid
inhaling fumes and skin contact, extinguish
all smoking materials. Never allow sparks,
flame or smoking materials near gasoline!
Failure to remove the fuel cap slowly could
result in personal injury.
Warning!G
Overfilling of the fuel tank may create pres-
sure in the system which could cause a gas
discharge. This could cause the gas to spray
back out when removing the fuel pump noz-
zle, which could cause personal injury.
��
Page 246 of 417

245 Operation
Engine compartment
Other display messages
If the SmartKey is not turned to position2
in the starter switch, the following
message will appear:
FOR ENGINE OIL LEVEL
SWITCH ON IGNITION!
�Switch on the ignition (�page 35).
If you see the message:
OBSERVE WAITING PERIOD
�If engine is at operating temperature,
wait five minutes before repeating
check procedure.
�If engine is not at operating tempera-
ture yet, wait 30 minutes before re-
peating check procedure.If you see the message:
ENGINE OIL LEVEL
NOT WHEN ENGINE ON!
�Turn off the engine.
�If the engine is at operating tempera-
ture, wait five minutes before checking
oil.
�If the engine is not at operating temper-
ature yet, you must wait 30 minutes
before checking oil.
If there is excess engine oil with the engine
at normal operating temperature, the
following message will appear:
ENGINE OIL LEVEL
REDUCE OIL LEVEL
�Have excess oil siphoned or drained
off. Contact an authorized
Mercedes-Benz Light Truck Center.For more information on messages in the
multifunction display concerning engine
oil, see the “Practical hints” section
(
�page 311).
!
Excess oil must be siphoned or drained
off. It could cause damage to the
engine and catalytic converter not
covered by the Mercedes-Benz Limited
Warranty.
i
Perform the engine oil level check with
the dipstick if it cannot be completed
with the control system (
�page 246).
In this case we recommend that you
have the system checked at a
Mercedes-Benz Light Truck Center.
Page 252 of 417

251 Operation
Battery
�Battery
The battery is located in front of the rear
seat bench and below the cup holder. Jump
starting terminals are located in the left
side of the engine compartment
(
�page 357). Refer to Maintenance
Booklet for battery maintenance intervals.
The battery should always be sufficiently
charged in order to achieve its rated ser-
vice life.
If you use your vehicle less than approxi-
mately 200 miles (300 km) per month,
mostly for short-distance trips, or if it is not
used for long periods of time, you will need
to have the battery charge checked more
frequently and corrected if necessary.
When replacing batteries, always use bat-
teries approved by Mercedes-Benz.
If you do not intend to operate your vehicle
for an extended period of time, consult an
authorized Mercedes-Benz Light Truck
Center about steps you need to observe.Batteries contain materials that can harm
the environment if disposed of improperly.
Recycling of batteries is the preferred
method of disposal. Many states require
sellers of batteries to accept old batteries
for recycling.
For more information, see “Battery”
(
�page 353).
G
Observe all safety instructions
and precautions when handling
automotive batteries.
A
Risk of explosion
D
Keep flames or sparks away
from battery. Do not smoke.
B
Battery acid is caustic. Do not
allow it to come into contact
with skin, eyes or clothing.
In case it does, immediately
flush affected area with clear
water and seek medical help if
necessary.
E
Wear eye protection.
C
Keep children away.
F
Follow the instructions in this
Operator’s Manual.
i
If the battery is discharged
�you will no longer be able to turn
the SmartKey in the starter switch
�the gear selector lever will remain
locked in positionP
Page 287 of 417

286 Operation
Vehicle care
Cleaning the Rear Parking Assist
sensors*
1Sensor
�Use a mild car wash detergent, such as
Mercedes-Benz approved Car
Shampoo, with plenty of water to
clean sensors1.
To prevent scratches, never apply strong
force and use only a soft, non-scratchy
cloth when cleaning the sensors. Do not
attempt to wipe dirty sensors with a dry
cloth or sponge.Wiper blades
�Fold wiper arms forward.
�Clean the wiper blade inserts with a
clean cloth and detergent solution.Window cleaning
�Fold wiper arms forward.
�Use a window cleaning solution on all
glass surfaces.
An automotive glass cleaner is recom-
mended.
Warning!G
For safety reasons, switch off wipers and re-
move SmartKey from starter switch before
cleaning the wiper blades. Otherwise, the
wiper motor can suddenly turn on and cause
injury.
!
Fold the windshield wiper arms back
onto the windshield before turning the
SmartKey in the starter switch.
Hold on to the wiper when folding the
wiper arm back. If released, the force
of the impact from the tensioning
spring could crack the windshield.
Warning!G
For safety reasons, switch off wipers and re-
move SmartKey from starter switch before
cleaning the windshield. Otherwise, the wip-
er motor can suddenly turn on and cause in-
jury.
!
Fold the windshield wiper arms back
onto the windshield before turning the
SmartKey in the starter switch.
Hold on to the wiper when folding the
wiper arm back. If released, the force
of the impact from the tensioning
spring could crack the windshield.
Page 290 of 417
289 Practical hints
What to do if …
Where will I find...?
Unlocking/locking in an emergency
Opening/closing in an emergency
Brush guard*
Replacing SmartKey batteries
Replacing bulbs
Replacing wiper blades
Flat tire
Battery
Jump starting
Towing the vehicle
Fuses
Page 314 of 417
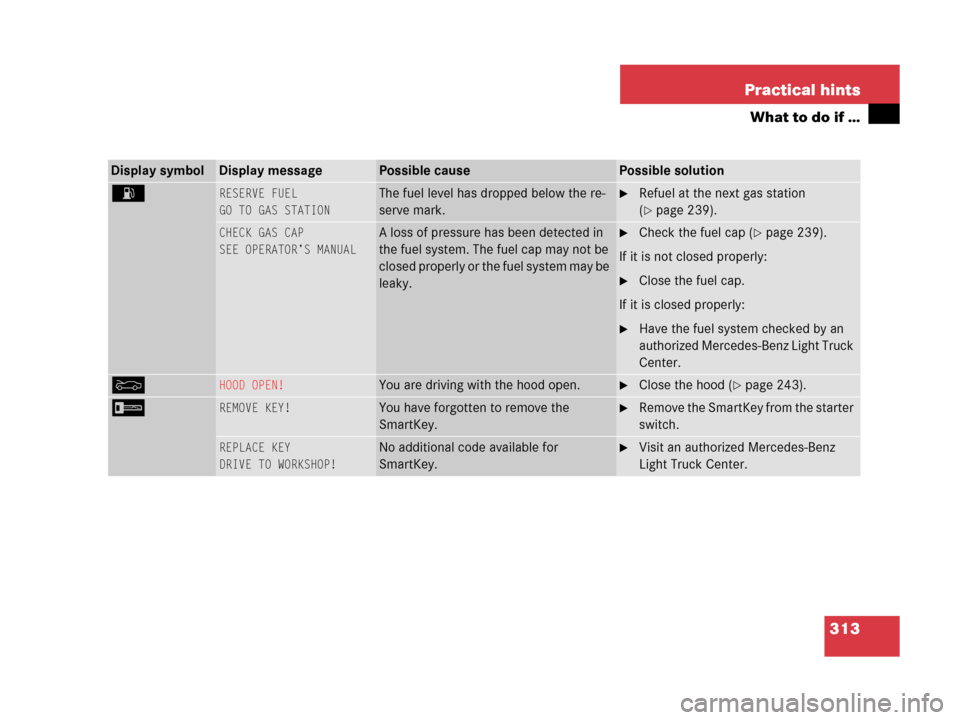
313 Practical hints
What to do if …
Display symbolDisplay message Possible causePossible solution
A RESERVE FUEL
GO TO GAS STATIONThe fuel level has dropped below the re-
serve mark.�Refuel at the next gas station
(
�page 239).
CHECK GAS CAP
SEE OPERATOR’S MANUALA loss of pressure has been detected in
the fuel system. The fuel cap may not be
closed properly or the fuel system may be
leaky.�Check the fuel cap (�page 239).
If it is not closed properly:
�Close the fuel cap.
If it is closed properly:
�Have the fuel system checked by an
authorized Mercedes-Benz Light Truck
Center.
YHOOD OPEN!You are driving with the hood open.�Close the hood (�page 243).
I REMOVE KEY!You have forgotten to remove the
SmartKey.�Remove the SmartKey from the starter
switch.
REPLACE KEY
DRIVE TO WORKSHOP!No additional code available for
SmartKey.�Visit an authorized Mercedes-Benz
Light Truck Center.
Page 315 of 417

314 Practical hints
What to do if …
Display symbolDisplay messagePossible causePossible solution
. 3RD BRAKE LIGHT
CHECK LIGHT!
The high mounted brake lamp is malfunc-
tioning. This message will only appear if
all light emitting diodes have stopped
working.�Visit an authorized Mercedes-Benz
Light Truck Center as soon as
possible.
ADD. TURN SIG., L
CHECK LIGHT!The left turn signal in the exterior rear
view mirror is malfunctioning. This mes-
sage will only appear if all light emitting
diodes have stopped working.�Have the LEDs replaced as soon as
possible.
ADD. TURN SIG., R
CHECK LIGHT!The right turn signal in the exterior rear
view mirror is malfunctioning. This mes-
sage will only appear if all light emitting
diodes have stopped working.�Have the LEDs replaced as soon as
possible.
AUTOM. LIGHT ON
REMOVE KEY!You have left the SmartKey in the starter
switch.�Remove the SmartKey from the starter
switch.
BRAKE LIGHT
DRIVE TO WORKSHOP!Brake lamp illumination is delayed or
lamp is permanently on.�Visit an authorized Mercedes-Benz
Light Truck Center as soon as
possible.
BRAKE LIGHT, L
CHECK LIGHT!
The left brake lamp is malfunctioning.�Visit an authorized Mercedes-Benz
Light Truck Center as soon as
possible.
Page 317 of 417

316 Practical hints
What to do if …
Display symbolDisplay messagePossible causePossible solution
. LIGHT SENSOR
DRIVE TO WORKSHOP!The lamp sensor is malfunctioning. The
headlamps switch on automatically.�In the control system, set lamp opera-
tion to manual (
�page 138).
�Switch on headlamps using the
exterior lamp switch (
�page 110).
�Visit an authorized Mercedes-Benz
Light Truck Center as soon as possi-
ble.
LICENSE PLATE LIGHT, L
CHECK LIGHT!
The left license plate lamp is malfunction-
ing.�Replace the bulb as soon as possible.
LICENSE PLATE LIGHT R
CHECK LIGHT!
The right license plate lamp is malfunc-
tioning.�Replace the bulb as soon as possible.
LIGHTS
TURN OFF LIGHTS!The display appears if the driver’s door is
opened with the engine shut off and no
SmartKey in the starter switch.�Insert SmartKey in the starter switch.
�Switch off the lights (�page 110).
LOW BEAM, L
CHECK LIGHT!The left low beam lamp is malfunctioning.�Visit an authorized Mercedes-Benz
Light Truck Center as soon as
possible.
LOW BEAM, R
CHECK LIGHT!The right low beam lamp is malfunction-
ing.�Visit an authorized Mercedes-Benz
Light Truck Center as soon as
possible.