Page 229 of 521

With the engine switched off, it is possible
to continue to heat or ventilate the interior
for up t")
228 Controls in detail4-zone automatic climate control*Residual heat and ventilation (Canada only)
With the engine switched off, it is possible
to continue to heat or ventilate the interior
for up to 30 minutes. This feature makes
use of the residual heat produced by the
engine.
Activating
�
Switch off the ignition.
�
Press buttonT (
�page 217).
REST in the display4 (�page 217)
comes on.Deactivating
�
Press buttonT (
�page 217) again.
REST in the display4 (�page 217)
goes out.
iIf you switch on the residual heat
function when temperatures are high,
only the ventilation will be switched on.iRegardless of the selected air volume,
the blower operates at low speed.
iHow long the system will provide heat-
ing depends on�
the coolant temperature
�
the temperature set by the operator
The blower will run at speed setting 1
regardless of the air distribution con-
trol setting.
iThe residual heat is automatically
turned off:�
when the ignition is switched on
�
after about 30 minutes
�
if the battery voltage drops
�
if the coolant temperature is too
low
Page 233 of 521
.
Opening the windows
�
Press switch2 to 5 to the resistance
point.
The corresponding window will move
downwards until you rel")
232 Controls in detailPower windows
�
Switch on the ignition (
�page 36).
Opening the windows
�
Press switch2 to 5 to the resistance
point.
The corresponding window will move
downwards until you release the
switch.
Closing the windows
�
Pull switch2 to 5 to the resistance
point.
The corresponding window will move
upwards until you release the switch.Fully opening the windows
(Express-open)
�
Press switch2 to 5 past the resis-
tance point and release.
The corresponding window opens com-
pletely.
iYou can also open or close the win-
dows using the SmartKey, see “Sum-
mer opening feature” (
�page 234) and
“Convenience closing feature”
(
�page 234).
Depending on current position, the win-
dows may also open or close when the
air recirculation button, in the
control panel of the climate control
(�page 204), (
�page 216) or
(
�page 217) is pressed and held.
iOperating the windows from the rear is
not possible if you activate the override
switch (
�page 89).
iWith the SmartKey in starter switch po-
sition 0 or removed from the starter
switch, the power windows can be op-
erated:�
until you open the driver’s or front
passenger’s door
�
for at least 5 minutes.
Warning!
G
If you pull and hold the switch up when clos-
ing the window, and upward movement of
the window is blocked by some obstruction
including but not limited to arms, hands, fin-
gers, etc., the automatic reversal will not op-
erate.
Page 234 of 521
�
Pull switch2 to 5 past the resis-
tance point and release.
The corresponding window closes com-
pletely.
If the upward")
233 Controls in detail
Power windows
Fully closing the windows
(Express-close)�
Pull switch2 to 5 past the resis-
tance point and release.
The corresponding window closes com-
pletely.
If the upward movement of the window is
blocked during the closing procedure, the
window will stop and open slightly.
Stopping windows during Express-op-
eration
�
Press or pull the respective power win-
dow switch again.
Synchronizing power windows
The power windows must be synchronized�
after the battery has been disconnect-
ed
�
if the power windows cannot be fully
opened (Express-open) or closed
(Express-close)
Synchronizing
�
Close all doors.
�
Switch on the ignition (
�page 36).
�
Pull switch2 to 5 until the side win-
dows are completely closed.
�
Hold on to switches2 to 5 for ap-
proximately 1 second.
The power windows are synchronized.
Warning!
G
Driver’s door only:
If within 5 seconds switch is again pulled
past the resistance point and released, the
automatic reversal will not operate.
!If the upward movement of the window
is blocked during the closing proce-
dure, the window will stop and open
slightly.
Remove the obstruction, pull the re-
spective power window switch again
past the resistance point and release.
If the window still does not close when
there is no obstruction, pull and hold
the respective power window switch.
The side window will then close without
the obstruction sensor function.
Page 238 of 521
.Opening and closing the power
tilt/sliding sunroof
�
To open, close, raise or lower the
tilt/sliding sunroof,")
237 Controls in detail
Power tilt/sliding sunroof*
�
Switch on the ignition (
�page 36).Opening and closing the power
tilt/sliding sunroof
�
To open, close, raise or lower the
tilt/sliding sunroof, move the sunroof
switch to resistance point in the re-
quired direction of arrows1to4.
Release the sunroof switch when the
tilt/sliding sunroof has reached the
desired position.
Fully opening (Express-open) and
closing (Express-close) the power
tilt/sliding sunroof
�
To open or close the tilt/sliding sun-
roof, move the sunroof switch past the
resistance point in direction of
arrow1to2 and release.
The tilt/sliding sunroof opens or closes
completely.
When leaving the vehicle, always remove the
SmartKey or the SmartKey with
KEYLESS-GO* from the starter switch, take
it with you, and lock the vehicle. Do not
leave children unattended in the vehicle, or
with access to an unlocked vehicle. Unsu-
pervised use of vehicle equipment can
cause an accident and/or serious personal
injury.!To avoid damaging the seals, do not
transport any objects with sharp edges
which can stick out of the tilt/sliding
sunroof.
Do not open the tilt/sliding sunroof if
there is snow or ice on the roof, as this
could result in malfunctions.
The tilt/sliding sunroof can be opened
or closed manually should an electrical
malfunction occur (
�page 427).
iYou can also open or close the tilt/slid-
ing sunroof using the SmartKey, see
“Summer opening feature”
(�page 234) and “Convenience clos-
ing feature” (
�page 234).
Depending on current position, the
tilt/sliding sunroof may also open or
close when the air recirculation
button, in the control panel of the
climate control (�page 204),
(
�page 216) or (
�page 217) is
pressed and held.
Page 239 of 521

238 Controls in detailPower tilt/sliding sunroof*Stopping the power tilt/sliding sunroof
during Express-operation�
Move the sunroof switch in any direc-
tion.Synchronizing the power tilt/sliding
sunroof
The tilt/sliding sunroof must be synchro-
nized�
after the battery has been disconnect-
ed or discharged
�
after the tilt/sliding sunroof has been
closed manually (
�page 427)
�
after a malfunction
�
if the tilt/sliding sunroof does not open
smoothly
�
Remove the respective fuse from the
main fuse box (
�page 462).
�
Reinsert the fuse in the main fuse box.
�
Switch on the ignition (
�page 36).
�
Move and hold the sunroof switch in di-
rection of arrow3 until the tilt/sliding
sunroof is fully raised at the rear.
Keep holding the sunroof switch in di-
rection of arrow3 for approximately
1 second.
�
Check the Express-open feature
(�page 237).
If the tilt/sliding sunroof opens com-
pletely, the roof is synchronized. Other-
wise repeat the above steps.
iIf the movement of the tilt/sliding sun-
roof is blocked during the
Express-close procedure, the tilt/slid-
ing sunroof will stop and reopen
slightly.
Page 279 of 521
278 Controls in detailUseful featuresReinstalling ashtray insert�
Install insert by pushing it back into
frame until it engages again.
Rear seat ashtray
Opening rear seat ashtray
�
Briefly press the top of the ashtray.
The cover opens automatically.
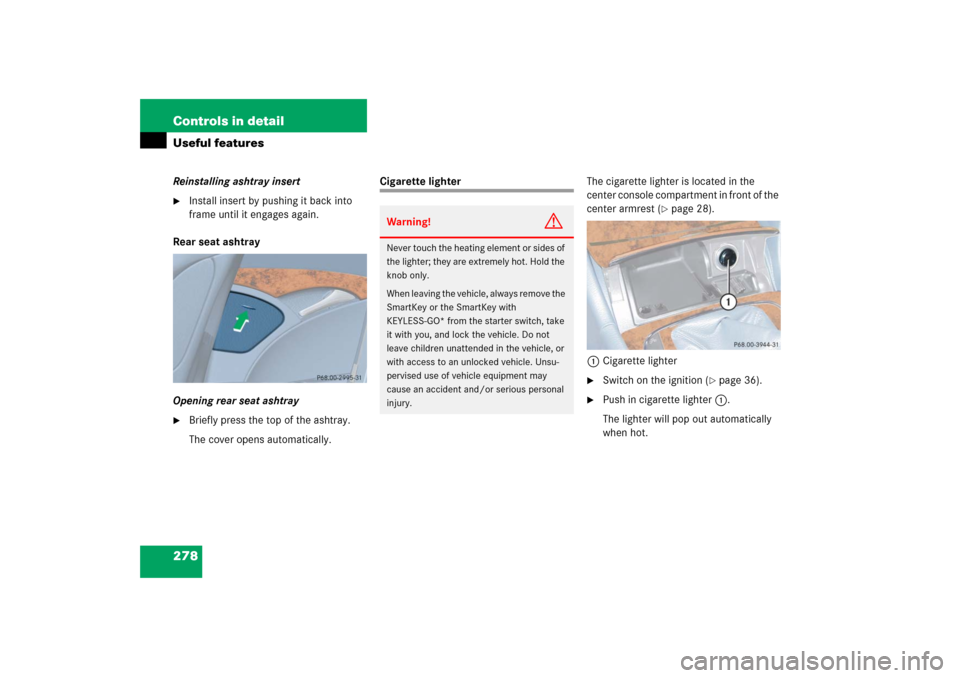
Cigarette lighterThe cigarette lighter is located in the
center console compartment in front of the
center armrest (
�page 28).
1Cigarette lighter
�
Switch on the ignition (
�page 36).
�
Push in cigarette lighter1.
The lighter will pop out automatically
when hot.
Warning!
G
Never touch the heating element or sides of
the lighter; they are extremely hot. Hold the
knob only.
When leaving the vehicle, always remove the
SmartKey or the SmartKey with
KEYLESS-GO* from the starter switch, take
it with you, and lock the vehicle. Do not
leave children unattended in the vehicle, or
with access to an unlocked vehicle. Unsu-
pervised use of vehicle equipment may
cause an accident and/or serious personal
injury.
Page 280 of 521
.
�
Flip up cover and insert electrical plug
(c")
279 Controls in detail
Useful features
Power outlet
The power outlet is located in the rear pas-
senger compartment.�
Switch on the ignition (
�page 36).
�
Flip up cover and insert electrical plug
(cigarette lighter type).
Heated steering wheel*
The steering wheel heating warms up the
leather area of the steering wheel.
The stalk is on the lower left-hand side of
the steering wheel.
1Indicator lamp
2Switching off
3Switching on
!The lighter socket can be used to ac-
commodate 12V DC electrical acces-
sories (up to a maximum of 85 W)
designed for use with the standard
“cigarette lighter” plug type. Keep in
mind, however, that connecting acces-
sories to the lighter socket (for exam-
ple extensive connecting and
disconnecting, or using plugs that do
not fit properly) can damage the lighter
socket. With the socket damaged, the
lighter may no longer be able to be
placed in the heating (pushed-in) posi-
tion, or the lighter may pop out too ear-
ly with the lighter not hot enough.
To help avoid damaging the cigarette
lighter socket, we recommend con-
necting 12V DC electrical accessories
designed for use with a standard “ciga-
rette lighter” plug type to the 12V pow-
er outlets in your vehicle whenever
possible.
iThe power outlet can be used to
accommodate 12V DC electrical ac-
cessories (e.g. air pump, auxiliary
lamps) up to a maximum of 180 W.
An additional power outlet is located on
the left side in the cargo compartment.
Page 281 of 521
.
�
Turn switch at the tip of stalk in direc-
tion of arrow3.
The steering wheel is heated. Indicator
lamp1 comes")
280 Controls in detailUseful featuresSwitching on�
Switch on the ignition (
�page 36).
�
Turn switch at the tip of stalk in direc-
tion of arrow3.
The steering wheel is heated. Indicator
lamp1 comes on.Switching off
�
Turn switch at the tip of stalk in direc-
tion of arrow2.
The heated steering wheel is switched
off. Indicator lamp1 goes out.
For information on steering wheel, see
“Multifunction steering wheel”
(
�page 156).
Floormats
1Retainer pin
2Eyelet
iThe steering wheel heating is tempo-
rarily suspended while indicator
lamp1 remains on when�
the temperature of the vehicle inte-
rior is above 86°F (30°C)
�
the temperature of the steering
wheel is above 95°F (35°C)
When these conditions do not apply
anymore, steering wheel heating con-
tinues.
iIndicator lamp1 flashes or goes out�
in case of power surge or undervolt-
age
�
in case of a steering wheel heating
malfunction
iThe steering wheel heating switches off
automatically when you remove the
SmartKey from the starter switch or, on
vehicles with KEYLESS-GO*, when you
switch off the ignition (
�page 61) and
open the driver’s door.
iTo install or remove the floormat more
easily, move the driver’s seat or front
passenger seat as far to the rear as
possible (
�page 41).