Page 141 of 521

140 Controls in detailMemory functionPrior to operating the vehicle, the driver
should check and adjust the seat height,
seat position fore and aft, and seat back-
rest angle if necessary, to ensure adequate
control, reach and comfort. The head re-
straint should also be adjusted for proper
height. See also the section on air bags
(�page 67) for more information on prop-
er seat positioning.
In addition, adjust the steering wheel to
ensure adequate control, reach, operation
and comfort. Both the interior and outside
rear view mirrors should be adjusted for
adequate rear vision.
Fasten seat belts. Infants and small chil-
dren should be seated in a properly se-
cured restraint system that complies with
U.S. Federal Motor Vehicle Safety Stan-
dards 213 and 225 and Canadian Motor
Vehicle Safety Standards 213 and 210.2.The following settings are stored when
using the buttons on the driver’s door:
�
Driver’s seat, backrest and head
restraint position and settings for
multicontour seat
�
Steering wheel position
�
Exterior rear view mirror positions
The following settings are stored when us-
ing the buttons on the front passenger
door:
�
Front passenger seat, backrest and
head restraint position and settings for
multicontour seatThe memory button and memory position
buttons are located on the door.
MMemory button
1, 2, 3Memory position button
�
Switch on the ignition (
�page 36).
or
�
Open the respective door.
Warning!
G
Do not activate the memory function while
driving. Activating the memory function
while driving could cause the driver to lose
control of the vehicle.
Page 143 of 521
142 Controls in detailMemory function1Passenger side, exterior rear view mir-
ror
2Adjustment button�
Stop the vehicle.
�
Switch on the ignition (
�page 36).
�
Press button1.
The passenger-side exterior rear view
mirror is selected.
�
Adjust the exterior rear view mirror
with button2 so that you see the rear
wheel and the road curb.
�
Press memory button M.
�
Within 3 seconds, press bottom of ad-
justment button2.
The parking position is stored if the
mirror does not move.iIf the mirror does move, repeat the
above steps. After the setting is stored,
you can move the mirror again.
Page 149 of 521

148 Controls in detailLightingSwitching on hazard warning flasher�
Press the hazard warning flasher
switch1.
All turn signals are flashing.
Switching off hazard warning flasher
�
Press hazard warning flasher switch1
again.
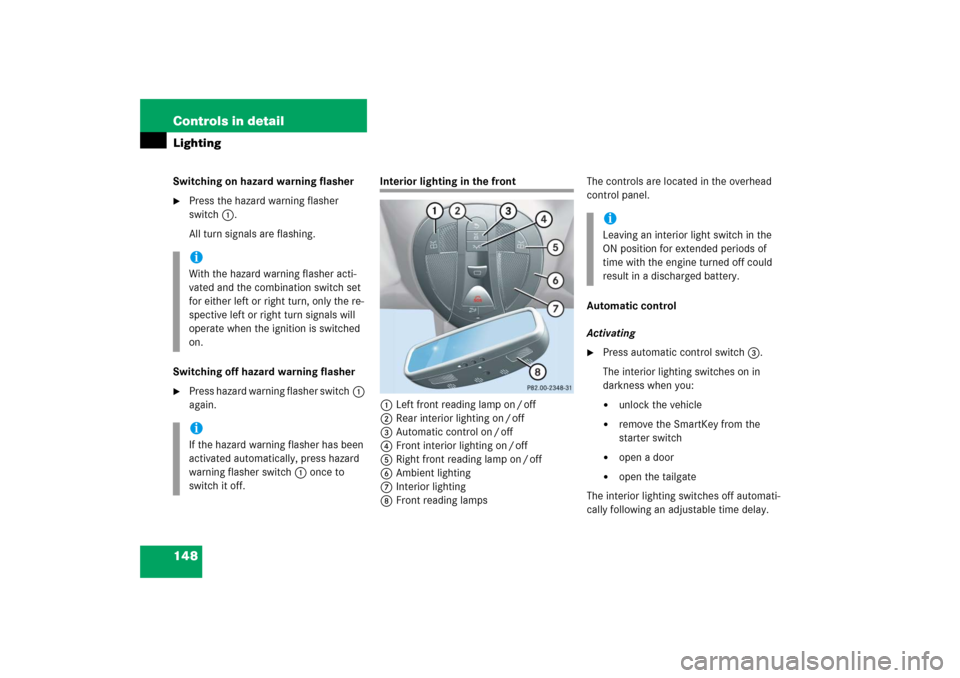
Interior lighting in the front
1Left front reading lamp on / off
2Rear interior lighting on / off
3Automatic control on / off
4Front interior lighting on / off
5Right front reading lamp on / off
6Ambient lighting
7Interior lighting
8Front reading lampsThe controls are located in the overhead
control panel.
Automatic control
Activating
�
Press automatic control switch3.
The interior lighting switches on in
darkness when you:�
unlock the vehicle
�
remove the SmartKey from the
starter switch
�
open a door
�
open the tailgate
The interior lighting switches off automati-
cally following an adjustable time delay.
iWith the hazard warning flasher acti-
vated and the combination switch set
for either left or right turn, only the re-
spective left or right turn signals will
operate when the ignition is switched
on.iIf the hazard warning flasher has been
activated automatically, press hazard
warning flasher switch1 once to
switch it off.
iLeaving an interior light switch in the
ON position for extended periods of
time with the engine turned off could
result in a discharged battery.
Page 152 of 521

151 Controls in detail
Instrument cluster
�Instrument cluster
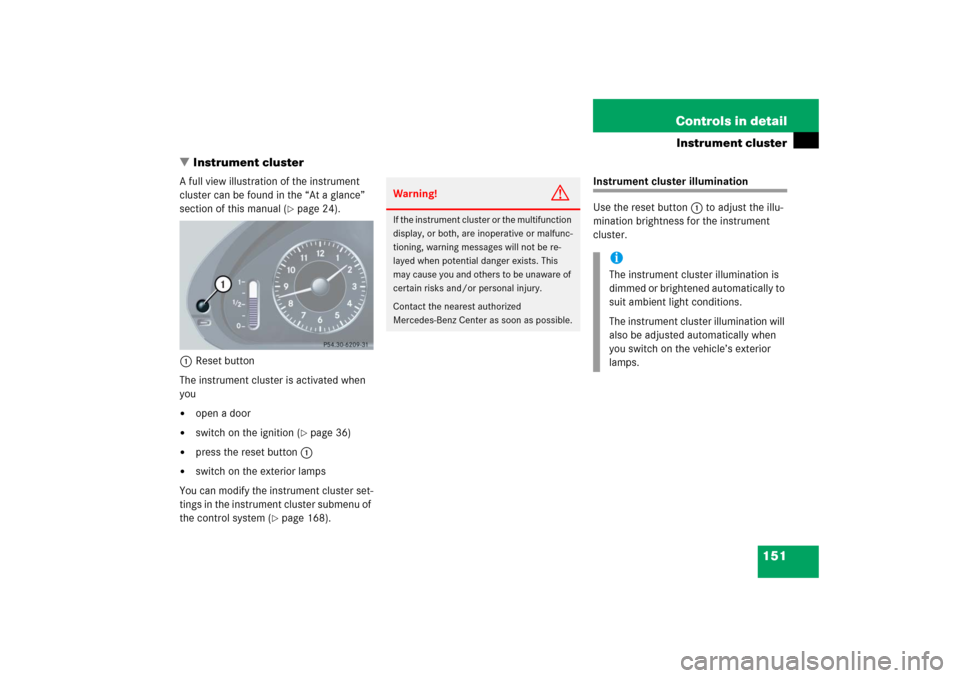
A full view illustration of the instrument
cluster can be found in the “At a glance”
section of this manual (
�page 24).
1Reset button
The instrument cluster is activated when
you
�
open a door
�
switch on the ignition (
�page 36)
�
press the reset button1
�
switch on the exterior lamps
You can modify the instrument cluster set-
tings in the instrument cluster submenu of
the control system (
�page 168).
Instrument cluster illumination
Use the reset button1 to adjust the illu-
mination brightness for the instrument
cluster.
Warning!
G
If the instrument cluster or the multifunction
display, or both, are inoperative or malfunc-
tioning, warning messages will not be re-
layed when potential danger exists. This
may cause you and others to be unaware of
certain risks and/or personal injury.
Contact the nearest authorized
Mercedes-Benz Center as soon as possible.
iThe instrument cluster illumination is
dimmed or brightened automatically to
suit ambient light conditions.
The instrument cluster illumination will
also be adjusted automatically when
you switch on the vehicle’s exterior
lamps.
Page 198 of 521

197 Controls in detail
Good visibility
�Good visibility
For information on windshield wipers, see
“Windshield wipers” (
�page 55).
Headlamp cleaning system*
The button is located on the left side of the
dashboard.
1Headlamp washer button�
Switch on the ignition (
�page 36).
�
Press button1.
The headlamps are cleaned with a
high-pressure water jet.For more information on filling up the
washer reservoir, see “Windshield washer
system and headlamp cleaning system*”
(
�page 323).
Rear view mirrors
For more information on setting the rear
view mirrors, see “Mirrors” (
�page 45).
Auto-dimming mirrors
The reflection brightness of the exterior
rear view mirror on the driver’s side and
the interior rear view mirror will respond
automatically to glare when
�
the ignition is switched on
and
�
incoming light from headlamps falls on
the sensor in the interior rear view mir-
ror
The rear view mirrors will not react if
�
reverse gear is engaged
�
the interior lighting is turned on
iThe headlamps will automatically be
cleaned when you have�
switched on the headlamps
and
�
operated the windshield wipers
with windshield washer fluid
fifteen times
When you switch off the ignition, the
counter resets.
Page 200 of 521

199 Controls in detail
Good visibility
�
Make sure the
Mirror adjustment
parking aid function in the
Conve-
nience
submenu of the control system
is switched to
on (�page 178).
�
Switch on the ignition (
�page 36).
�
Press button2 for the passenger-side
exterior rear view mirror.
�
Place the gear selector lever in reverse
gearR.
The passenger-side exterior rear view
mirror will be turned downward to the
stored position.
The exterior rear view mirror returns to its
previously stored driving position:
�
10 seconds after you put the gear se-
lector lever out of positionR
�
immediately once your vehicle exceeds
a speed of approximately 6 mph
(10 km/h)
�
immediately when you press button1
for driver’s side mirror.
Sun visors
The sun visors protect you from sun glare
while driving.�
Swing sun visor1 down when you ex-
perience glare.1Sun visor
2Mirror cover
3Mirror lamp
4Mounting
5Vanity mirror
�
To use the vanity mirror 5, lift up the
mirror cover2.
Warning!
G
Do not use the vanity mirror while driving.
Keep the mirrors in the sun visors closed
while vehicle is in motion. Reflected glare
can endanger you and others.
iIf sun visor1 is disengaged from
mounting4 with mirror cover2
open, mirror lamp3 will switch off.
Page 207 of 521

206 Controls in detailDual-zone automatic climate control (USA only)Deactivating the climate control system
Deactivating�
Press button´ (
�page 204).
Reactivating
�
Make sure the ignition is switched on.
�
Press button´ (
�page 204) again.
The previous settings are once again in
effect.Operating the climate control system
in automatic modeActivating
�
Press buttonU (
�page 204) while
the engine is running.
The indicator lamp on the button
comes on. The air volume and air distri-
bution are adjusted automatically.
�
Use temperature controls1 and6
(�page 204) to separately adjust the
air temperature on each side of the
passenger compartment.
The temperature of the vehicle interior
is adjusted automatically.
iWhen the climate control system is de-
activated, the outside air supply and
circulation are also deactivated. Only
choose this setting for a short time.
Otherwise the windows could fog up.iTo switch the system on, you can also
press another button, with the excep-
tion of 1.
iWhen operating the climate control
system in automatic mode, you will
only rarely need to adjust the tempera-
ture, air volume and air distribution.
In automatic mode, cooling with dehu-
midify is switched on. This function can
be switched off if necessary.
Page 221 of 521

220 Controls in detail4-zone automatic climate control*Reactivating�
Make sure the ignition is switched on.
�
Press button´ (
�page 216) or
(
�page 217) again.
The previous settings are once again in
effect.Operating the climate control system
in automatic modeActivating
�
Switch on the ignition (
�page 36).
�
Press one buttonU (
�page 216) or
(
�page 217).
The indicator lamp on the button
comes on.
AUTO
appears in the
display4 (
�page 216) or
(
�page 217). The air volume and air
distribution are adjusted automatically.
�
Use temperature controls1 and6
(�page 216) or (
�page 217) to sepa-
rately adjust the air temperature on
each side of the passenger compart-
ment.
The temperature of the vehicle interior
is adjusted automatically.
iTo switch the system on, you can also
press another button, with the excep-
tion of 1, F and T
(�page 216) or (
�page 217).
iWhen operating the climate control
system in automatic mode, you will
only rarely need to adjust the tempera-
ture, air volume and air distribution.
In automatic mode, cooling with dehu-
midify is switched on. This function can
be switched off if necessary.iThe automatic climate control system
can also be switched on or off
separately for the left and right sides of
the passenger compartment, as
required.