Page 148 of 489

147 Controls in detail
Control system
Menus, submenus and functions
Menu1
Menu2
Menu3
Menu4
Menu5
Menu6
Menu7
Standard
display
AUDIO
NAV*
Vehicle status
message memory
1
1The vehicle status message memory menu is only displayed if there is a message stored.
Settings
Trip computer
Telephone*
(�page 148)
(�page 149)
(�page 150)
(�page 151)
(�page 152)
(�page 165)
(�page 167)
Commands/submenusRun Flat
Indicator*
Select radio
station
Show route guid-
ance instruc-
tions, current
direction traveled
Calling up vehicle
malfunction, warning
and system status mes-
sages stored in memory
Reset to factory
settings
Fuel consumption
statistics after
start
Load phone
book
Digital speed-
ometer
Select satellite
radio station*
(USA only)
Instrument clus-
ter submenu
Fuel consumption
statistics since
the last reset
Search for
name in
phone book
Call up mainte-
nance service
display
Operate CD
player
Time/Date sub-
menu
Call up range
Check engine
oil level
(CLK 500 only)
Lighting
submenuVehicle submenuConvenience
submenu
Page 150 of 489

149 Controls in detail
Control system
AUDIO menu
The functions in the
Audio
menu operate
the audio equipment which you currently
have turned on.
If no audio equipment is currently turned
on, the message
Audio off
is shown in the
multifunction display.
The following functions are available:
Select radio station
�
Turn on the radio (
�page 212) and se-
lect radio. Vehicles with COMAND*:
Refer to separate operating instruc-
tions.
�
Press buttonè orÿ repeatedly
until the currently tuned station
appears in the multifunction display.1Waveband setting
2Station frequency
�
Press buttonk orj repeatedly
until the desired station is found.Select satellite radio station*
(USA only)
The satellite radio is treated as a radio
application.
�
Select satellite radio with the
corresponding soft key (SAT) in the
radio menu.
1SAT mode and preset number
2Setting for station selection using
memory
3Channel name or number
�
Press buttonk orj repeatedly
until the desired channel is found.
Function
Page
Select radio station
149
Select satellite radio station*
(USA only)
149
Operate CD player
150
iYou can only store new stations using
the corresponding feature on the radio
(�page 218).
Vehicles with COMAND*: Refer to
separate operating instructions.
You can also operate the radio in the
usual manner.
Page 151 of 489
. Vehicles
with COMAND*: Refer to separate
operating instructions.
�
Press butt")
150 Controls in detailControl systemOperate the CD player�
Turn on the radio and select CD or
CD changer* (
�page 228). Vehicles
with COMAND*: Refer to separate
operating instructions.
�
Press buttonè orÿ repeatedly
until the settings for the CD currently
being played appear in the multifunc-
tion display.1Current CD (with additional number
from 1 to 6 when running from
CD changer*)
2Current track
�
Press buttonk orj repeatedly
until the desired track is selected.
For more information on CD operation, see
“CD mode” (
�page 225) and for the
CD changer*, see “CD changer*”
(
�page 228).
NAV* menu
The
Nav
menu contains the functions
needed to operate your navigation system.
�
Press buttonè orÿ repeatedly
until the message
Nav
appears in the
multifunction display.
�
If COMAND* is switched off, the mes-
sage
Nav off
appears in the multifunc-
tion display.
�
With COMAND* switched on but route
guidance not activated, the direction of
travel and, if available, the name of the
street currently traveld on appear in
the multifunction display.
�
With COMAND* switched on and route
guidance activated, the direction of
travel and maneuver instructions ap-
pear in the multifunction display.
Please refer to the COMAND* manual for
instructions on how to activate the route
guidance system*.
iFor more information on satellite radio
operation, see “Introduction to satellite
radio* (USA only)” (
�page 220).
Vehicles with COMAND*: Refer to
separate operating instructions.
iTo select a CD from the CD changer*
magazine, press a number on the audio
system or the COMAND* system key
pad located in the center dashboard.
Page 158 of 489

157 Controls in detail
Control system
Time/Date submenu
Access the
Time/Date
submenu via the
Settings
menu. Use the
Time/Date
submenu to change the instrument cluster
display settings.
The following functions are available:Setting time (hours)
This function can only be seen in vehicles
with audio system.
�
Move the selection marker with
buttonæ orç to the
Time/Date
submenu.
�
Press buttonj ork repeatedly
until the message
Clock, hours
Confirm by press. R
appears in the
multifunction display.
The selection marker is on the hour
setting.
�
Press buttonæ orç to set the
hour.
�
Press the reset button in the instru-
ment cluster (
�page 140) to confirm.
The hour is set and stored.
Function
Page
Setting the time (hours)
157
Setting the time (minutes)
158
Setting the date (month)
158
Setting the date (day)
159
Setting the date (year)
159
iThe
Time/Date
submenu is not shown
in vehicles with COMAND*.
iVehicles with COMAND*:
For information on setting the time in
COMAND, refer to the separate
COMAND operating instructions.
Page 159 of 489

This function can only be seen with audio
system.�
Move the selection marker with
buttonæ orç to the
Time/Date
submenu.
�
Press button")
158 Controls in detailControl systemSetting time (minutes)
This function can only be seen with audio
system.�
Move the selection marker with
buttonæ orç to the
Time/Date
submenu.
�
Press buttonj ork repeatedly
until the message
Clock, minutes
Confirm by press. R
appears in the
multifunction display.
The selection marker is on the minutes
setting.
�
Press buttonæ orç to set the
minutes.
�
Press the reset button in the instru-
ment cluster (
�page 140) to confirm.
The minutes are set and stored.Setting the date (month)
This function can only be seen with audio
system.
�
Move the selection marker with
buttonæ orç to the
Time/Date
submenu.
�
Press buttonj ork repeatedly
until the message
Set date month
appears in the multifunction display.
The selection marker is on the month
setting.
iVehicles with COMAND*:
For information on setting the time in
COMAND, refer to the separate
COMAND operating instructions.
iVehicles with COMAND*:
For information on setting the date in
COMAND, refer to the separate
COMAND operating instructions.
Page 160 of 489
159 Controls in detail
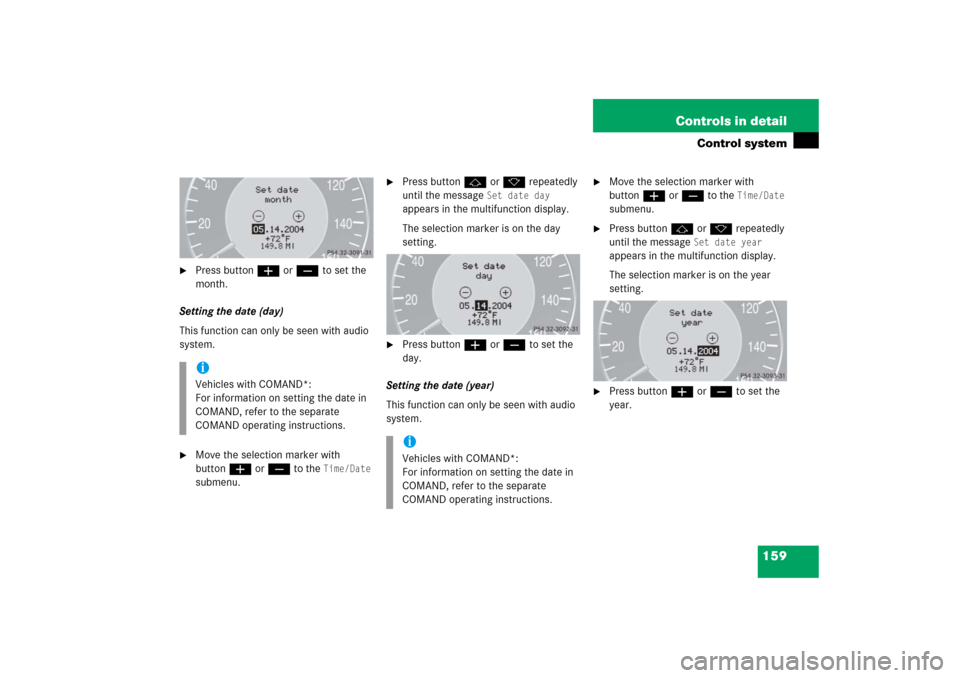
Control system
�
Press buttonæ orç to set the
month.
Setting the date (day)
This function can only be seen with audio
system.
�
Move the selection marker with
buttonæ orç to the
Time/Date
submenu.
�
Press buttonj ork repeatedly
until the message
Set date day
appears in the multifunction display.
The selection marker is on the day
setting.
�
Press buttonæ orç to set the
day.
Setting the date (year)
This function can only be seen with audio
system.
�
Move the selection marker with
buttonæ orç to the
Time/Date
submenu.
�
Press buttonj ork repeatedly
until the message
Set date year
appears in the multifunction display.
The selection marker is on the year
setting.
�
Press buttonæ orç to set the
year.
iVehicles with COMAND*:
For information on setting the date in
COMAND, refer to the separate
COMAND operating instructions.
iVehicles with COMAND*:
For information on setting the date in
COMAND, refer to the separate
COMAND operating instructions.
Page 168 of 489

167 Controls in detail
Control system
TEL menu*
You can use the functions in the
TEL
menu
to operate your telephone, provided it is
connected to a hands-free system and
switched on.
�
Switch on the telephone and Audio or
COMAND*.
�
Press buttonÿ orè on the
steering wheel repeatedly until the
message
TEL
appears in the
multifunction display.Which messages will appear in the
multifunction display depends on whether
your telephone is switched on or off:
�
If the telephone is off, the message TEL OFF
appears in the multifunction
display.
�
If the telephone is on:
The telephone will then search for a
network. During this time the multi-
function display is empty.
As soon as the telephone has found a
network, the message
READY
appears in
the multifunction display.
This standby message indicates that your
telephone is ready for use and you can
operate it using the control system.
Warning!
G
A driver’s attention to the road must always
be his/her primary focus when driving. For
your safety and the safety of others, we
recommend that you pull over to a safe
location and stop before placing or taking a
telephone call. If you choose to use the
telephone while driving, please use the
hands-free device and only use the tele-
phone when weather, road and traffic
conditions permit.
Some jurisdictions prohibit the driver from
using a cellular telephone while driving a
vehicle.
Bear in mind that at a speed of just 30 mph
(approximately 50 km/h), your vehicle is
covering a distance of 44 feet
(approximately 14 m) every second.
Never operate radio transmitters equipped
with a built-in or attached antenna (i.e. with-
out being connected to an external antenna)
from inside the vehicle while the engine is
running. Doing so could lead to a malfunc-
tion of the vehicle’s electronic system,
possibly resulting in an accident and /or
personal injury.
Page 210 of 489

209 Controls in detail
Audio system
�Audio system
Audio and telephone*, operation
These instructions are intended to help
you become familiar with your
Mercedes-Benz audio system. They con-
tain useful tips and a detailed description
of the user functions.
Operating safety
Warning!
G
In order to avoid distraction which could
lead to an accident, the driver should enter
system settings with the vehicle at a
standstill and operate the system only when
road and traffic conditions permit. Always
pay full attention to traffic conditions first
before operating system controls while
driving.
Bear in mind that at a speed of just 30 mph
(approximately 50 km/h), your car is
covering a distance of 44 feet
(approximately 14 m) every second.
Warning!
G
Any alterations made to electronic
components can cause malfunctions.
The radio, amplifier, CD changer*, satellite
radio*, and telephone* are interconnected.
When one of the components is not opera-
tional or has not been removed/replaced
properly, the function of other components
may be impaired.
This condition might seriously impair the
operating safety of your vehicle.
We recommend that you have any service
work on electronic components carried out
by an authorized Mercedes-Benz Center.