Page 194 of 473

Charcoal filter
An activated charcoal filter markedly
reduces bad odors and removes pollutants
from air entering the passenger compart")
193 Controls in detail
Automatic climate control* (Canada only)
Charcoal filter
An activated charcoal filter markedly
reduces bad odors and removes pollutants
from air entering the passenger compart-
ment. The charcoal filter can be activated
or deactivated.
The system switches automatically to the
air recirculation mode, if the
�charcoal filter is switched on
�carbon monoxide (CO) or nitrogen
oxide (NO
X) concentration of the out-
side air increases beyond a predeter-
mined levelActivating
�Press buttone (�page 185).
The indicator lamp on the button
comes on.
i
Press and hold button, for approx.
2 seconds. The side windows and or
tilt/sliding sunroof will return to their
previous position. You can release
button, once the opening proce-
dure has begun. The windows and
tilt/sliding sunroof continue opening
until they have reached their previous
position.
A window or tilt/sliding sunroof will
only return to its previous position if it
has not been moved to another posi-
tion using the respective window
switch or tilt/sliding sunroof switch af-
ter it was closed with button,.
A window or tilt/sliding sunroof that
was moved will remain in its current po-
sition if button, i s u se d to re -ope n
the remaining windows or tilt/sliding
sunroof.
i
The automatic air recirculation mode
does not function if theA/C mode is
deactivated (indicator lamp on
button9 not lit), or if the
outside temperature has fallen
below 5°C (41°F).
i
The activated charcoal filter should be
switched off when windows fog up on
the inside, or if the passenger compart-
ment needs to be quickly heated or
cooled down.
i
The activated charcoal filter should be
switched off when windows fog up on
the inside, or if the passenger compart-
ment needs to be quickly heated or
cooled down.
Page 195 of 473

Deactivating
�Press buttone (�page 185).
The indicator lamp on the button goes
out.
Air conditioning
The cooling function, only operati")
194 Controls in detail
Automatic climate control* (Canada only)
Deactivating
�Press buttone (�page 185).
The indicator lamp on the button goes
out.
Air conditioning
The cooling function, only operational
when the engine is running, cools the vehi-
cle interior down to the selected tempera-
ture. The cooling function also
dehumidifies the air in the vehicle interior,
thus preventing the windows from fogging
up.
Warning!G
Never operate the side windows and the
tilt/sliding sunroof if there is the possibility
of anyone being harmed by the closing pro-
cedure.
In the event that the closing procedure
causes potential danger, the closing of the
side windows can be immediately halted by
pressing or pulling the respective window
switch. The closing of the tilt/sliding
sunroof can be immediately halted by
moving the tilt/sliding sunroof switch in the
overhead control panel in any direction.
The closing of the side windows and
tilt/sliding sunroof can be reversed by again
pressing and holding the buttone.
i
Press and hold buttone for approx.
2 seconds. The side windows and or
tilt/sliding sunroof will return to their
previous position. You can release
buttone once the opening proce-
dure has begun. The windows and
tilt/sliding sunroof continue opening
until they have reached their previous
position.
A window or tilt/sliding sunroof will
only return to its previous position if it
has not been moved to another posi-
tion using the respective window
switch or tilt/sliding sunroof switch af-
ter it was closed with buttone. A
window or tilt/sliding sunroof that was
moved will remain in its current posi-
tion if buttone is used to re-open
the remaining windows or tilt/sliding
sunroof.
i
Condensation may drip out from under-
neath the vehicle. This is normal and
not an indication of a malfunction.
Warning!G
If you turn off the cooling function, the
vehicle will not be cooled when weather
conditions are warm. The windows can fog
up more quickly. Window fogging may
impair visibility and endanger you and
others.
Page 197 of 473

Deactivating
�Press button9 (�page 185).
The indicator lamp on the button goes
out.
The residual heat is automatically turned
off:
�w")
196 Controls in detail
Automatic climate control* (Canada only)
Deactivating
�Press button9 (�page 185).
The indicator lamp on the button goes
out.
The residual heat is automatically turned
off:
�when the ignition is switched on
�after about 30 minutes
�if the battery voltage drops
Rear passenger compartment
adjustable air vents
The air conditioning for the rear passenger
compartment is controlled via the auto-
matic climate control panel (
�page 185).The air vents for the rear passenger
compartment are located in the rear
center console.
1Left center air vent
2Thumbwheel for air volume control for
center air vents
3Right center air ventAdjusting air distribution
�Push the slide for the left center
vent1 or right center vent3 to the
left, right, up, or down.
The air flow is directed in the
corresponding direction.
Adjusting air volume
�Turn thumbwheel2 up or down.
The air volume is increased or
decreased.
i
The temperature at the center air vents
for the rear passenger
compartment1 and3 i s t h e s a m e a s
at the dashboard center air vents.
i
For draft-free ventilation, push
slides1 and3 upward.
Page 204 of 473

203 Controls in detail
Audio system
Returning sound functions to factory
settings
�Press O button to call up settings
menu in the display.
�Press RES soft key briefly; the respec-
tive sound function is reset to its center
level.
or
�Press and hold RES soft key until RESET
appears in the display.
The sound settings for bass and treble
are returned to their center level and
the volume is set to a predefined level.Vehicles with sound system*:
The sound setting is reset depending
on the sound source activated.
�Radio mode: STANDARD
�CD/AUX mode: SURROUND
�Telephone: SPEECH
The radio switches back to the
standard radio menu 4 seconds
after the last soft key is pressed.
Adjusting volume distribution
Call up fader and balance functions by
pressing the P button.
Fader
�Press P button repeatedly until
FADER appears in the display.
�Press V or W soft key.
The volume is distributed accordingly
between the front and rear of the
vehicle.
or
�Press RES soft key briefly.
The fader is reset to its center level.
The radio switches back to the
standard radio menu 8 seconds after
the last soft key is pressed.
Page 205 of 473

204 Controls in detail
Audio system
Adjusting balance
�Press P button repeatedly until
BALANCE appears in the display.
�Press X or Y soft key.
The volume is distributed between the
left and right sides of the vehicle.
or
�Press RES soft key briefly.
The balance is reset to its center level.
The radio switches back to the
standard radio menu 8 seconds after
the last button is pressed.Returning volume distribution to
factory settings
�Press P button to call up settings
menu in the display.
�Press RES soft key briefly; the
respective volume distribution is reset
to its center (flat) level.
or
�Press and hold RES soft key until RESET
appears in the display.
The volume distribution settings for
fader and balance are set to their
center level.
The radio switches back to the
standard radio menu 4 seconds after
the last soft key is pressed.Telephone* muting
If your vehicle equipment includes a
Mercedes-Benz specified mobile
telephone*, you can adjust its volume
separately from the volume of the audio
system while the telephone is being used.
Page 207 of 473
206 Controls in detail
Audio system
Calling up wavebands for radios
with SAT
�Press FM, AM, or WB soft key repeatedly
until desired waveband has been
selected.
The FM, AM, and WB wavebands are
called up one after another.
The waveband currently selected
appears in the upper left-hand corner
of the display.Selecting a station
The following options are available for
selecting a station:
�Direct frequency input (�page 206)
�Manual tuning (�page 207)
�Automatic seek tuning (�page 207)
�Scan search (�page 207)
�Station memory (�page 207)
�Automatic station memory (Autostore)
(
�page 208)
The station search proceeds in the
following frequency increments:
�200 KHz in FM range
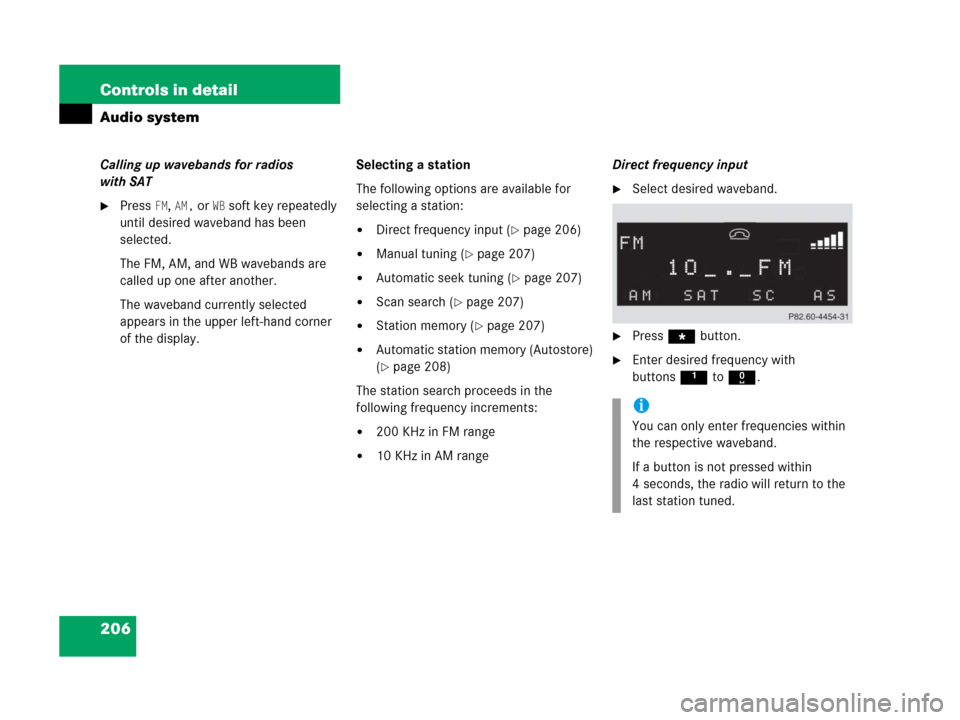
�10 KHz in AM rangeDirect frequency input
�Select desired waveband.
�Press *button.
�Enter desired frequency with
buttons1to R.
i
You can only enter frequencies within
the respective waveband.
If a button is not pressed within
4 seconds, the radio will return to the
last station tuned.
Page 213 of 473
212 Controls in detail
Audio system
Accessing via number keys
�Enter number of preset you wish to
select, e.g. 1.
The radio plays the station stored
under this number and the PTY function
changes to the category corresponding
to the station.
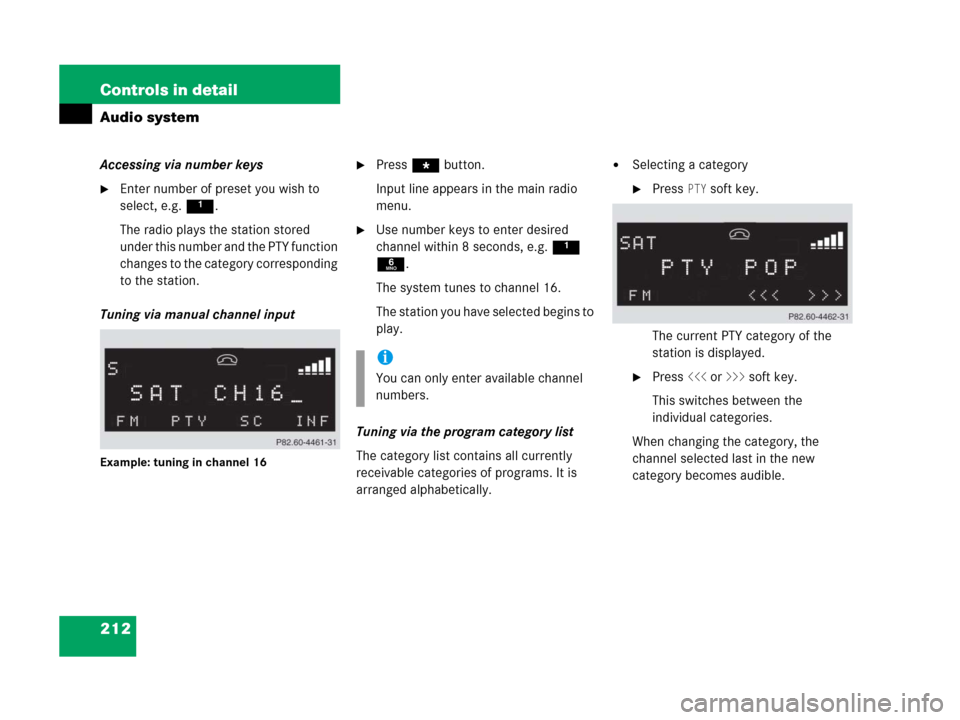
Tuning via manual channel input
Example: tuning in channel 16
�Press * button.
Input line appears in the main radio
menu.
�Use number keys to enter desired
channel within 8 seconds, e.g.1
6.
The system tunes to channel 16.
The station you have selected begins to
play.
Tuning via the program category list
The category list contains all currently
receivable categories of programs. It is
arranged alphabetically.
�Selecting a category
�Press PTY soft key.
The current PTY category of the
station is displayed.
�Press <<< or >>> soft key.
This switches between the
individual categories.
When changing the category, the
channel selected last in the new
category becomes audible.
i
You can only enter available channel
numbers.
Page 216 of 473

215 Controls in detail
Audio system
General notes
The system may not be able to play audio
CDs with copy protection.
Playing copied CDs may cause
malfunctions during playback.Do not use CDs with an 8 cm diameter, not
even with a CD adapter. Attempting to play
CDs with an 8 cm diameter or playing such
CDs with an adapter may cause damage to
the CD drive. Such damage is not covered
by the Mercedes-Benz Limited Warranty.
Should excessively high or low tempera-
tures occur while in CD changer mode*,
CD ERROR will appear in the display, and the
CD will be muted until the temperature has
reached an acceptable level for the system
to continue operation.
The single CD player play audio CDs, the
CD changer* can play audio CDs as well as
CDs with MP3 files.
Warning!G
In order to avoid distraction which could
lead to an accident, the driver should insert
CDs with the vehicle at a standstill and
operate the audio system only if permitted
by road, weather and traffic conditions.
Bear in mind that at a speed of just 30 mph
(approximately 50 km/h), your car covers a
distance of 44 feet (approximately 14 m)
every second.
!
If you affix stickers to the CDs, they can
become warped due to the heat that
develops in the CD drive or
CD changer*.
In certain situations, the CDs can then
no longer be ejected and cause
damage to the drive. Such damage is
not covered by the Mercedes-Benz
Limited Warranty.
!
Your CD drive or CD changer* has been
designed to play CDs which
correspond to the EN 60908 standard.
You can therefore only use CDs with a
maximum thickness of 1.3 mm.
If you insert thicker data carriers, e.g.
ones that have data on both sides (one
side with DVD data, the other side with
audio data), they cannot be ejected and
will damage the drive.