Page 117 of 473

116 Controls in detail
Lighting
Daytime running lamp mode
�Turn the exterior lamp switch to
positionM orU.
When the engine is running, the low beam
headlamps are switched on.
In low ambient light conditions, the
following lamps will switch on additionally:
�Tail and parking lamps
�License plate lamps
�Side marker lamps
For nighttime driving you should turn the
exterior lamp switch to positionB to
permit activation of the high beam head-
lamps.Canada only:
The daytime running lamp mode is manda-
tory and therefore in a constant mode.
When the engine is running, and you shift
from a driving position to positionN orP,
the low beam headlamps will switch off
with a three-minute delay.
When the engine is running, and you
�turn the exterior lamp switch to
positionC, the parking lamps
switch on additionally.
�turn the exterior lamp switch to
positionB, the manual headlamp
mode has priority over the daytime
running lamp mode.
The corresponding exterior lamps
switch on (
�page 114).USA only:
By default, the daytime running lamp mode
is deactivated. Activate the daytime
running lamp mode using the control
system, see “Set daytime running lamp
mode (USA only)” (
�page 144).
When the engine is running, and you turn
the exterior lamp switch to positionC
orB, the manual headlamp mode has
priority over the daytime running lamp
mode.
The corresponding exterior lamps switch
on (
�page 114).
i
With the daytime running lamp mode
activated and the exterior lamp switch
in positionM, the high beam head-
lamps cannot be switched on.
The high beam flasher is available at all
times.
Page 120 of 473
119 Controls in detail
Lighting
Hazard warning flasher
The hazard warning flasher can be
switched on at all times, even with the
SmartKey removed from the starter
switch.
The hazard warning flasher switches on
automatically when an air bag deploys.
The hazard warning flasher switch is
located on the upper part of the center
console.
1Hazard warning flasher switchSwitching on hazard warning flasher
�Press hazard warning flasher
switch1.
All turn signals are flashing.Switching off hazard warning flasher�Press hazard warning flasher switch1
again.
i
With the hazard warning flasher
activated and the combination switch
set for either left or right turn, only the
respective turn signals will operate
when the SmartKey is in the starter
switch position1 or 2.
i
If the hazard warning flasher has been
activated automatically, press hazard
warning flasher switch1 once to
switch it off.
Page 122 of 473

121 Controls in detail
Lighting
Manual control
Switching front/rear interior lights on
and off
�Press theW symbol on rocker
switch3 or the rear interior light
switch1 to switch on the desired
interior light.
�Press the rocker switch3 to center
position or the rear interior light
switch1 again to switch off the
respective interior light.
Switching front reading lamp on and off
�Press front reading lamp switch2
or4 to switch on the desired front
reading lamp.
�Press front reading lamp switch2
or4 again to switch off the respective
front reading lamp.
Door entry lamps
For better orientation in the dark, the cor-
responding front door entry lamps will
switch on in darkness when you open a
front door and the automatic control is ac-
tivated.
The door entry lamps will switch off when
the corresponding door is closed.Trunk lamp
The trunk lamp switches on if the trunk is
opened.
If the trunk remains open, the trunk light-
ing switches off automatically after ap-
proximately 10 minutes.
i
If you turn the SmartKey in the starter
switch to position0 and switch off the
exterior headlamps, the door entry
lamps will remain lit for approximately
5 minutes.
Page 125 of 473
 denotes excessive engine
speed.
To help protect the engine, the fuel supply
is interrupted if the")
124 Controls in detail
Instrument cluster
Tachometer
The red marking on the tachometer
(
�page 24) denotes excessive engine
speed.
To help protect the engine, the fuel supply
is interrupted if the engine is operated
within the red marking.
Outside temperature indicator
The outside temperature is indicated in the
multifunction display (
�page 125).The temperature sensor is located in the
front bumper area. Due to its location, the
sensor can be affected by road or engine
heat during idling or slow driving. There-
fore, the accuracy of the displayed temper-
ature can only be verified by comparison to
a thermometer placed next to the sensor,
not by comparison to external displays
(e.g. bank signs, etc.).
When moving the vehicle into colder ambi-
ent temperatures (e.g. when leaving your
garage), you will notice a delay before the
lower temperature is displayed.
A delay also occurs when ambient temper-
atures rise. This prevents inaccurate tem-
perature indications caused by heat
radiated from the engine during idling or
slow driving.
!
Avoid driving at excessive engine
speeds, as it may result in serious
engine damage that is not covered by
the Mercedes-Benz Limited Warranty.
Warning!G
The outside temperature indicator is not de-
signed to serve as an ice-warning device and
is therefore unsuitable for that purpose.
Indicated temperatures just above the freez-
ing point do not guarantee that the road sur-
face is free of ice. The road may still be icy,
especially in wooded areas or on bridges.
Page 132 of 473
131 Controls in detail
Control system
AUDIO menu
The functions in the
Audio menu operate
the audio equipment which you currently
have turned on.
If no audio equipment is currently turned
on, the message
Audio off appears in the
multifunction display.
The following functions are available:Select radio station
�Turn on the radio (�page 200).
Vehicles with COMAND*:
Refer to separate operating
instructions.
�Press buttonè orÿ repeatedly
until the currently tuned station
appears in the multifunction display.
1Waveband setting
2Station frequency
�Press buttonk orj repeatedly
until the desired station is found.
FunctionPage
Select radio station131
Select satellite radio station*
(USA only)132
Operate CD player*132
i
You can only store new stations using
the corresponding feature on the radio
(
�page 208).
Vehicles with COMAND*:
Refer to separate operating
instructions.
You can also operate the radio in the
usual manner.
Page 133 of 473

The satellite radio is treated as a radio
application.
�Select satellite radio with the
corresponding soft key (SAT)")
132 Controls in detail
Control system
Select satellite radio station*
(USA only)
The satellite radio is treated as a radio
application.
�Select satellite radio with the
corresponding soft key (SAT) in the
radio menu.
1SAT mode and preset number
2Channel name or number
�Press buttonk orj repeatedly
until the desired channel is found.Operate the CD player*
Selecting CD track
�Turn on the radio and select CD or
CD changer* (
�page 219).
Vehicles with COMAND*:
Refer to separate operating
instructions.
�Press buttonè orÿ repeatedly
until the settings for the CD currently
being played appear in the
multifunction display.
1Current CD (for CD changer*)
2Current track
�Press buttonk orj repeatedly
until the desired track is selected.
i
For more information on satellite radio
operation, see “Introduction to satellite
radio* (USA only)” (
�page 209).
Vehicles with COMAND*:
Refer to separate operating
instructions.
i
The COMAND* system and the CD
changer* can play audio CDs as well as
CDs with MP3 files.
i
To select a CD from the CD changer*
magazine, press a number on the audio
system or the COMAND* system key
pad located in the center dashboard.
Page 135 of 473

134 Controls in detail
Control system
NAV* menu
The
NAV menu contains the functions
needed to operate your navigation system.
�Press buttonè orÿ repeatedly
until the message
NAV appears in the
multifunction display.
�If COMAND* is switched off, the mes-
sage
NAV off appears in the multifunc-
tion display.
�With COMAND* switched on but route
guidance not activated, the direction of
travel and, if available, the name of the
street currently traveled on appear in
the multifunction display.
�With COMAND* switched on and route
guidance activated, the direction of
travel and maneuver instructions ap-
pear in the multifunction display.
Please refer to the COMAND* manual for
instructions on how to activate the route
guidance system*.
Vehicle status message memory menu
Use the vehicle status message memory
menu to scan malfunction and warning
messages that may be stored in the
system. Such messages appear in the mul-
tifunction display and are based on condi-
tions or system status the vehicle’s system
has recorded.
The vehicle status message memory menu
only appears if there are any messages
stored.
�Press buttonè orÿ repeatedly
until the vehicle status message
memory appears in the multifunction
display.
If the vehicle status message memory
menu does not appear, then there are
no messages stored.
Warning!G
Malfunction and warning messages are only
indicated for certain systems and are inten-
tionally not very detailed. The malfunction
and warning messages are simply a remind-
er with respect to the operation of certain
systems and do not replace the owner’s
and/or driver’s responsibility to maintain
the vehicle’s operating safety by having all
required maintenance and
safety checks performed on the vehicle and
by bringing the vehicle to an authorized
Mercedes-Benz Center to address the mal-
function and warning messages
(
�page 358).
Page 140 of 473
139 Controls in detail
Control system
�Press buttonæ orç to select
the language to be used for the
multifunction display messages.
Available languages:
�German (Deutsch)
�English (English)
�French (francais)
�Italian (italiano)
�Spanish (Español)
�Dutch (Nederlands)
�Danish (Dansk)
�Swedish (Svenska)
�Portuguese (Português)
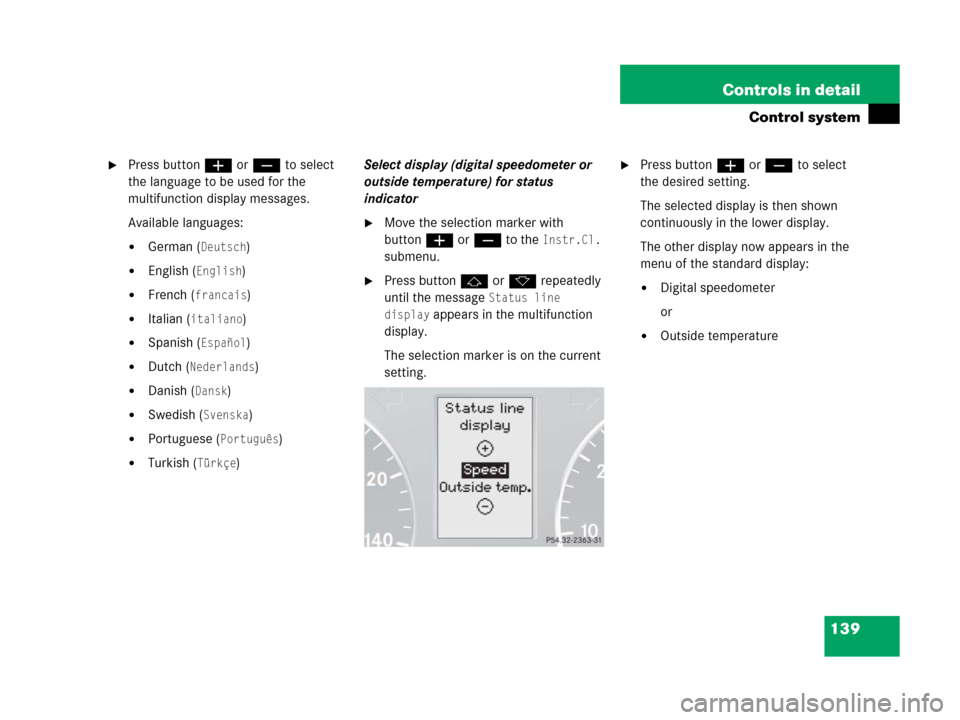
�Turkish (Türkçe)Select display (digital speedometer or
outside temperature) for status
indicator
�Move the selection marker with
buttonæ orç to the
Instr.Cl.
submenu.
�Press buttonj ork repeatedly
until the message
Status line
display
appears in the multifunction
display.
The selection marker is on the current
setting.
�Press buttonæ orç to select
the desired setting.
The selected display is then shown
continuously in the lower display.
The other display now appears in the
menu of the standard display:
�Digital speedometer
or
�Outside temperature