Page 124 of 651

INTERIOR EQUIPMENT
103
�Main switch
To use the power outlet, push the main switch on the
instrument panel.
An indicator light will illuminate to indicate that the power outlet
is ready for use.
Push the main switch once again to turn the power outlet off.
When the power outlet is not in use, make sure that the main
switch is turned off.
NOTICE
� To prevent the battery from being discharged, do not
use the power outlet longer than necessary when the
engine is not running.
�Close the power outlet lid when the power outlet is
not in use. Inserting a foreign object other than the
appropriate plug that fits the outlet may cause
electrical failure or short circuit.
The power outlet is not designed for the following electric
appliances even though their power consumption is
under 115 VAC/100W. These appliances may not operate
properly.
�Appliances with high initial peak wattage: Cathode −ray
tube type televisions, compressor −driven refrigerators,
electric pumps, electric tools, etc.
� Measuring devices which process precise data: Medical
equipment, measuring instruments, etc.
� Other appliances requiring an extremely stable power
supply: Microcomputer −controlled electric blankets, touch
sensor lamps, etc.
Certain electrical appliances may cause radio noise.
Page 128 of 651
 is manufactured under license from
HomeLink
� and can be programmed to operate garage
doors, gates, entry doo")
INTERIOR EQUIPMENT
107
GARAGE DOOR OPENER
The garage door opener (� Universal
Transceiver) is manufactured under license from
HomeLink
� and can be programmed to operate garage
doors, gates, entry doors, door locks, home lighting
systems, and security systems, etc.
(a) Programming the HomeLink�
�1Buttons2Indicator light
The HomeLink
� in your vehicle has 3 buttons and you can
store one program for each button.
To ensure correct programming into the HomeLink
�, install a
new battery in the hand −held transmitter prior to programming. The battery side of the hand
−held transmitter must be pointed
away from the HomeLink
� during the programming process.
For Canadian users, follow the procedure in “Programming an
entrance gate/programming all devices in the Canadian
market”.
1. Decide which of 3 HomeLink
� buttons you want to program.
�1HomeLink�2Hand�held garage transmitter
325 to 75 mm (1 to 3 in.)
2. Place your hand −held garage transmitter 25 to 75 mm (1 to
3 in.) away from the surface of the HomeLink
�.
Keep the indicator light on the HomeLink
� in view while
programming.
Page 148 of 651
EXTERIOR EQUIPMENT
127
CAUTION
�Make sure the cap is installed securely to prevent fuel
spillage in the event of an accident.
� Use only a genuine Lexus fuel tank cap for
replacement. It is designed to regulate fuel tank
pressure.
NOTICE
To prevent damage to the cap, apply force only in the
turning direction to the cap. Do not pull or pry it.
In case the opener is not actuated
Open the auxiliary box in the luggage compartment, pull
the manual lever.
This is used in case the fuel filler door cannot be opened due
to a discharged battery or other trouble.
Page 201 of 651
OCCUPANT RESTRAINT SYSTEMS
180
In the following cases, contact your Lexus dealer as soon as
possible:
�The SRS front airbags have been inflated.
� The front of the vehicle (shaded in the illustration) was
involved in an accident that was not severe enough to cause
the SRS front airbags to inflate. �
The pad section of the steering wheel, dashboard, lower
portion of instrument or front passenger airbag cover
(shaded in the illustration) is scratched, cracked, or
otherwise damaged.
NOTICE
Do not disconnect the battery cables before contacting
your Lexus dealer.
Page 213 of 651
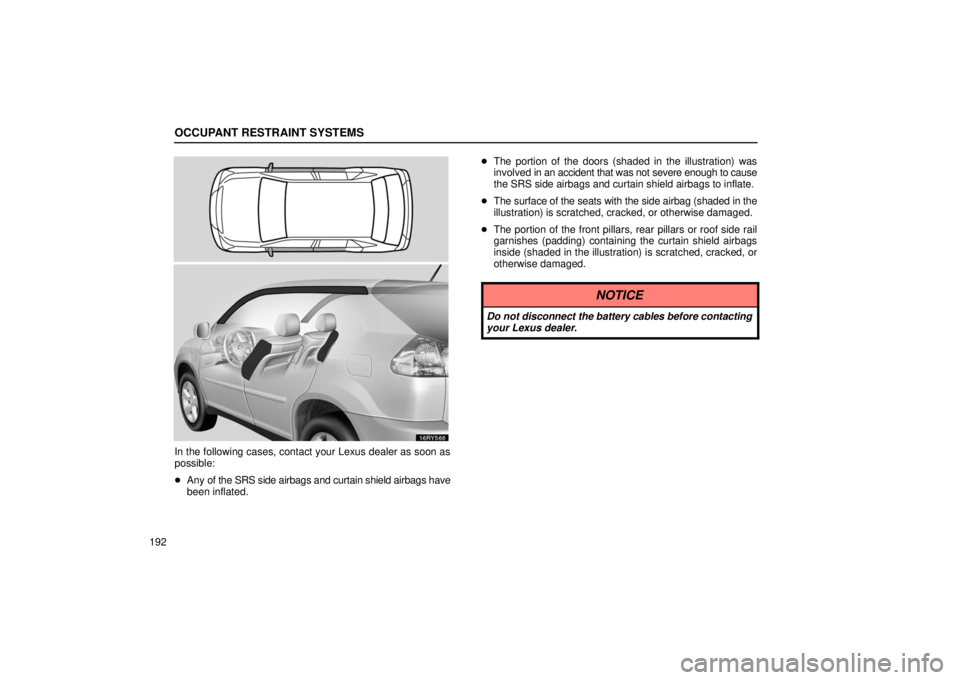
OCCUPANT RESTRAINT SYSTEMS
192
In the following cases, contact your Lexus dealer as soon as
possible:
�Any of the SRS side airbags and curtain shield airbags have
been inflated. �
The portion of the doors (shaded in the illustration) was
involved in an accident that was not severe enough to cause
the SRS side airbags and curtain shield airbags to inflate.
� The surface of the seats with the side airbag (shaded in the
illustration) is scratched, cracked, or otherwise damaged.
� The portion of the front pillars, rear pillars or roof side rail
garnishes (padding) containing the curtain shield airbags
inside (shaded in the illustration) is scratched, cracked, or
otherwise damaged.
NOTICE
Do not disconnect the battery cables before contacting
your Lexus dealer.
Page 247 of 651
OCCUPANT RESTRAINT SYSTEMS
226If any driving position memory switch is pushed while one of the
memorized driving position profiles is being activated, the
operation will stop.
To activate the system, push the desired button (“1” or “2”)\
again.
The driving position memory control system cannot be
operated while the vehicle is moving.
If the vehicle’s battery is disconnected, the computer’s
memory will
be erased and the memorized positions will have
to be set again.
CAUTION
� Do not start the vehicle while the adjustments are
being made.
� Take care not to select the wrong button, or the seat
could strike the rear passenger or hit your body
against the steering wheel. If this happens, you can
stop the movement by pressing another driving
position memory switch.
Page 257 of 651

STEERING WHEEL AND MIRRORS
236�
The vehicle is in a place where the earth’s magnetic field is
subject to interference by artificial magnetic fields
(underground parking, under a steel tower, between
buildings, roof parking, near a crossing, near a large vehicle,
etc.).
� The vehicle is magnetized. (There is a magnet or a metal
object on or near the inside rear view mirror.)
� The battery has been disconnected.
If your vehicle is out of the set zone, refer to “Calibrating the
compass” in this Section to set the zone number.
If the deviation is small, the compass works to calibrate the
direction automatically while the vehicle is in motion.
For obtaining additional precision or for complete calibrating,
see “Calibrating the compass” below.
If the direction is not indicated or the system does not operate
properly, contact your Lexus dealer.
� Compass sensor
NOTICE
Do not put magnets or a metal object on or near the
inside rear view mirror of the vehicle. Doing this may
cause malfunction of the compass sensor in the mirror.
Page 260 of 651
STEERING WHEEL AND MIRRORS
239
Drive the vehicle slowly (at 8 km/h [5 mph] or lower) in a circle
until the direction is displayed. If there is not enough space to
drive in a circle, drive around the block until the direction is
displayed.
After driving in 1 to 3 circles in the above method, calibration
is complete with the direction shown on the display. Perform
circling calibration just after you have purchased
your Lexus. And then always perform circling calibration
after the battery has been removed, replaced or
disconnected.
� Do not perform circling calibration of the compass in a place
where the earth’s magnetic field is subject to interference by
artificial magnetic fields (underground parking, under a steel
tower, between buildings, roof parking, near a crossing,
near a large vehicle, etc.).
� During calibration, do not operate electric systems (moon
roof, power windows, etc.) as they may interfere with the
calibration.


![LEXUS RX330 2006 Owners Manual STEERING WHEEL AND MIRRORS
239
Drive the vehicle slowly (at 8 km/h [5 mph] or lower) in a circle
until the direction is displayed. If there is not enough space to
drive in a circle, drive around the](/manual-img/36/58030/w960_58030-259.png "LEXUS RX330 2006 Owners Manual STEERING WHEEL AND MIRRORS
239
Drive the vehicle slowly (at 8 km/h [5 mph] or lower) in a circle
until the direction is displayed. If there is not enough space to
drive in a circle, drive around the")