Page 54 of 651
KEYS AND DOORS
33
When closing the back door, the inside handle can be used
to make the reach easier.
To close the back door, lower it and press down on it. After
closing the back door, try pulling it up to make sure it is securely
closed.
CAUTION
� Keep the back door closed while driving. This not
only keeps the luggage from being thrown out but
also prevents exhaust gases from entering the
vehicle.
� If the open back door hides the rear stop and tail
lights or rear turn signal lights while you are parked,
other road users must be warned of the presence of
your vehicle by a warning triangle or other device.
NOTICE
To prevent damage to the back door dampers, do not
apply any force, paint or let any other foreign matter on
them.
Page 57 of 651
KEYS AND DOORS
36
When closing the back door, the inside handle can be used
to make the reach easier.
To close the back door, lower it and press down on it. After
closing the back door, try pulling it up to make sure it is securely
closed.
CAUTION
� Keep the back door closed while driving. This not
only keeps the luggage from being thrown out but
also prevents exhaust gases from entering the
vehicle.
�If the open back door hides the rear stop and tail
lights or rear turn signal lights while you are parked,
other road users must be warned of the presence of
your vehicle by a warning triangle or other device.
NOTICE
To prevent damage to the back door dampers, do not
apply any force, paint or let any other foreign matter on
them.
Page 64 of 651
KEYS AND DOORS
43
THEFT DETERRENT SYSTEM
To deter theft of the vehicle, this system is designed to
sound an alarm if any of the doors or hood is forcibly
unlocked or the battery terminal is disconnected and then
reconnected while the vehicle is locked.
The alarm blows the horn intermittently and flashes the
headlights, tail lights and turn signal lights.
Further more when the interior light switch is in the “DOOR”
position, the interior light turns on.
� Security indicator light
Setting the system
1. Turn the ignition key to the “LOCK” position and
remove it.
The engine immobilizer system causes the indicator light to
flash.
2. Close and lock all the doors and hood using an ignition
key or wireless remote control.
The flashing indicator light will remain on when all the doors
and hood are closed and locked.
3. After 30 seconds, the indicator starts flashing and the
system is set.
Page 101 of 651
 Malfunction Indicator Lamp
This lamp comes on when the ignition key is turned to the
“ON” position and goes off after the engine starts. This")
GAUGES, METERS AND SERVICE REMINDER INDICATORS
80
(h) Malfunction Indicator Lamp
This lamp comes on when the ignition key is turned to the
“ON” position and goes off after the engine starts. This
means that the warning light system is operating properly.
If the lamp remains on, or the lamp comes on while driving,
first check the followings.
� Empty fuel tank
If the fuel tank is empty, refuel immediately.
� Loose fuel tank cap
If the fuel tank cap is loose, securely tighten it.
These cases are temporary malfunctions. The malfunction
indicator lamp will go off after taking several driving trips.
If the lamp does not go off even after several trips, contact your
Lexus dealer as soon as possible. If the fuel tank is not empty or the fuel tank cap is not
loose...
�
There is a problem somewhere in the engine, emission
control system, electronic throttle control system, automatic
transmission electrical system or warning light system itself.
Contact your Lexus dealer as soon as possible to service the
vehicle.
If engine speed does not increase when the accelerator pedal
is depressed, there may be a problem somewhere in the
electronic throttle control system.
At this time, vibration may occur. However, if you depress the
accelerator pedal more firmly and slowly, you can drive your
vehicle at low speeds. Have your vehicle checked by your
Lexus dealer as soon as possible.
Even if the abnormality of the electronic throttle control system
is corrected during low speed driving, the system may not be
recovered until the engine is stopped and the ignition key is
turned to the “ACC” or “LOCK” position.
CAUTION
Be especially careful to prevent erroneous pedal
operation.
Page 125 of 651
INTERIOR EQUIPMENT
104
REAR CONSOLE BOX
Sliding the rear console box
To slide the rear console box:
1. Open the cupholder lid in the front part of the rear
console box.
2. Slide the rear console box forward or backward while
gripping the lock release lever in the cupholder.
3. Release the lock release lever after sliding the rear
console box to the desired position. Then make sure it is
securely locked in position.
CAUTION
�Do not slide the rear console box while the vehicle is
moving. Doing so may cause the driver to mishandle
the vehicle and an accident may occur resulting in
death or serious injuries.
� Be careful not to get hands or feet pinched between
the rear console box and the center cluster or rear
seat.
� Be careful not to hit any passengers with the rear
console box while sliding it.
� After sliding the rear console box, make sure it is
securely locked in position.
Page 128 of 651
 is manufactured under license from
HomeLink
� and can be programmed to operate garage
doors, gates, entry doo")
INTERIOR EQUIPMENT
107
GARAGE DOOR OPENER
The garage door opener (� Universal
Transceiver) is manufactured under license from
HomeLink
� and can be programmed to operate garage
doors, gates, entry doors, door locks, home lighting
systems, and security systems, etc.
(a) Programming the HomeLink�
�1Buttons2Indicator light
The HomeLink
� in your vehicle has 3 buttons and you can
store one program for each button.
To ensure correct programming into the HomeLink
�, install a
new battery in the hand −held transmitter prior to programming. The battery side of the hand
−held transmitter must be pointed
away from the HomeLink
� during the programming process.
For Canadian users, follow the procedure in “Programming an
entrance gate/programming all devices in the Canadian
market”.
1. Decide which of 3 HomeLink
� buttons you want to program.
�1HomeLink�2Hand�held garage transmitter
325 to 75 mm (1 to 3 in.)
2. Place your hand −held garage transmitter 25 to 75 mm (1 to
3 in.) away from the surface of the HomeLink
�.
Keep the indicator light on the HomeLink
� in view while
programming.
Page 131 of 651
 the hand
−held
gate/device transmitter button every two seconds until step 5
is complete.
5. When the indicator light on the HomeLin")
INTERIOR EQUIPMENT
11 04. Continuously press and release (cycle) the hand
−held
gate/device transmitter button every two seconds until step 5
is complete.
5. When the indicator light on the HomeLink
� changes from a
slow to a rapid flash after 20 seconds, you can release both
buttons.
6. Test the operation of the HomeLink
� by pressing the newly
programmed button. Check to see if the gate/device operates
correctly.
7. Repeat steps 1 through 6 for each remaining HomeLink
�
button to program another device.
Programming other devices
To program other devices such as home security systems,
home door locks or lighting, contact your authorized Lexus
dealer for assistance.
Reprogramming a button
Individual HomeLink� buttons cannot be erased, however, to
reprogram a single button, follow the procedure “Programming
the HomeLink
�”.
(b) Operating the HomeLink�
To operate the HomeLink�, press the appropriate HomeLink�
button to activate the programmed device. The HomeLink�
indicator light should come on. The HomeLink� continues to
send the signal for up to 20 seconds as long as the button is
pressed.
(c) Erasing the entire HomeLink� memory (all
three programs)
To erase all previously programmed codes at one time, press
and hold down the 2 outside buttons for 20 seconds until the
indicator light flashes.
If you sell your vehicle, be sure to erase the programs stored
in the HomeLink
� memory.
Page 133 of 651
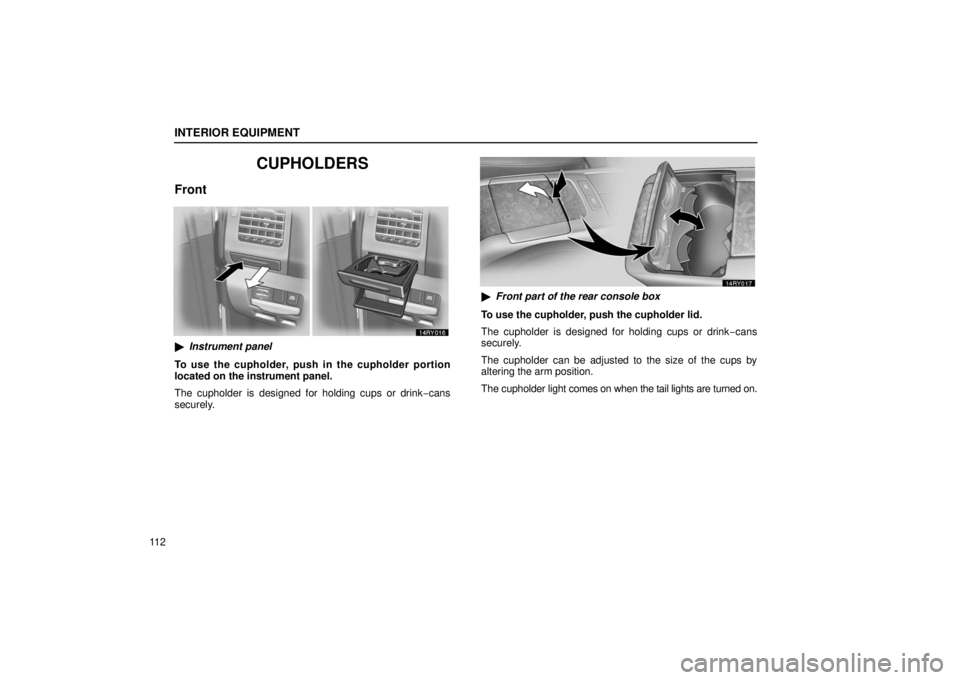
INTERIOR EQUIPMENT
11 2
CUPHOLDERS
Front
�Instrument panel
To use the cupholder, push in the cupholder portion
located on the instrument panel.
The cupholder is designed for holding cups or drink −cans
securely.
� Front part of the rear console box
To use the cupholder, push the cupholder lid.
The cupholder is designed for holding cups or drink −cans
securely.
The cupholder can be adjusted to the size of the cups by
altering the arm position.
The cupholder light comes on when the tail lights are turned on.