Page 89 of 225

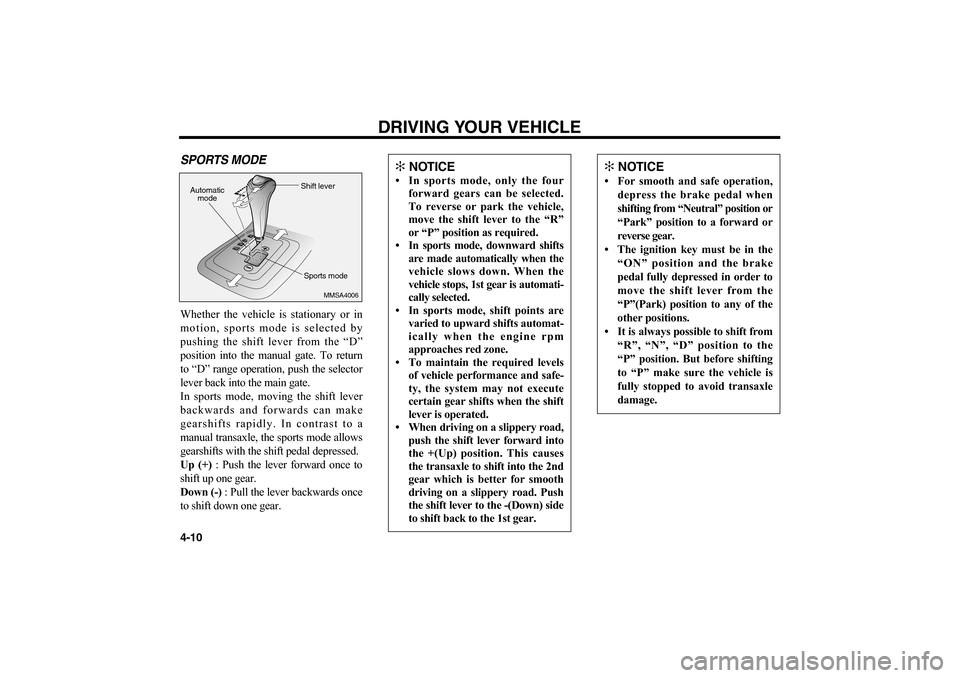
SPORTS MODEWhether the vehicle is stationary or in
motion, sports mode is selected by
pushing the shift lever from the “D”
position into the manual gate. To return
to “D” range operation, push the selector
lever back into the main gate.
In sports mode, moving the shift lever
backwards and forwards can make
gearshifts rapidly. In contrast to a
manual transaxle, the sports mode allows
gearshifts with the shift pedal depressed.
Up (+): Push the lever forward once to
shift up one gear.
Down (-): Pull the lever backwards once
to shift down one gear.
DRIVING YOUR VEHICLE
4-10
PRND
MMSA4006
Automatic
modeShift lever
Sports mode
✻
NOTICE
• In sports mode, only the four
forward gears can be selected.
To reverse or park the vehicle,
move the shift lever to the “R”
or “P” position as required.
• In sports mode, downward shifts
are made automatically when the
vehicle slows down. When the
vehicle stops, 1st gear is automati-
cally selected.
• In sports mode, shift points are
varied to upward shifts automat-
ically when the engine rpm
approaches red zone.
• To maintain the required levels
of vehicle performance and safe-
ty, the system may not execute
certain gear shifts when the shift
lever is operated.
• When driving on a slippery road,
push the shift lever forward into
the +(Up) position. This causes
the transaxle to shift into the 2nd
gear which is better for smooth
driving on a slippery road. Push
the shift lever to the -(Down) side
to shift back to the 1st gear.
✻
NOTICE
• For smooth and safe operation,
depress the brake pedal when
shifting from “Neutral” position or
“Park” position to a forward or
reverse gear.
• The ignition key must be in the
“ON” position and the brake
pedal fully depressed in order to
move the shift lever from the
“P”(Park) position to any of the
other positions.
• It is always possible to shift from
“R”, “N”, “D” position to the
“P” position. But before shifting
to “P” make sure the vehicle is
fully stopped to avoid transaxle
damage.
MS-CNA-Eng 4(~39).QXD 7/25/2005 5:16 PM Page 10
Page 90 of 225

MOVING UP A STEEP GRADE
FROM A STANDING STARTTo move up a steep grade from a
standing start, depress the brake pedal,
shift the shift lever to D (Drive). Select
the appropriate gear depending on load
weight and steepness of the grade, and
release the parking brake. Depress the
accelerator gradually while releasing the
service brakes.
When accelerating from a stop on a
steep hill, the vehicle may have a
tendency to roll backwards. Shifting
the shift lever into 2 (Second Gear)
while in Sports mode will help prevent
the vehicle from rolling backwards.
SHIFT LOCK SYSTEMFor your safety, the Automatic Transaxle
has a shift lock system which prevents
shifting the transaxle out of P (Park)
unless the brake pedal is depressed.
To shift the transaxle out of P (Park) ;
1. Depress and hold the brake pedal.
2. Start the engine or turn the ignition
key to the ON position.
3. Depress the lock release button and
move the shift lever.
When the ignition switch is in the ACC
or LOCK position, the transaxle cannot
be shifted from P (Park).
If the brake pedal is repeatedly depressed
and released with the shift lever in the P
(Park) position, a chattering noise near
the shift lever may be heard.
This is a normal condition.
Note that the ignition key cannot be
removed unless the shift lever is in the P
(Park) position. If the ignition switch is
in any other position, the key cannot be
removed.
4-11
CAUTION
Shift into the “R” and “P” posi-
tion only when the vehicle has
completely stopped.
Do not accelerate the engine in
reverse or any of the forward
positions with the brakes applied.
Always apply the footbrake when
shifting from “P” or “N”, to “R”
or “D” position.
Do not use the “P” (Park) posi-
tion in place of the parking
brake. Always set the parking
brake, shift the transaxle into
“P” (Park) position and turn off
the ignition when you leave the
vehicle, even momentarily.
Never leave the vehicle unat-
tended while the engine is run-
ning.
Check the automatic transaxle
fluid level regularly, and add
fluid as necessary.
MS-CNA-Eng 4(~39).QXD 7/25/2005 5:16 PM Page 11
Page 91 of 225

BRAKE SYSTEMPOWER BRAKESYour vehicle has power-assisted brakes
that adjust automatically through normal
usage.
In the event that brake system power
assist is lost because of a stalled engine
or some other reason, you can still stop
your vehicle by applying greater force to
the brake pedal than you normally
would. The stopping distance, however,
will be longer than usual.
When the engine is not running, the
reserve brake power is partially depleted
each time the brake pedal is depressed.
Do not pump the brake pedal when the
power assist has been interrupted, except
when necessary to maintain steering
control on slippery surfaces.
ANTI LOCK BRAKES (ABS)
(IF EQUIPPED)The anti-lock brake system is designed
to prevent lock-up of the wheels during
sudden braking or braking on slippery
surfaces. Compared to a conventional
brake system, the anti-lock brake system
provides greater steering control during
braking in such situations.DRIVING YOUR VEHICLE
4-12
WARNING - ABS Brakes
The anti-lock brake system
(ABS) cannot compensate for
bad road conditions, for
unsafe or reckless driving or
for bad judgement.
The ABS is designed to
improve maximum braking
effectiveness on typical
highways and roads in good
condition.
On road surfaces which are
in poor condition, the ABS
may actually reduce braking
effectiveness.
Always operate your vehicle
at reasonable speeds that are
safe for weather and traffic
conditions.
MS-CNA-Eng 4(~39).QXD 7/25/2005 5:16 PM Page 12
Page 92 of 225

During normal driving conditions, the
anti-lock brake system operates the same
as a conventional brake system. When
the anti-lock brake system is engaged
due to imminent loss of traction, a
pulsation of the brake pedal will result
and you may hear or feel “chattering”.
This is a normal condition and indicates
the system is functioning properly.
When driving a vehicle equipped with
anti-lock brakes, adjust your driving
according to the road and traffic conditions
and keep the following in mind.
• Do not pump the brakes as you would
when driving a vehicle not equipped
with an anti-lock brake system (ABS).
In order for the ABS to function
normally, press the brake pedal firmly,
without pumping the pedal.
• Even with the anti-lock brake system,
your vehicle still requires a sufficient
stopping distance. Always maintain a
safe distance from the vehicle in
front of you.• Always slow down when cornering.
The anti-lock brake system cannot
prevent accidents resulting from
excessive speeds.
• On loose or uneven road surfaces,
operation of the anti-lock brake
system may result in a longer stopping
distance than for vehicles equipped
with a conventional brake system.
• Avoid high speeds on wet roads. The
anti-lock brake system cannot
eliminate the risk of hydroplaning.
If the anti-lock brake system should fail,
the brake system will function as a
conventional brake system. Have your
vehicle checked by an Authorized Kia
Dealer as soon as possible.
4-13
✻
NOTICE
• If the ABS warning light is on
and stays on, you may have a
problem with the ABS system.
In this case, however, your regu-
lar brakes will work normally.
• The ABS warning light will stay
on for 2-3 seconds after the igni-
tion “ON”. During that time, the
ABS will go through self-diagno-
sis and the light will go off if
everything is normal. If the light
stays on you may have a problem
with your ABS.
Contact an Authorized Kia
Dealer for service as soon as pos-
sible.
MS-CNA-Eng 4(~39).QXD 7/25/2005 5:16 PM Page 13
Page 93 of 225

IN THE EVENT OF BRAKE
FAILUREIf the service brakes should fail to operate
while the vehicle is in motion, you can
make an emergency stop with the parking
brake. The stopping distance, however,
will be much greater than normal.DRIVING YOUR VEHICLE
4-14✻
NOTICE
• If the battery is discharged and
the engine is jump started, the
ABS warning light may come on.
This condition occurs because of
a discharged battery and not
because there is an anti-lock
brake system malfunction.
• Have the battery recharged
before driving the vehicle.
WARNING -
Parking Brake
Pulling on the parking brake
while the vehicle is moving at
normal speed can cause a
sudden loss of control of the
vehicle. If you must use the
parking brake to stop the
vehicle, use great caution in
applying the brake.
WARNING
Do not drive with your foot
resting on the brake pedal.
This will create abnormally
high brake temperatures,
excessive brake lining and
pad wear, and increased
stopping distances.
When descending a long or
steep hill, shift to a lower gear
and avoid continuous applica-
tion of the brakes.
Continuous brake application
will cause the brakes to
overheat and could result in a
temporary loss of braking
performance.
MS-CNA-Eng 4(~39).QXD 7/25/2005 5:16 PM Page 14
Page 94 of 225

DISC BRAKE WEAR
INDICATORSYour vehicle has front disc brakes.
When your front brake pads are worn
and it’s time for new pads, you will hear
a high-pitched warning sound from your
front brakes. You may hear this sound
intermittently or constantly.Some driving conditions or climates may
cause a brake squeal when you first
apply, or lightly apply, the brakes. This
is normal and does not indicate a
problem with your brakes.
4-15
Wet brakes may result in the
vehicle not slowing down at
the usual rate and/or
pulling to one side when the
brakes are applied. Applying
the brakes lightly will
indicate whether they have
been affected in this way.
Always test your brakes in
this fashion after driving
through deep water.
To dry the brakes, apply
them lightly while
maintaining a safe forward
speed until brake
performance returns to
normal.
WARNING - Brake Wear
This brake-wear warning sound
means your vehicle needs
service. If you ignore this
audible warning, you will
eventually lose braking
performance, which could lead
to a serious accident.
✻
NOTICE
To avoid costly brake repairs, do not
continue to drive with worn brake
pads.
MS-CNA-Eng 4(~39).QXD 7/25/2005 5:16 PM Page 15
Page 95 of 225
REAR DRUM BRAKES
(IF EQUIPPED)Your rear drum brakes don’t have wear
indicators. Have the rear brake linings
inspected if you hear a rear brake
rubbing noise. Also, have your rear
brakes inspected each time you change
or rotate your tires and when you have
the front brakes replaced.
PARKING BRAKE• To set the parking brake, pull the
parking brake handle fully and firmly
upward while applying the service
brake.DRIVING YOUR VEHICLE
4-16
MMSA4012
MMSA4011
CAUTION
Always replace brake linings or
front pads as complete front or
rear axle sets.
CAUTION
Driving with the parking brake on
will cause excessive wear of the
brake linings and pads.
MS-CNA-Eng 4(~39).QXD 7/25/2005 5:16 PM Page 16
Page 96 of 225

Check the brake warning light each time
you start the engine. The light is located
in the instrument panel. This warning
light will be illuminated when the engine
is running and the parking brake is set.
Before driving, be sure the parking brake
is fully released and the brake warning
light is off.
If the brake warning light remains on
after the parking brake is released, there
may be a malfunction in the brake
system. Immediate attention is
necessary.
If at all possible, cease driving the
vehicle immediately. If that is not
possible, use extreme caution in
operating the vehicle and only drive it
until you reach the first safe location or a
repair shop.
4-17
AN7B04014
CAUTION
When stopped, do not use the
gearshift lever in place of the park-
ing brake. Always set the parking
brake fully AND make sure the
gearshift lever is securely positioned
in P (Park) with an automatic
transaxle or in 1st (First) or R
(Reverse) gear with a manual
transaxle.
MS-CNA-Eng 4(~39).QXD 7/25/2005 5:16 PM Page 17