2006 KIA AMANTI maintenance schedule
[x] Cancel search: maintenance schedulePage 253 of 322
1
2
3
4
5
6
7
8
910
79
Maintenance
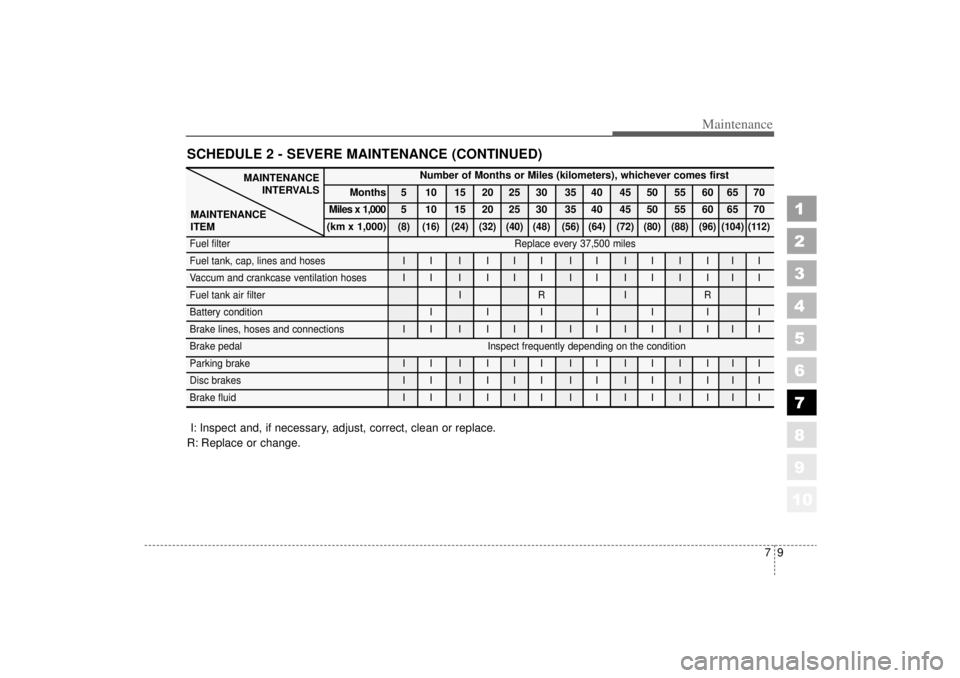
SCHEDULE 2 - SEVERE MAINTENANCE (CONTINUED)
MAINTENANCEINTERVALS
MAINTENANCE
ITEM
Number of Months or Miles (kilometers), whichever comes first
Months 5 10 15 20 25 30 35 40 45 50 55 60 65 70
Miles x 1,000 5 10 15 20 25 30 35 40 45 50 55 60 65 70
(km x 1,000)
(8) (16) (24) (32) (40) (48) (56) (64) (72) (80) (88) (96) (104) (112)
Fuel filter Replace every 37,500 miles
Fuel tank, cap, lines and hoses I I I I I I I I I I I I I I
Vaccum and crankcase ventilation hoses I I I I I I I I I I I I I I
Fuel tank air filter I R I R
Battery condition I I I I I I I
Brake lines, hoses and connections I I I I I I I I I I I I I I
Brake pedal Inspect frequently depending on the condition
Parking brake I I I I I I I I I I I I I I
Disc brakes I I I I I I I I I I I I I I
Brake fluid I I I I I I I I I I I I I I
I: Inspect and, if necessary, adjust, correct, clean or replace.
R: Replace or change.
Page 254 of 322
1
2
3
4
5
6
7
8
910
Maintenance10
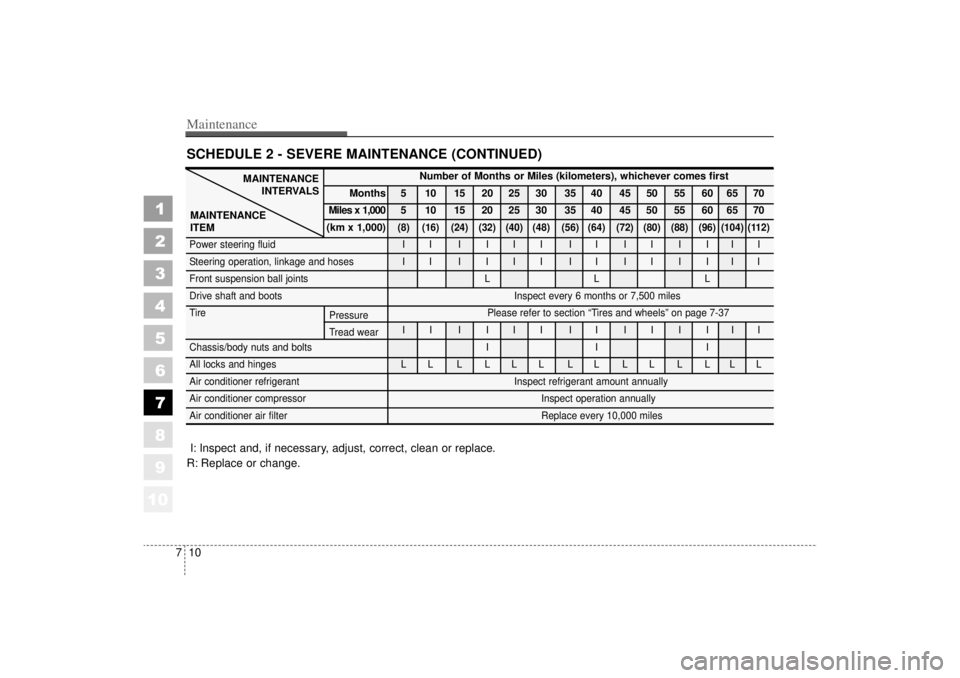
7SCHEDULE 2 - SEVERE MAINTENANCE (CONTINUED)
MAINTENANCE
INTERVALS
MAINTENANCE
ITEM
Number of Months or Miles (kilometers), whichever comes first
Months 5 10 15 20 25 30 35 40 45 50 55 60 65 70
Miles x 1,000 5 10 15 20 25 30 35 40 45 50 55 60 65 70
(km x 1,000)
(8) (16) (24) (32) (40) (48) (56) (64) (72) (80) (88) (96) (104) (112)
Power steering fluid I I I I I I I I I I I I I I
Steering operation, linkage and hoses I I I I I I I I I I I I I I
Front suspension ball joints L L L
Drive shaft and boots Inspect every 6 months or 7,500 miles
Tire Please refer to section “Tires and wheels” on page 7-37 II I III II II I III
Chassis/body nuts and bolts I I I
All locks and hinges L L L L L L L L L L L L L L
Air conditioner refrigerant Inspect refrigerant amount annually
Air conditioner compressor Inspect operation annually
Air conditioner air filter Replace every 10,000 miles
I: Inspect and, if necessary, adjust, correct, clean or replace.
R: Replace or change.
Pressure
Tread wear
Page 255 of 322
711
Maintenance
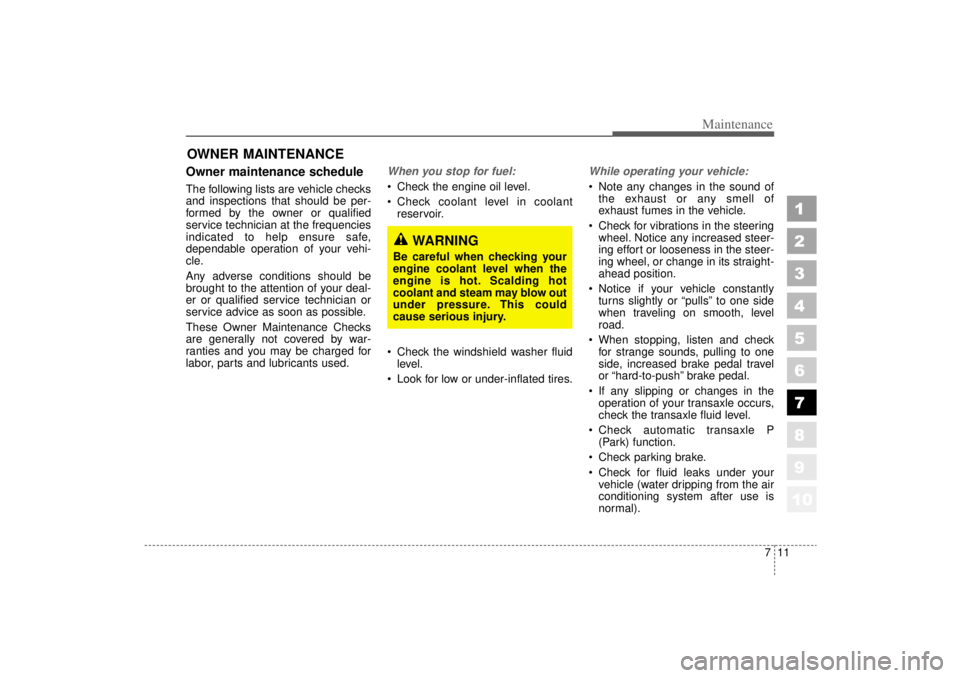
OWNER MAINTENANCE Owner maintenance schedule The following lists are vehicle checks
and inspections that should be per-
formed by the owner or qualified
service technician at the frequencies
indicated to help ensure safe,
dependable operation of your vehi-
cle.
Any adverse conditions should be
brought to the attention of your deal-
er or qualified service technician or
service advice as soon as possible.
These Owner Maintenance Checks
are generally not covered by war-
ranties and you may be charged for
labor, parts and lubricants used.
When you stop for fuel: Check the engine oil level.
Check coolant level in coolantreservoir.
Check the windshield washer fluid level.
Look for low or under-inflated tires.
While operating your vehicle: Note any changes in the sound of the exhaust or any smell of
exhaust fumes in the vehicle.
Check for vibrations in the steering wheel. Notice any increased steer-
ing effort or looseness in the steer-
ing wheel, or change in its straight-
ahead position.
Notice if your vehicle constantly turns slightly or “pulls” to one side
when traveling on smooth, level
road.
When stopping, listen and check for strange sounds, pulling to one
side, increased brake pedal travel
or “hard-to-push” brake pedal.
If any slipping or changes in the operation of your transaxle occurs,
check the transaxle fluid level.
Check automatic transaxle P (Park) function.
Check parking brake.
Check for fluid leaks under your vehicle (water dripping from the air
conditioning system after use is
normal).
1
2
3
4
5
6
7
8
910
WARNING
Be careful when checking your
engine coolant level when the
engine is hot. Scalding hot
coolant and steam may blow out
under pressure. This could
cause serious injury.
Page 259 of 322
715
Maintenance
1
2
3
4
5
6
7
8
910
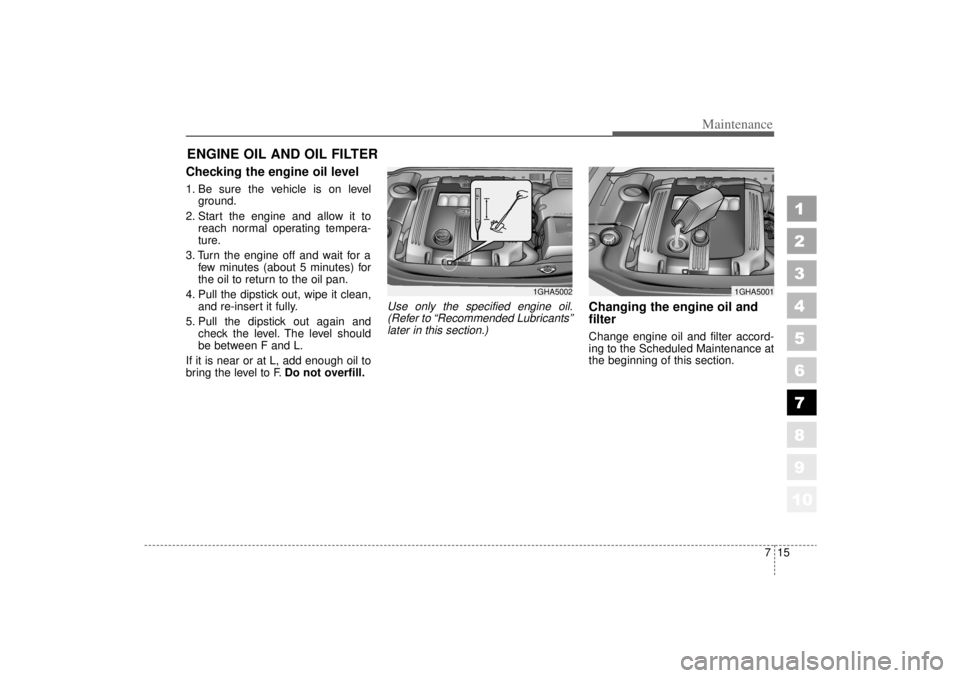
ENGINE OIL AND OIL FILTERChecking the engine oil level 1. Be sure the vehicle is on levelground.
2. Start the engine and allow it to reach normal operating tempera-
ture.
3. Turn the engine off and wait for a few minutes (about 5 minutes) for
the oil to return to the oil pan.
4. Pull the dipstick out, wipe it clean, and re-insert it fully.
5. Pull the dipstick out again and check the level. The level should
be between F and L.
If it is near or at L, add enough oil to
bring the level to F. Do not overfill.
Use only the specified engine oil.
(Refer to “Recommended Lubricants”later in this section.)
Changing the engine oil and
filterChange engine oil and filter accord-
ing to the Scheduled Maintenance at
the beginning of this section.
1GHA5001
1GHA5002
Page 263 of 322
719
Maintenance
1
2
3
4
5
6
7
8
910
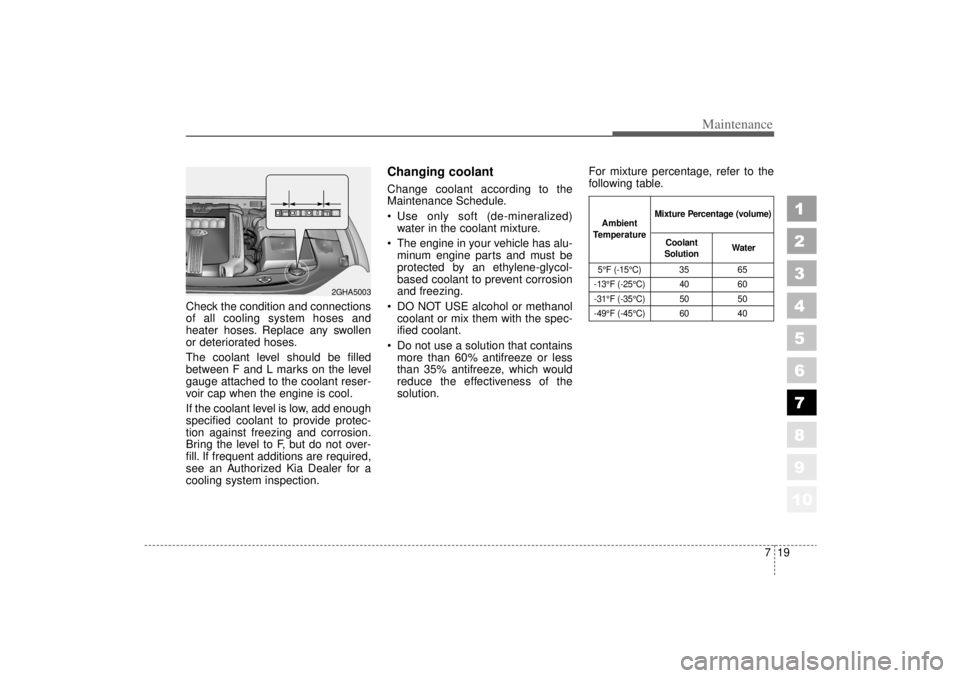
Check the condition and connections
of all cooling system hoses and
heater hoses. Replace any swollen
or deteriorated hoses.
The coolant level should be filled
between F and L marks on the level
gauge attached to the coolant reser-
voir cap when the engine is cool.
If the coolant level is low, add enough
specified coolant to provide protec-
tion against freezing and corrosion.
Bring the level to F, but do not over-
fill. If frequent additions are required,
see an Authorized Kia Dealer for a
cooling system inspection.
Changing coolant Change coolant according to the
Maintenance Schedule.
Use only soft (de-mineralized)water in the coolant mixture.
The engine in your vehicle has alu- minum engine parts and must be
protected by an ethylene-glycol-
based coolant to prevent corrosion
and freezing.
DO NOT USE alcohol or methanol coolant or mix them with the spec-
ified coolant.
Do not use a solution that contains more than 60% antifreeze or less
than 35% antifreeze, which would
reduce the effectiveness of the
solution. For mixture percentage, refer to the
following table.
2GHA5003
5°F (-15°C) 35
65
-13°F (-25°C) 40 60
-31°F (-35°C) 50 50
-49°F (-45°C) 60 40Ambient
Temperature Mixture Percentage (volume)
Coolant
Solution Water
Page 270 of 322
Maintenance26
7
1
2
3
4
5
6
7
8
910
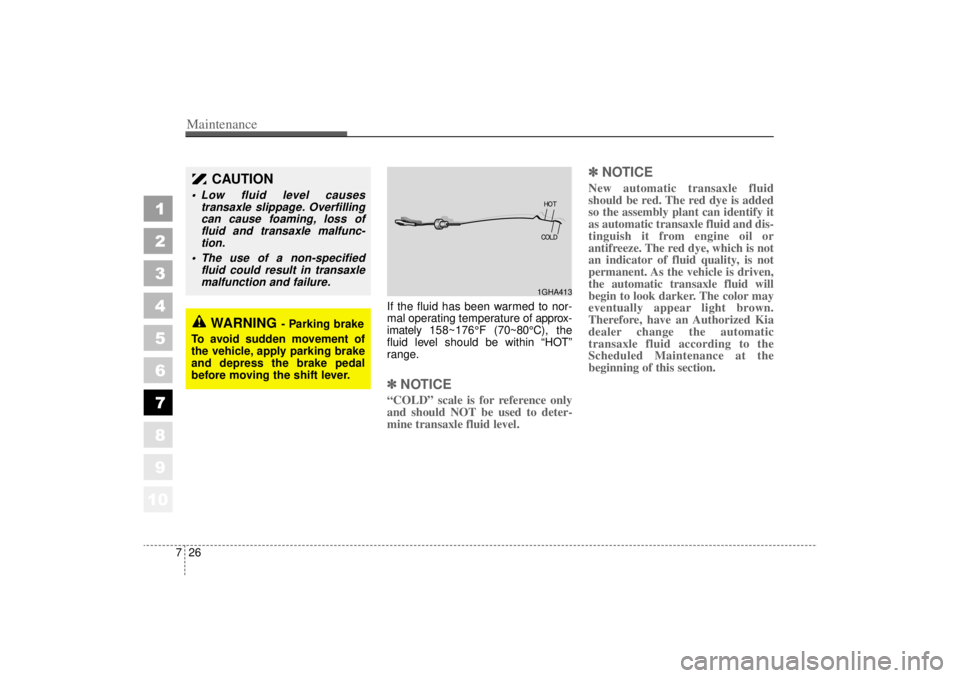
If the fluid has been warmed to nor-
mal operating temperature of approx-
imately 158~176° F (70~80°C), the
fluid level should be within “HOT”
range.✽ ✽ NOTICE“COLD” scale is for reference only
and should NOT be used to deter-
mine transaxle fluid level.
✽ ✽NOTICENew automatic transaxle fluid
should be red. The red dye is added
so the assembly plant can identify it
as automatic transaxle fluid and dis-
tinguish it from engine oil or
antifreeze. The red dye, which is not
an indicator of fluid quality, is not
permanent. As the vehicle is driven,
the automatic transaxle fluid will
begin to look darker. The color may
eventually appear light brown.
Therefore, have an Authorized Kia
dealer change the automatic
transaxle fluid according to the
Scheduled Maintenance at the
beginning of this section.
CAUTION
Low fluid level causes
transaxle slippage. Overfillingcan cause foaming, loss offluid and transaxle malfunc-tion.
The use of a non-specified fluid could result in transaxlemalfunction and failure.
WARNING
- Parking brake
To avoid sudden movement of
the vehicle, apply parking brake
and depress the brake pedal
before moving the shift lever.
1GHA413
Page 274 of 322
Maintenance30
7
1
2
3
4
5
6
7
8
910
Replace the element according to
the Scheduled Maintenance Section.If the vehicle is operated in extreme-
ly dusty or sandy areas, replace theelement more often than the usualrecommended intervals. (Refer toSevere Maintenance Schedule inthis section.)
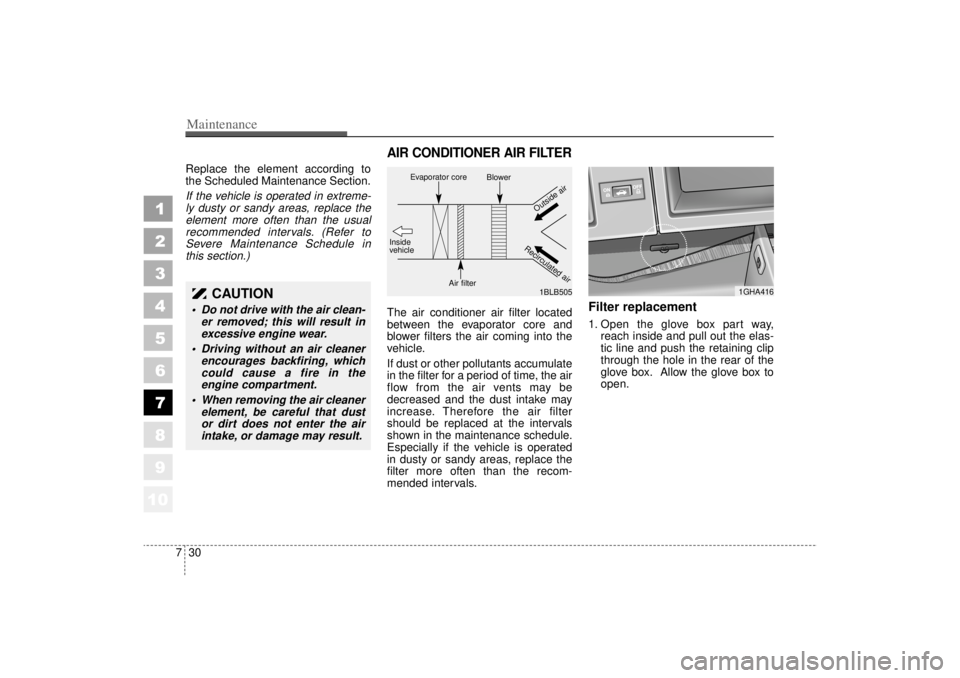
AIR CONDITIONER AIR FILTERThe air conditioner air filter located
between the evaporator core and
blower filters the air coming into the
vehicle.
If dust or other pollutants accumulate
in the filter for a period of time, the air
flow from the air vents may be
decreased and the dust intake may
increase. Therefore the air filter
should be replaced at the intervals
shown in the maintenance schedule.
Especially if the vehicle is operated
in dusty or sandy areas, replace the
filter more often than the recom-
mended intervals.
Filter replacement1. Open the glove box part way, reach inside and pull out the elas-
tic line and push the retaining clip
through the hole in the rear of the
glove box. Allow the glove box to
open.
CAUTION
Do not drive with the air clean-er removed; this will result inexcessive engine wear.
Driving without an air cleaner encourages backfiring, whichcould cause a fire in theengine compartment.
When removing the air cleaner element, be careful that dustor dirt does not enter the airintake, or damage may result.
1GHA416
1BLB505
Evaporator core
BlowerOutside air
Recirculated air
Air filter
Inside
vehicle
Page 318 of 322
Index6
10Label
Information . . . . . . . . . . . . . . . . . . . . . . . . . . . . . . 5-21
Tire Specification/Pressure . . . . . . . . . . . . . . . . . . . 5-22
Vehicle Certification Number . . . . . . . . . . . . . . . . . 5-21
Lamp, door courtesy . . . . . . . . . . . . . . . . . . . . . . . . . 3-98
Lap/Shoulder Belt . . . . . . . . . . . . . . . . . . . . . . . . . . . 3-43 Rear . . . . . . . . . . . . . . . . . . . . . . . . . . . . . . . . . . . 3-45
Webbing, Cleaning the . . . . . . . . . . . . . . . . . . . . . . 7-57
Light Bulbs (Specifications) . . . . . . . . . . . . . . . . . . . . . . . 8-5
Bulb Replacement, Interior . . . . . . . . . . . . . . . . . . 7-47
Bulb Replacement, License Plate . . . . . . . . . . . . . . 7-58
Bulb Replacement, Rear Combination . . . . . . . . . . 7-48
Dome . . . . . . . . . . . . . . . . . . . . . . . . . . . . . . . . . . . 3-97
Interior . . . . . . . . . . . . . . . . . . . . . . . . . . . . . . . .\
. . 3-97
Map . . . . . . . . . . . . . . . . . . . . . . . . . . . . . . . . . . . .\
3-97
Lighter, Cigarette . . . . . . . . . . . . . . . . . . . . . . . . . . 3-102
Lighting, Control . . . . . . . . . . . . . . . . . . . . . . . . . . . 4-44
Lights, interior . . . . . . . . . . . . . . . . . . . . . . . . . . . . . 3-97
Locks From inside the vehicle, operating door . . . . . . . . . 3-11
From outside the vehicle, operating door . . . . . . . . . 3-9
Door . . . . . . . . . . . . . . . . . . . . . . . . . . . . . . . . . . . .\
3-9
Low Fuel Level Warning . . . . . . . . . . . . . . . . . . . . . . 4-39
Low Brake Fluid Level Warning . . . . . . . . . . . . . . . . 4-39
Lubricant Specifications . . . . . . . . . . . . . . . . . . . . . . 7-51
Lubricants and Fluids . . . . . . . . . . . . . . . . . . . . . . . . 7-28
Lubrication, Body . . . . . . . . . . . . . . . . . . . . . . . . . . . 7-28
Lumbar Support . . . . . . . . . . . . . . . . . . . . . . . . . . . . 3-23 Main Fuse . . . . . . . . . . . . . . . . . . . . . . . . . . . . . . . . . . 6-9
Maintenance . . . . . . . . . . . . . . . . . . . . . . . . . . . . . . . . 7-1
Aluminum Wheel . . . . . . . . . . . . . . . . . . . . . . . . . . 7-56
Bright Metal . . . . . . . . . . . . . . . . . . . . . . . . . . . . . 7-55
Finish . . . . . . . . . . . . . . . . . . . . . . . . . . . . . . . . . . 7-53
Normal - Schedule 1 . . . . . . . . . . . . . . . . . . . . . . . . 7-5
Owner . . . . . . . . . . . . . . . . . . . . . . . . . . . . . . . . . . 7-11
Severe - Schedule 1 . . . . . . . . . . . . . . . . . . . . . . . . . 7-8
Service, Scheduled . . . . . . . . . . . . . . . . . . . . . . . . . . 7-4
Services . . . . . . . . . . . . . . . . . . . . . . . . . . . . . . . . . . 7-3
Underbody . . . . . . . . . . . . . . . . . . . . . . . . . . . . . . . 7-55
When Trailer Towing . . . . . . . . . . . . . . . . . . . . . . . 5-20
Malfunction Indicator . . . . . . . . . . . . . . . . . . . . . . . . 4-40
Mirror Day/Night Rearview . . . . . . . . . . . . . . . . . . . . . . . 3-94
Outside Rearview . . . . . . . . . . . . . . . . . . . . . . . . . 3-92
Mirrors . . . . . . . . . . . . . . . . . . . . . . . . . . . . . . . . . . . 3-92
Mode selection Button . . . . . . . . . . . . . . . . . . . . . . . 4-60
Modifications, Vehicle . . . . . . . . . . . . . . . . . . . . . . . . 5-3
Night, Driving at . . . . . . . . . . . . . . . . . . . . . . . . . . . . . 5-8
Odometer . . . . . . . . . . . . . . . . . . . . . . . . . . . . . . . . . 4-34
1
2
3
4
5
6
7
8
910
L
MNO