2006 JEEP LIBERTY belt
[x] Cancel search: beltPage 59 of 424
However, if you haven’t healed significantly within a
few days, or if you have any blistering, see your doctor
immediately. As the airbags deflate you may see some
smoke-like particles. The particles are a normal by-
product of the process that generates the nontoxic gas
used for airbag inflation. These airborne particles may
irritate the skin, eyes, nose, or throat. If you have skin
or eye irritation, rinse the area with cool water. For
nose or throat irritation, move to fresh air. If the
irritation continues, see your doctor. If these particles
settle on your clothing, follow the garment manufac-
turer’s instructions for cleaning.
•It is not advisable to drive your vehicle after the
airbags have deployed. If you are involved in another
collision, the airbags will not be in place to protect you.
WARNING!
Deployed airbags and seat belt pretensioners cannot
protect you in another collision. Have the airbags,
seat belt pretensioners, and the front passenger seat
belt retractor assembly, replaced by an authorized
dealer as soon as possible. Also, have the Occupant
Classification System serviced as well.
THINGS TO KNOW BEFORE STARTING YOUR VEHICLE 59
2
Page 62 of 424
WARNING!
In a collision, an unrestrained child, even a tiny
baby, can become a missile inside the vehicle. The
force required to hold even an infant on your lap can
become so great that you could not hold the child, no
matter how strong you are. The child and others
could be badly injured. Any child riding in your
vehicle should be in a proper restraint for the child’s
size.
Infants and Small Children
There are different sizes and types of restraints for
children from newborn size to the child almost large
enough for an adult seat belt. Always check the child seat
owner’s manual to ensure you have the right seat for
your child. Use the restraint that is correct for your child:
•This vehicle is not capable of accommodating the
installation of a car bed used for carrying newborn
babies at the right front passenger seat position. If a car
bed must be used to transport a newborn baby, the car
bed must be installed in the second seating row only.
•Safety experts recommend that children ride
rearward-facing in the vehicle until they are at least
one year old and weigh at least 20 lbs (9 kg). Two types
of child restraints can be used rearward facing: infant
carriers and “convertible” child seats.
•The infant carrier is only used rearward-facing in the
vehicle. It is recommended for children who weigh up
to about 20 lbs (9 kg). “Convertible” child seats can be
used either rearward-facing or forward-facing in the
vehicle. Convertible child seats often have a higher
weight limit in the rearward-facing direction than
62 THINGS TO KNOW BEFORE STARTING YOUR VEHICLE
Page 63 of 424

infant carriers do, so they can be used rearward-facing
by children who weigh more than 20 lbs (9 kg) but are
less than one year old.
•Rearward-facing child seats must NEVERbe used in
the front seat of a vehicle with a front passenger
airbag. An airbag deployment could cause severe
injury or death to infants in this position.
•Children who weigh more than 20 lbs (9 kg) and who
are older than one year can ride forward-facing in the
vehicle. Forward-facing child seats and convertible
child seats used in the forward-facing direction are for
children who weigh 20 to 40 lbs (9 to 18 kg), and are
older than one year old. These child seats are also held
in the vehicle by the lap/shoulder belt.
•The belt-positioning booster seat is for children weigh-
ing more than 40 lbs (18 kg), but who are still too small
to fit the vehicle’s seat belts properly. If the child
cannot sit with knees bent over the seat cushion while
the child’s back is against the seatback, they need a
belt-positioning booster seat. The child and booster
seat are held in the vehicle by the lap/shoulder belt.
(Some booster seats are equipped with a front shield
and are held in the vehicle by the lap portion.)
•For additional information refer to www.seatcheck.org
or call 1-866-SEATCHECK.
THINGS TO KNOW BEFORE STARTING YOUR VEHICLE 63
2
Page 64 of 424
WARNING!
•Improper installation can lead to failure of an
infant or child restraint. It could come loose in a
collision. The child could be badly injured or
killed. Follow the manufacturer’s directions ex-
actly when installing an infant or child restraint.
•A rearward facing infant restraint should only be
used in a rear seat. A rearward facing infant
restraint in the front seat may be struck by a
deploying passenger airbag which may cause se-
vere or fatal injuries to the infant.
Here are some tips for getting the most out of your child
restraint:
•Before buying any restraint system, make sure that it
has a label certifying that it meets all applicable Safety Standards. The manufacturer recommends that you
try a child restraint in the vehicle seats where you will
use it before you buy it.
•The restraint must be appropriate for your child’s
weight and height. Check the label on the restraint for
weight and height limits.
•Carefully follow the instructions that come with the
restraint. If you install the restraint improperly, it may
not work when you need it.
•The passenger seat belts are equipped with either
cinching latch plates or automatic locking retractors,
which are designed to keep the lap portion tight
around the child restraint so that it is not necessary to
use a locking clip. If the seat belt has a cinching latch
plate, pulling up on the shoulder portion of the
lap/shoulder belt will tighten the belt. The cinching
latch plate will keep the belt tight, however, any seat
64 THINGS TO KNOW BEFORE STARTING YOUR VEHICLE
Page 65 of 424

belt system will loosen with time, so check the belt
occasionally and pull it tight if necessary.
If the seat belt has a automatic locking retractor, it will
have a distinctive label. Pull the belt from the retractor
until there is enough to allow you to pass through the
child restraint and slide the latch plate into the buckle.
Then, pull the belt until it is all extracted from the
retractor. Allow the belt to return to the retractor,
pulling on the excess webbing to tighten the lap
portion about the child restraint. Refer to “Automatic
Locking Mode” earlier in this section.
•Buckle the child into the restraint exactly as the
manufacturer’s instructions tell you.
•When your child restraint is not in use, secure it in the
vehicle with the seat belt or remove it from the vehicle.
Do not leave it loose in the vehicle. In a sudden stop or
collision, it could strike the occupants or seat backs
and cause serious personal injury.
LATCH — Child Seat Anchorage System (Lower
Anchors and Tether for CH ildren)
Your vehicle’s rear seat is equipped with the child
restraint anchorage system called LATCH. The LATCH
system provides for the installation of the child restraint
without using the vehicle’s seat belts, instead securing
the child restraint using lower anchorages and upper
tether straps from the child restraint to the vehicle
structure.
LATCH-compatible child restraint systems are now avail-
able. However, because the lower anchorages are to be
introduced over a period of years, child restraint systems
having attachments for those anchorages will continue to
also have features for installation using the vehicle’s seat
belts. Child restraints having tether straps and hooks for
connection to the top tether anchorages have been avail-
able for some time. For some older child restraints, many
child restraint manufacturers offer add-on tether strap
THINGS TO KNOW BEFORE STARTING YOUR VEHICLE 65
2
Page 66 of 424

kits or retro-fit kits. You are urged to take advantage of all
the available attachments provided with your child re-
straint in any vehicle.
NOTE: When using the LATCH attaching system to
install a child restraint, please ensure that all seat belts
not being used for occupant restraints are stowed and out
of reach of children. It is recommended that before
installing the child restraint, buckle the seat belt so the
seat belt is tucked behind the child restraint and out of
reach. If the buckled seat belt interferes with the child
restraint installation, instead of tucking the seat belt
behind the child restraint, route the seat belt through the
child restraint belt path and then buckle it. This should
stow the seat belt out of the reach of an inquisitive child.
Remind all children in the vehicle that the seat belts are
not toys and should not be played with, and never leave
your child unattended in the vehicle. All three rear seating positions have lower anchorages
that are capable of accommodating LATCH-compatible
child seats having flexible, webbing-mounted lower at-
tachments. Child seats with fixed lower attachments
must be installed in the outboard positions only. Regard-
less of the specific type of lower attachment,
NEVER
install LATCH-compatible child seats such that two seats
share a common lower anchorage. If installing child seats
in adjacent rear-seating positions or if your child re-
straints are not LATCH-compatible, install the restraints
using the vehicle’s seat belts.
Installing the LATCH-Compatible Child Restraint
System
We urge that you carefully follow the directions of the
manufacturer when installing your child restraint. Not all
child restraint systems will be installed as described here.
Again, carefully follow the installation instructions that
were provided with the child restraint system.
66 THINGS TO KNOW BEFORE STARTING YOUR VEHICLE
Page 69 of 424

Installing Child Restraints Using the Vehicle Seat
Belt
The passenger seat belts are equipped with either cinch-
ing latch plates or automatic locking retractors, which are
designed to keep the lap portion tight around the child
restraint so that it is not necessary to use a locking clip. If
the seat belt has a cinching latch plate, pulling up on the
shoulder portion of the lap/shoulder belt will tighten the
belt. The cinching latch plate will keep the belt tight,
however, any seat belt system will loosen with time, so
check the belt occasionally and pull it tight if necessary.
If the seat belt has a automatic locking retractor, it will
have a distinctive label. Pull the belt from the retractor
until there is enough to allow you to pass through the
child restraint and slide the latch plate into the buckle.
Then, pull the belt until it is all extracted from the
retractor. Allow the belt to return to the retractor, pulling on the excess webbing to tighten the lap portion about
the child restraint. Refer to “Automatic Locking Mode”
earlier in this section.
In the rear seat, you may have trouble tightening the
lap/shoulder belt on the child restraint because the
buckle or latch plate is too close to the belt path opening
on the restraint. Disconnect the latch plate from the
buckle and twist the short buckle-end belt several times
to shorten it. Insert the latch plate into the buckle with the
release button facing out.
If the belt still can’t be tightened, or if by pulling and
pushing on the restraint loosens the belt, you may need
to do something more. Disconnect the latch plate from
the buckle, turn the buckle around, and insert the latch
plate into the buckle again. If you still can’t make the
child restraint secure, try a different seating position.
THINGS TO KNOW BEFORE STARTING YOUR VEHICLE 69
2
Page 70 of 424
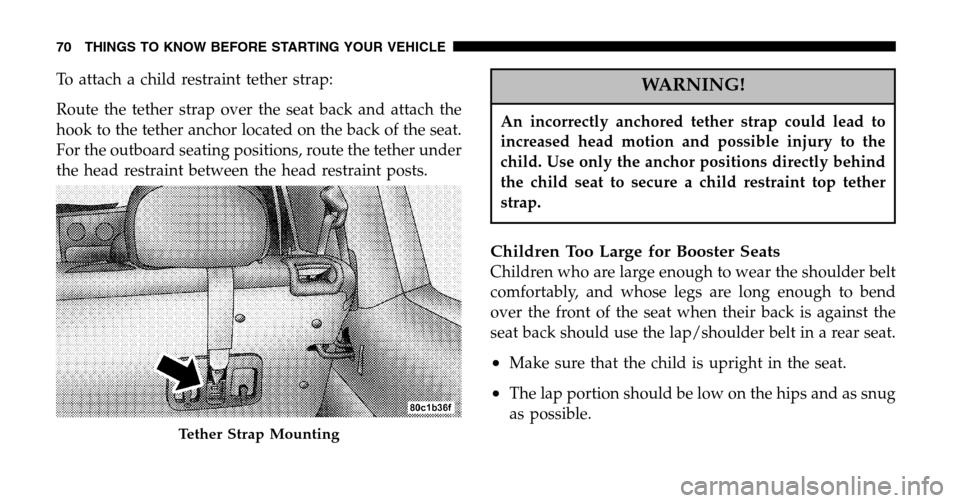
To attach a child restraint tether strap:
Route the tether strap over the seat back and attach the
hook to the tether anchor located on the back of the seat.
For the outboard seating positions, route the tether under
the head restraint between the head restraint posts.WARNING!
An incorrectly anchored tether strap could lead to
increased head motion and possible injury to the
child. Use only the anchor positions directly behind
the child seat to secure a child restraint top tether
strap.
Children Too Large for Booster Seats
Children who are large enough to wear the shoulder belt
comfortably, and whose legs are long enough to bend
over the front of the seat when their back is against the
seat back should use the lap/shoulder belt in a rear seat.
•Make sure that the child is upright in the seat.
•The lap portion should be low on the hips and as snug
as possible.
Tether Strap Mounting
70 THINGS TO KNOW BEFORE STARTING YOUR VEHICLE