Page 315 of 3383

AT-240
ON-VEHICLE SERVICE
Revision: November 20092006 QX56
Rear Oil SealECS00EQ1
REMOVAL AND INSTALLATION
Removal
1. Remove rear propeller shaft. Refer to PR-9, "REMOVAL" .
2. Remove transfer from transmission (4WD models). Refer to TF-
145, "REMOVAL" .
3. Remove rear oil seal using suitable tool. CAUTION:
Be careful not to scratch rear extension assembly (2WD
models) or adapter case assembly (4WD models).
Installation
1. Install new rear oil seal until it is flush with component face intothe extension case (2WD models) using Tool, or adapter case
(4WD models) using suitable tool.
CAUTION:
�Apply ATF to rear oil seal.
�Do not reuse rear oil seal.
2. Install transfer to transmission (4WD models). Refer to TF-145,
"INSTALLATION" .
3. Install rear propeller shaft. Refer to PR-9, "
INSTALLATION" .
CAUTION:
After completing installation, check for A/T fluid leakage and
fluid level. Refer to AT- 1 2 , "
Changing Automatic Transmission
Fluid (ATF)" and AT- 1 2 , "Checking Automatic Transmission
Fluid (ATF)" .
SCIA5254E
Tool number : ST33400001 (J-26082)
SCIA5583E
Page 318 of 3383
TRANSMISSION ASSEMBLYAT-243
DE
F
G H
I
J
K L
M A
B
AT
Revision: November 2009 2006 QX56
TRANSMISSION ASSEMBLYPFP:31020
Removal and Installation (2WD)ECS00EQ2
COMPONENTS
REMOVAL
CAUTION:
When removing the A/T assembly from engine, first remove the crankshaft position sensor (POS) from
the A/T assembly.
Be careful not to damage sensor edge.
1. Disconnect the negative battery terminal.
2. Remove engine cover.
3. Remove A/T fluid indicator gauge.
4. Remove undercovers using power tool.
5. Remove exhaust front tube and center muffler using power tool. Refer to EX-3, "
Removal and Installation"
.
6. Remove rear propeller shaft. Refer to PR-8, "
Removal and Installation" .
7. Remove A/T control cable. Refer to AT- 2 2 7 , "
REMOVAL" .
1. A/T fluid indicator pipe 2. A/T fluid indicator 3. O-ring
4. Transmission assembly 5. Fluid cooler tube6. A/T cross member
7. Insulator 8. Copper washers
WCIA0567E
Page 319 of 3383

AT-244
TRANSMISSION ASSEMBLY
Revision: November 20092006 QX56
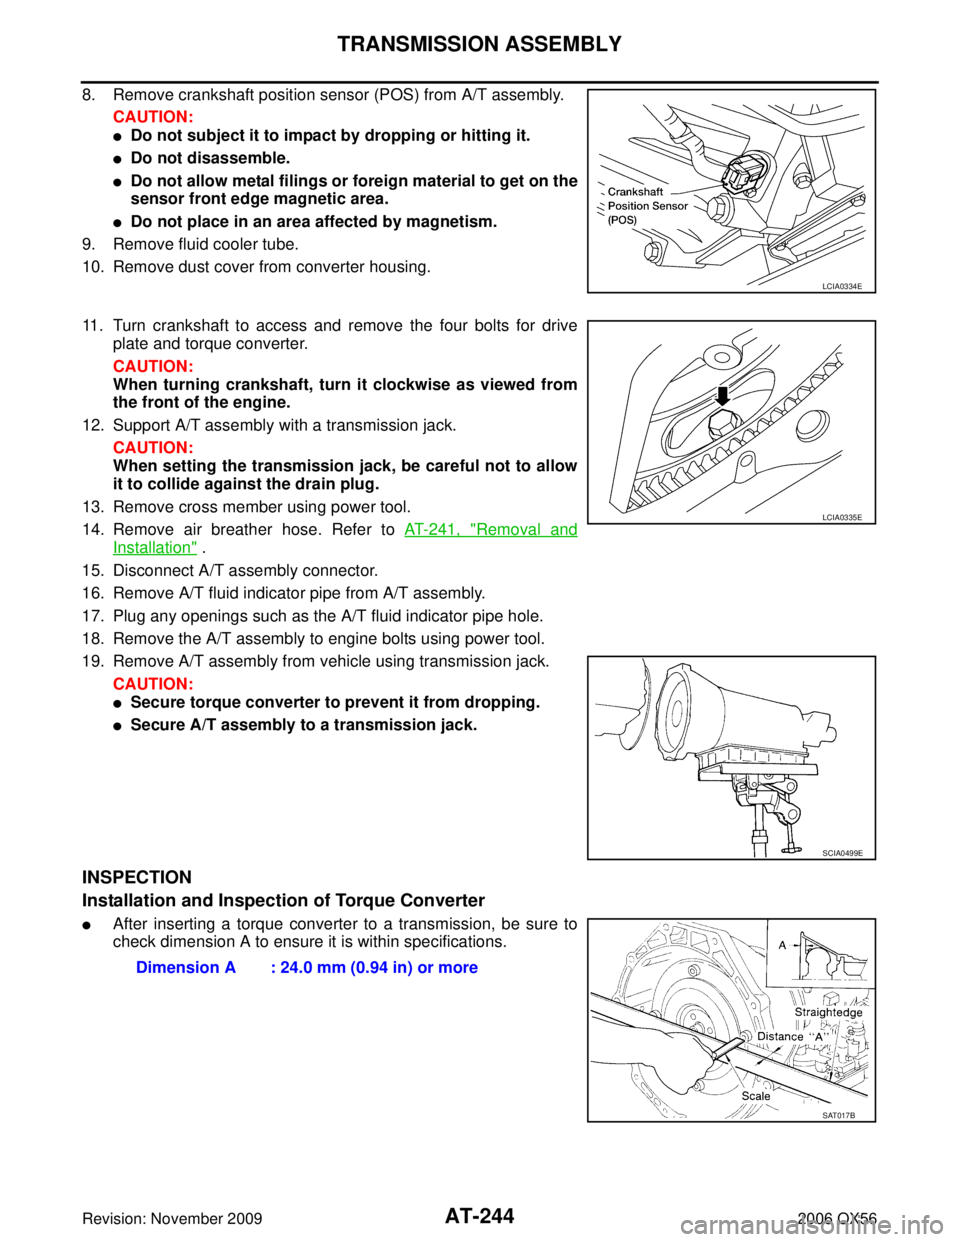
8. Remove crankshaft position sensor (POS) from A/T assembly.
CAUTION:
�Do not subject it to impact by dropping or hitting it.
�Do not disassemble.
�Do not allow metal filings or foreign material to get on the
sensor front edge magnetic area.
�Do not place in an area affected by magnetism.
9. Remove fluid cooler tube.
10. Remove dust cover from converter housing.
11. Turn crankshaft to access and remove the four bolts for drive plate and torque converter.
CAUTION:
When turning crankshaft, turn it clockwise as viewed from
the front of the engine.
12. Support A/T assembly with a transmission jack. CAUTION:
When setting the transmission jack, be careful not to allow
it to collide against the drain plug.
13. Remove cross member using power tool.
14. Remove air breather hose. Refer to AT- 2 4 1 , "
Removal and
Installation" .
15. Disconnect A/T assembly connector.
16. Remove A/T fluid indicator pipe from A/T assembly.
17. Plug any openings such as the A/T fluid indicator pipe hole.
18. Remove the A/T assembly to engine bolts using power tool.
19. Remove A/T assembly from vehicle using transmission jack. CAUTION:
�Secure torque converter to prevent it from dropping.
�Secure A/T assembly to a transmission jack.
INSPECTION
Installation and Inspection of Torque Converter
�After inserting a torque converter to a transmission, be sure to
check dimension A to ensure it is within specifications.
LCIA0334E
LCIA0335E
SCIA0499E
Dimension A : 24.0 mm (0.94 in) or more
SAT017B
Page 320 of 3383

TRANSMISSION ASSEMBLYAT-245
DE
F
G H
I
J
K L
M A
B
AT
Revision: November 2009 2006 QX56
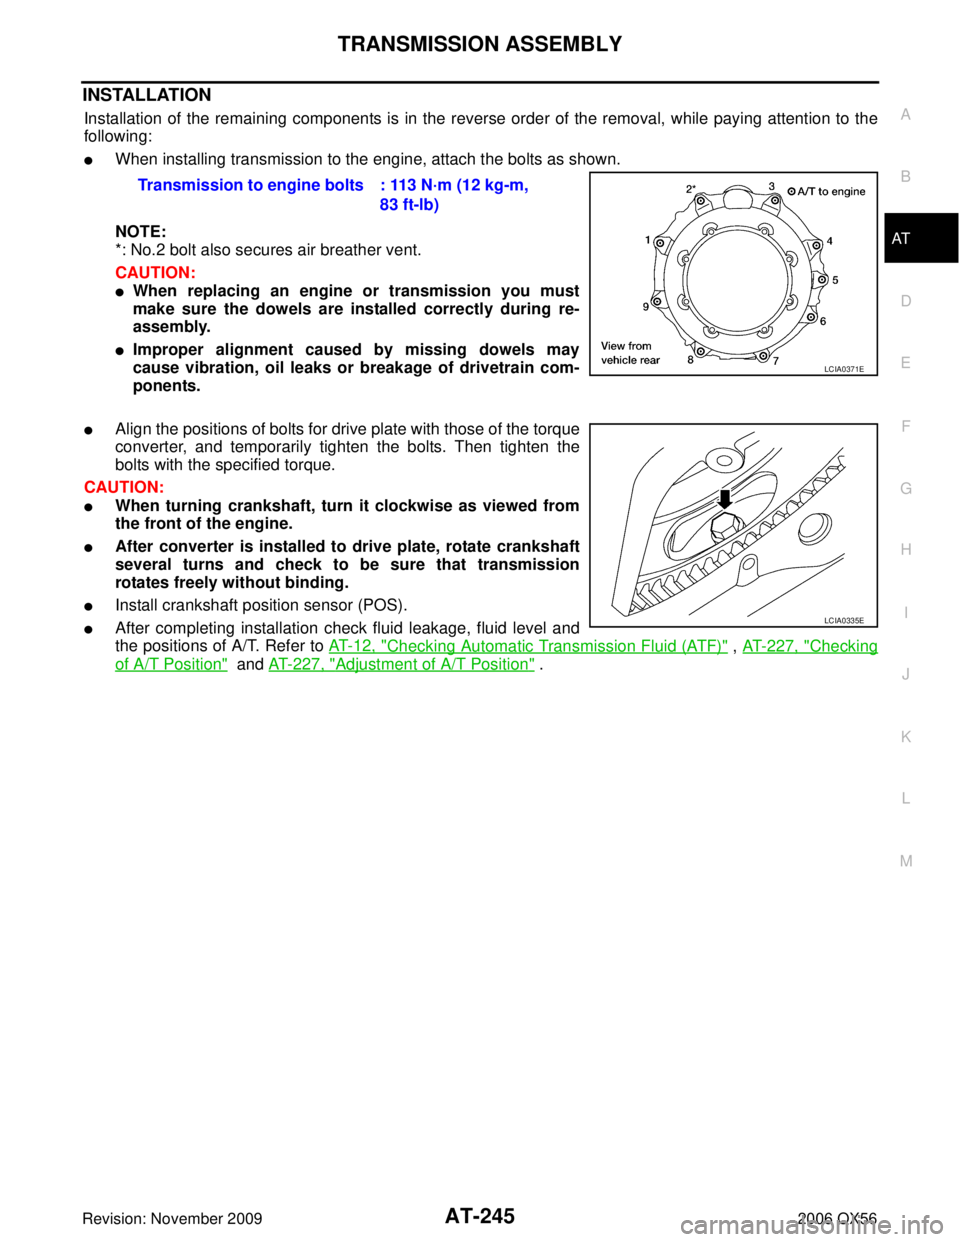
INSTALLATION
Installation of the remaining components is in the reverse order of the removal, while paying attention to the
following:
�When installing transmission to the engine, attach the bolts as shown.
NOTE:
*: No.2 bolt also secures air breather vent.
CAUTION:
�When replacing an engine or transmission you must
make sure the dowels are installed correctly during re-
assembly.
�Improper alignment caused by missing dowels may
cause vibration, oil leaks or breakage of drivetrain com-
ponents.
�Align the positions of bolts for drive plate with those of the torque
converter, and temporarily tighten the bolts. Then tighten the
bolts with the specified torque.
CAUTION:
�When turning crankshaft, turn it clockwise as viewed from
the front of the engine.
�After converter is installed to drive plate, rotate crankshaft
several turns and check to be sure that transmission
rotates freely without binding.
�Install crankshaft position sensor (POS).
�After completing installation check fluid leakage, fluid level and
the positions of A/T. Refer to AT- 1 2 , "
Checking Automatic Transmission Fluid (ATF)" , AT- 2 2 7 , "Checking
of A/T Position" and AT- 2 2 7 , "Adjustment of A/T Position" .
Transmission to engine bolts : 113 N·m (12 kg-m,
83 ft-lb)
LCIA0371E
LCIA0335E
Page 321 of 3383
AT-246
TRANSMISSION ASSEMBLY
Revision: November 20092006 QX56
Removal and Installation (4WD) ECS00EQ3
COMPONENTS
REMOVAL
CAUTION:
When removing the A/T assembly from engine, first remove the crankshaft position sensor (POS) from
the A/T assembly.
Be careful not to damage sensor edge.
1. Disconnect the negative battery terminal.
2. Remove engine cover using power tool.
3. Remove A/T fluid indicator.
4. Remove undercovers using power tool.
5. Remove exhaust front tube and center muffler using power tool. Refer to EX-3, "
Removal and Installation"
.
6. Remove propeller shafts. Refer to PR-4, "
Removal and Installation" and PR-8, "Removal and Installation"
.
7. Remove A/T control cable. Refer to AT- 2 2 7 , "
REMOVAL" .
1. A/T fluid indicator pipe 2. A/T fluid indicator 3. O-ring
4. Transmission assembly 5. Fluid cooler tube 6. Copper washer
7. A/T cross member 8. Insulator
WCIA0566E
Page 322 of 3383

TRANSMISSION ASSEMBLYAT-247
DE
F
G H
I
J
K L
M A
B
AT
Revision: November 2009 2006 QX56
8. Remove crankshaft position sensor (POS) from A/T assembly.
CAUTION:
�Do not subject it to impact by dropping or hitting it.
�Do not disassemble.
�Do not allow metal filings or foreign material to get on the
sensor's front edge magnetic area.
�Do not place in an area affected by magnetism.
9. Disconnect A/T fluid cooler tube from A/T assembly.
10. Remove dust cover from converter housing.
11. Turn crankshaft, and remove the four bolts for drive plate and torque converter.
CAUTION:
When turning crankshaft, turn it clockwise as viewed from
the front of the engine.
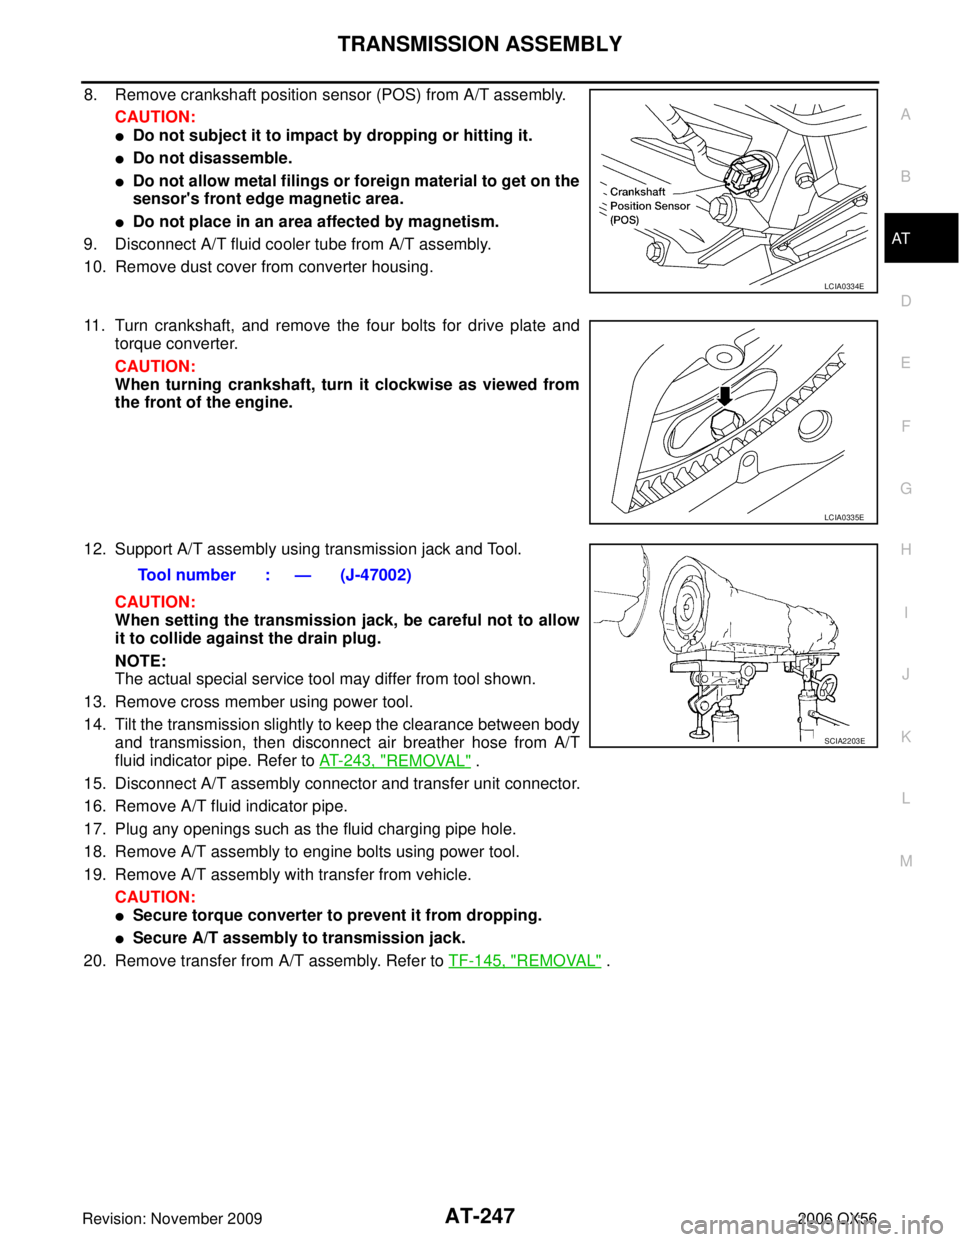
12. Support A/T assembly using transmission jack and Tool. CAUTION:
When setting the transmission jack, be careful not to allow
it to collide against the drain plug.
NOTE:
The actual special service tool may differ from tool shown.
13. Remove cross member using power tool.
14. Tilt the transmission slightly to keep the clearance between body and transmission, then disconnect air breather hose from A/T
fluid indicator pipe. Refer to AT- 2 4 3 , "
REMOVAL" .
15. Disconnect A/T assembly connector and transfer unit connector.
16. Remove A/T fluid indicator pipe.
17. Plug any openings such as the fluid charging pipe hole.
18. Remove A/T assembly to engine bolts using power tool.
19. Remove A/T assembly with transfer from vehicle. CAUTION:
�Secure torque converter to prevent it from dropping.
�Secure A/T assembly to transmission jack.
20. Remove transfer from A/T assembly. Refer to TF-145, "
REMOVAL" .
LCIA0334E
LCIA0335E
Tool number : — (J-47002)
SCIA2203E
Page 324 of 3383

TRANSMISSION ASSEMBLYAT-249
DE
F
G H
I
J
K L
M A
B
AT
Revision: November 2009 2006 QX56
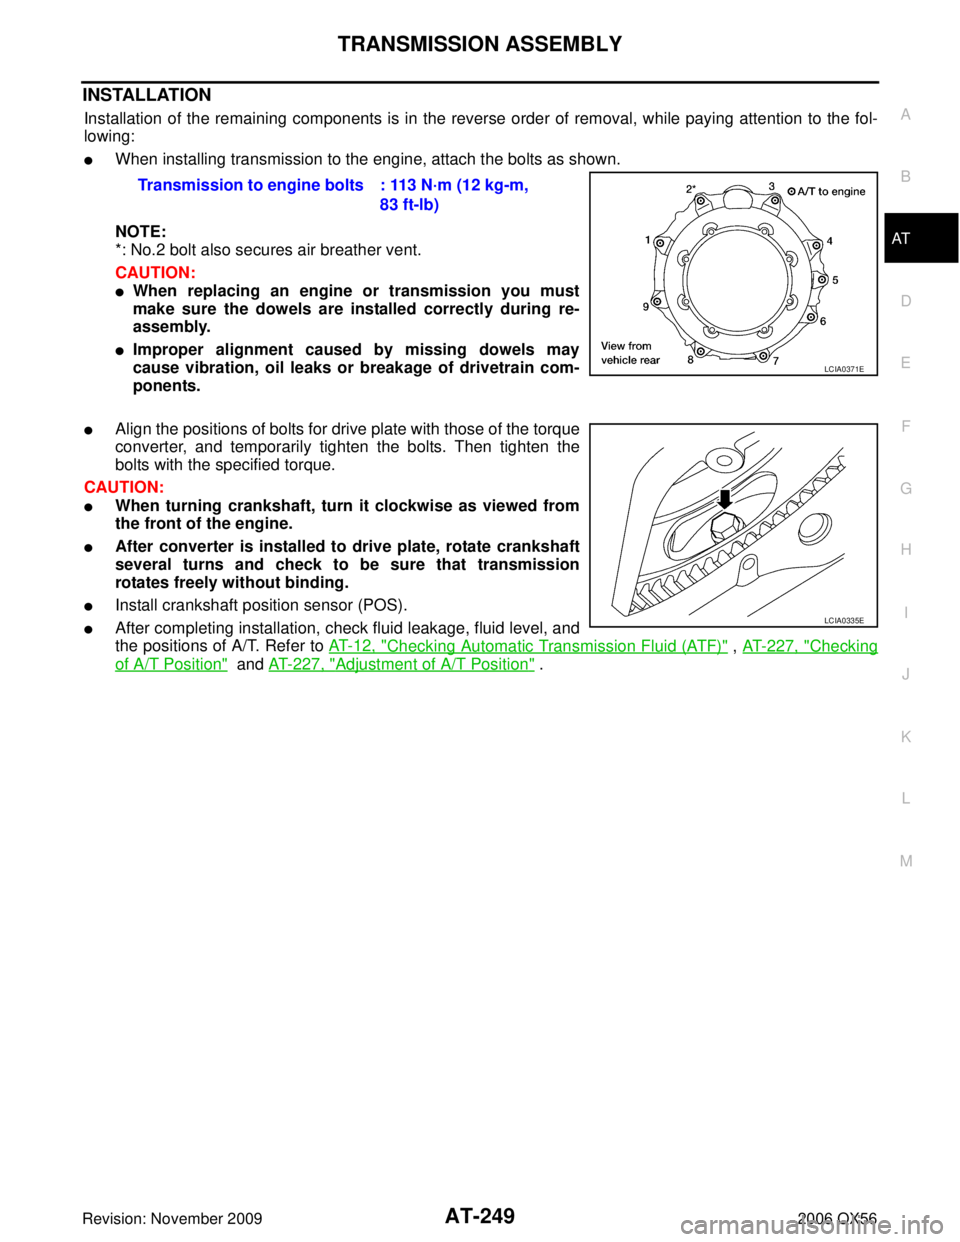
INSTALLATION
Installation of the remaining components is in the reverse order of removal, while paying attention to the fol-
lowing:
�When installing transmission to the engine, attach the bolts as shown.
NOTE:
*: No.2 bolt also secures air breather vent.
CAUTION:
�When replacing an engine or transmission you must
make sure the dowels are installed correctly during re-
assembly.
�Improper alignment caused by missing dowels may
cause vibration, oil leaks or breakage of drivetrain com-
ponents.
�Align the positions of bolts for drive plate with those of the torque
converter, and temporarily tighten the bolts. Then tighten the
bolts with the specified torque.
CAUTION:
�When turning crankshaft, turn it clockwise as viewed from
the front of the engine.
�After converter is installed to drive plate, rotate crankshaft
several turns and check to be sure that transmission
rotates freely without binding.
�Install crankshaft position sensor (POS).
�After completing installation, check fluid leakage, fluid level, and
the positions of A/T. Refer to AT- 1 2 , "
Checking Automatic Transmission Fluid (ATF)" , AT- 2 2 7 , "Checking
of A/T Position" and AT- 2 2 7 , "Adjustment of A/T Position" .
Transmission to engine bolts : 113 N·m (12 kg-m,
83 ft-lb)
LCIA0371E
LCIA0335E
Page 330 of 3383
OVERHAULAT-255
DE
F
G H
I
J
K L
M A
B
AT
Revision: November 2009 2006 QX56
7. Return spring8. Pawl shaft9. Self-sealing bolt
10. Bracket 11. Seal ring12. Needle bearing
13. Revolution sensor 14. Parking gear15. Output shaft
16. Bearing race 17. Needle bearing18. Manual plate
19. Parking rod 20. Manual shaft oil seal21. Manual shaft
22. O-ring 23. Band servo anchor end pin 24. Detent spring
25. Spacer 26. Seal rings27. Return spring
28. O-ring 29. Servo assembly30. Snap ring
31. Snap ring 32. Sub-harness33. Control valve with TCM
34. Bracket 35. A/T fluid temperature sensor 2 36. Oil pan
37. Magnets 38. Drain plug39. Drain plug gasket
40. Oil pan bolt 41. Oil pan gasket42. Terminal cord assembly
43. O-ring 44. Retaining pin45. Transmission case