Page 2430 of 3383

HEADLAMP (FOR USA)LT-23
C
DE
F
G H
I
J
L
M A
B
LT
Revision: November 2009 2006 QX56
Headlamp HI Does Not Illuminate (One Side)EKS00B84
1. BULB INSPECTION
Inspect inoperative headlamp bulb.
OK or NG
OK >> GO TO 2.
NG >> Replace headlamp bulb. Refer to LT- 3 1 , "
HEADLAMP (INNER SIDE), FOR HIGH BEAM" .
2. CHECK POWER TO HEADLAMP
1. Disconnect inoperative front combination lamp connector.
2. Turn the high beam headlamps ON.
3. Check voltage between inoperative front combination lamp ter- minal and ground.
OK or NG
OK >> GO TO 3.
NG >> GO TO 4.
3. CHECK HEADLAMP GROUND
1. Turn the high beam headlamps OFF.
2. Check continuity between inoperative front combination lamp connector and ground.
OK or NG
OK >> Check front combination lamp connector for damage or poor connection. Repair as necessary.
NG >> Repair open circuit in harness between inoperative front combination lamp and ground.
Terminals
(– ) Voltage
(Approx.)
(+)
Connector Terminal
RH E107 6Ground Battery voltage
LH E11
WKIA3608E
Terminals Continuity
Connector Terminal
RH E107 2Ground Yes
LH E11
WKIA1854E
Page 2432 of 3383
HEADLAMP (FOR USA)LT-25
C
DE
F
G H
I
J
L
M A
B
LT
Revision: November 2009 2006 QX56
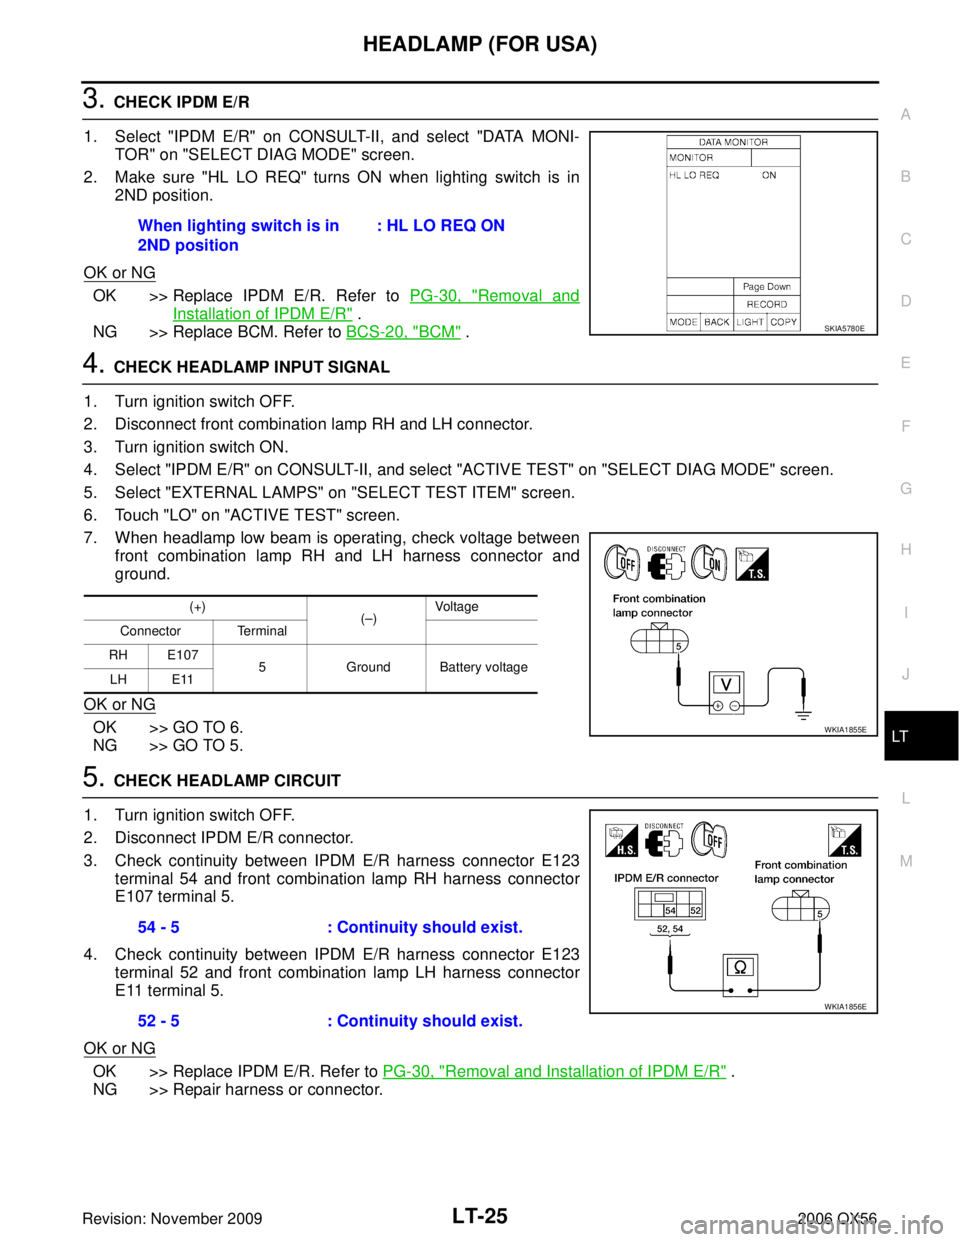
3. CHECK IPDM E/R
1. Select "IPDM E/R" on CONSULT-II, and select "DATA MONI- TOR" on "SELECT DIAG MODE" screen.
2. Make sure "HL LO REQ" turns ON when lighting switch is in 2ND position.
OK or NG
OK >> Replace IPDM E/R. Refer to PG-30, "Removal and
Installation of IPDM E/R" .
NG >> Replace BCM. Refer to BCS-20, "
BCM" .
4. CHECK HEADLAMP INPUT SIGNAL
1. Turn ignition switch OFF.
2. Disconnect front combination lamp RH and LH connector.
3. Turn ignition switch ON.
4. Select "IPDM E/R" on CONSULT-II, and select "ACTIVE TEST" on "SELECT DIAG MODE" screen.
5. Select "EXTERNAL LAMPS" on "SELECT TEST ITEM" screen.
6. Touch "LO" on "ACTIVE TEST" screen.
7. When headlamp low beam is operating, check voltage between front combination lamp RH and LH harness connector and
ground.
OK or NG
OK >> GO TO 6.
NG >> GO TO 5.
5. CHECK HEADLAMP CIRCUIT
1. Turn ignition switch OFF.
2. Disconnect IPDM E/R connector.
3. Check continuity between IPDM E/R harness connector E123 terminal 54 and front combination lamp RH harness connector
E107 terminal 5.
4. Check continuity between IPDM E/R harness connector E123 terminal 52 and front combination lamp LH harness connector
E11 terminal 5.
OK or NG
OK >> Replace IPDM E/R. Refer to PG-30, "Removal and Installation of IPDM E/R" .
NG >> Repair harness or connector. When lighting switch is in
2ND position
: HL LO REQ ON
SKIA5780E
(+)
(– ) Voltage
Connector Terminal
RH E107 5Ground Battery voltage
LH E11
WKIA1855E
54 - 5 : Continuity should exist.
52 - 5 : Continuity should exist.
WKIA1856E
Page 2433 of 3383
LT-26
HEADLAMP (FOR USA)
Revision: November 20092006 QX56
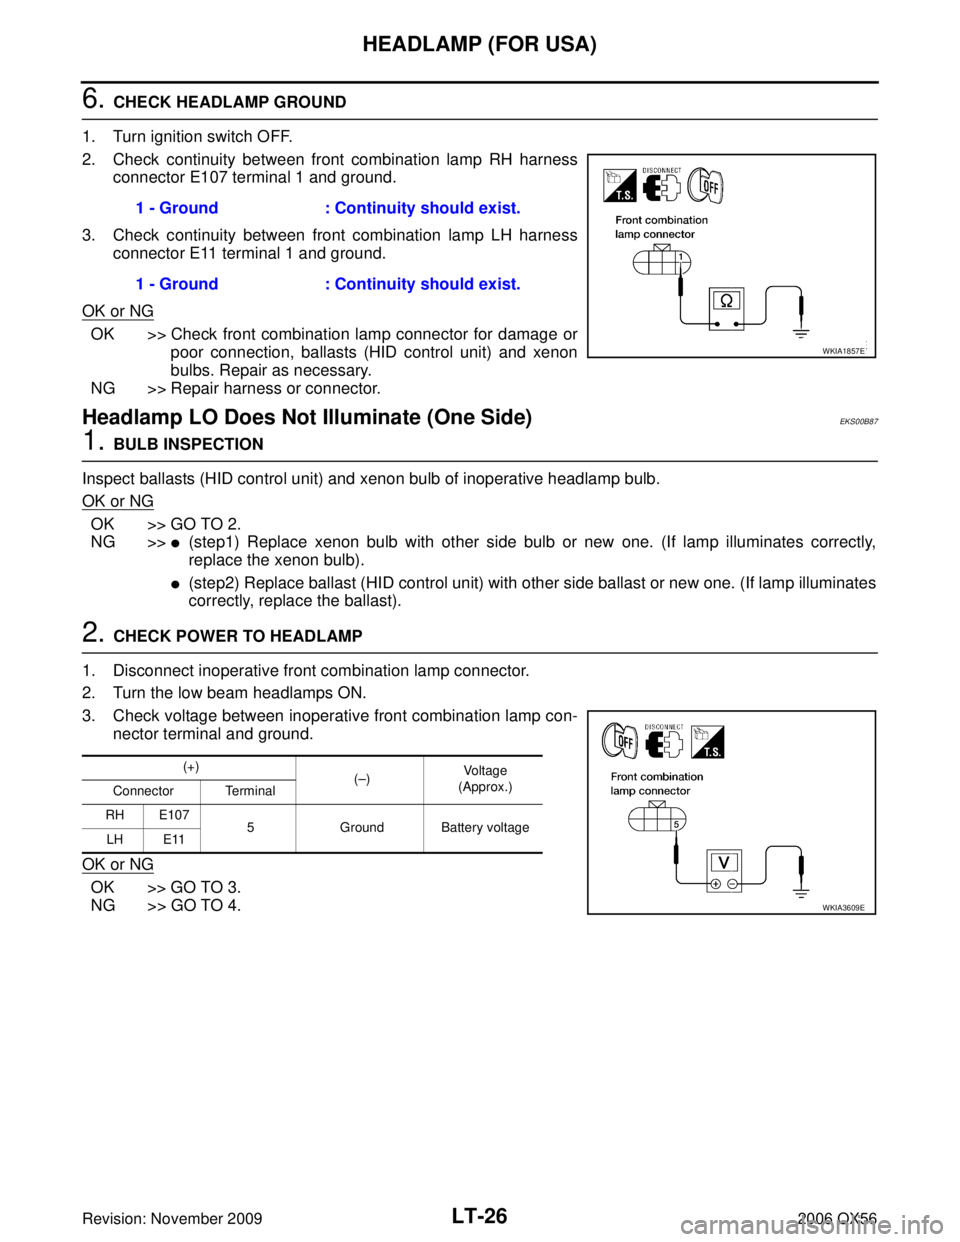
6. CHECK HEADLAMP GROUND
1. Turn ignition switch OFF.
2. Check continuity between front combination lamp RH harness connector E107 terminal 1 and ground.
3. Check continuity between front combination lamp LH harness connector E11 terminal 1 and ground.
OK or NG
OK >> Check front combination lamp connector for damage or poor connection, ballasts (HID control unit) and xenon
bulbs. Repair as necessary.
NG >> Repair harness or connector.
Headlamp LO Does Not Illuminate (One Side)EKS00B87
1. BULB INSPECTION
Inspect ballasts (HID control unit) and xenon bulb of inoperative headlamp bulb.
OK or NG
OK >> GO TO 2.
NG >>
�(step1) Replace xenon bulb with other side bulb or new one. (If lamp illuminates correctly,
replace the xenon bulb).
�(step2) Replace ballast (HID control unit) with other side ballast or new one. (If lamp illuminates
correctly, replace the ballast).
2. CHECK POWER TO HEADLAMP
1. Disconnect inoperative front combination lamp connector.
2. Turn the low beam headlamps ON.
3. Check voltage between inoperative front combination lamp con- nector terminal and ground.
OK or NG
OK >> GO TO 3.
NG >> GO TO 4. 1 - Ground
: Continuity should exist.
1 - Ground : Continuity should exist.
WKIA1857E
(+)
(– ) Voltage
(Approx.)
Connector Terminal
RH E107 5Ground Battery voltage
LH E11
WKIA3609E
Page 2437 of 3383
LT-30
HEADLAMP (FOR USA)
Revision: November 20092006 QX56
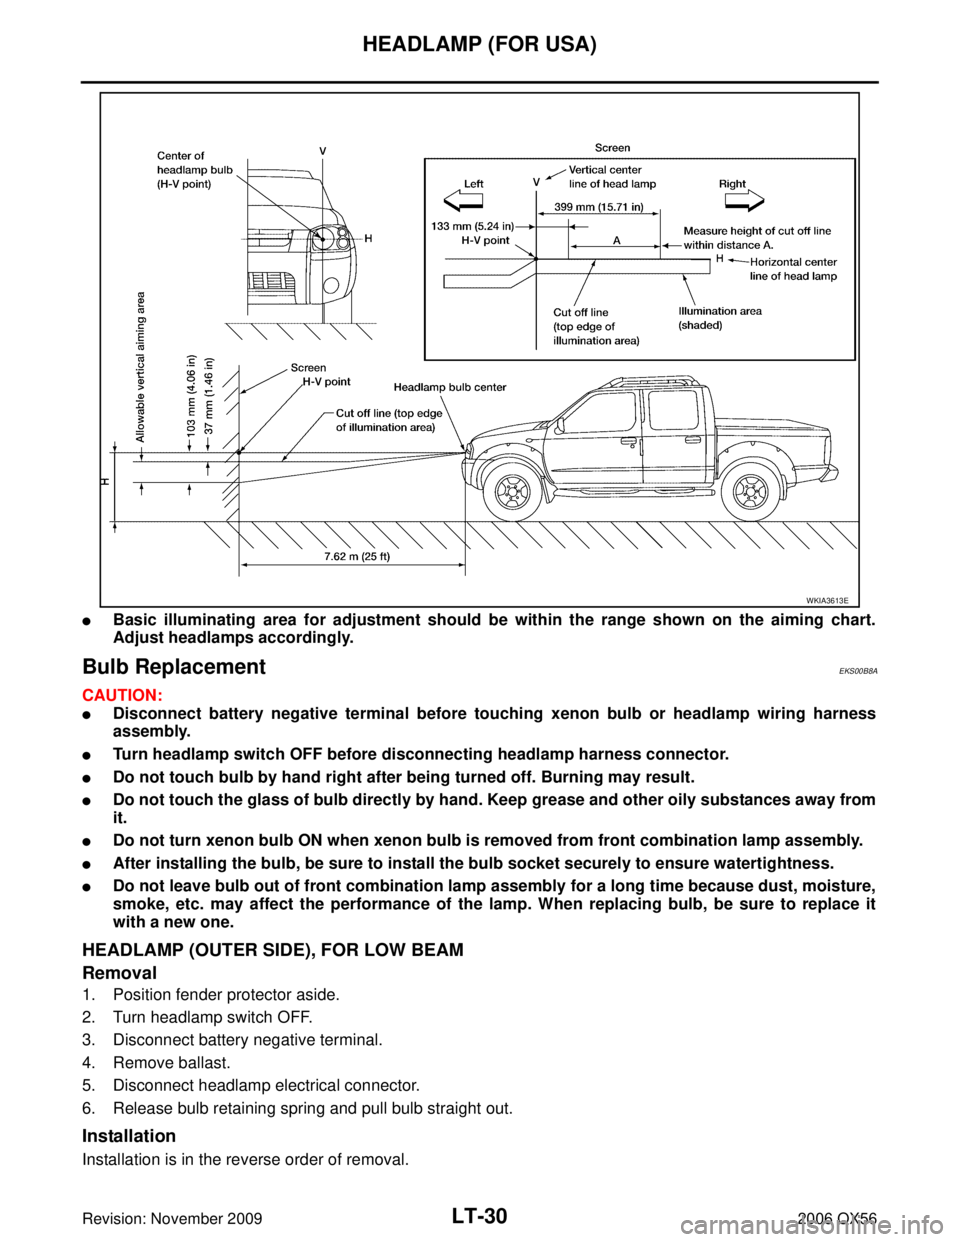
�Basic illuminating area for adjustment should be within the range shown on the aiming chart.
Adjust headlamps accordingly.
Bulb Replacement EKS00B8A
CAUTION:
�Disconnect battery negative terminal before touching xenon bulb or headlamp wiring harness
assembly.
�Turn headlamp switch OFF before disconnecting headlamp harness connector.
�Do not touch bulb by hand right after being turned off. Burning may result.
�Do not touch the glass of bulb directly by hand. Keep grease and other oily substances away from
it.
�Do not turn xenon bulb ON when xenon bulb is removed from front combination lamp assembly.
�After installing the bulb, be sure to install the bulb socket securely to ensure watertightness.
�Do not leave bulb out of front combination lamp assembly for a long time because dust, moisture,
smoke, etc. may affect the performance of the lamp. When replacing bulb, be sure to replace it
with a new one.
HEADLAMP (OUTER SIDE), FOR LOW BEAM
Removal
1. Position fender protector aside.
2. Turn headlamp switch OFF.
3. Disconnect battery negative terminal.
4. Remove ballast.
5. Disconnect headlamp electrical connector.
6. Release bulb retaining spring and pull bulb straight out.
Installation
Installation is in the reverse order of removal.
WKIA3613E
Page 2438 of 3383
HEADLAMP (FOR USA)LT-31
C
DE
F
G H
I
J
L
M A
B
LT
Revision: November 2009 2006 QX56
HEADLAMP (INNER SIDE), FOR HIGH BEAM
Removal
1. Turn headlamp switch OFF.
2. Disconnect headlamp electrical connector.
3. Turn the bulb counterclockwise to remove it.
Installation
Installation is in the reverse order of removal.
FRONT PARKING LAMP (INNER OR OUTER)
Removal
1. Turn the bulb socket counterclockwise to unlock it.
2. Pull the bulb to remove it from the socket.
Installation
Installation is in the reverse order of removal.
SIDE MARKER LAMP (FRONT)
Removal
1. Position fender protector aside.
2. Turn the side marker lamp (front) bulb socket counterclockwise and remove side marker lamp (front) bulb
socket.
3. Pull to remove side marker lamp (front) from the side marker lamp (front) bulb socket.
Installation
Installation is in the reverse order of removal.
Removal and InstallationEKS00B8B
FRONT COMBINATION LAMP ASSEMBLY
CAUTION:
�Disconnect battery negative terminal before touching xenon bulb or headlamp wiring harness
assembly.
�Turn headlamp switch OFF before disconnecting headlamp harness connector.
�Do not touch bulb by hand right after being turned off. Burning may result.
�Do not touch the glass of bulb directly by hand. Keep grease and other oily substances away from
it.
�Do not turn xenon bulb ON when xenon bulb is removed from front combination lamp assembly.
�After installing the bulb, be sure to install the bulb socket securely to ensure watertightness.
�Do not leave bulb out of front combination lamp assembly for a long time because dust, moisture,
smoke, etc. may affect the performance of the lamp. When replacing bulb, be sure to replace it
with a new one.
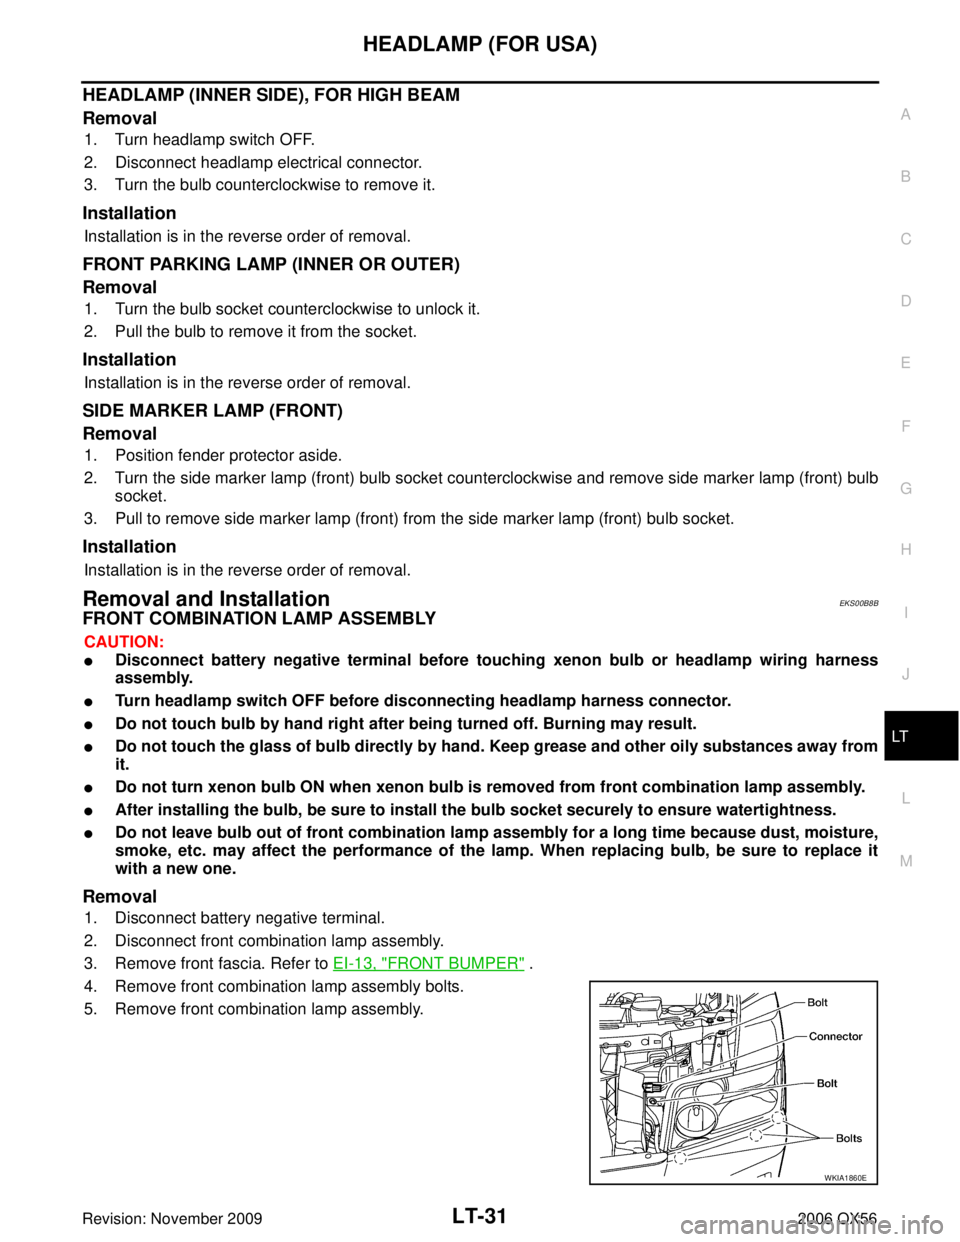
Removal
1. Disconnect battery negative terminal.
2. Disconnect front combination lamp assembly.
3. Remove front fascia. Refer to EI-13, "
FRONT BUMPER" .
4. Remove front combination lamp assembly bolts.
5. Remove front combination lamp assembly.
WKIA1860E
Page 2449 of 3383
LT-42
HEADLAMP (FOR CANADA) - DAYTIME LIGHT SYSTEM -
Revision: November 20092006 QX56
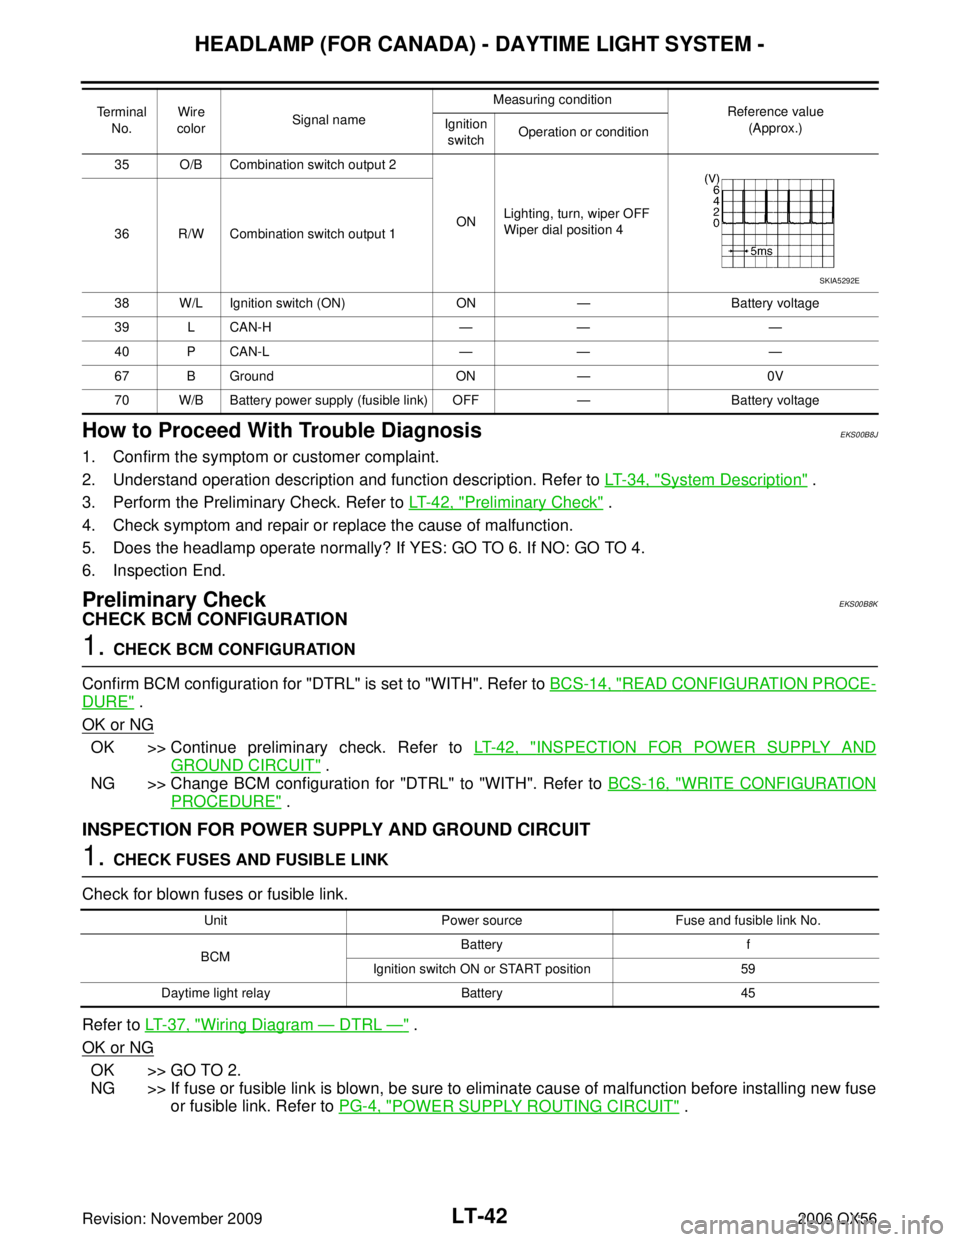
How to Proceed With Trouble DiagnosisEKS00B8J
1. Confirm the symptom or customer complaint.
2. Understand operation description and function description. Refer to LT- 3 4 , "
System Description" .
3. Perform the Preliminary Check. Refer to LT- 4 2 , "
Preliminary Check" .
4. Check symptom and repair or replace the cause of malfunction.
5. Does the headlamp operate normally? If YES: GO TO 6. If NO: GO TO 4.
6. Inspection End.
Preliminary CheckEKS00B8K
CHECK BCM CONFIGURATION
1. CHECK BCM CONFIGURATION
Confirm BCM configuration for "DTRL" is set to "WITH". Refer to BCS-14, "
READ CONFIGURATION PROCE-
DURE" .
OK or NG
OK >> Continue preliminary check. Refer to LT- 4 2 , "INSPECTION FOR POWER SUPPLY AND
GROUND CIRCUIT" .
NG >> Change BCM configuration for "DTRL" to "WITH". Refer to BCS-16, "
WRITE CONFIGURATION
PROCEDURE" .
INSPECTION FOR POWER SUPPLY AND GROUND CIRCUIT
1. CHECK FUSES AND FUSIBLE LINK
Check for blown fuses or fusible link.
Refer to LT- 3 7 , "
Wiring Diagram — DTRL —" .
OK or NG
OK >> GO TO 2.
NG >> If fuse or fusible link is blown, be sure to eliminate cause of malfunction before installing new fuse or fusible link. Refer to PG-4, "
POWER SUPPLY ROUTING CIRCUIT" .
35 O/B Combination switch output 2
ONLighting, turn, wiper OFF
Wiper dial position 4
36 R/W Combination switch output 1
38 W/L Ignition switch (ON) ON— Battery voltage
39 L CAN-H ———
40 P CAN-L ———
67 B Ground ON— 0V
70 W/B Battery power supply (fusible link) OFF —Battery voltage
Terminal
No. Wire
color Signal name Measuring condition
Reference value
(Approx.)
Ignition
switch Operation or condition
SKIA5292E
Unit
Power sourceFuse and fusible link No.
BCM Battery
f
Ignition switch ON or START position 59
Daytime light relay Battery45
Page 2450 of 3383
HEADLAMP (FOR CANADA) - DAYTIME LIGHT SYSTEM -LT-43
C
DE
F
G H
I
J
L
M A
B
LT
Revision: November 2009 2006 QX56
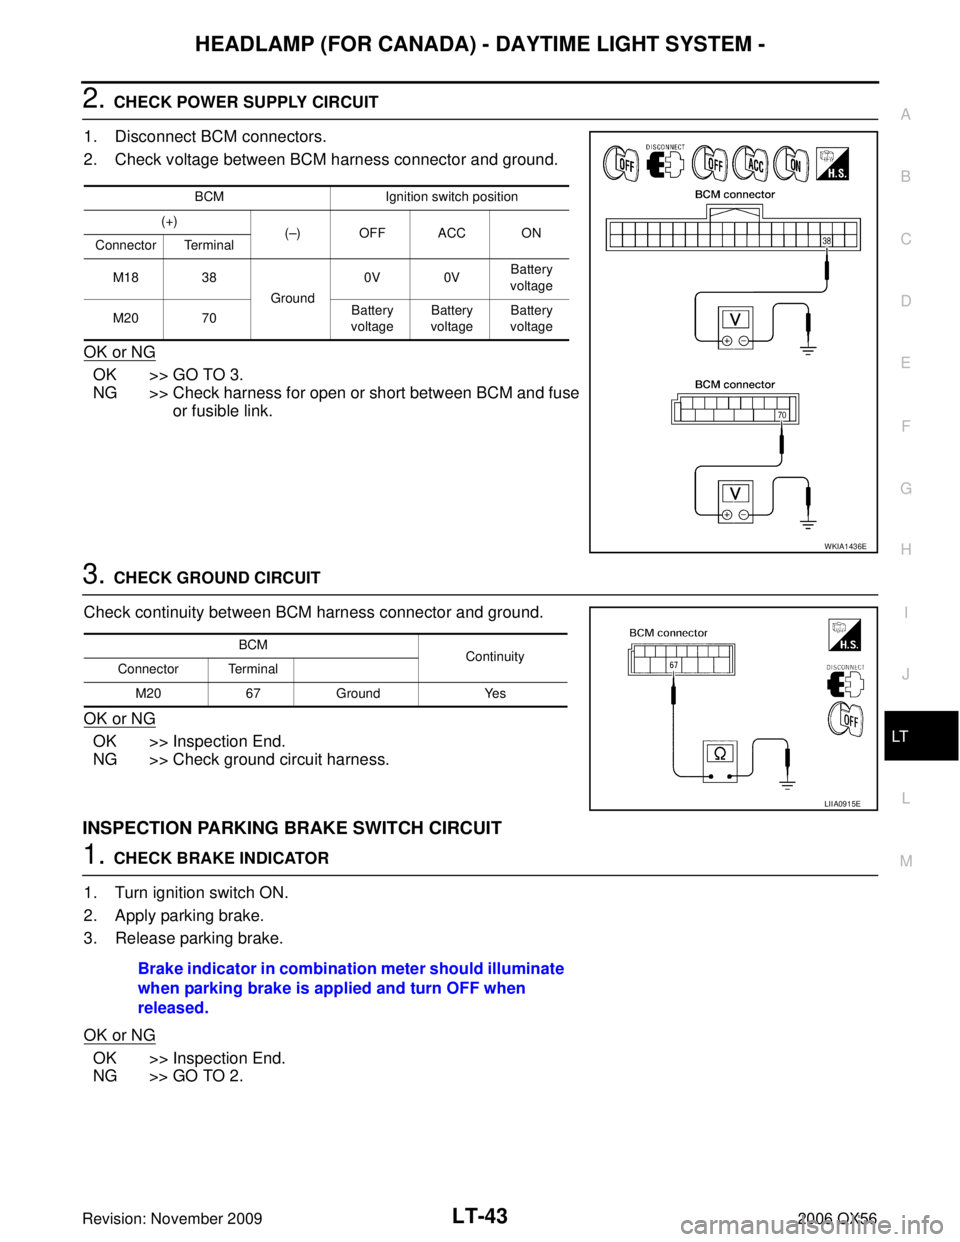
2. CHECK POWER SUPPLY CIRCUIT
1. Disconnect BCM connectors.
2. Check voltage between BCM harness connector and ground.
OK or NG
OK >> GO TO 3.
NG >> Check harness for open or short between BCM and fuse or fusible link.
3. CHECK GROUND CIRCUIT
Check continuity between BCM harness connector and ground.
OK or NG
OK >> Inspection End.
NG >> Check ground circuit harness.
INSPECTION PARKING BRAKE SWITCH CIRCUIT
1. CHECK BRAKE INDICATOR
1. Turn ignition switch ON.
2. Apply parking brake.
3. Release parking brake.
OK or NG
OK >> Inspection End.
NG >> GO TO 2.
BCM Ignition switch position
(+) (– )OFFACCON
Connector Terminal
M18 38 Ground0V 0V
Battery
voltage
M20 70 Battery
voltage Battery
voltage Battery
voltage
WKIA1436E
BCM Continuity
Connector Terminal
M20 67Ground Yes
LIIA0915E
Brake indicator in combination meter should illuminate
when parking brake is applied and turn OFF when
released.
Page 2451 of 3383
LT-44
HEADLAMP (FOR CANADA) - DAYTIME LIGHT SYSTEM -
Revision: November 20092006 QX56
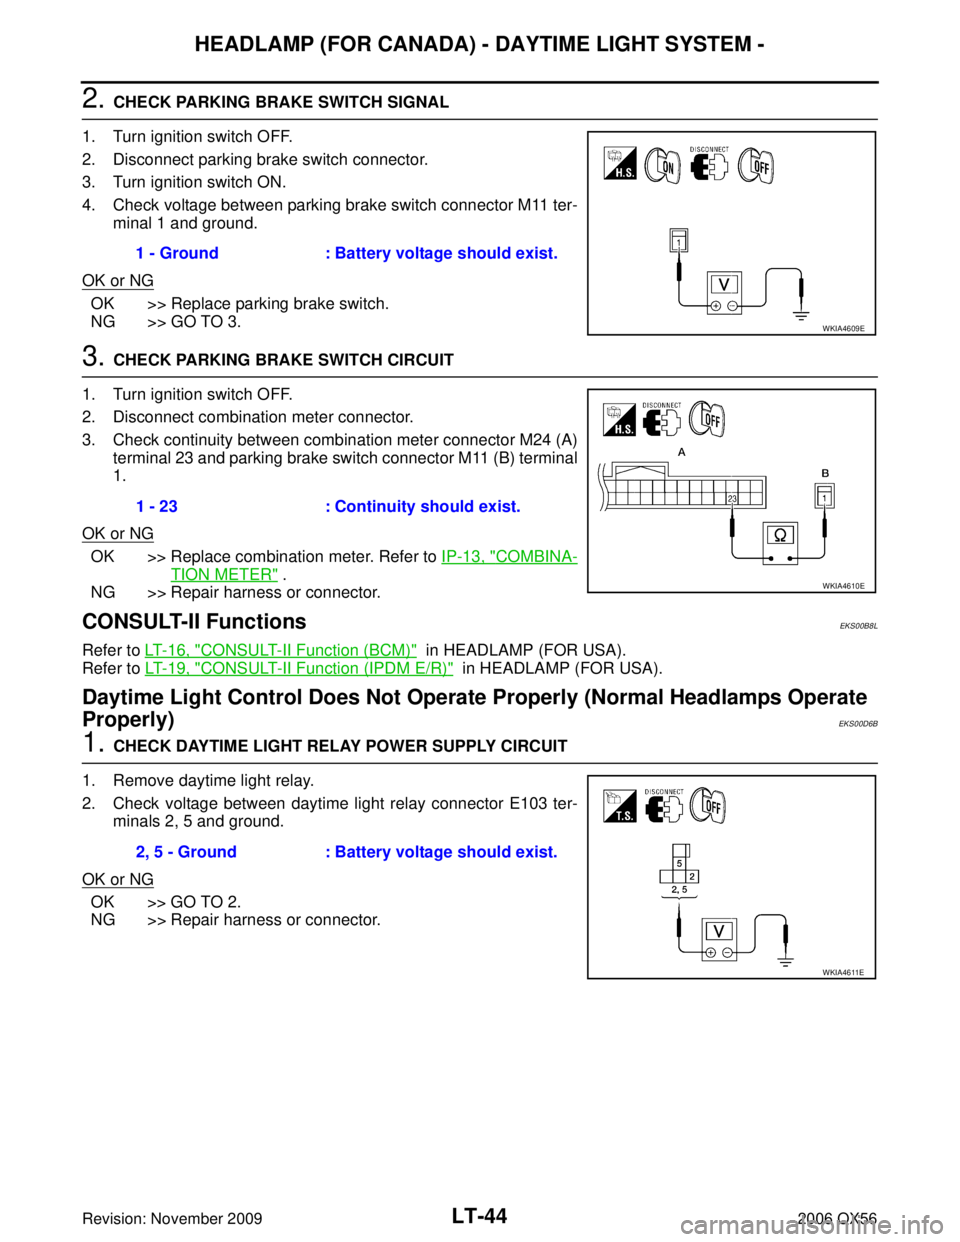
2. CHECK PARKING BRAKE SWITCH SIGNAL
1. Turn ignition switch OFF.
2. Disconnect parking brake switch connector.
3. Turn ignition switch ON.
4. Check voltage between parking brake switch connector M11 ter- minal 1 and ground.
OK or NG
OK >> Replace parking brake switch.
NG >> GO TO 3.
3. CHECK PARKING BRAKE SWITCH CIRCUIT
1. Turn ignition switch OFF.
2. Disconnect combination meter connector.
3. Check continuity between combination meter connector M24 (A) terminal 23 and parking brake switch connector M11 (B) terminal
1.
OK or NG
OK >> Replace combination meter. Refer to IP-13, "COMBINA-
TION METER" .
NG >> Repair harness or connector.
CONSULT-II FunctionsEKS00B8L
Refer to LT- 1 6 , "CONSULT-II Function (BCM)" in HEADLAMP (FOR USA).
Refer to LT- 1 9 , "
CONSULT-II Function (IPDM E/R)" in HEADLAMP (FOR USA).
Daytime Light Control Does Not Operate Properly (Normal Headlamps Operate
Properly)
EKS00D6B
1. CHECK DAYTIME LIGHT RELAY POWER SUPPLY CIRCUIT
1. Remove daytime light relay.
2. Check voltage between daytime light relay connector E103 ter- minals 2, 5 and ground.
OK or NG
OK >> GO TO 2.
NG >> Repair harness or connector. 1 - Ground
: Battery voltage should exist.
WKIA4609E
1 - 23: Continuity should exist.
WKIA4610E
2, 5 - Ground : Battery voltage should exist.
WKIA4611E