Page 2797 of 3383
 or B1")
RF-22
SUNROOF
Revision: November 20092006 QX56
2. CHECK DOOR SWITCH CIRCUIT
1. Disconnect front door switches and BCM connectors.
2. Check continuity between front door switch connector B8 (LH) or B108 (RH) terminal 2 and BCM connec- tor M18, M19 terminals 12 and 47.
3. Check continuity between front door switch connector B8 (LH) or B108 (RH) terminal 2 and ground.
OK or NG
OK >> GO TO 3.
NG >> Repair or replace harness between BCM and sunroof motor assembly.
3. CHECK DOOR SWITCHES
Check continuity between each door switch terminal 2 and body ground part of door switch.
OK or NG
OK >> GO TO 4.
NG >> Replace malfunctioning door switch.
4. CHECK BCM OUTPUT SIGNAL
1. Connect BCM connectors.
2. Check voltage between BCM connector M18 terminal 12, M19 terminal 47 and ground.
OK or NG
OK >> Check the condition of the harness and the connector.
NG >> Replace BCM. Refer to BCS-20, "
BCM" .
Front door switch LH
2 - 47
: Continuity should exist.
Front door switch RH
2 - 12 : Continuity should exist.
2 - Ground : Continuity should not exist.
WIIA0235E
Terminal Condition Continuity
2 Body ground part
of door switch Door switch pushed No
Door switch released Yes
WIIA0289E
12 - Ground
: Battery voltage
47 - Ground : Battery voltage
WIIA0234E
Page 2798 of 3383
SUNROOFRF-23
C
DE
F
G H
J
K L
M A
B
RF
Revision: November 2009 2006 QX56
Fitting AdjustmentEIS007XG
GAP ADJUSTMENT
NOTE:
If any gap or height difference between glass lid assembly and roof panel is found, check the fit and adjust as
follows:
1. Open sunshade assembly.
2. Loosen glass lid assembly screws (2 each on left and right sides), then tilt glass lid assembly down.
3. Manually adjust glass lid assembly from outside of vehicle so it resembles "A-A" as shown in the figure.
4. After adjusting glass lid assembly, tilt up and tighten screws.
NOTE:
First tighten left front screw then right rear to prevent movement while tightening the remaining screws.
5. Tilt glass lid assembly up and down several times to check that it moves smoothly.
WIIA0304E
Page 2799 of 3383

RF-24
SUNROOF
Revision: November 20092006 QX56
HEIGHT DIFFERENCE ADJUSTMENT
If an excessive height difference between glass lid assembly and roof panel is found, adjust in the following
manner:
1. Remove headlining. Refer to EI-38, "
HEADLINING" .
2. Loosen sunroof frame assembly nuts and sunroof bracket bolts.
3. Add shims until gap is within specification "A-A". NOTE:
Temporarily snug nuts and bolts to prevent movement between each adjustment.
4. Tilt glass lid assembly up and down several times to check that it moves and seals properly.
5. Tighten sunroof frame assembly nuts and sunroof bracket bolts. NOTE:
First tighten left front then right rear sunroof frame assembly to prevent uneven torque while tightening
remaining sunroof bracket bolts.
6. Install headlining. Refer to EI-38, "
HEADLINING" .
Removal and InstallationEIS007XH
�After any adjustment, check sunroof operation and glass lid assembly alignment.
�Handle glass lid assembly with care so not to cause damage.
�For easier installation, mark each point before removal.
CAUTION:
�Always work with a helper.
�Before removal, fully close the glass lid assembly. Then, after removal, do not move the sunroof
motor assembly.
Page 2800 of 3383
SUNROOFRF-25
C
DE
F
G H
J
K L
M A
B
RF
Revision: November 2009 2006 QX56
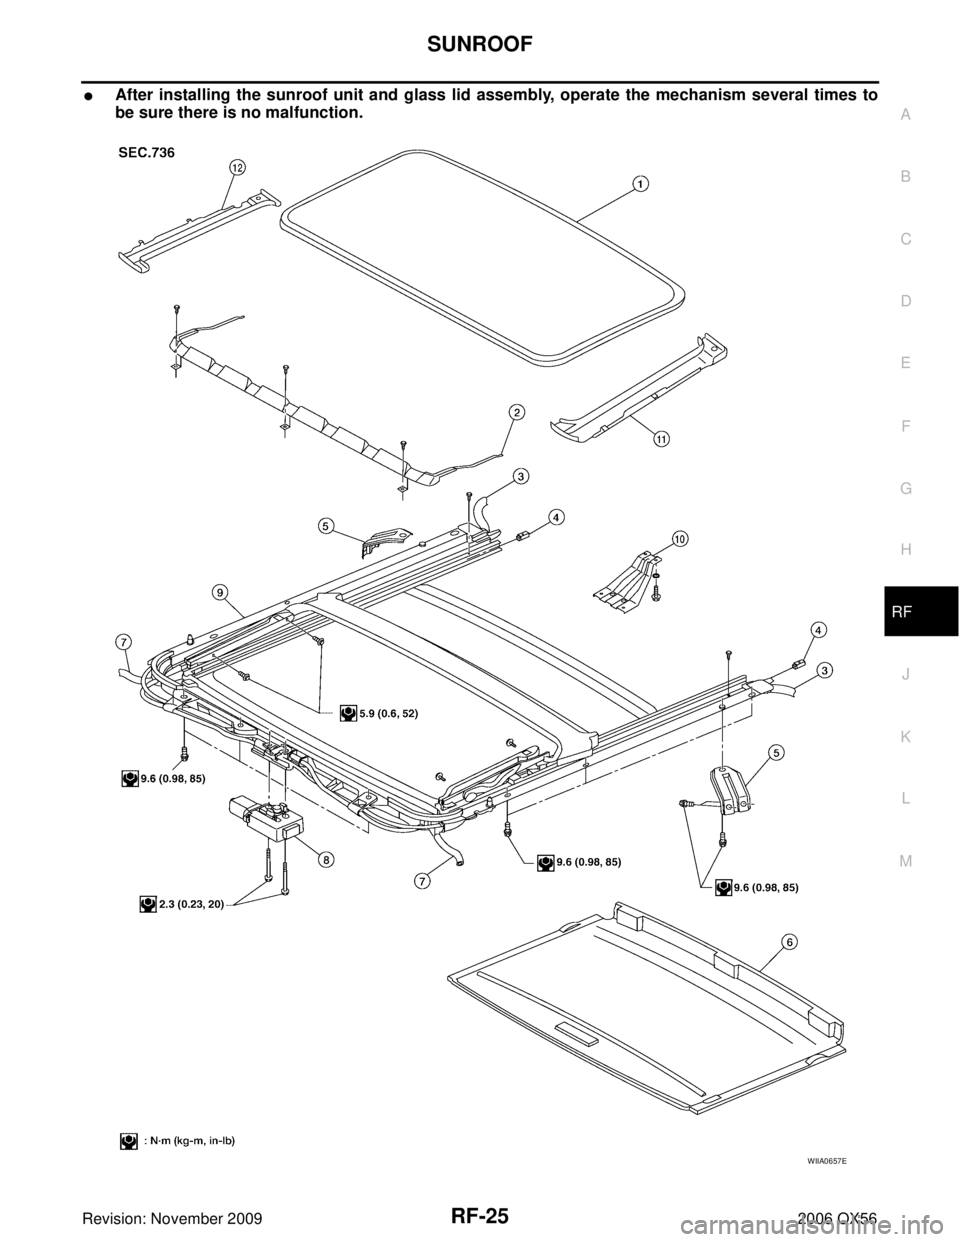
�After installing the sunroof unit and glass lid assembly, operate the mechanism several times to
be sure there is no malfunction.
WIIA0657E
Page 2801 of 3383

RF-26
SUNROOF
Revision: November 20092006 QX56
SUNROOF UNIT
Removal
CAUTION:
�Always work with a helper.
�When taking sunroof unit out, use shop cloths to protect the seats and trim from damage.
�After installing the sunroof unit and glass lid assembly, check gap adjustment to make sure there
is no malfunction.
1. Remove headlining. Refer to EI-38, "
HEADLINING" .
2. Remove the sunroof glass lid assembly. Refer to RF-26, "
GLASS LID ASSEMBLY" .
3. Remove overhead console bracket.
4. Disconnect front and rear drain hoses.
5. Remove front sunroof frame assembly bolts.
6. Remove rear sunroof bracket bolts.
7. Remove the sunroof frame assembly side bolts, then the sunroof unit.
Installation
1. Position the sunroof frame assembly and install the side bolts.
2. Install the sunroof brackets and bolts.
3. Install the front sunroof frame assembly bolts.
4. Connect front and rear drain hoses.
5. Install the overhead console bracket.
6. Install the sunroof glass lid assembly. Refer to RF-26, "
GLASS LID ASSEMBLY" .
NOTE:
Adjust sunroof glass lid assembly gap and height, refer to RF-23, "
Fitting Adjustment" .
7. Install headlining. Refer to EI-38, "
HEADLINING" .
GLASS LID ASSEMBLY
Removal
1. Open sunshade assembly.
NOTE:
Be sure glass lid assembly is fully closed.
2. Remove side cover LH and RH.
3. Remove the glass lid assembly screws at the sunroof frame assembly.
4. Remove the glass lid assembly.
Installation
1. Position glass lid assembly to sunroof frame assembly.
2. Install glass lid assembly screws. NOTE:
First tighten left front screw, then right rear to prevent movement while tightening the remaining screws.
1. Glass lid assembly 2. Wind deflector3. Rear drain hoses
4. Shade stoppers 5. Sunroof bracket 6. Sunshade assembly
7. Front drain hoses 8. Sunroof motor assembly9. Sunroof frame assembly
10. Overhead console bracket 11. Side cover LH 12. Side cover RH
WIIA0252E
Page 2802 of 3383

SUNROOFRF-27
C
DE
F
G H
J
K L
M A
B
RF
Revision: November 2009 2006 QX56
3. Adjust the glass lid assembly. Refer to RF-23, "Fitting Adjustment" .
4. Install side cover LH and RH.
WIND DEFLECTOR
Removal
1. Open the glass lid assembly.
2. Remove screws from the left, center, and right side wind deflec- tor holders.
3. Remove the wind deflector from the sunroof frame assembly.
Installation
Installation is in the reverse order of removal.
SUNSHADE ASSEMBLY
Removal
1. Remove the sunroof frame assembly. Refer to RF-26, "SUNROOF UNIT" .
2. Remove the two (2) shade stoppers from the end of the sunroof frame assembly.
3. Remove the sunshade assembly from the rear end of the sun- roof frame assembly.
Installation
Installation is in the reverse order of removal.
SUNROOF MOTOR ASSEMBLY
Removal
CAUTION:
�When removing the sunroof motor assembly, be sure the glass lid assembly is in the fully closed
position.
�Never run the removed sunroof motor assembly.
1. Position the glass lid assembly in the fully closed position.
2. Disconnect the negative and positive battery cables, then wait at least 3 minutes.
3. Remove the overhead console assembly. Refer to EI-38, "
HEADLINING" .
LIIA1099E
SBT251A
Page 2803 of 3383
RF-28
SUNROOF
Revision: November 20092006 QX56
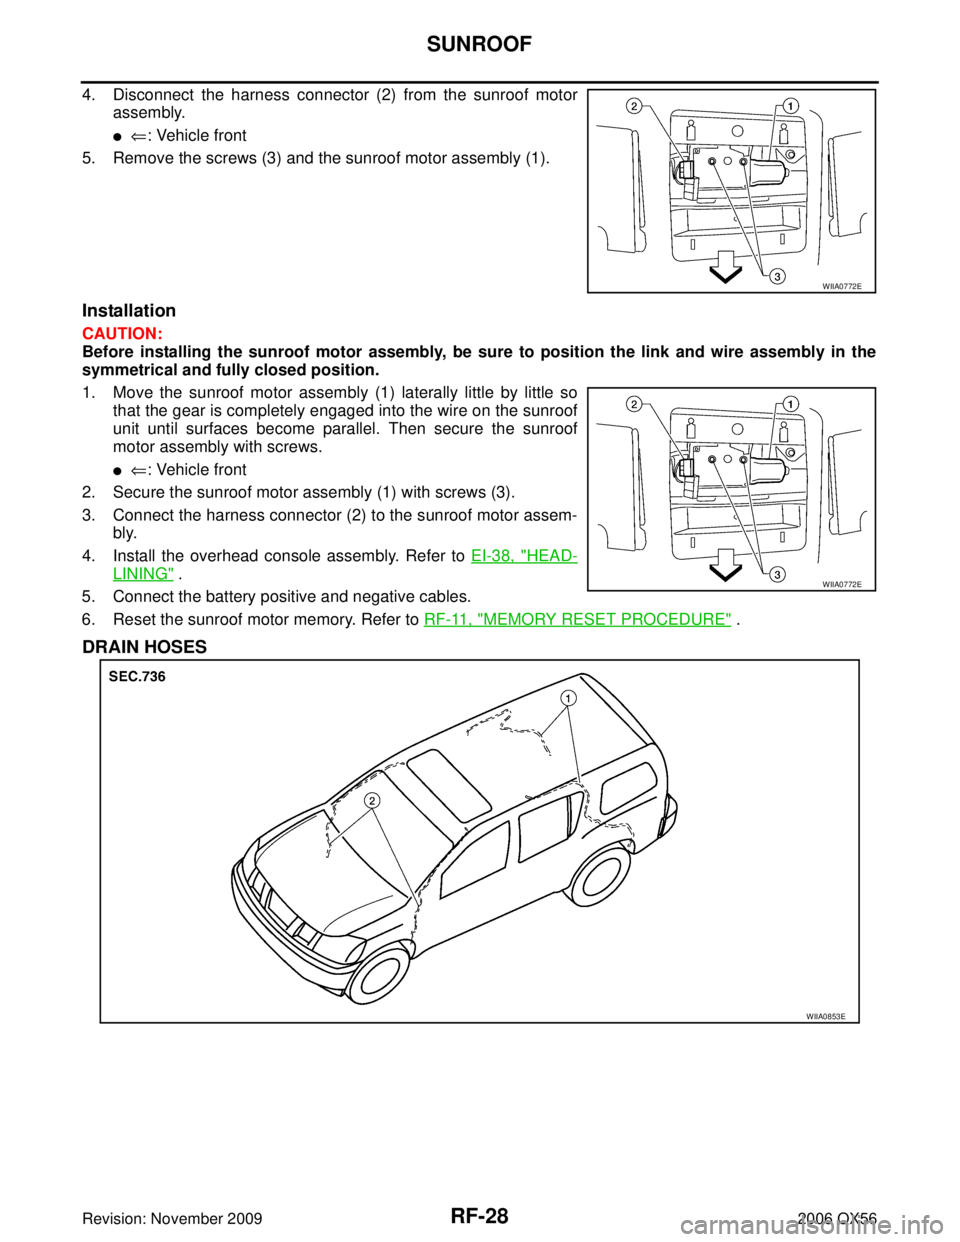
4. Disconnect the harness connector (2) from the sunroof motor
assembly.
�⇐: Vehicle front
5. Remove the screws (3) and the sunroof motor assembly (1).
Installation
CAUTION:
Before installing the sunroof motor assembly, be sure to position the link and wire assembly in the
symmetrical and fully closed position.
1. Move the sunroof motor assembly (1) laterally little by little so that the gear is completely engaged into the wire on the sunroof
unit until surfaces become parallel. Then secure the sunroof
motor assembly with screws.
�⇐: Vehicle front
2. Secure the sunroof motor assembly (1) with screws (3).
3. Connect the harness connector (2) to the sunroof motor assem- bly.
4. Install the overhead console assembly. Refer to EI-38, "
HEAD-
LINING" .
5. Connect the battery positive and negative cables.
6. Reset the sunroof motor memory. Refer to RF-11, "
MEMORY RESET PROCEDURE" .
DRAIN HOSES
WIIA0772E
WIIA0772E
WIIA0853E
Page 2804 of 3383

SUNROOFRF-29
C
DE
F
G H
J
K L
M A
B
RF
Revision: November 2009 2006 QX56
1. Remove the headlining. Refer to EI-38, "HEADLINING" .
2. Visually check the drain hoses for proper connections, damage or deterioration.
3. Remove each drain hose and check visually for damage, cracks or deterioration.
4. Pour water through the drain hose to check for damage.
�If any damage is found, replace the drain hose.
WEATHERSTRIP
Visually check weatherstrip for any damage, deterioration, or flattening.
�In the case of leakage around glass lid assembly, close and pour water around it to find the damaged or
gaped portion, remove glass lid assembly.
�If any damage is found, replace glass lid assembly.
CAUTION:
Do not remove weatherstrip.
LINK AND WIRE ASSEMBLY
NOTE:
Before replacing any suspect part, be sure it is the source of the noise being experienced.
1. Visually check to determine if a sufficient amount of petroleum jelly has been applied to the wire or rail groove. If not, add petroleum jelly as required.
2. Check wire and casing for any damage or deterioration. If any damage is found, replace sunroof frame assembly.
LIIA0272E