Page 1515 of 3383
EC-304Revision: November 2009
DTC P0172, P0175 FUEL INJECTION SYSTEM FUNCTION
2006 QX56
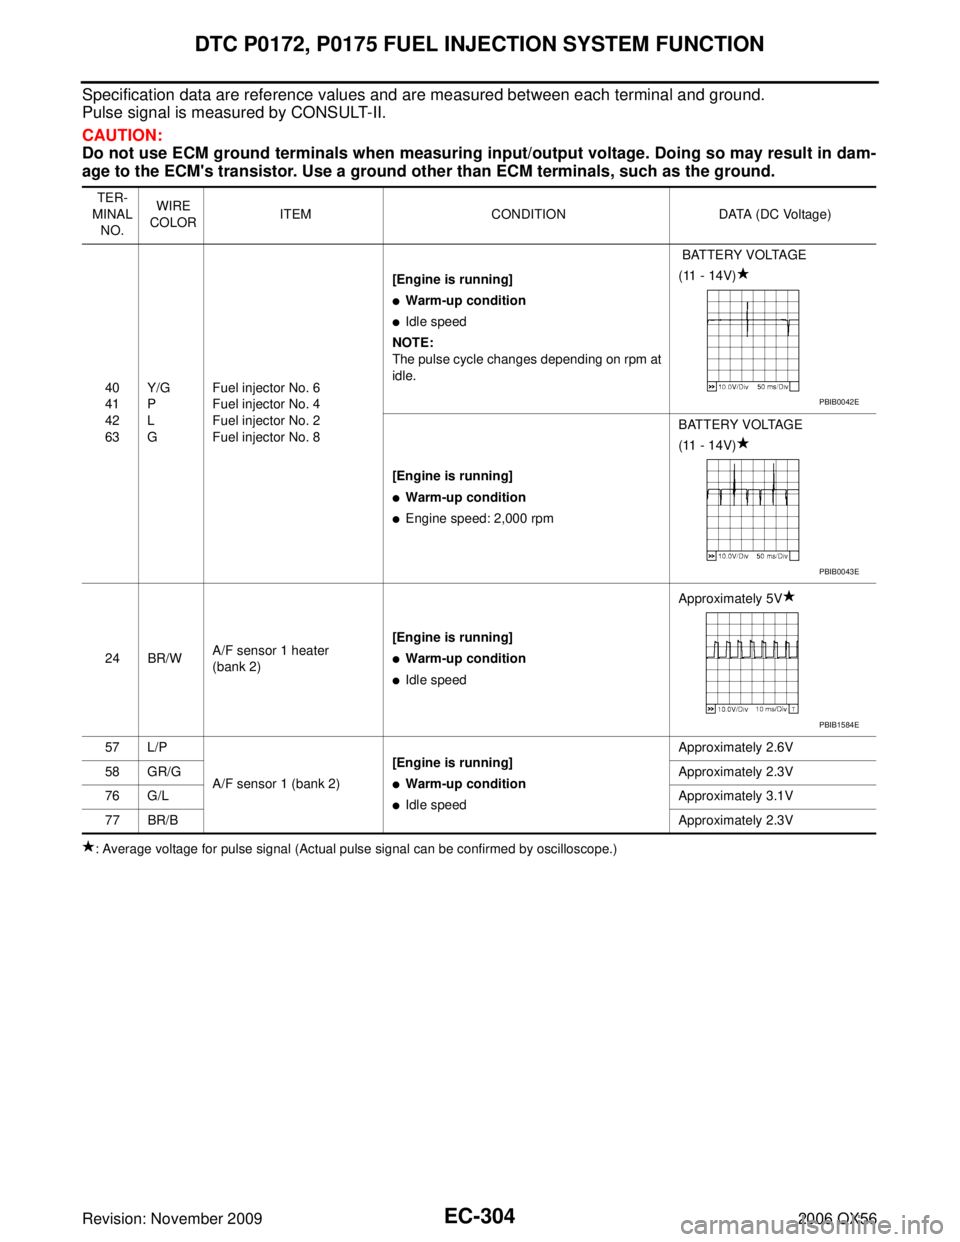
Specification data are reference values and are measured between each terminal and ground.
Pulse signal is measured by CONSULT-II.
CAUTION:
Do not use ECM ground terminals when measuring input/output voltage. Doing so may result in dam-
age to the ECM's transistor. Use a ground other than ECM terminals, such as the ground.
: Average voltage for pulse signal (Actual pulse signal can be confirmed by oscilloscope.)TER-
MINAL NO. WIRE
COLOR ITEM
CONDITION DATA (DC Voltage)
40
41
42
63 Y/G
P
L
G Fuel injector No. 6
Fuel injector No. 4
Fuel injector No. 2
Fuel injector No. 8 [Engine is running]
�Warm-up condition
�Idle speed
NOTE:
The pulse cycle changes depending on rpm at
idle. BATTERY VOLTAGE
(11 - 14V)
[Engine is running]
�Warm-up condition
�Engine speed: 2,000 rpm BATTERY VOLTAGE
(11 - 14V)
24 BR/W A/F sensor 1 heater
(bank 2) [Engine is running]
�Warm-up condition
�Idle speed Approximately 5V
57 L/P A/F sensor 1 (bank 2) [Engine is running]
�Warm-up condition
�Idle speed Approximately 2.6V
58 GR/G Approximately 2.3V
76 G/L Approximately 3.1V
77 BR/B Approximately 2.3V
PBIB0042E
PBIB0043E
PBIB1584E
Page 1544 of 3383
DTC P0300 - P0308 MULTIPLE CYLINDER MISFIRE, NO. 1 - 8 CYLINDER MIS-FIRE
EC-333
C
D E
F
G H
I
J
K L
M A
EC
Revision: November 2009 2006 QX56
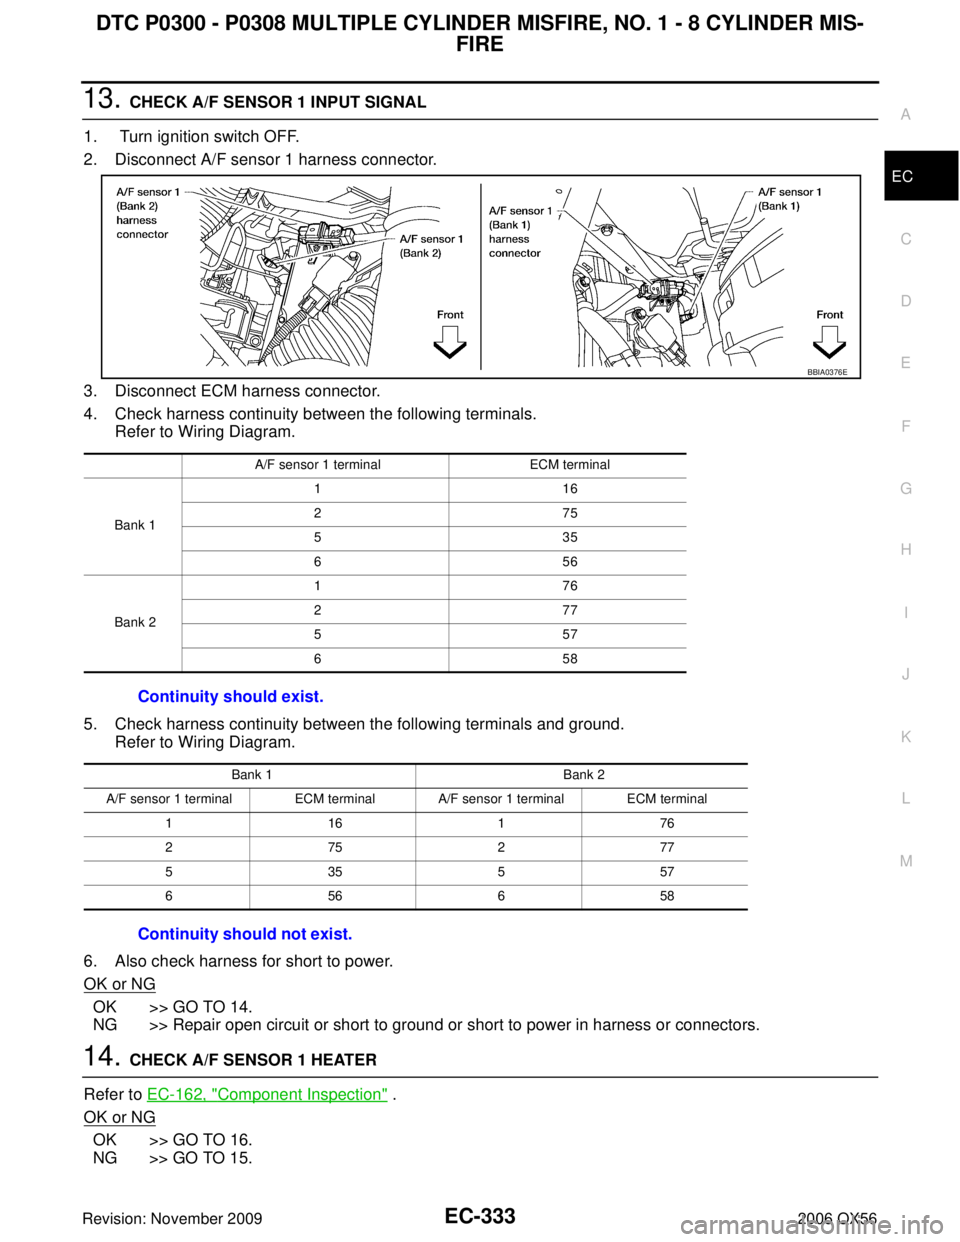
13. CHECK A/F SENSOR 1 INPUT SIGNAL
1. Turn ignition switch OFF.
2. Disconnect A/F sensor 1 harness connector.
3. Disconnect ECM harness connector.
4. Check harness continuity between the following terminals. Refer to Wiring Diagram.
5. Check harness continuity between the following terminals and ground. Refer to Wiring Diagram.
6. Also check harness for short to power.
OK or NG
OK >> GO TO 14.
NG >> Repair open circuit or short to ground or short to power in harness or connectors.
14. CHECK A/F SENSOR 1 HEATER
Refer to EC-162, "
Component Inspection" .
OK or NG
OK >> GO TO 16.
NG >> GO TO 15.
A/F sensor 1 terminal ECM terminal
Bank 1 11
6
27 5
53 5
65 6
Bank 2 17
6
27 7
55 7
65 8
Continuity should exist.
Bank 1 Bank 2
A/F sensor 1 terminal ECM terminal A/F sensor 1 terminal ECM terminal 11 617 6
27 527 7
53 555 7
65 665 8
Continuity should not exist.
BBIA0376E
Page 1681 of 3383
EC-470Revision: November 2009
DTC P1148, P1168 CLOSED LOOP CONTROL
2006 QX56
DTC P1148, P1168 CLOSED LOOP CONTROLPFP:22690
On Board Diagnosis LogicUBS00H8K
These self-diagnoses have the one trip detection logic.
DTC P1148 or P1168 is displayed with another DTC for air fuel ratio (A/F) sensor 1.
Perform the trouble diagnosis for the corresponding DTC.
DTC No. Trouble diagnosis nameDTC detecting condition Possible cause
P1148
1148
(Bank 1) Closed loop control
function The closed loop control function for bank 1
does not operate even when vehicle is driving
in the specified condition.
�Harness or connectors
[The air fuel ratio (A/F) sensor 1 circuit is
open or shorted.]
�Air fuel ratio (A/F) sensor 1
�Air fuel ratio (A/F) sensor 1 heater
P1168
1168
(Bank 2) The closed loop control function for bank 2
does not operate even when vehicle is driving
in the specified condition.
Page 1786 of 3383
DTC P2A00, P2A03 A/F SENSOR 1EC-575
C
DE
F
G H
I
J
K L
M A
EC
Revision: November 2009 2006 QX56
DTC P2A00, P2A03 A/F SENSOR 1PFP:22693
Component DescriptionUBS00N7D
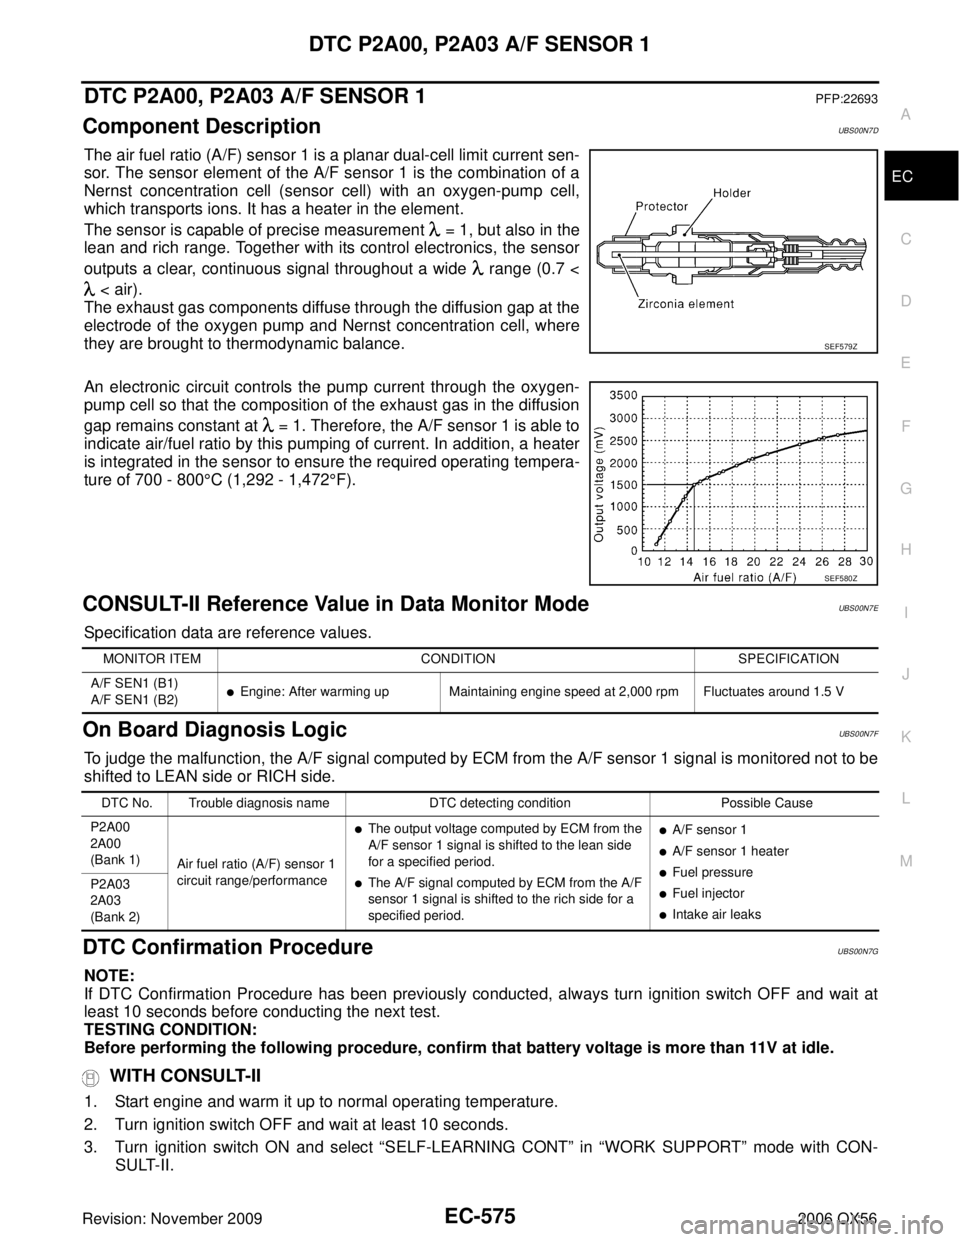
The air fuel ratio (A/F) sensor 1 is a planar dual-cell limit current sen-
sor. The sensor element of the A/F sensor 1 is the combination of a
Nernst concentration cell (sensor cell) with an oxygen-pump cell,
which transports ions. It has a heater in the element.
The sensor is capable of precise measurement = 1, but also in the
lean and rich range. Together with its control electronics, the sensor
outputs a clear, continuous signal throughout a wide range (0.7 <
< air).
The exhaust gas components diffuse through the diffusion gap at the
electrode of the oxygen pump and Nernst concentration cell, where
they are brought to thermodynamic balance.
An electronic circuit controls the pump current through the oxygen-
pump cell so that the composition of the exhaust gas in the diffusion
gap remains constant at = 1. Therefore, the A/F sensor 1 is able to
indicate air/fuel ratio by this pumping of current. In addition, a heater
is integrated in the sensor to ensure the required operating tempera-
ture of 700 - 800 °C (1,292 - 1,472 °F).
CONSULT-II Reference Value in Data Monitor ModeUBS00N7E
Specification data are reference values.
On Board Diagnosis LogicUBS00N7F
To judge the malfunction, the A/F signal computed by ECM from the A/F sensor 1 signal is monitored not to be
shifted to LEAN side or RICH side.
DTC Confirmation ProcedureUBS00N7G
NOTE:
If DTC Confirmation Procedure has been previously conducted, always turn ignition switch OFF and wait at
least 10 seconds before conducting the next test.
TESTING CONDITION:
Before performing the following procedure, confirm that battery voltage is more than 11V at idle.
WITH CONSULT-II
1. Start engine and warm it up to normal operating temperature.
2. Turn ignition switch OFF and wait at least 10 seconds.
3. Turn ignition switch ON and select “SELF-LEARNING CONT ” in “WORK SUPPORT” mode with CON-
SULT-II.
SEF579Z
SEF580Z
MONITOR ITEM CONDITIONSPECIFICATION
A/F SEN1 (B1)
A/F SEN1 (B2)
�Engine: After warming up Maintaining engine speed at 2,000 rpm Fluctuates around 1.5 V
DTC No. Trouble diagnosis name DTC detecting conditionPossible Cause
P2A00
2A00
(Bank 1) Air fuel ratio (A/F) sensor 1
circuit range/performance
�The output voltage computed by ECM from the
A/F sensor 1 signal is shifted to the lean side
for a specified period.
�The A/F signal computed by ECM from the A/F
sensor 1 signal is shifted to the rich side for a
specified period.
�A/F sensor 1
�A/F sensor 1 heater
�Fuel pressure
�Fuel injector
�Intake air leaks
P2A03
2A03
(Bank 2)
Page 1789 of 3383
EC-578Revision: November 2009
DTC P2A00, P2A03 A/F SENSOR 1
2006 QX56
Specification data are reference values and are measured between each terminal and ground.
Pulse signal is measured by CONSULT-II.
CAUTION:
Do not use ECM ground terminals when measuring input/output voltage. Doing so may result in dam-
age to the ECM's transistor. Use a ground other than ECM terminals, such as the ground.
: Average voltage for pulse signal (Actual pulse signal can be confirmed by oscilloscope.)TER-
MINAL NO. WIRE
COLOR ITEM
CONDITION DATA (DC Voltage)
2 O/B A/F sensor 1 heater
(bank 1) [Engine is running]
�Warm-up condition
�Idle speed Approximately 5V
16 BR/R A/F sensor 1 (bank 1) [Engine is running]
�Warm-up condition
�Idle speed Approximately 3.1V
35 BR/G Approximately 2.6V
56 LG/B Approximately 2.3V
75 P/B Approximately 2.3V
PBIB1584E
Page 1791 of 3383
EC-580Revision: November 2009
DTC P2A00, P2A03 A/F SENSOR 1
2006 QX56
Specification data are reference values and are measured between each terminal and ground.
Pulse signal is measured by CONSULT-II.
CAUTION:
Do not use ECM ground terminals when measuring input/output voltage. Doing so may result in dam-
age to the ECM's transistor. Use a ground other than ECM terminals, such as the ground.
: Average voltage for pulse signal (Actual pulse signal can be confirmed by oscilloscope.)
Diagnostic ProcedureUBS00N7I
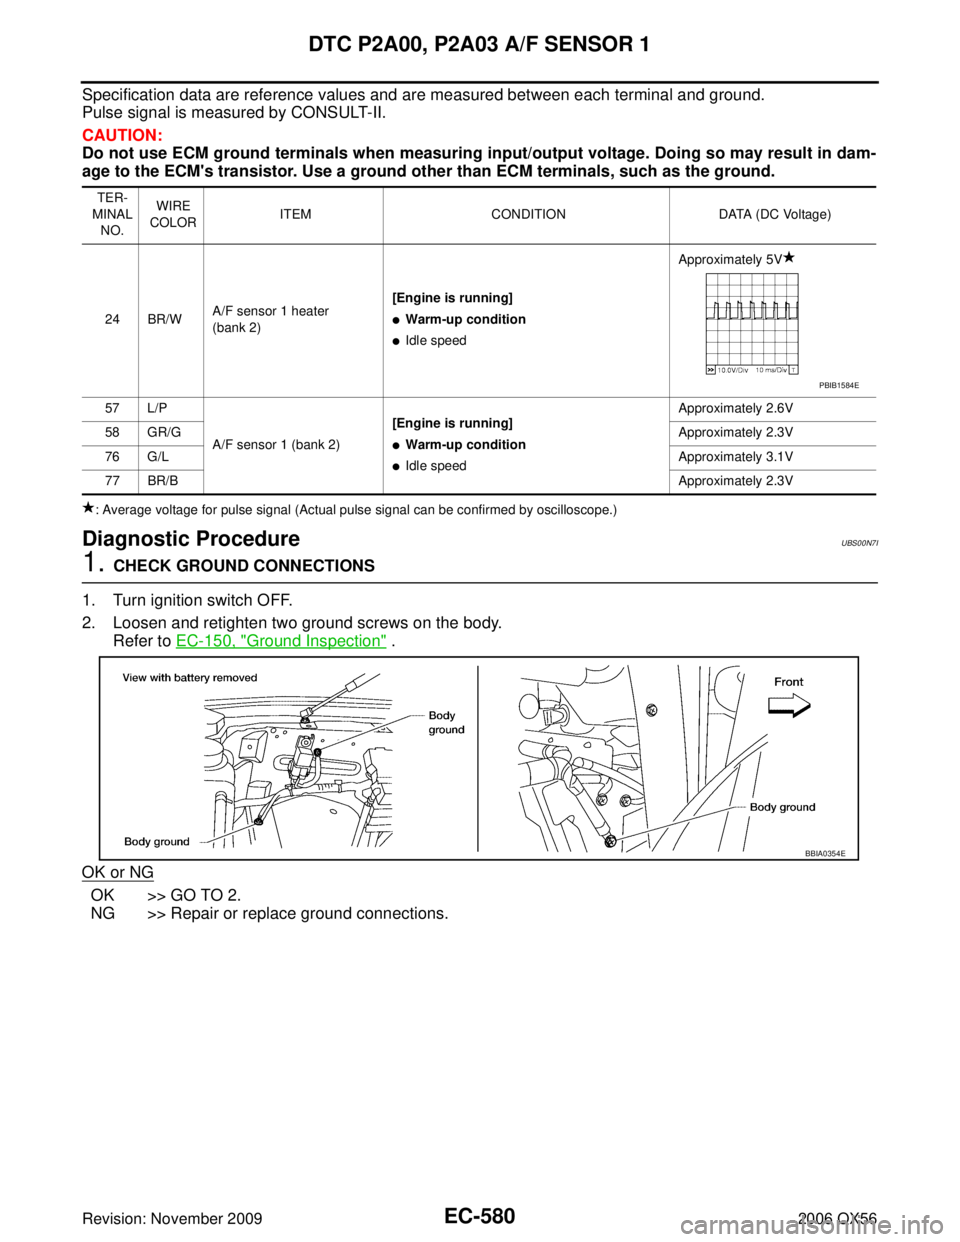
1. CHECK GROUND CONNECTIONS
1. Turn ignition switch OFF.
2. Loosen and retighten two ground screws on the body. Refer to EC-150, "
Ground Inspection" .
OK or NG
OK >> GO TO 2.
NG >> Repair or replace ground connections.
TER-
MINAL NO. WIRE
COLOR ITEM
CONDITION DATA (DC Voltage)
24 BR/W A/F sensor 1 heater
(bank 2) [Engine is running]
�Warm-up condition
�Idle speed Approximately 5V
57 L/P A/F sensor 1 (bank 2) [Engine is running]
�Warm-up condition
�Idle speed Approximately 2.6V
58 GR/G Approximately 2.3V
76 G/L Approximately 3.1V
77 BR/B Approximately 2.3V
PBIB1584E
BBIA0354E
Page 1795 of 3383

EC-584Revision: November 2009
DTC P2A00, P2A03 A/F SENSOR 1
2006 QX56
8. CHECK A/F SENSOR 1 INPUT SIGNAL CIRCUIT FOR OPEN AND SHORT
1. Turn ignition switch OFF.
2. Disconnect ECM harness connector.
3. Check harness continuity between A/F sensor 1 terminal and ECM terminal as follows. Refer to Wiring Diagram.
4. Check harness continuity between the following terminals and ground. Refer to Wiring Diagram.
5. Also check harness for short to power.
OK or NG
OK >> GO TO 9.
NG >> Repair open circuit or short to ground or short to power in harness or connectors.
9. CHECK A/F SENSOR 1 HEATER
Refer to EC-162, "
Component Inspection" .
OK or NG
OK >> GO TO 10.
NG >> GO TO 11.
10. CHECK INTERMITTENT INCIDENT
Perform EC-144, "
TROUBLE DIAGNOSIS FOR INTERMITTENT INCIDENT" .
OK or NG
OK >> GO TO 11.
NG >> Repair or replace.
A/F sensor 1 terminal ECM terminal
Bank1 11
6
27 5
53 5
65 6
Bank 2 17
6
27 7
55 7
65 8
Continuity should exist.
Bank 1 Bank 2
A/F sensor 1 terminal ECM terminal A/F sensor 1 terminal ECM terminal 11 617 6
27 527 7
53 555 7
65 665 8
Continuity should not exist.
Page 1807 of 3383
EC-596Revision: November 2009
ELECTRICAL LOAD SIGNAL
2006 QX56
ELECTRICAL LOAD SIGNALPFP:25350
DescriptionUBS00HDL
The electrical load signal (Headlamp switch signal, rear window defogger switch signal, etc.) is transferred
through the CAN communication line from BCM to ECM via IPDM E/R.
CONSULT-II Reference Value in Data Monitor ModeUBS00HDM
Specification data are reference values.
Diagnostic ProcedureUBS00HDN
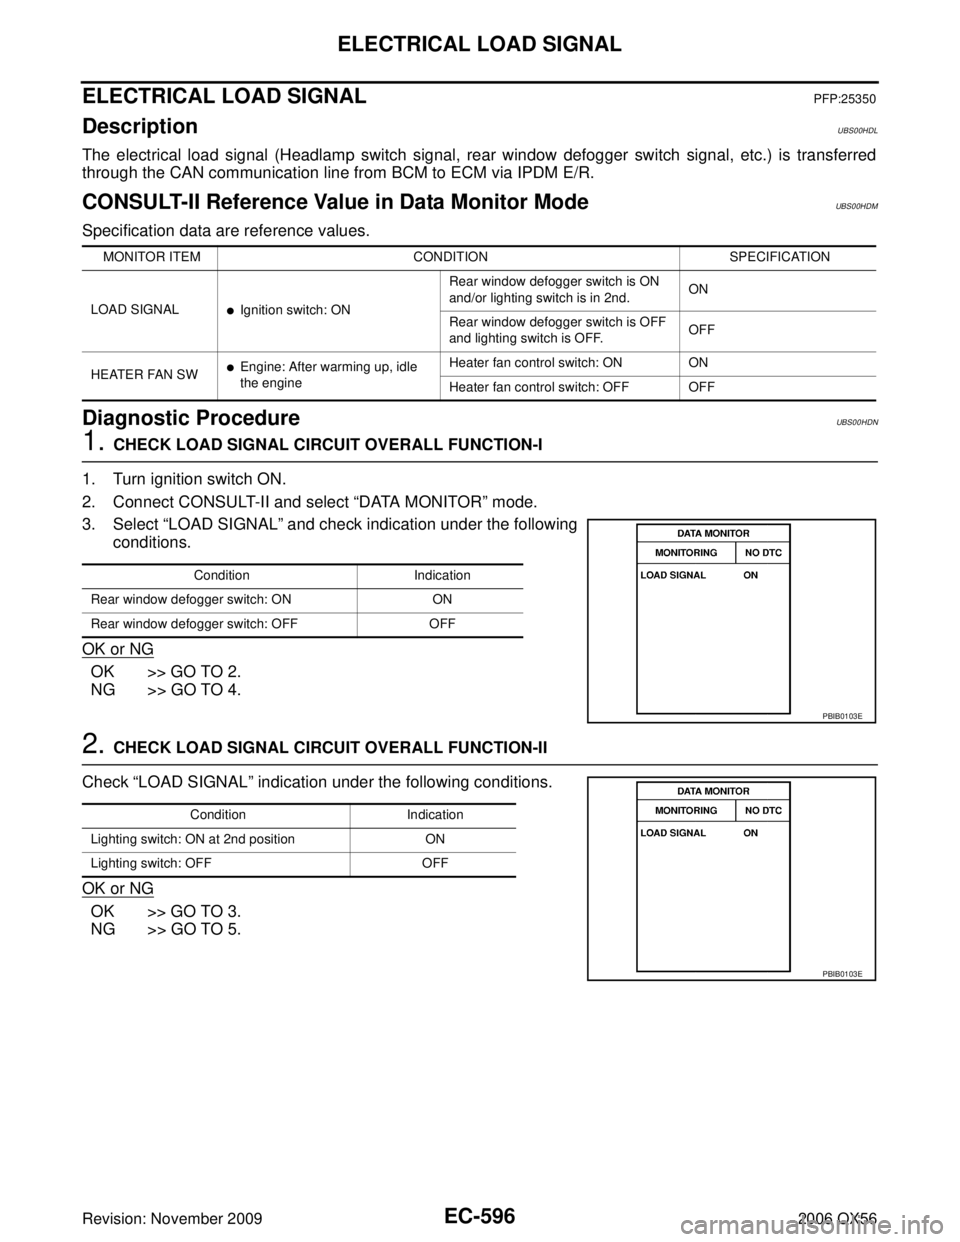
1. CHECK LOAD SIGNAL CIRCUIT OVERALL FUNCTION-I
1. Turn ignition switch ON.
2. Connect CONSULT-II and select “DATA MONITOR ” mode.
3. Select “LOAD SIGNAL ” and check indication under the following
conditions.
OK or NG
OK >> GO TO 2.
NG >> GO TO 4.
2. CHECK LOAD SIGNAL CIRCUIT OVERALL FUNCTION-II
Check “LOAD SIGNAL ” indication under the following conditions.
OK or NG
OK >> GO TO 3.
NG >> GO TO 5.
MONITOR ITEM CONDITION SPECIFICATION
LOAD SIGNAL
�Ignition switch: ON Rear window defogger switch is ON
and/or lighting switch is in 2nd.
ON
Rear window defogger switch is OFF
and lighting switch is OFF. OFF
HEATER FAN SW
�Engine: After warming up, idle
the engine Heater fan control switch: ON
ON
Heater fan control switch: OFF OFF
Condition Indication
Rear window defogger switch: ON ON
Rear window defogger switch: OFF OFF
PBIB0103E
ConditionIndication
Lighting switch: ON at 2nd position ON
Lighting switch: OFF OFF
PBIB0103E