Page 3044 of 5621

BODY SIDE TRIM
EI-39
C
D
E
F
G
H
J
K
L
MA
B
EI
Revision: 2006 January2006 M35/M45
FRONT BODY SIDE WELT
Removal
1. Remove center pillar lower garnish.
2. Remove center kicking plate inner.
3. Remove front body side welt.
Installation
Install in the reverse order of removal.
CENTER PILLAR LOWER GARNISH
Removal
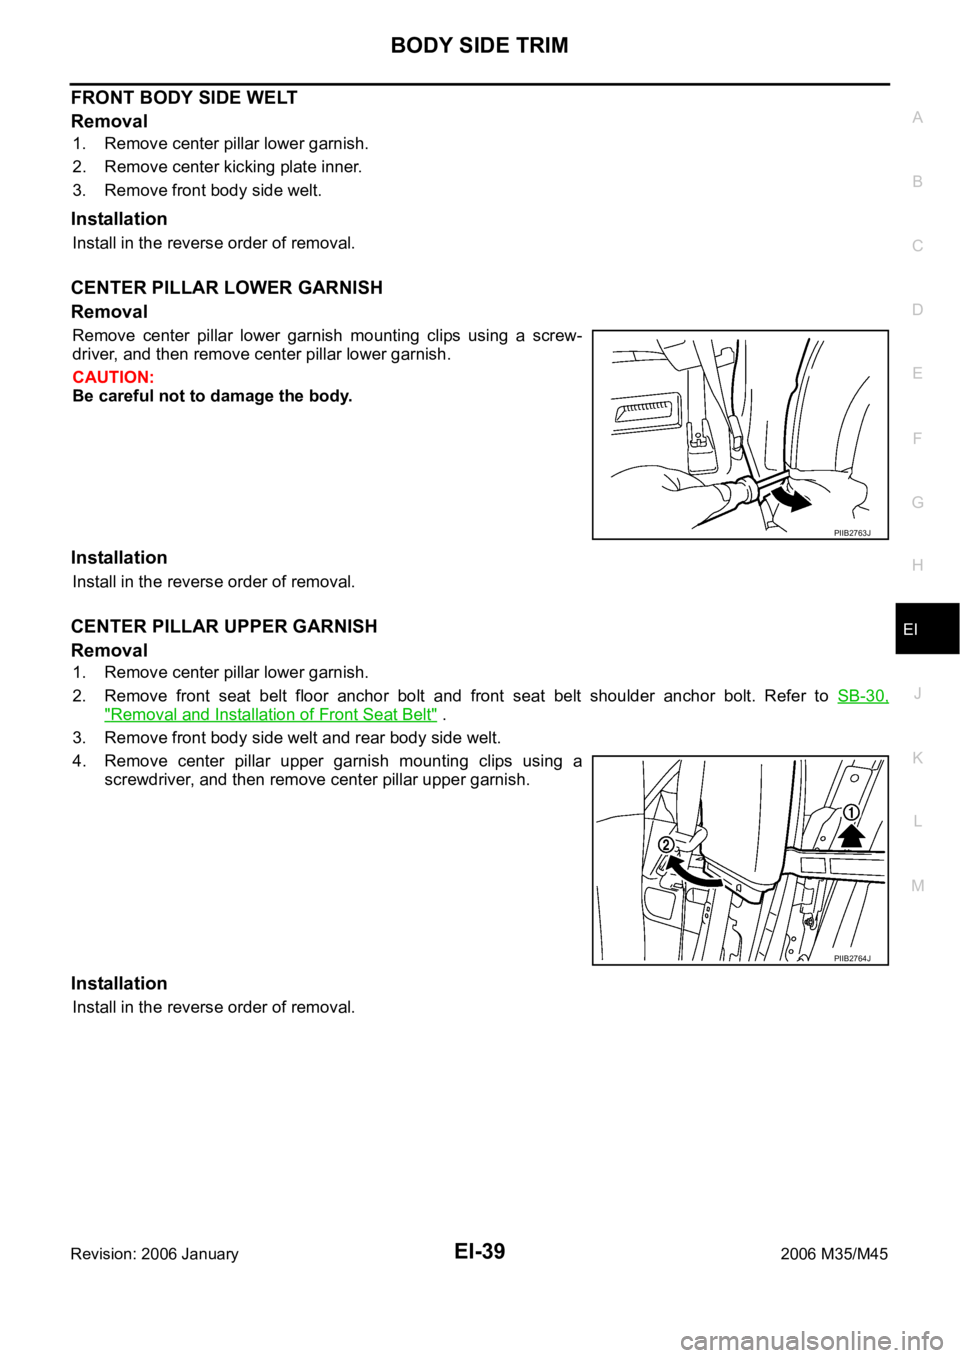
Remove center pillar lower garnish mounting clips using a screw-
driver, and then remove center pillar lower garnish.
CAUTION:
Be careful not to damage the body.
Installation
Install in the reverse order of removal.
CENTER PILLAR UPPER GARNISH
Removal
1. Remove center pillar lower garnish.
2. Remove front seat belt floor anchor bolt and front seat belt shoulder anchor bolt. Refer to SB-30,
"Removal and Installation of Front Seat Belt" .
3. Remove front body side welt and rear body side welt.
4. Remove center pillar upper garnish mounting clips using a
screwdriver, and then remove center pillar upper garnish.
Installation
Install in the reverse order of removal.
PIIB2763J
PIIB2764J
Page 3045 of 5621
EI-40
BODY SIDE TRIM
Revision: 2006 January2006 M35/M45
REAR KICKING PLATE OUTER
Removal
Remove rear kicking plate outer mounting clips using a clip clamp
remover, and then remove kicking plate outer.
Installation
Install in the reverse order of removal.
REAR KICKING PLATE INNER
Removal
1. Remove rear seat cushion. Refer to SE-176, "Removal and Installation" .
2. Remove kicking plate inner mounting clips using a clip clamp
remover, and then remove kicking plate inner.
Installation
Install in the reverse order of removal.
REAR BODY SIDE WELT
Removal
1. Remove center pillar lower garnish.
2. Remove rear seat cushion. Refer to SE-176, "
Removal and Installation" .
3. Remove rear kicking plate inner.
4. Remove rear body side welt.
Installation
Install in the reverse order of removal.
PIIB2765J
PIIB2766J
Page 3046 of 5621

BODY SIDE TRIM
EI-41
C
D
E
F
G
H
J
K
L
MA
B
EI
Revision: 2006 January2006 M35/M45
REAR WHEEL HOUSE GARNISH
Removal
1. Remove rear seat cushion and rear seatback. Refer to SE-176, "Removal and Installation" .
2. Remove rear body side welt.
3. Remove clip of rear wheel house garnish.
4. Remove rear wheel house garnish.
Installation
Install in the reverse order of removal.
NOTE:
To install, check if all clips are matched over holes of panel on vehicle, then push on.
REAR PILLAR FINISHER
Removal
1. Remove rear seat cushion and rear seatback. Refer to SE-176, "Removal and Installation" .
2. Remove rear seat belt floor anchor bolt. Refer to SB-32, "
Removal and Installation of Rear Seat Belt" .
3. Remove rear kicking plate inner.
4. Remove rear wheel house garnish.
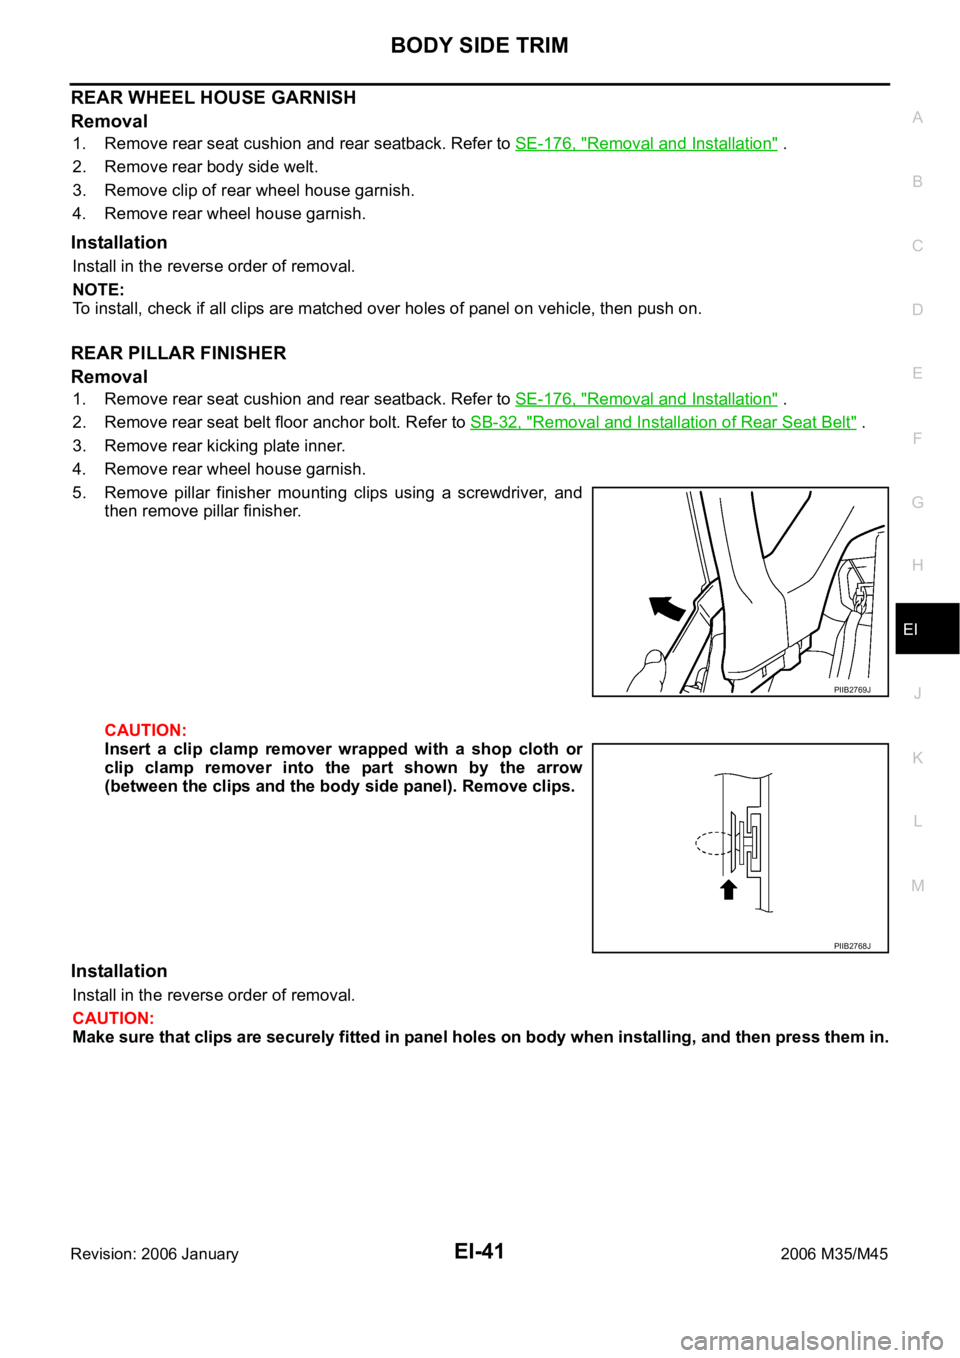
5. Remove pillar finisher mounting clips using a screwdriver, and
then remove pillar finisher.
CAUTION:
Insert a clip clamp remover wrapped with a shop cloth or
clip clamp remover into the part shown by the arrow
(between the clips and the body side panel). Remove clips.
Installation
Install in the reverse order of removal.
CAUTION:
Make sure that clips are securely fitted in panel holes on body when installing, and then press them in.
PIIB2769J
PIIB2768J
Page 3047 of 5621
EI-42
REAR PARCEL SHELF FINISHER
Revision: 2006 January2006 M35/M45
REAR PARCEL SHELF FINISHERPFP:79910
Removal and InstallationNIS0024W
REMOVAL
1. Remove rear seatback and rear seat cushion. Refer to SE-176, "Removal and Installation" .
2. Remove rear seat belt floor anchor bolt and rear seat belt shoulder anchor bolt. Refer to SB-32, "
Removal
and Installation of Rear Seat Belt" .
3. Disengage child anchor cover front pawls, and then pull out child anchor cover (LH/RH center) toward
front of vehicle. (Models with rear window sunshade)
4. Remove rear kicking plate inner, rear wheelhouse garnish, rear pillar finisher. Refer to EI-37, "
BODY SIDE
TRIM" .
1. Rear parcel shelf lid 2. High-mounted stop lamp 3. Child anchor cover
4. Rear parcel shelf finisher 5. Rear seat belt shoulder anchor cover 6. Rear window sunshade
PIIB4590E
Page 3048 of 5621

REAR PARCEL SHELF FINISHER
EI-43
C
D
E
F
G
H
J
K
L
MA
B
EI
Revision: 2006 January2006 M35/M45
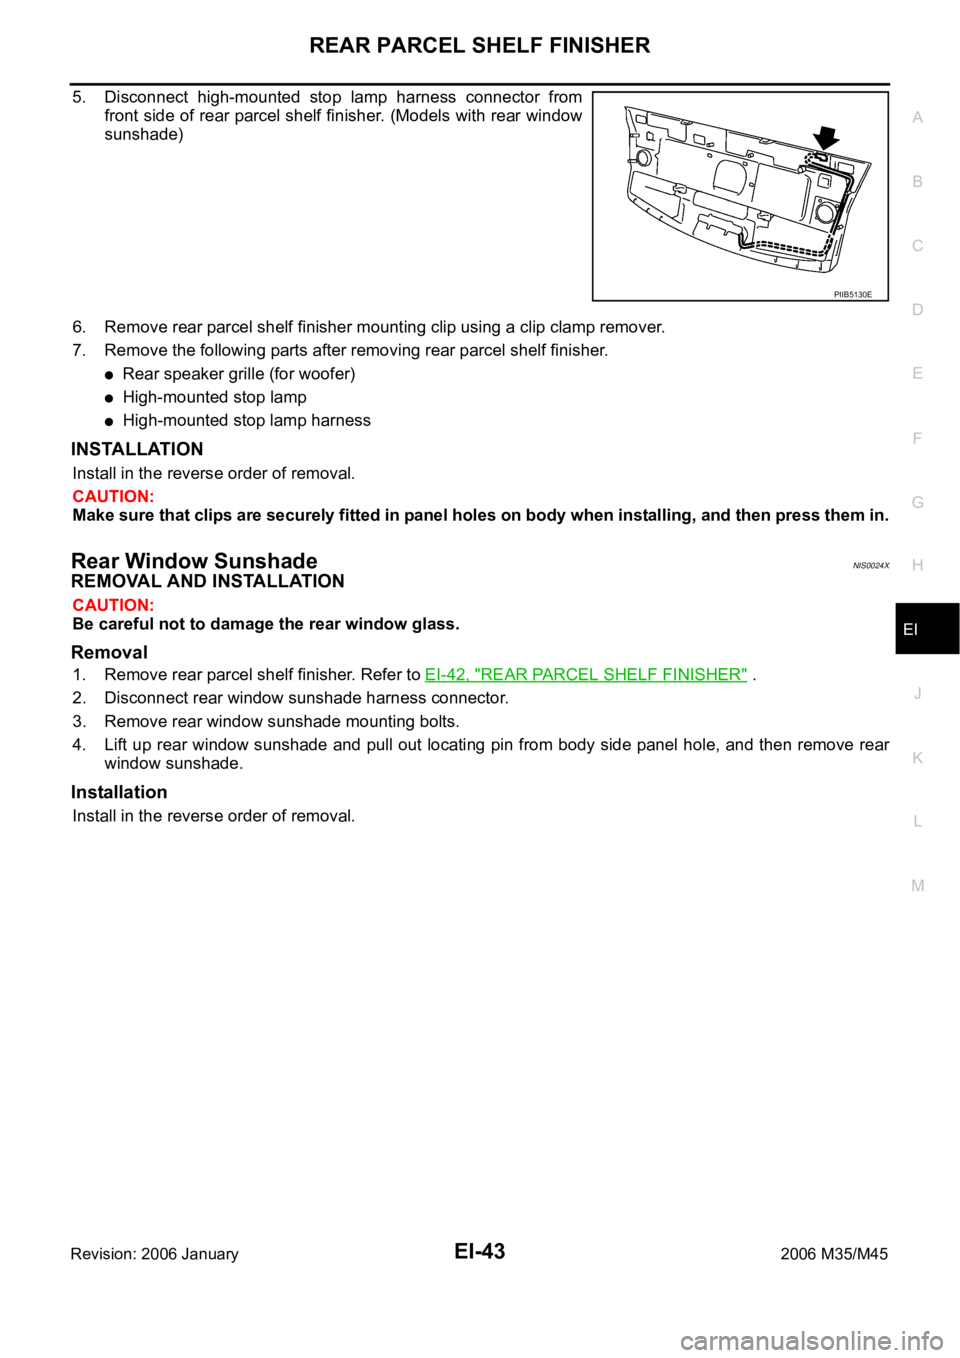
5. Disconnect high-mounted stop lamp harness connector from
front side of rear parcel shelf finisher. (Models with rear window
sunshade)
6. Remove rear parcel shelf finisher mounting clip using a clip clamp remover.
7. Remove the following parts after removing rear parcel shelf finisher.
Rear speaker grille (for woofer)
High-mounted stop lamp
High-mounted stop lamp harness
INSTALLATION
Install in the reverse order of removal.
CAUTION:
Make sure that clips are securely fitted in panel holes on body when installing, and then press them in.
Rear Window SunshadeNIS0024X
REMOVAL AND INSTALLATION
CAUTION:
Be careful not to damage the rear window glass.
Removal
1. Remove rear parcel shelf finisher. Refer to EI-42, "REAR PARCEL SHELF FINISHER" .
2. Disconnect rear window sunshade harness connector.
3. Remove rear window sunshade mounting bolts.
4. Lift up rear window sunshade and pull out locating pin from body side panel hole, and then remove rear
window sunshade.
Installation
Install in the reverse order of removal.
PIIB5130E
Page 3055 of 5621

EI-50
FLOOR TRIM
Revision: 2006 January2006 M35/M45
FLOOR TRIMPFP:74902
Removal and InstallationNIS00252
REMOVAL
1. Remove front seat (LH/RH) and rear seat cushion. Refer to SE-167, "Removal and Installation" and SE-
176, "Removal and Installation" .
2. Remove accelerator pedal pad. Refer to ACC-3, "
ACCELERATOR CONTROL SYSTEM" .
3. Remove rear floor grille and foot grille. Refer to ATC-144, "
DUCTS AND GRILLES" .
4. Remove front seat belt floor anchor bolt (LH/RH). Refer to SB-30, "
Removal and Installation of Front Seat
Belt" .
5. Remove center console. Refer to IP-10, "
INSTRUMENT PANEL ASSEMBLY" .
6. Remove instrument driver lower panel and instrument passenger lower cover. Refer to IP-10, "
INSTRU-
MENT PANEL ASSEMBLY" .
7. Remove floor hook.
8. Remove dash side finisher, front kicking plate inner, center pillar lower garnish, and rear kicking plate
inner, front body side welt (LH/RH), rear body side welt (LH/RH), rear wheel house garnish. Refer to EI-
37, "BODY SIDE TRIM" .
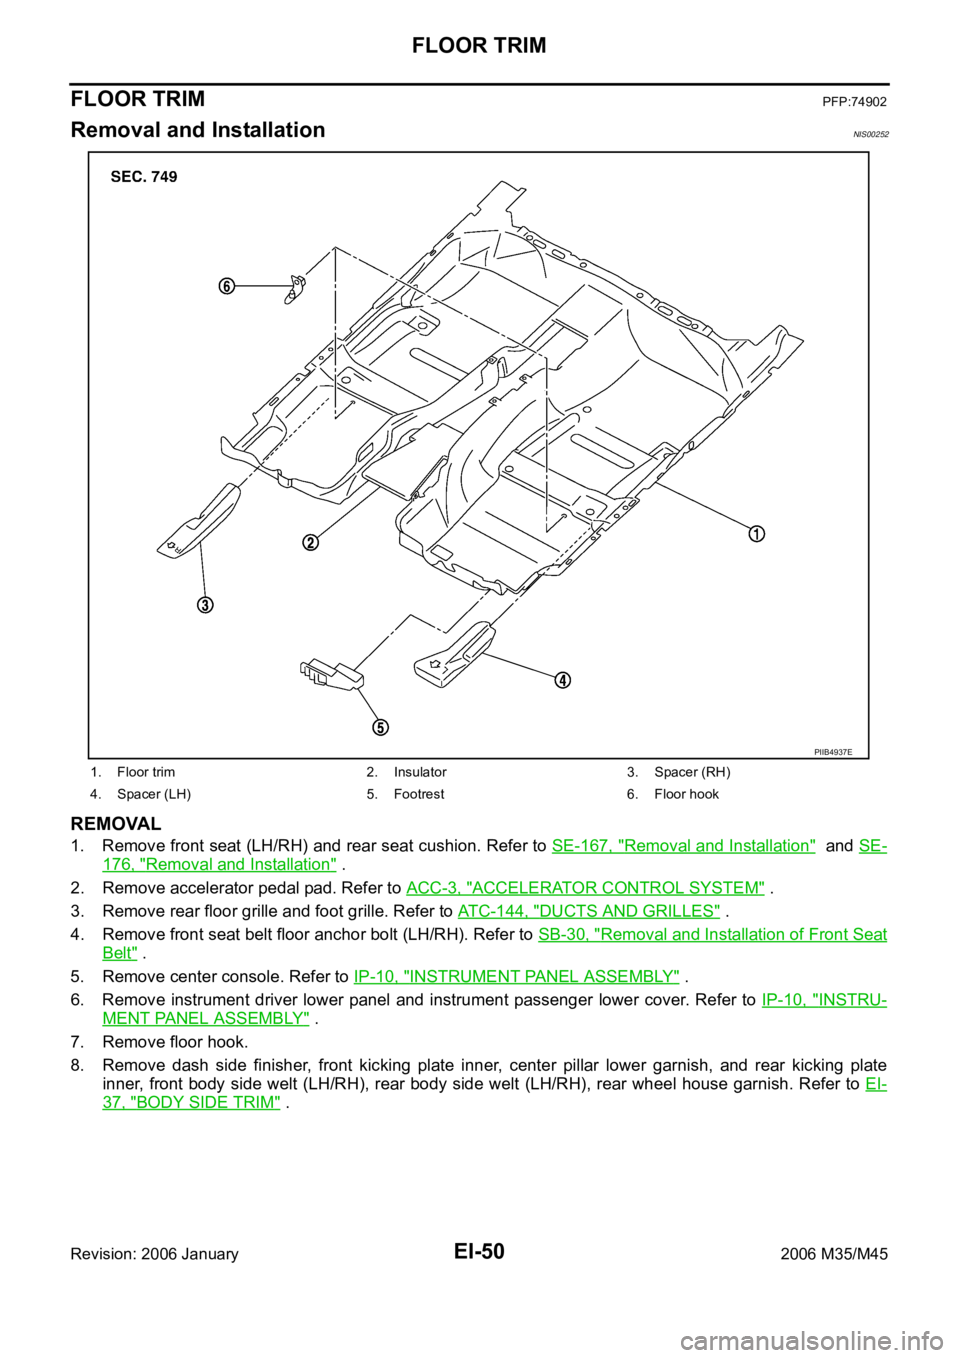
1. Floor trim 2. Insulator 3. Spacer (RH)
4. Spacer (LH) 5. Footrest 6. Floor hook
PIIB4937E
Page 3056 of 5621
FLOOR TRIM
EI-51
C
D
E
F
G
H
J
K
L
MA
B
EI
Revision: 2006 January2006 M35/M45
9. Remove floor carpet from carpet clips and remove floor carpet.
INSTALLATION
Install in the reverse order of removal.
PIIA7125E
Page 3057 of 5621
EI-52
HEADLINING
Revision: 2006 January2006 M35/M45
HEADLININGPFP:73910
Removal and InstallationNIS00253
1. Headlining assembly 2. Sun-visor (RH) 3. Sun-visor (LH)
4. Sun-visor holder 5. Clip 6. Personal lamp
7. Clip holder 8. Dual-visor (RH) 9. Dual-visor (LH)
10. Dual lock fastener 11. Map lamp assembly 12. Roof harness assembly
13. Antenna feeder assembly 14. Map lamp assembly (with LDW system)
Pawl Metal clip
PIIB7208E