2006 INFINITI M35 stall
[x] Cancel search: stallPage 3006 of 5621
EI-1
EXTERIOR & INTERIOR
I BODY
CONTENTS
C
D
E
F
G
H
J
K
L
M
SECTION EI
A
B
EI
Revision: 2006 January2006 M35/M45
EXTERIOR & INTERIOR
PRECAUTIONS .......................................................... 3
Precautions for Supplemental Restraint System
(SRS) “AIR BAG” and “SEAT BELT PRE-TEN-
SIONER” .................................................................. 3
Precautions for Procedures without Cowl Top Cover ..... 3
Precautions for Work ...........................................
..... 3
PREPARATION ........................................................... 4
Special Service Tools ............................................... 4
Commercial Service Tools ........................................ 4
SQUEAK AND RATTLE TROUBLE DIAGNOSES ..... 5
Work Flow ................................................................ 5
CUSTOMER INTERVIEW ..................................... 5
DUPLICATE THE NOISE AND TEST DRIVE ....... 6
CHECK RELATED SERVICE BULLETINS ........... 6
LOCATE THE NOISE AND IDENTIFY THE
ROOT CAUSE ...................................................... 6
REPAIR THE CAUSE ........................................... 6
CONFIRM THE REPAIR ....................................... 7
Generic Squeak and Rattle Troubleshooting ........... 7
INSTRUMENT PANEL .......................................... 7
CENTER CONSOLE ............................................. 7
DOORS ................................................................. 7
TRUNK .................................................................. 8
SUNROOF/HEADLINING ..................................... 8
SEATS ................................................................... 8
UNDERHOOD ....................................................... 8
Diagnostic Worksheet .............................................. 9
FRONT BUMPER ......................................................11
Removal and Installation ......................................... 11
REMOVAL ........................................................
... 12
INSTALLATION ................................................... 12
Removal and Installation of Front Bumper Grille ... 13
REMOVAL ........................................................
... 13
INSTALLATION ................................................... 13
REAR BUMPER ....................................................
... 14
Removal and Installation ........................................ 14
REMOVAL ........................................................
... 15
INSTALLATION ................................................... 15FRONT GRILLE ........................................................ 16
Removal and Installation ........................................ 16
REMOVAL ........................................................
... 16
INSTALLATION ................................................... 16
HOOD ........................................................................ 17
Removal and Installation ........................................ 17
HOOD TOP MOLDING ........................................ 17
COWL TOP ............................................................... 18
Removal and Installation ........................................ 18
REMOVAL ........................................................
... 18
INSTALLATION ................................................
... 18
FENDER PROTECTOR ............................................ 20
Removal and Installation ........................................ 20
REMOVAL ........................................................
... 20
INSTALLATION ................................................... 20
Rear Wheel House Protector .................................. 21
REMOVAL AND INSTALLATION ........................ 21
REMOVAL ........................................................
... 21
INSTALLATION ................................................... 21
CENTER MUD GUARD ............................................ 22
Removal and Installation ........................................ 22
REMOVAL ........................................................
... 22
INSTALLATION ................................................... 22
FLOOR SIDE FAIRING ............................................. 23
Removal and Installation of Under Cover (for V6
Engine Models) ....................................................... 23
Removal and Installation of Under Cover (for V8
Engine Models) ....................................................... 23
FRONT UNDER COVER .................................... 23
FRONT UNDER COVER (REAR) ....................... 24
FLOOR UNDER COVER .................................... 24
REAR UNDER COVER ....................................... 24
REAR DIFFUSER ............................................... 24
ROOF SIDE MOLDING ............................................. 25
Removal and Installation ........................................ 25
REMOVAL ........................................................
... 25
INSTALLATION ................................................... 26
Page 3007 of 5621

EI-2Revision: 2006 January2006 M35/M45 DOOR SASH MOLDING ........................................... 27
Removal and Installation ........................................ 27
FRONT DOOR SASH MOLDING ........................ 27
REAR DOOR SUSH MOLDING .......................... 27
DOOR SASH OUTER COVER ............................ 28
REAR DOOR CORNER COVER ........................ 28
DOOR OUTSIDE MOLDING ..................................... 29
Removal and Installation ........................................ 29
FRONT DOOR OUTSIDE MOLDING .................. 29
REAR DOOR OUTSIDE MOLDING .................... 30
SIDE GUARD MOLDING .......................................... 31
Removal and Installation ........................................ 31
REMOVAL ........................................................
... 31
INSTALLATION .................................................... 31
DOOR PARTING SEAL ............................................ 32
Removal and Installation ........................................ 32
FRONT DOOR PARTING SEAL .......................... 32
REAR DOOR PARTING SEAL ............................ 32
TRUNK LID FINISHER .............................................. 33
Removal and Installation ........................................ 33
REMOVAL ........................................................
... 33
INSTALLATION .................................................... 33
DOOR FINISHER ...................................................... 34
Removal and Installation ........................................ 34
FRONT AND REAR DOOR FINISHER ............... 34
FRONT DOOR SASH COVER INNER ................ 36
REAR DOOR SASH COVER INNER .................. 36BODY SIDE TRIM ..................................................... 37
Removal and Installation ......................................... 37
FRONT PILLAR GARNISH .................................. 38
FRONT KICKING PLATE OUTER ....................... 38
FRONT KICKING PLATE INNER ........................ 38
FRONT BODY SIDE WELT ................................. 39
CENTER PILLAR LOWER GARNISH ................. 39
CENTER PILLAR UPPER GARNISH .................. 39
REAR KICKING PLATE OUTER ......................... 40
REAR KICKING PLATE INNER ........................... 40
REAR BODY SIDE WELT .................................... 40
REAR WHEEL HOUSE GARNISH ...................... 41
REAR PILLAR FINISHER .................................... 41
REAR PARCEL SHELF FINISHER ........................... 42
Removal and Installation ......................................... 42
REMOVAL ............................................................ 42
INSTALLATION .................................................... 43
Rear Window Sunshade ......................................... 43
REMOVAL AND INSTALLATION ......................... 43
SUNSHADE ............................................................... 44
Component Parts and Harness Connector Location ... 44
Schematic ............................................................... 45
Wiring Diagram—SHADE— .................................... 46
Terminals and Reference Values for Rear Sun-
shade Unit ............................................................... 49
FLOOR TRIM ............................................................. 50
Removal and Installation ......................................... 50
REMOVAL ............................................................ 50
INSTALLATION .................................................... 51
HEADLINING ............................................................. 52
Removal and Installation ......................................... 52
REMOVAL ............................................................ 53
INSTALLATION .................................................... 55
TRUNK ROOM TRIM & TRUNK LID FINISHER ....... 56
Removal and Installation for Trunk Room Trim ....... 56
REMOVAL ............................................................ 57
INSTALLATION .................................................... 57
REMOVAL AND INSTALLATION OF TRUNK LID
FINISHER INNER ................................................ 57
Page 3008 of 5621
PRECAUTIONS
EI-3
C
D
E
F
G
H
J
K
L
MA
B
EI
Revision: 2006 January2006 M35/M45
PRECAUTIONSPFP:00001
Precautions for Supplemental Restraint System (SRS) “AIR BAG” and “SEAT
BELT PRE-TENSIONER”
NIS00245
The Supplemental Restraint System such as “AIR BAG” and “SEAT BELT PRE-TENSIONER”, used along
with a front seat belt, helps to reduce the risk or severity of injury to the driver and front passenger for certain
types of collision. This system includes seat belt switch inputs and dual stage front air bag modules. The SRS
system uses the seat belt switches to determine the front air bag deployment, and may only deploy one front
air bag, depending on the severity of a collision and whether the front occupants are belted or unbelted.
Information necessary to service the system safely is included in the SRS and SB section of this Service Man-
ual.
WAR NING :
To avoid rendering the SRS inoperative, which could increase the risk of personal injury or death
in the event of a collision which would result in air bag inflation, all maintenance must be per-
formed by an authorized NISSAN/INFINITI dealer.
Improper maintenance, including incorrect removal and installation of the SRS, can lead to per-
sonal injury caused by unintentional activation of the system. For removal of Spiral Cable and Air
Bag Module, see the SRS section.
Do not use electrical test equipment on any circuit related to the SRS unless instructed to in this
Service Manual. SRS wiring harnesses can be identified by yellow and/or orange harnesses or
harness connectors.
Precautions for Procedures without Cowl Top CoverNIS00246
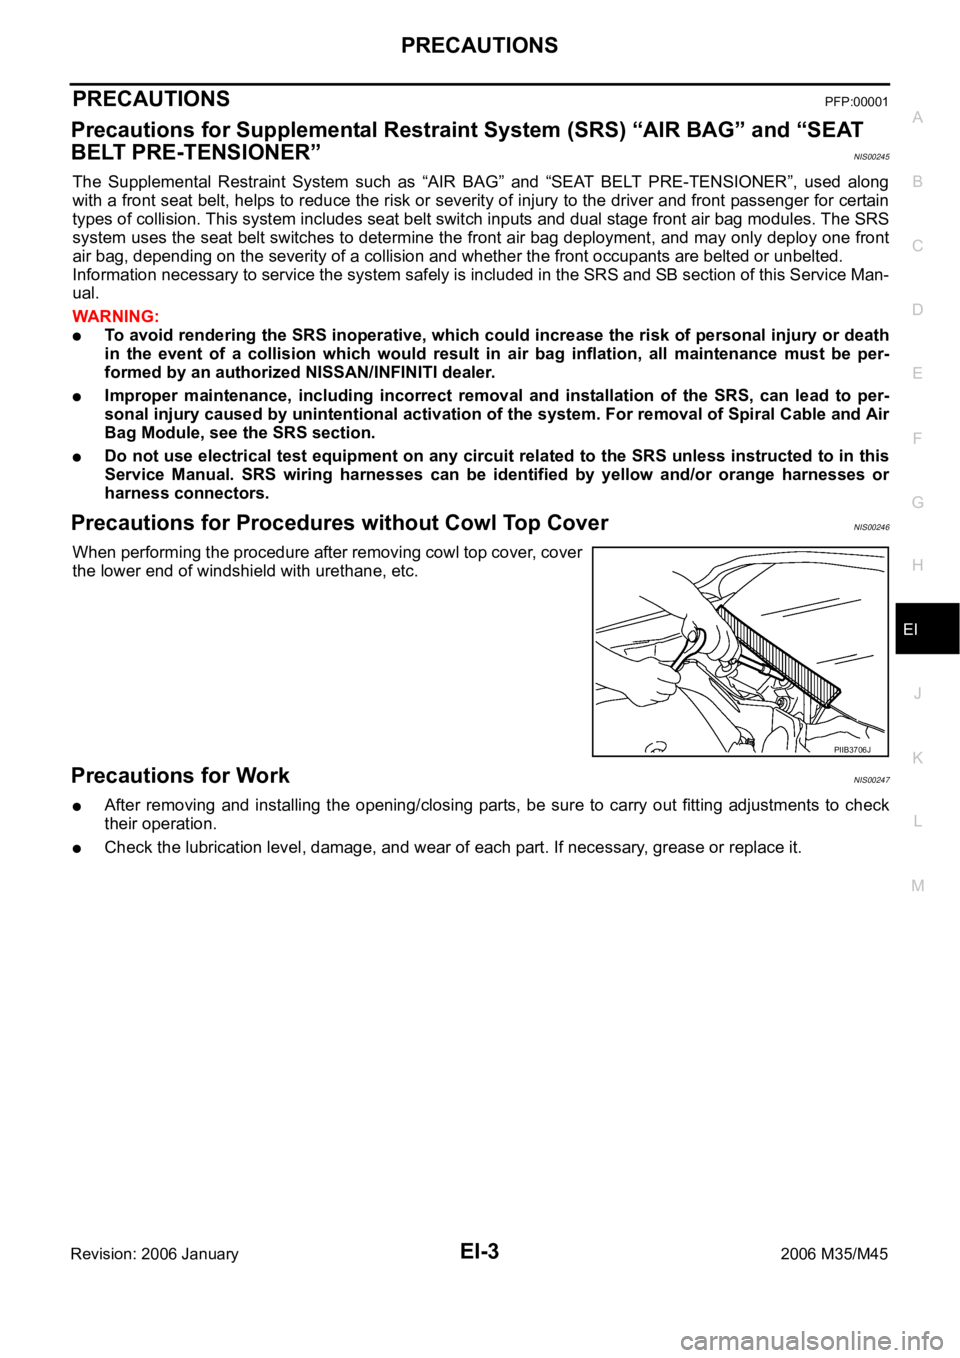
When performing the procedure after removing cowl top cover, cover
the lower end of windshield with urethane, etc.
Precautions for WorkNIS00247
After removing and installing the opening/closing parts, be sure to carry out fitting adjustments to check
their operation.
Check the lubrication level, damage, and wear of each part. If necessary, grease or replace it.
PIIB3706J
Page 3012 of 5621
SQUEAK AND RATTLE TROUBLE DIAGNOSES
EI-7
C
D
E
F
G
H
J
K
L
MA
B
EI
Revision: 2006 January2006 M35/M45
INSULATOR (Light foam block)
80845-71L00: 30 mm (1.18 in) thick, 30
50 mm (1.181.97 in)
FELT CLOTHTAPE
Used to insulate where movement does not occur. Ideal for instrument panel applications.
68370-4B000: 15
25 mm (0.590.98 in) pad/68239-13E00: 5 mm (0.20 in) wide tape roll
The following materials, not found in the kit, can also be used to repair squeaks and rattles.
UHMW (TEFLON) TAPE
Insulates where slight movement is present. Ideal for instrument panel applications.
SILICONE GREASE
Used in place of UHMW tape that will be visible or not fit. Will only last a few months.
SILICONE SPRAY
Use when grease cannot be applied.
DUCT TAPE
Use to eliminate movement.
CONFIRM THE REPAIR
Confirm that the cause of a noise is repaired by test driving the vehicle. Operate the vehicle under the same
conditions as when the noise originally occurred. Refer to the notes on the Diagnostic Worksheet.
Generic Squeak and Rattle TroubleshootingNIS0024B
Refer to Table of Contents for specific component removal and installation information.
INSTRUMENT PANEL
Most incidents are caused by contact and movement between:
1. The cluster lid A and instrument panel
2. Acrylic lens and combination meter housing
3. Instrument panel to front pillar garnish
4. Instrument panel to windshield
5. Instrument panel mounting pins
6. Wiring harnesses behind the combination meter
7. A/C defroster duct and duct joint
These incidents can usually be located by tapping or moving the components to duplicate the noise or by
pressing on the components while driving to stop the noise. Most of these incidents can be repaired by
applying felt cloth tape or silicon spray (in hard to reach areas). Urethane pads can be used to insulate
wiring harness.
CAUTION:
Do not use silicone spray to isolate a squeak or rattle. If you saturate the area with silicone, you
will not be able to recheck the repair.
CENTER CONSOLE
Components to pay attention to include:
1. Shifter assembly cover to finisher
2. A/C control unit and cluster lid C
3. Wiring harnesses behind audio and A/C control unit
The instrument panel repair and isolation procedures also apply to the center console.
DOORS
Pay attention to the:
1. Finisher and inner panel making a slapping noise
2. Inside handle escutcheon to door finisher
3. Wiring harnesses tapping
4. Door striker out of alignment causing a popping noise on starts and stops
Tapping or moving the components or pressing on them while driving to duplicate the conditions can isolate
many of these incidents. You can usually insulate the areas with felt cloth tape or insulator foam blocks from
the Nissan Squeak and Rattle Kit (J-43980) to repair the noise.
Page 3016 of 5621
FRONT BUMPER
EI-11
C
D
E
F
G
H
J
K
L
MA
B
EI
Revision: 2006 January2006 M35/M45
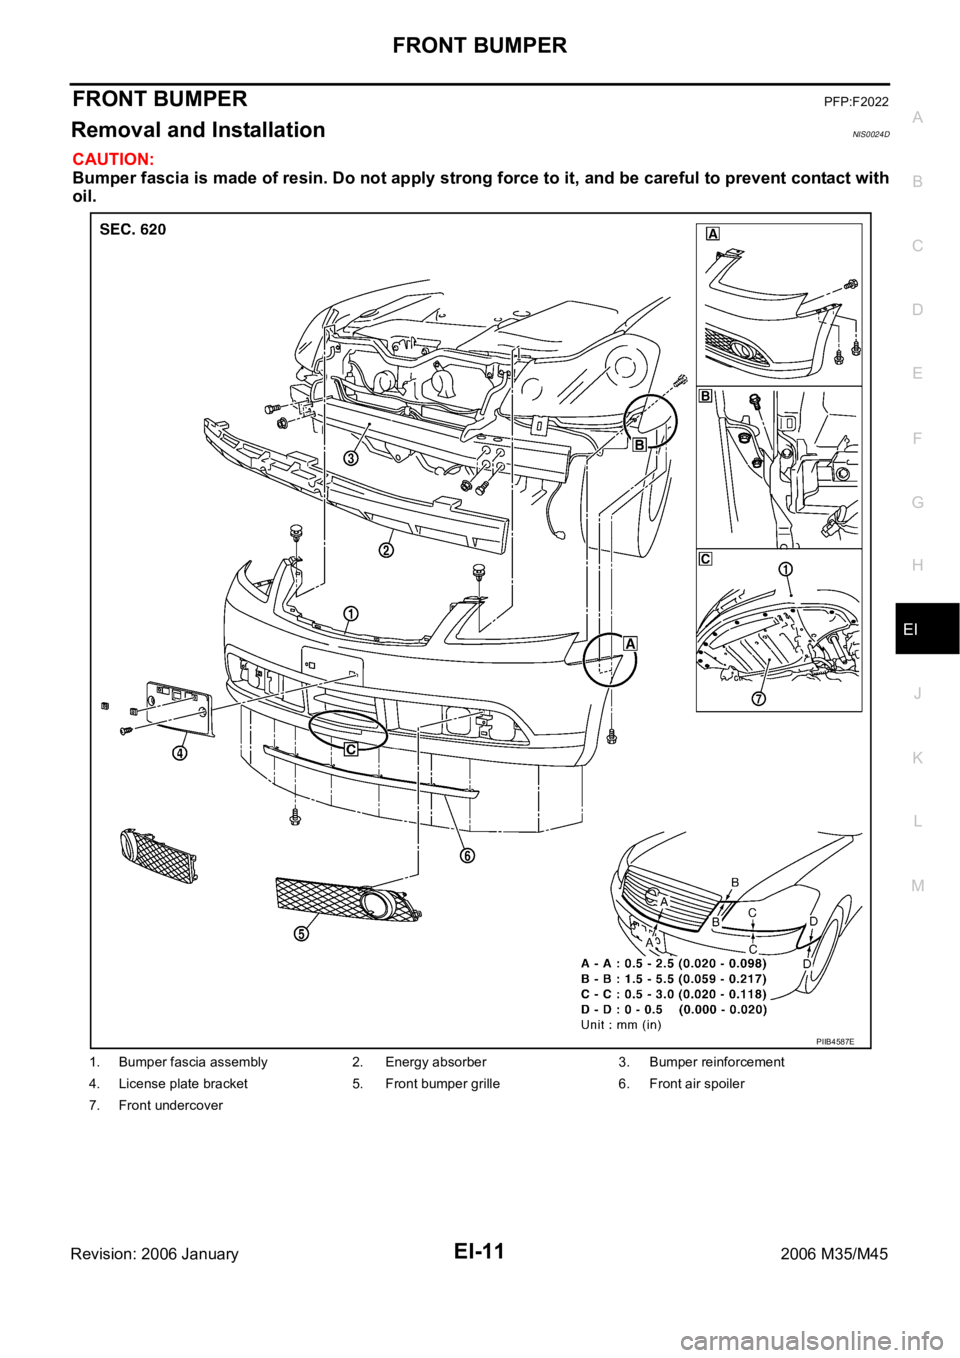
FRONT BUMPERPFP:F2022
Removal and InstallationNIS0024D
CAUTION:
Bumper fascia is made of resin. Do not apply strong force to it, and be careful to prevent contact with
oil.
1. Bumper fascia assembly 2. Energy absorber 3. Bumper reinforcement
4. License plate bracket 5. Front bumper grille 6. Front air spoiler
7. Front undercover
PIIB4587E
Page 3017 of 5621
EI-12
FRONT BUMPER
Revision: 2006 January2006 M35/M45
REMOVAL
1. Fully open hood assembly.
2. Remove screws of front air spoiler and remove front air spoiler.
3. Remove bolts of front undercover and remove undercover. (Figure to illustration C)
4. Remove front side of fender protector (LH/RH). Refer to EI-20, "
FENDER PROTECTOR" .
5. Remove clips of bumper fascia upper side.
6. Remove clips of front grille upper side.
7. Remove screws of bumper fascia left/right side. (Figure to illustration A, B)
8. Disconnect fog lamp harness connectors (LH/RH) after pulling out, and then remove bumper fascia.
CAUTION:
When removing bumper fascia, 2 workers are required so as to prevent it from dropping.
9. Remove the following parts after removing bumper fascia.
Front grille
License plate bracket
Front bumper grille (LH/RH) Refer to EI-13, "Removal and Installation of Front Bumper Grille" .
Fog lamp assembly (LH/RH) Refer to LT- 1 9 3 , "FRONT FOG LAMP" .
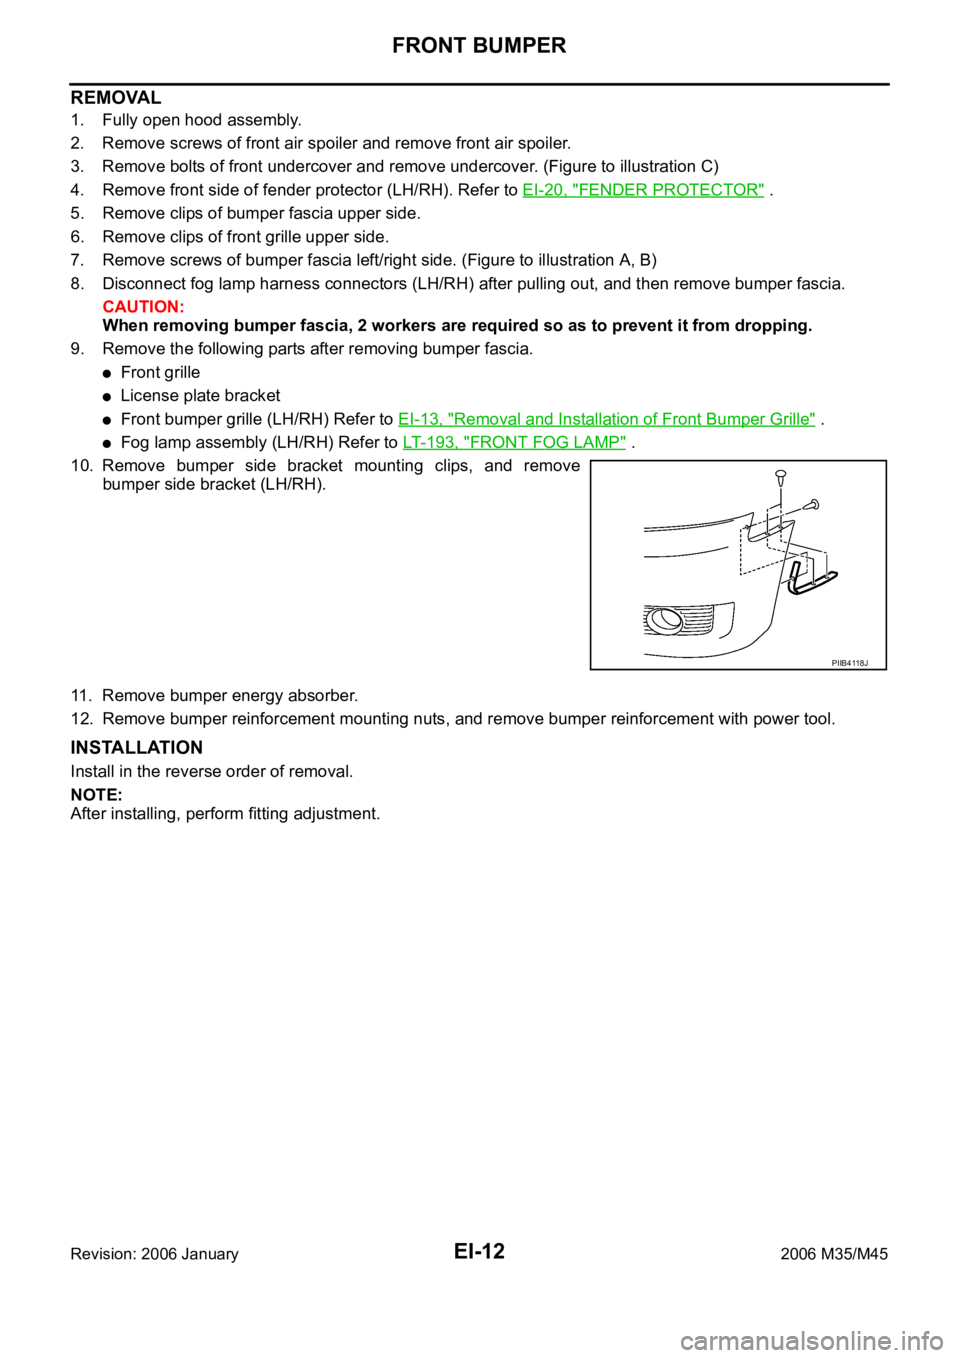
10. Remove bumper side bracket mounting clips, and remove
bumper side bracket (LH/RH).
11. Remove bumper energy absorber.
12. Remove bumper reinforcement mounting nuts, and remove bumper reinforcement with power tool.
INSTALLATION
Install in the reverse order of removal.
NOTE:
After installing, perform fitting adjustment.
PIIB4118J
Page 3018 of 5621
FRONT BUMPER
EI-13
C
D
E
F
G
H
J
K
L
MA
B
EI
Revision: 2006 January2006 M35/M45
Removal and Installation of Front Bumper GrilleNIS0024E
CAUTION:
Apply protection tape around outer circumference of front bumper grille (bumper fascia side).
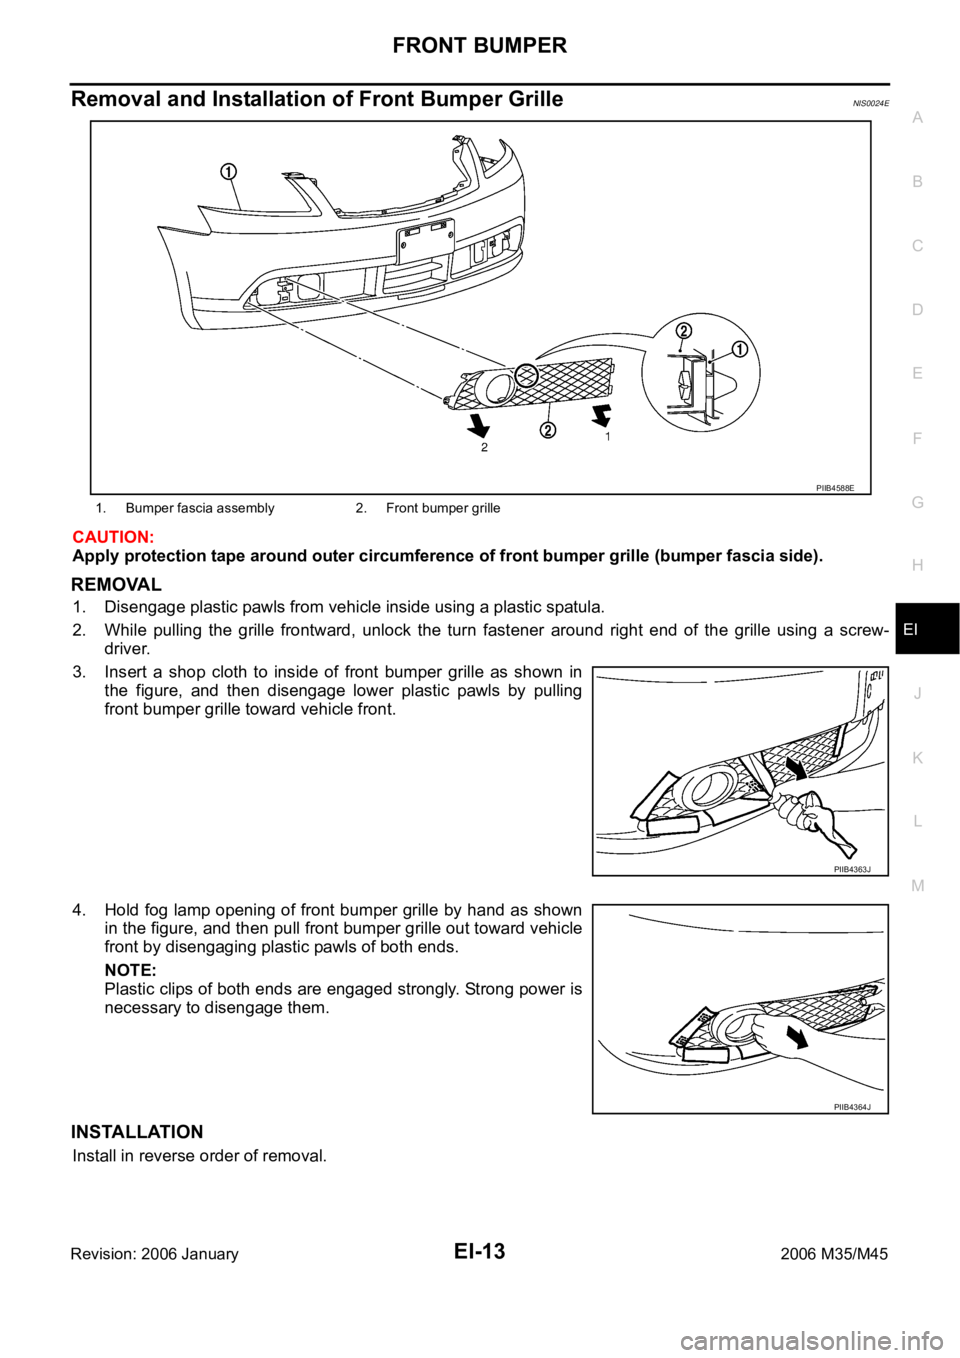
REMOVAL
1. Disengage plastic pawls from vehicle inside using a plastic spatula.
2. While pulling the grille frontward, unlock the turn fastener around right end of the grille using a screw-
driver.
3. Insert a shop cloth to inside of front bumper grille as shown in
the figure, and then disengage lower plastic pawls by pulling
front bumper grille toward vehicle front.
4. Hold fog lamp opening of front bumper grille by hand as shown
in the figure, and then pull front bumper grille out toward vehicle
front by disengaging plastic pawls of both ends.
NOTE:
Plastic clips of both ends are engaged strongly. Strong power is
necessary to disengage them.
INSTALLATION
Install in reverse order of removal.
1. Bumper fascia assembly 2. Front bumper grille
PIIB4588E
PIIB4363J
PIIB4364J
Page 3019 of 5621
EI-14
REAR BUMPER
Revision: 2006 January2006 M35/M45
REAR BUMPERPFP:H5022
Removal and InstallationNIS0024F
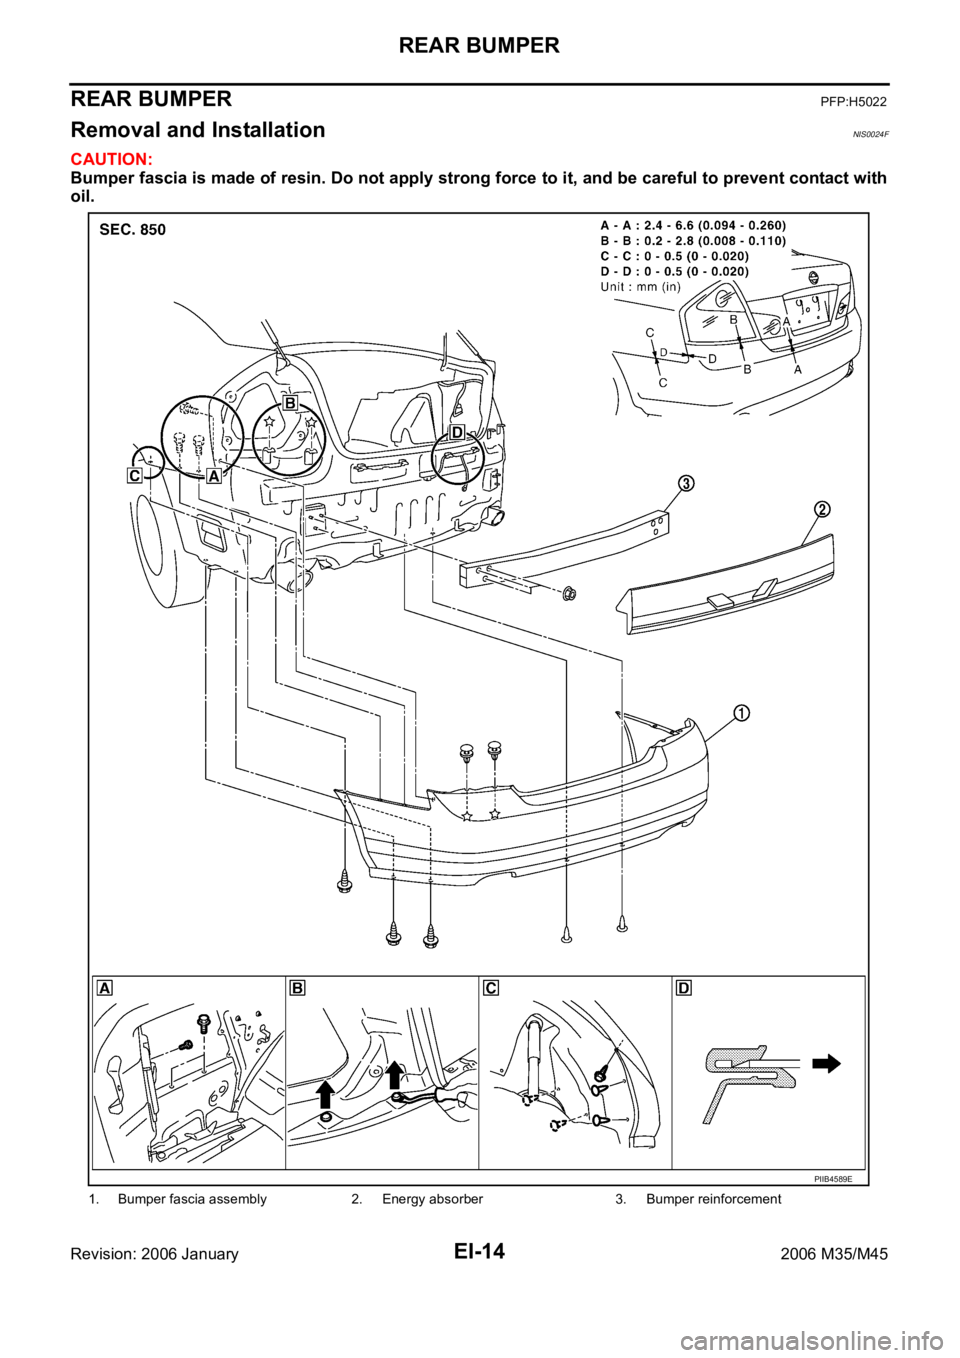
CAUTION:
Bumper fascia is made of resin. Do not apply strong force to it, and be careful to prevent contact with
oil.
1. Bumper fascia assembly 2. Energy absorber 3. Bumper reinforcement
PIIB4589E