2006 INFINITI M35 brake
[x] Cancel search: brakePage 5121 of 5621

SB-22
PRE-CRASH SEAT BELT
Revision: 2006 January2006 M35/M45
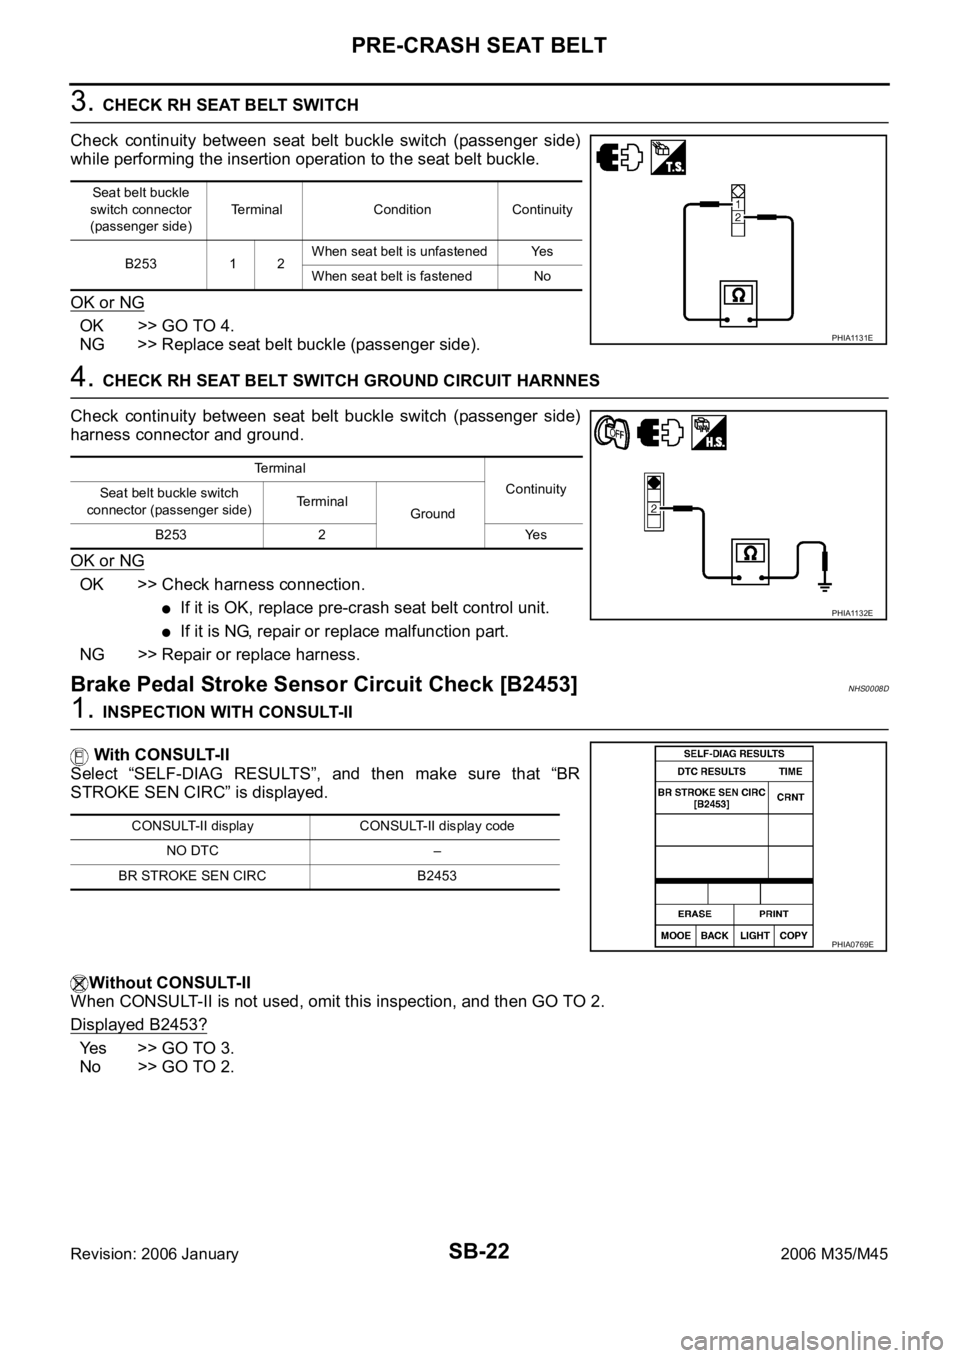
3. CHECK RH SEAT BELT SWITCH
Check continuity between seat belt buckle switch (passenger side)
while performing the insertion operation to the seat belt buckle.
OK or NG
OK >> GO TO 4.
NG >> Replace seat belt buckle (passenger side).
4. CHECK RH SEAT BELT SWITCH GROUND CIRCUIT HARNNES
Check continuity between seat belt buckle switch (passenger side)
harness connector and ground.
OK or NG
OK >> Check harness connection.
If it is OK, replace pre-crash seat belt control unit.
If it is NG, repair or replace malfunction part.
NG >> Repair or replace harness.
Brake Pedal Stroke Sensor Circuit Check [B2453]NHS0008D
1. INSPECTION WITH CONSULT-II
With CONSULT-II
Select “SELF-DIAG RESULTS”, and then make sure that “BR
STROKE SEN CIRC” is displayed.
Without CONSULT-II
When CONSULT-II is not used, omit this inspection, and then GO TO 2.
Displayed B2453?
Yes >> GO TO 3.
No >> GO TO 2.
Seat belt buckle
switch connector
(passenger side)Terminal Condition Continuity
B253 1 2When seat belt is unfastened Yes
When seat belt is fastened No
PHIA1131E
Te r m i n a l
Continuity
Seat belt buckle switch
connector (passenger side) Terminal
Ground
B253 2 Yes
PHIA1132E
CONSULT-II display CONSULT-II display code
NO DTC –
BR STROKE SEN CIRC B2453
PHIA0769E
Page 5122 of 5621

PRE-CRASH SEAT BELT
SB-23
C
D
E
F
G
I
J
K
L
MA
B
SB
Revision: 2006 January2006 M35/M45
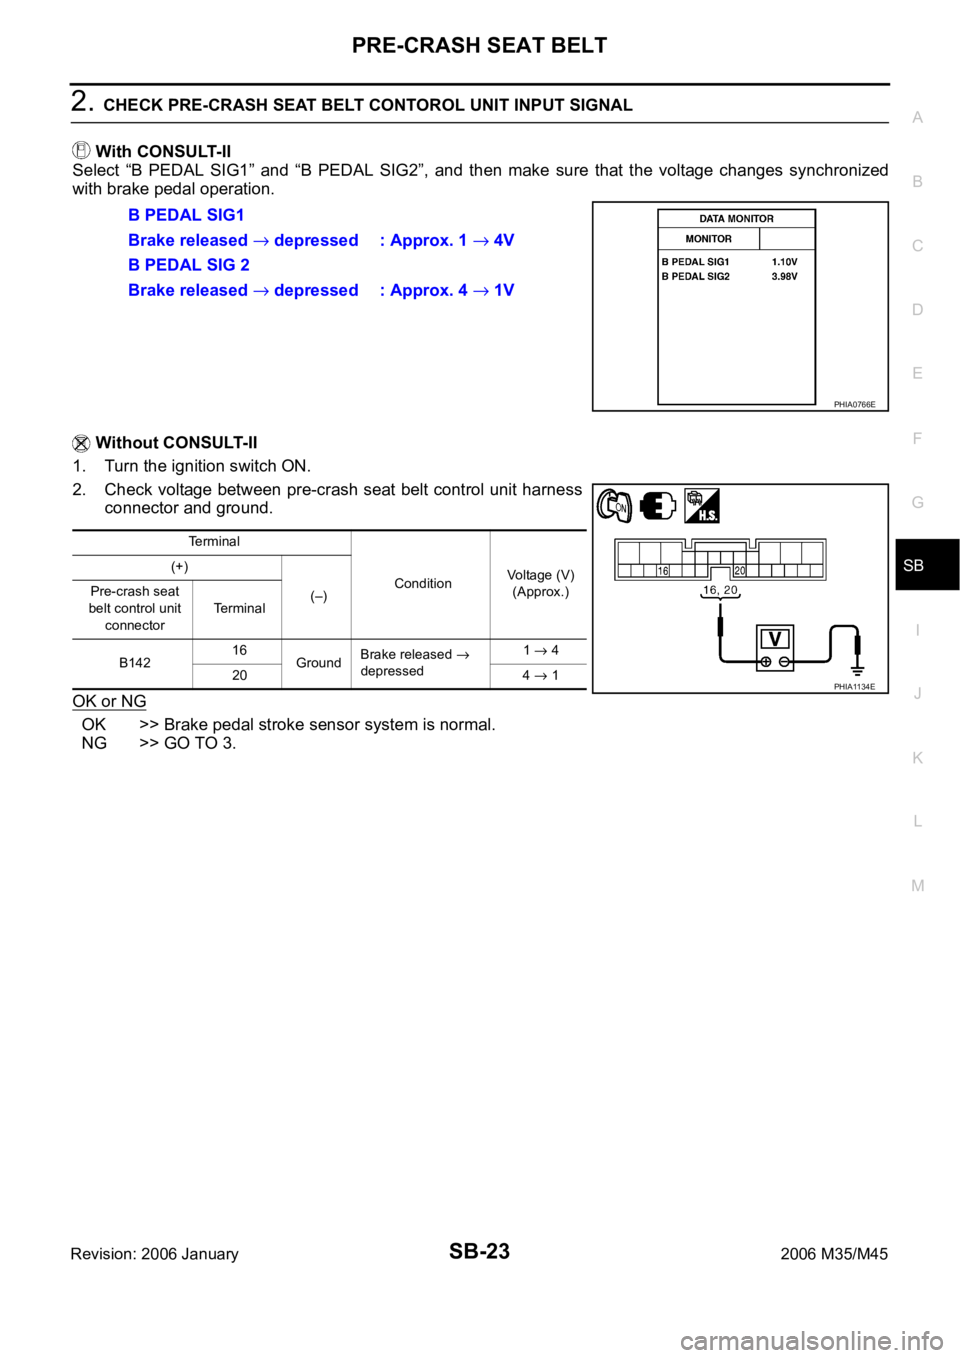
2. CHECK PRE-CRASH SEAT BELT CONTOROL UNIT INPUT SIGNAL
With CONSULT-II
Select “B PEDAL SIG1” and “B PEDAL SIG2”, and then make sure that the voltage changes synchronized
with brake pedal operation.
Without CONSULT-II
1. Turn the ignition switch ON.
2. Check voltage between pre-crash seat belt control unit harness
connector and ground.
OK or NG
OK >> Brake pedal stroke sensor system is normal.
NG >> GO TO 3.B PEDAL SIG1
Brake released
depressed : Approx. 1 4V
B PEDAL SIG 2
Brake released
depressed : Approx. 4 1V
PHIA0766E
Terminal
ConditionVoltage (V)
(Approx.) (+)
(–) Pre-crash seat
belt control unit
connectorTe r m i n a l
B14216
GroundBrake released
depressed1 4
20 4
1PHIA1134E
Page 5123 of 5621

SB-24
PRE-CRASH SEAT BELT
Revision: 2006 January2006 M35/M45
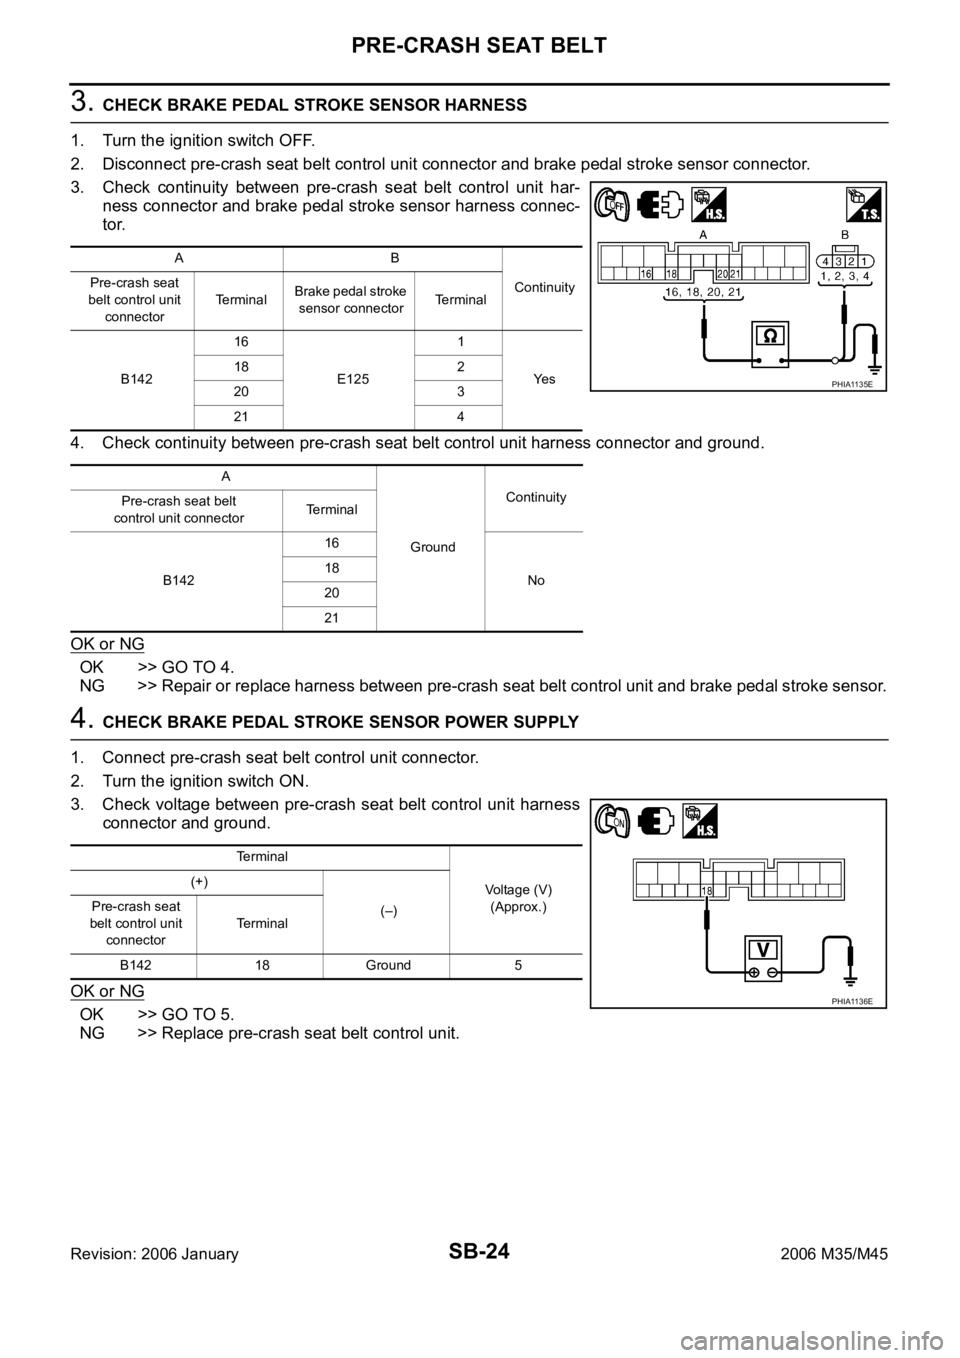
3. CHECK BRAKE PEDAL STROKE SENSOR HARNESS
1. Turn the ignition switch OFF.
2. Disconnect pre-crash seat belt control unit connector and brake pedal stroke sensor connector.
3. Check continuity between pre-crash seat belt control unit har-
ness connector and brake pedal stroke sensor harness connec-
tor.
4. Check continuity between pre-crash seat belt control unit harness connector and ground.
OK or NG
OK >> GO TO 4.
NG >> Repair or replace harness between pre-crash seat belt control unit and brake pedal stroke sensor.
4. CHECK BRAKE PEDAL STROKE SENSOR POWER SUPPLY
1. Connect pre-crash seat belt control unit connector.
2. Turn the ignition switch ON.
3. Check voltage between pre-crash seat belt control unit harness
connector and ground.
OK or NG
OK >> GO TO 5.
NG >> Replace pre-crash seat belt control unit.
AB
Continuity Pre-crash seat
belt control unit
connectorTe r m i n a lBrake pedal stroke
sensor connectorTerminal
B14216
E1251
Ye s 18 2
20 3
21 4
A
GroundContinuity
Pre-crash seat belt
control unit connectorTerminal
B14216
No 18
20
21
PHIA1135E
Terminal
Voltage (V)
(Approx.) (+)
(–) Pre-crash seat
belt control unit
connectorTerminal
B142 18 Ground 5
PHIA1136E
Page 5124 of 5621

PRE-CRASH SEAT BELT
SB-25
C
D
E
F
G
I
J
K
L
MA
B
SB
Revision: 2006 January2006 M35/M45
5. CHECK BRAKE PEDAL STROKE SENSOR
Check continuity between brake pedal stroke sensor while perform-
ing brake operation.
OK or NG
OK >> Check harness connection.
If it is OK, replace pre-crash seat belt control unit.
If it is NG, repair or replace malfunction part.
NG >> Replace brake pedal stroke sensor.
Pre-Crash Seat Belt Motor LH Circuit Check [B2452]NHS0008E
1. CHECK LH SEAT BELT MOTOR CIRCUIT
With CONSULT-II
Select “SELF-DIAG RESULTS” of CONSULT-II, and then make sure
that “SB MOTOR LH CIRC” is displayed.
Without CONSULT-II
When CONSULT-II is not used, omit this inspection, and then GO TO 2.
Displayed B2452?
Ye s > > G O T O 2 .
No >> Pre-crash seat belt motor LH circuit is OK.
Brake pedal stroke
sensor connectorTerminal ConditionResistance
(K)
(Approx.)
E125 21
Brake released
depressed1.0 0.2
30.2
1.0
PHIA1137E
CONSULT-II display CONSULT-II display code
NO DTC –
SB MOTOR LH CIRC B2452
PHIA0768E
Page 5127 of 5621

SB-28
PRE-CRASH SEAT BELT
Revision: 2006 January2006 M35/M45
3. CHECK SEAT BELT MOTOR
Check continuity between pre-crash seat belt motor RH.
OK or NG
OK >> Replace pre-crash seat belt control unit.
NG >> Replace pre-crash seat belt motor RH.
Brake Pedal Stroke Sensor Shield Wire Circuit CheckNHS0008G
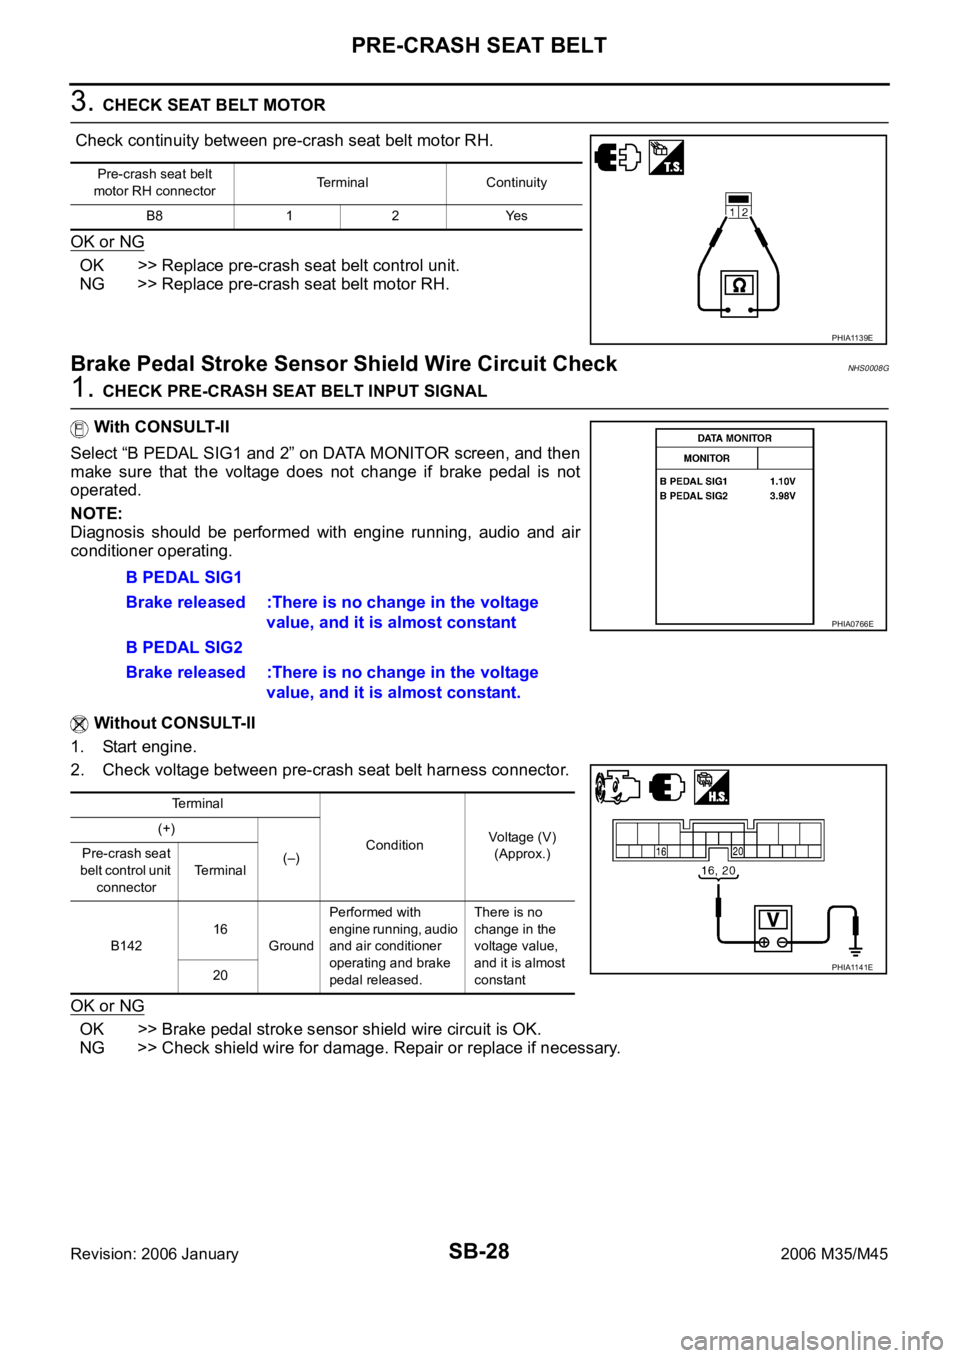
1. CHECK PRE-CRASH SEAT BELT INPUT SIGNAL
With CONSULT-II
Select “B PEDAL SIG1 and 2” on DATA MONITOR screen, and then
make sure that the voltage does not change if brake pedal is not
operated.
NOTE:
Diagnosis should be performed with engine running, audio and air
conditioner operating.
Without CONSULT-II
1. Start engine.
2. Check voltage between pre-crash seat belt harness connector.
OK or NG
OK >> Brake pedal stroke sensor shield wire circuit is OK.
NG >> Check shield wire for damage. Repair or replace if necessary.
Pre-crash seat belt
motor RH connectorTerminal Continuity
B8 1 2 Yes
PHIA1139E
B PEDAL SIG1
Brake released :There is no change in the voltage
value, and it is almost constant
B PEDAL SIG2
Brake released :There is no change in the voltage
value, and it is almost constant.
Terminal
ConditionVoltage (V)
(Approx.) (+)
(–) Pre-crash seat
belt control unit
connectorTerminal
B14216
GroundPerformed with
engine running, audio
and air conditioner
operating and brake
pedal released.There is no
change in the
voltage value,
and it is almost
constant 20
PHIA0766E
PHIA1141E
Page 5133 of 5621

SB-34
SEAT BELTS
Revision: 2006 January2006 M35/M45
NOTE:
Apply the tape so that there is no looseness or wrinkling.
6. Remove the clip fixing the seat belt and check that the webbing returns smoothly.
6. Repeat steps above as necessary to check the other seat belts.
SEAT BELT RETRACTOR ON-VEHICLE CHECK
Emergency Locking Retractors (ELR) and Automatic Locking Retractors (ALR)
NOTE:
All seat belt retractors are of the Emergency Locking Retractors (ELR) type. In an emergency (sudden stop)
the retractor will lock and prevent the webbing from extending any further. All 3-point type seat belt retractors
except the driver's seat belt also have an Automatic Locking Retractors (ALR) mode. The ALR mode (also
called child restraint mode) is used when installing child seats. The ALR mode is activated when the seat belt
is fully extended. When the webbing is then retracted partially, the ALR mode automatically locks the seat belt
in a specific position so the webbing cannot be extended any further. To cancel the ALR mode, allow the seat
belt to fully wind back into the retractor.
Check the seat belt retractors using the following test(s) to determine if a retractor assembly is operating prop-
erly.
ELR Function Stationary Check
Grasp the shoulder webbing and pull forward quickly. The retractor should lock and prevent the belt from
extending further.
ALR Function Stationary Check
1. Pull out entire length of seat belt from retractor until a click is heard.
2. Retract the webbing partially. A clicking noise should be heard as the webbing retracts indicating that the
retractor is in the Automatic Locking Retractors (ALR) mode.
3. Grasp the seat belt and try to pull out the retractor. The webbing must lock and not extend any further. If
NG, replace the retractor assembly.
4. Allow the entire length of the webbing to retract to cancel the automatic locking mode.
ELR Function Moving Check
WAR NING :
Perform the following test in a safe, open area clear of other vehicles and obstructions (for example, a
large, empty parking lot). Road surface must be paved and dry. DO NOT perform the following test on
wet or gravel roads or on public streets and highways. This could result in an accident and serious
personal injury. The driver and passenger must be prepared to brace themselves in the event the
retractor does not lock.
1. Fasten driver's seat belt. Buckle a passenger into the seat for the belt that is to be tested.
2. Proceed to the designated safe area.
3. Drive the vehicle at approximately 16 km/h (10 MPH). Notify any passengers of a pending sudden stop
and the driver and passenger must be prepared to brace themselves in the event the retractor does not
lock, apply brakes firmly and make a very hard stop.
During stop, seat belts should lock and not be extended. If the seat belt retractor assembly does not lock, per-
form the retractor off-vehicle check.
Page 5441 of 5621
![INFINITI M35 2006 Factory Service Manual STC-26
[RAS]
TROUBLE DIAGNOSIS
Revision: 2006 January2006 M35/M45
Control Unit Input/Output Signal StandardNGS000EF
CIRCUIT TESTER REFERENCE VALUE
CAUTION:
When checked using a circuit tester for volt INFINITI M35 2006 Factory Service Manual STC-26
[RAS]
TROUBLE DIAGNOSIS
Revision: 2006 January2006 M35/M45
Control Unit Input/Output Signal StandardNGS000EF
CIRCUIT TESTER REFERENCE VALUE
CAUTION:
When checked using a circuit tester for volt](/manual-img/42/57023/w960_57023-5440.png)
STC-26
[RAS]
TROUBLE DIAGNOSIS
Revision: 2006 January2006 M35/M45
Control Unit Input/Output Signal StandardNGS000EF
CIRCUIT TESTER REFERENCE VALUE
CAUTION:
When checked using a circuit tester for voltage measurement, connector terminals should not be
forcefully extended.
Terminal
Measuring point Measuring condition Standard
+
(wire color)–
1 (L) — CAN-H —
4 (G)
GroundRR MAIN SIG Neutral Approx. 2.4 V
5 (W) RR VCCIgnition switch ON Approx. 5 V
Ignition switch OFF Approx. 0 V
7 (R) RR SUB SIG Neutral Approx. 2.4 V
8 (P) — CAN-L —
15 (B/W)
GroundRR SEN GND — Continuity exit
22 (P/L) STOP/L SWBrake pedal depressed Battery voltage (Approx. 12 V)
Brake pedal not depressed Approx. 0 V
25 (L/W) RLYIgnition switch ON Battery voltage (Approx. 12 V)
Ignition switch OFF Approx. 0 V
26 (G/W) WARNON Approx. 1.4 V or less
OFF Ignition voltage: 2.8 V or more
27 (G/B) IGNIgnition switch ON Battery voltage (Approx. 12 V)
Ignition switch OFF Approx. 0 V
34 (B) GND — Continuity exit
36 (LG) P/S SOLNormal (Vehicle speed)0 km/h (0 MPH) Approx. 4.4 - 6.6 V
100 km/h (62 MPH) Approx. 2.4 - 3.6 V
In fail-safe mode
(Engine speed)0 - 1,500 rpm Approx. 4.4 - 6.6 V
1,500 - 3,000 rpm Approx. 3.5 V
3,000 rpm or more Approx. 2.1 V
37 (L/Y) MOTOR VCCIgnition switch ON Battery voltage (Approx. 12 V)
Ignition switch OFF Approx. 0 V
38 (W) MTR-1 (RH) —
39 (B) MTR-2 (LH) —
40 (B/W) MOTOR GND — Continuity exit
Page 5442 of 5621
![INFINITI M35 2006 Factory Service Manual TROUBLE DIAGNOSIS
STC-27
[RAS]
C
D
E
F
H
I
J
K
L
MA
B
STC
Revision: 2006 January2006 M35/M45
STANDARD BY CONSULT-II
CAUTION:
The output signal indicates the RAS control unit calculation data. The norm INFINITI M35 2006 Factory Service Manual TROUBLE DIAGNOSIS
STC-27
[RAS]
C
D
E
F
H
I
J
K
L
MA
B
STC
Revision: 2006 January2006 M35/M45
STANDARD BY CONSULT-II
CAUTION:
The output signal indicates the RAS control unit calculation data. The norm](/manual-img/42/57023/w960_57023-5441.png)
TROUBLE DIAGNOSIS
STC-27
[RAS]
C
D
E
F
H
I
J
K
L
MA
B
STC
Revision: 2006 January2006 M35/M45
STANDARD BY CONSULT-II
CAUTION:
The output signal indicates the RAS control unit calculation data. The normal values will be displayed
even in the event that the output circuit (harness) is open.
Monitor itemDATA MONITOR
Malfunction inspection
checklist
Condition Reference values
VHCL SPEED SE (km/h)Ignition switch ON or engine
running Almost in accordance with the speed-
ometer display. It is not a malfunction,
through it might not be corresponding
just after ignition switch is turned ON.STC-38, "
Inspection 4:
Vehicle Speed Signal"
STEERING ANG ()Turning steering wheel clock-
wise or counterclockwise.Displays the angle when the steering
wheel turns from the neutral positionSTC-38, "
Inspection 5:
Steering Angle Signal
Malfunction"
ENGINE SPEED (rpm) Engine runningAlmost in accordance with tachometer
displaySTC-43, "
Inspection 8:
Engine Speed Signal
Malfunction"
POWER STR SOL (A)Accelerate the vehicle from 0
to 100 km/h (0 to 62 MPH)0 km/h (0 MPH): Approx. 1.10 A
100 km/h (62 MPH): Approx. 0.54 ASTC-46, "Diagnosis
Chart by Symptom 2"
RR ST ANG-MAI (V)
Perform the ACTIVE TEST
and stroke the actuator (with
tires off the ground)Neutral: Approx. 2.4 V
Turn steering wheel to right for full
stroke: Approx. 4.4 V
Turn steering wheel to left for full
stroke: Approx. 0.4 VSTC-40, "Inspection 6:
Rear Main Signal and
Rear Sub Signal Mal-
function"RR ST ANG- SUB (V)
RR ST ANG-VOL (V)
Ignition switch ON or engine
runningApprox. 5 VSTC-40, "
Inspection 6:
Rear Main Signal and
Rear Sub Signal Mal-
function"
C/U VOLTAGE (V) Battery voltage (Approx. 12 V)STC-35, "
Inspection 1:
RAS Control Unit Mal-
function"
MOTOR VOLTAGE (V) Battery voltage (Approx. 12V)STC-35, "
Inspection 2:
Motor Power Supply
System"
MOTOR CURRENT (A)Perform the ACTIVE TEST
and stroke the actuator.It is normal when there is the current
output at strokeSTC-35, "
Inspection 2:
Motor Power Supply
System"
MTR CRNT OPE (A)Turning steering wheel clock-
wise or counterclockwise
while ignition switch is ON or
running the engineNeutral (Steering force is zero and
straight-ahead position): Approx. 0 A
The value is changed according to
steering left or right STC-37, "
Inspection 3:
RAS Motor Output
Malfunction"
STOP LAMP SWDepressing or releasing brake
pedalBrake pedal depressed: ONSTC-44, "
Inspection
10: Stop Lamp Switch
Harness"Brake pedal not depressed: OFF
RAS RELAY
Ignition switch ON or engine
runningIgnition switch ON: ONSTC-35, "
Inspection 2:
Motor Power Supply
System"
FAIL SAFE Not activatedSelf-diagnosis and
suspect system
inspection on DATA
MONITOR
WARNING LAMP (ON/OFF)RAS warning lamp ON: ON
RAS warning lamp OFF: OFFWarning lamp circuit
inspection