Page 1282 of 5621
BRAKE PEDAL
BR-7
C
D
E
G
H
I
J
K
L
MA
B
BR
Revision: 2006 January2006 M35/M45
ADJUSTMENT
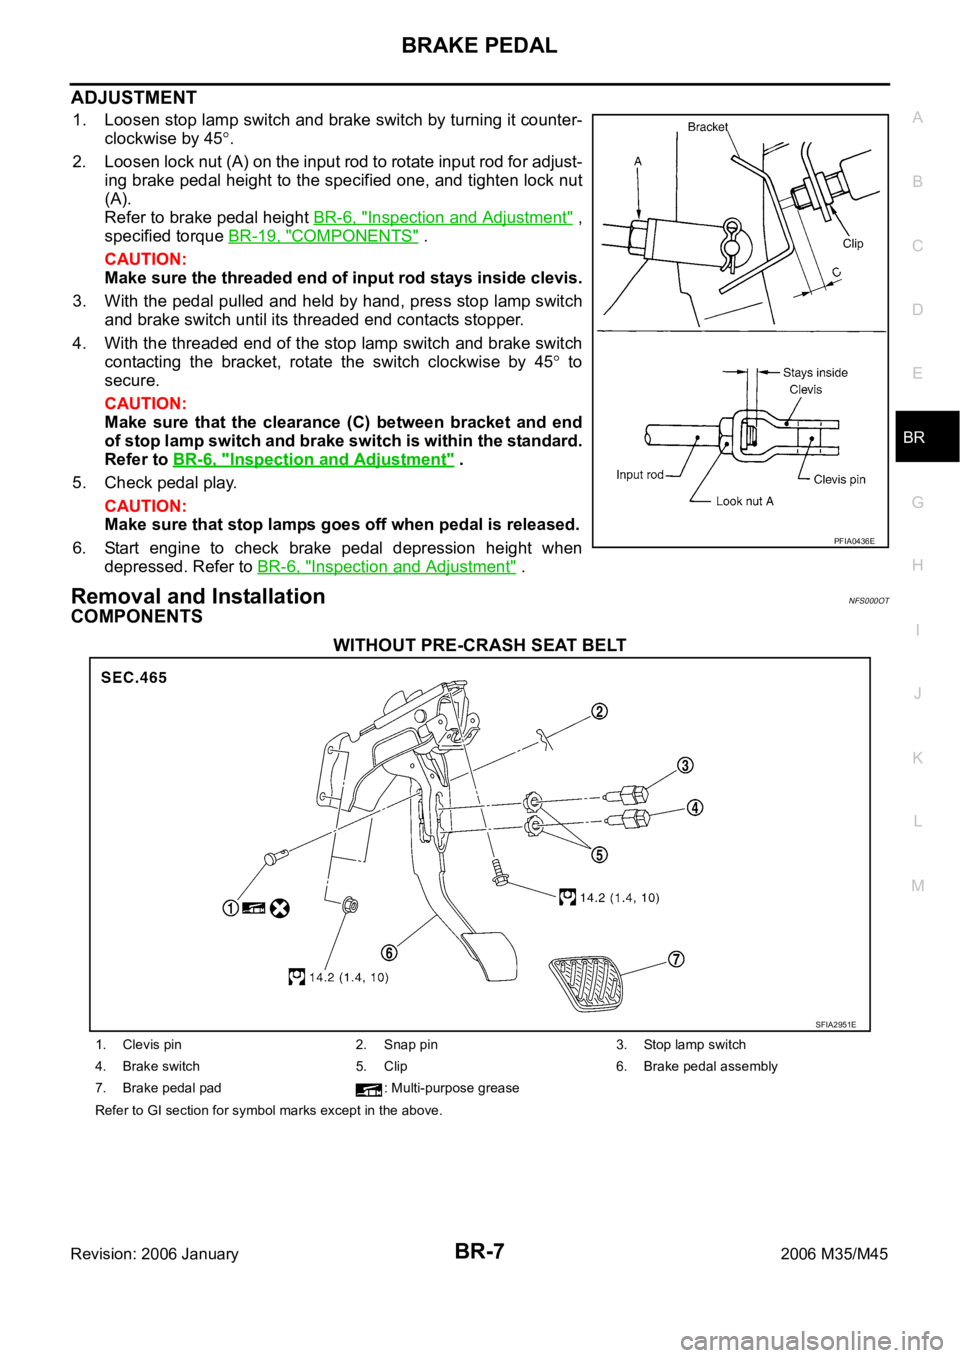
1. Loosen stop lamp switch and brake switch by turning it counter-
clockwise by 45
.
2. Loosen lock nut (A) on the input rod to rotate input rod for adjust-
ing brake pedal height to the specified one, and tighten lock nut
(A).
Refer to brake pedal height BR-6, "
Inspection and Adjustment" ,
specified torque BR-19, "
COMPONENTS" .
CAUTION:
Make sure the threaded end of input rod stays inside clevis.
3. With the pedal pulled and held by hand, press stop lamp switch
and brake switch until its threaded end contacts stopper.
4. With the threaded end of the stop lamp switch and brake switch
contacting the bracket, rotate the switch clockwise by 45
to
secure.
CAUTION:
Make sure that the clearance (C) between bracket and end
of stop lamp switch and brake switch is within the standard.
Refer to BR-6, "
Inspection and Adjustment" .
5. Check pedal play.
CAUTION:
Make sure that stop lamps goes off when pedal is released.
6. Start engine to check brake pedal depression height when
depressed. Refer to BR-6, "
Inspection and Adjustment" .
Removal and InstallationNFS000OT
COMPONENTS
WITHOUT PRE-CRASH SEAT BELT
PFIA0436E
SFIA2951E
1. Clevis pin 2. Snap pin 3. Stop lamp switch
4. Brake switch 5. Clip 6. Brake pedal assembly
7. Brake pedal pad : Multi-purpose grease
Refer to GI section for symbol marks except in the above.
Page 1283 of 5621
BR-8
BRAKE PEDAL
Revision: 2006 January2006 M35/M45
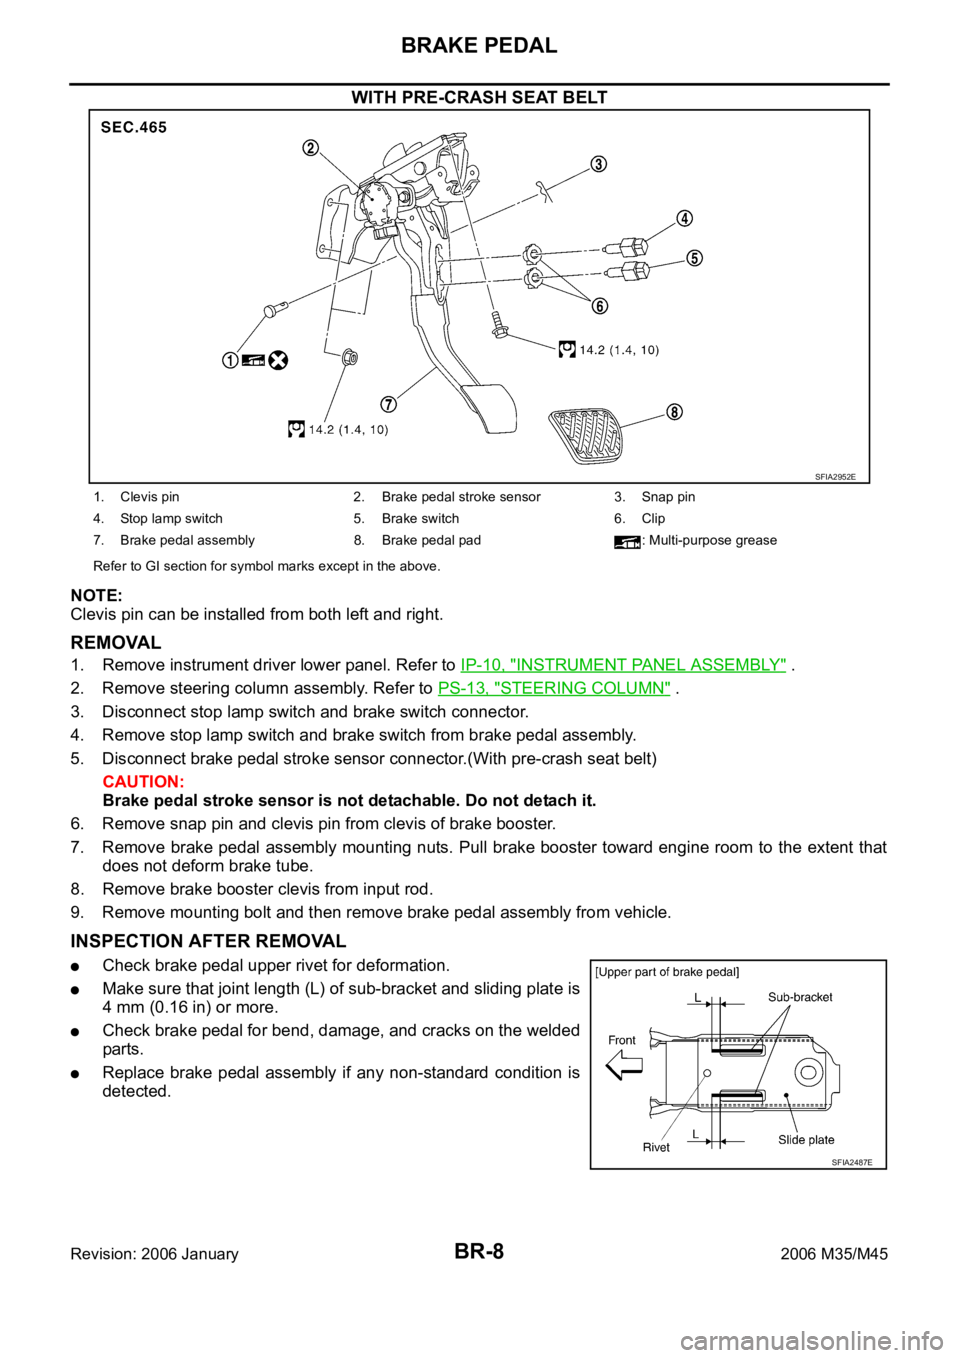
WITH PRE-CRASH SEAT BELT
NOTE:
Clevis pin can be installed from both left and right.
REMOVAL
1. Remove instrument driver lower panel. Refer to IP-10, "INSTRUMENT PANEL ASSEMBLY" .
2. Remove steering column assembly. Refer to PS-13, "
STEERING COLUMN" .
3. Disconnect stop lamp switch and brake switch connector.
4. Remove stop lamp switch and brake switch from brake pedal assembly.
5. Disconnect brake pedal stroke sensor connector.(With pre-crash seat belt)
CAUTION:
Brake pedal stroke sensor is not detachable. Do not detach it.
6. Remove snap pin and clevis pin from clevis of brake booster.
7. Remove brake pedal assembly mounting nuts. Pull brake booster toward engine room to the extent that
does not deform brake tube.
8. Remove brake booster clevis from input rod.
9. Remove mounting bolt and then remove brake pedal assembly from vehicle.
INSPECTION AFTER REMOVAL
Check brake pedal upper rivet for deformation.
Make sure that joint length (L) of sub-bracket and sliding plate is
4 mm (0.16 in) or more.
Check brake pedal for bend, damage, and cracks on the welded
parts.
Replace brake pedal assembly if any non-standard condition is
detected.
SFIA2952E
1. Clevis pin 2. Brake pedal stroke sensor 3. Snap pin
4. Stop lamp switch 5. Brake switch 6. Clip
7. Brake pedal assembly 8. Brake pedal pad : Multi-purpose grease
Refer to GI section for symbol marks except in the above.
SFIA2487E
Page 1285 of 5621
BR-10
BRAKE FLUID
Revision: 2006 January2006 M35/M45
BRAKE FLUIDPFP:KN100
On-Board Inspection NFS000OU
CHECKING BRAKE FLUID LEVEL
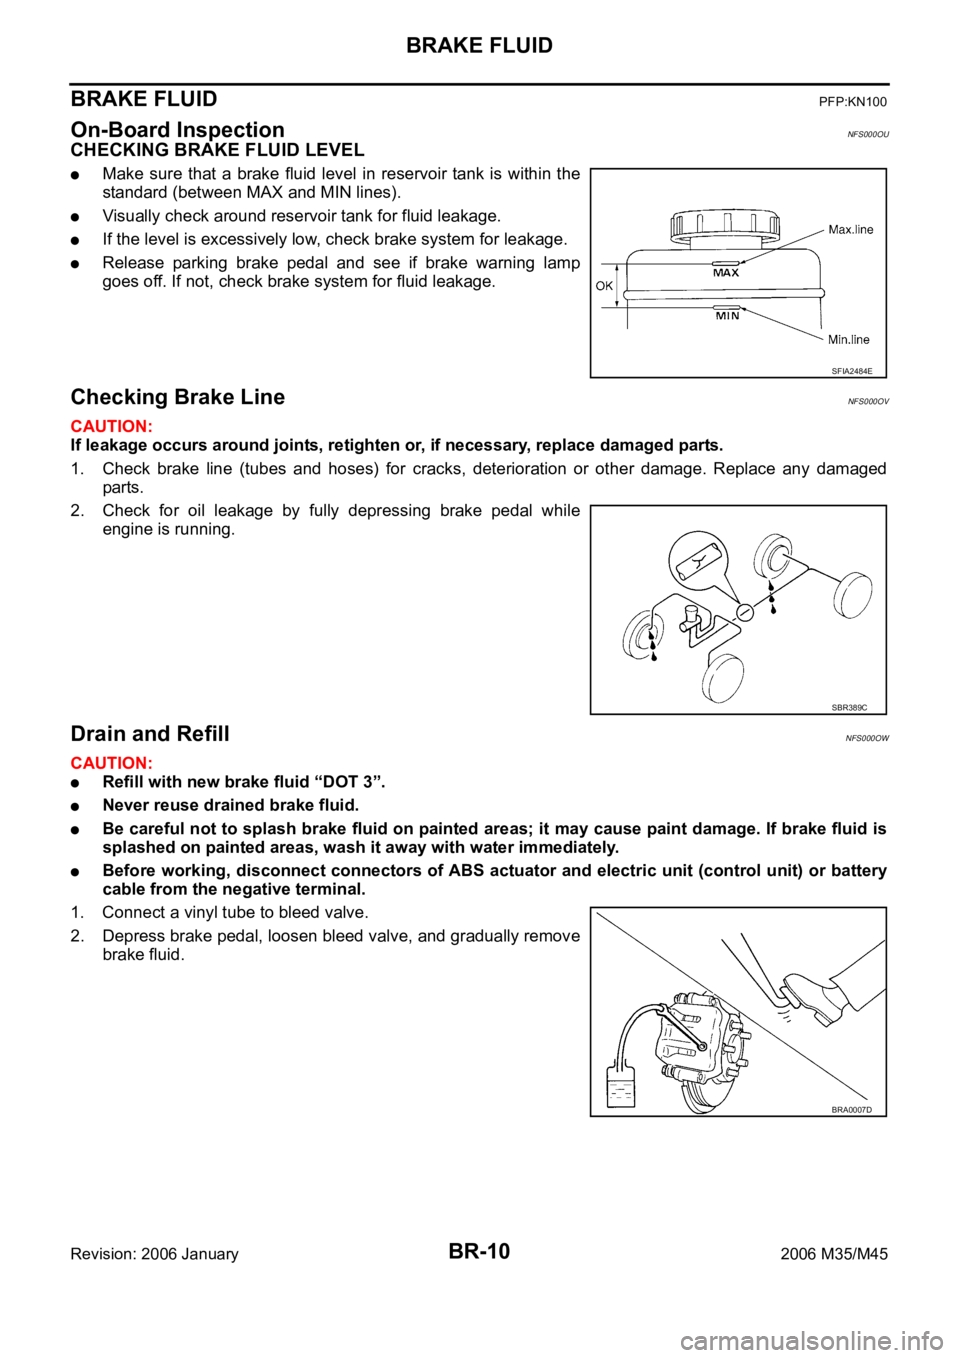
Make sure that a brake fluid level in reservoir tank is within the
standard (between MAX and MIN lines).
Visually check around reservoir tank for fluid leakage.
If the level is excessively low, check brake system for leakage.
Release parking brake pedal and see if brake warning lamp
goes off. If not, check brake system for fluid leakage.
Checking Brake LineNFS000OV
CAUTION:
If leakage occurs around joints, retighten or, if necessary, replace damaged parts.
1. Check brake line (tubes and hoses) for cracks, deterioration or other damage. Replace any damaged
parts.
2. Check for oil leakage by fully depressing brake pedal while
engine is running.
Drain and RefillNFS000OW
CAUTION:
Refill with new brake fluid “DOT 3”.
Never reuse drained brake fluid.
Be careful not to splash brake fluid on painted areas; it may cause paint damage. If brake fluid is
splashed on painted areas, wash it away with water immediately.
Before working, disconnect connectors of ABS actuator and electric unit (control unit) or battery
cable from the negative terminal.
1. Connect a vinyl tube to bleed valve.
2. Depress brake pedal, loosen bleed valve, and gradually remove
brake fluid.
SFIA2484E
SBR389C
BRA0007D
Page 1289 of 5621
BR-14
BRAKE TUBE AND HOSE
Revision: 2006 January2006 M35/M45
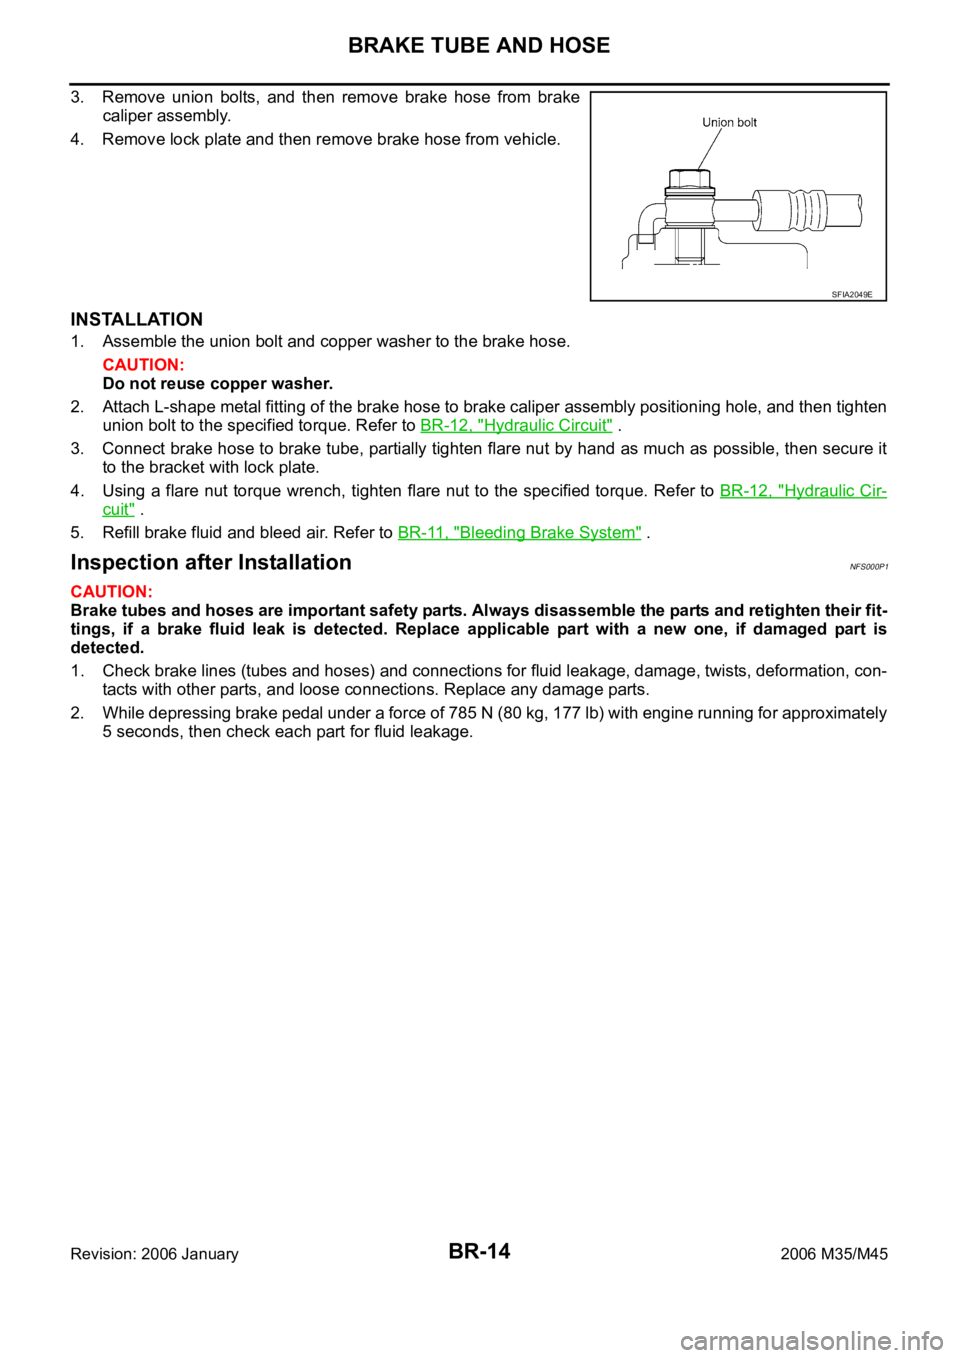
3. Remove union bolts, and then remove brake hose from brake
caliper assembly.
4. Remove lock plate and then remove brake hose from vehicle.
INSTALLATION
1. Assemble the union bolt and copper washer to the brake hose.
CAUTION:
Do not reuse copper washer.
2. Attach L-shape metal fitting of the brake hose to brake caliper assembly positioning hole, and then tighten
union bolt to the specified torque. Refer to BR-12, "
Hydraulic Circuit" .
3. Connect brake hose to brake tube, partially tighten flare nut by hand as much as possible, then secure it
to the bracket with lock plate.
4. Using a flare nut torque wrench, tighten flare nut to the specified torque. Refer to BR-12, "
Hydraulic Cir-
cuit" .
5. Refill brake fluid and bleed air. Refer to BR-11, "
Bleeding Brake System" .
Inspection after InstallationNFS000P1
CAUTION:
Brake tubes and hoses are important safety parts. Always disassemble the parts and retighten their fit-
tings, if a brake fluid leak is detected. Replace applicable part with a new one, if damaged part is
detected.
1. Check brake lines (tubes and hoses) and connections for fluid leakage, damage, twists, deformation, con-
tacts with other parts, and loose connections. Replace any damage parts.
2. While depressing brake pedal under a force of 785 N (80 kg, 177 lb) with engine running for approximately
5 seconds, then check each part for fluid leakage.
SFIA2049E
Page 1293 of 5621
BR-18
BRAKE BOOSTER
Revision: 2006 January2006 M35/M45
BRAKE BOOSTERPFP:47200
On-Board Inspection and ServiceNFS000P6
OPERATION CHECK
With engine stopped, change vacuum to atmospheric pressure by
depressing brake pedal several times. Then with brake pedal fully
depressed, start engine and when vacuum pressure reaches the
standard, make sure that clearance between brake pedal and floor
panel decreases.
AIR TIGHT CHECK
Run engine at idle for approximately 1 minute, and stop it after
applying vacuum to booster. Depress brake pedal normally to
change vacuum to atmospheric pressure. Make sure that dis-
tance at intervals of 5 seconds between brake pedal and floor
panel gradually increases.
Depress brake pedal while engine is running, and stop engine
with pedal depressed. The pedal stroke should not change after
holding pedal down for 30 seconds.
BRA0037D
SBR365AA
Page 1294 of 5621
BRAKE BOOSTER
BR-19
C
D
E
G
H
I
J
K
L
MA
B
BR
Revision: 2006 January2006 M35/M45
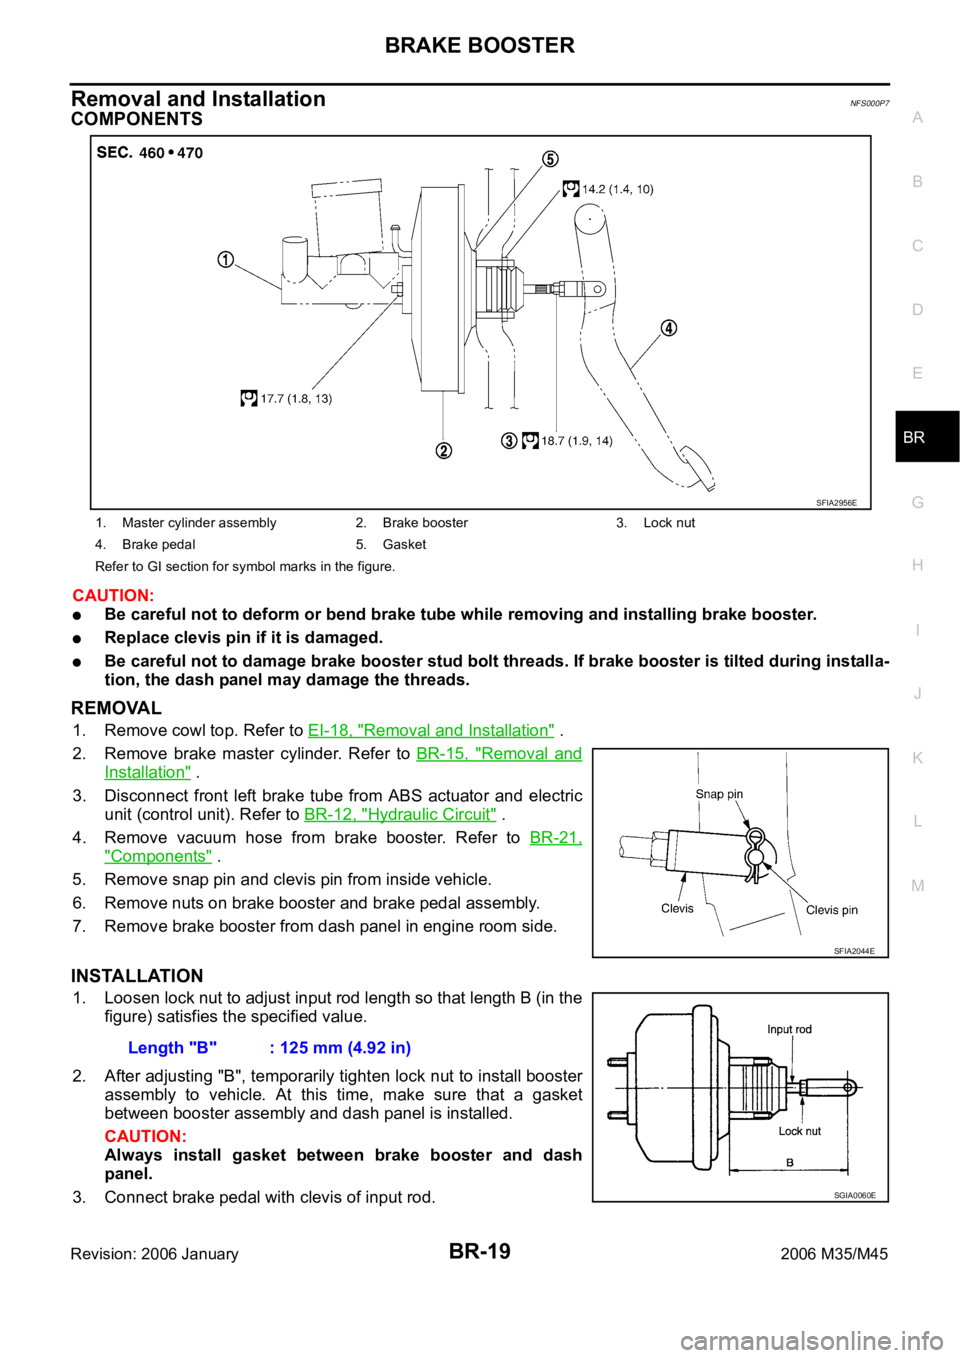
Removal and InstallationNFS000P7
COMPONENTS
CAUTION:
Be careful not to deform or bend brake tube while removing and installing brake booster.
Replace clevis pin if it is damaged.
Be careful not to damage brake booster stud bolt threads. If brake booster is tilted during installa-
tion, the dash panel may damage the threads.
REMOVAL
1. Remove cowl top. Refer to EI-18, "Removal and Installation" .
2. Remove brake master cylinder. Refer to BR-15, "
Removal and
Installation" .
3. Disconnect front left brake tube from ABS actuator and electric
unit (control unit). Refer to BR-12, "
Hydraulic Circuit" .
4. Remove vacuum hose from brake booster. Refer to BR-21,
"Components" .
5. Remove snap pin and clevis pin from inside vehicle.
6. Remove nuts on brake booster and brake pedal assembly.
7. Remove brake booster from dash panel in engine room side.
INSTALLATION
1. Loosen lock nut to adjust input rod length so that length B (in the
figure) satisfies the specified value.
2. After adjusting "B", temporarily tighten lock nut to install booster
assembly to vehicle. At this time, make sure that a gasket
between booster assembly and dash panel is installed.
CAUTION:
Always install gasket between brake booster and dash
panel.
3. Connect brake pedal with clevis of input rod.
1. Master cylinder assembly 2. Brake booster 3. Lock nut
4. Brake pedal 5. Gasket
Refer to GI section for symbol marks in the figure.
SFIA2956E
SFIA2044E
Length "B" : 125 mm (4.92 in)
SGIA0060E
Page 1296 of 5621
VACUUM LINES
BR-21
C
D
E
G
H
I
J
K
L
MA
B
BR
Revision: 2006 January2006 M35/M45
VACUUM LINESPFP:41920
ComponentsNFS000P8
VK45DE ENGINE MODEL
VQ35DE ENGINE MODEL
SFIA2957E
1. Clamp 2. Vacuum hose 3. Engine direction indicator stamp
(Built in check valve)
4. Clip 5. Vacuum piping 6. Grommet (Vacuum hose side)
7. Grommet (Cowl top assy side) 8. For intake manifold 9. For brake booster
SFIA2958E
1. Clamp 2. Vacuum hose 3. Engine direction indicator stamp
(Built in check valve)
4. Clip 5. Vacuum piping 6. Grommet (Vacuum hose side)
7. Grommet (Cowl top assy side) 8. For intake manifold 9. For brake booster
Page 1297 of 5621
BR-22
VACUUM LINES
Revision: 2006 January2006 M35/M45
Removal and InstallationNFS000P9
CAUTION:
Because vacuum hose contains a check valve, it must be
installed in the correct position. Refer to the stamp to con-
firm correct installation. Brake booster will not operate nor-
mally if the hose is installed in the wrong direction.
Insert vacuum hose at least 24 mm (0.94 in).
Do not use lubricating oil during assembly.
InspectionNFS000PA
VISUAL INSPECTION
Check for correct assembly, damage and deterioration.
CHECK VALVE INSPECTION
Airtightness Inspection
Use a handy vacuum pump to check.
Replace vacuum hose assembly if vacuum hose and check
valve are malfunctioning.
SBR225B
When connected to the booster side (1):
Vacuum should decrease within 1.3 kPa (10
mmHg, 0.39 inHg) for 15 seconds under a vacuum
of
66.7 kPa (500 mmHg, 19.69 inHg).
When connected to the engine side (2):
Vacuum should not exist.
SFIA0210E