2006 INFINITI M35 wheel
[x] Cancel search: wheelPage 920 of 5621
![INFINITI M35 2006 Factory Service Manual REMOVAL AND INSTALLATION
AV-299
[WITH MOBILE ENTERTAINMENT SYSTEM]
C
D
E
F
G
H
I
J
L
MA
B
AV
Revision: 2006 January2006 M35/M45
Steering Angle SensorNKS004CA
REMOVAL
1. Remove combination switch. Refe INFINITI M35 2006 Factory Service Manual REMOVAL AND INSTALLATION
AV-299
[WITH MOBILE ENTERTAINMENT SYSTEM]
C
D
E
F
G
H
I
J
L
MA
B
AV
Revision: 2006 January2006 M35/M45
Steering Angle SensorNKS004CA
REMOVAL
1. Remove combination switch. Refe](/manual-img/42/57023/w960_57023-919.png)
REMOVAL AND INSTALLATION
AV-299
[WITH MOBILE ENTERTAINMENT SYSTEM]
C
D
E
F
G
H
I
J
L
MA
B
AV
Revision: 2006 January2006 M35/M45
Steering Angle SensorNKS004CA
REMOVAL
1. Remove combination switch. Refer to SRS-40, "SPIRAL CABLE" .
2. Remove screws (A) and remove connector mount screw (B).
3. Remove steering angle sensor (1) from combination switch (2).
INSTALLATION
Installation is the reverse order of removal.
CAUTION:
Insert the projection area, and install steering wheel angle sensor while fitting adjusting the triangle
marks (Larger mark should be upward.).
SKIB4352E
Page 940 of 5621

BL-1
BODY, LOCK & SECURITY SYSTEM
I BODY
CONTENTS
C
D
E
F
G
H
J
K
L
M
SECTION BL
A
B
BL
Revision: 2006 January2006 M35/M45
BODY, LOCK & SECURITY SYSTEM
PRECAUTIONS .......................................................... 6
Precautions for Supplemental Restraint System
(SRS) “AIR BAG” and “SEAT BELT PRE-TEN-
SIONER” .................................................................. 6
Precautions for Procedures without Cowl Top Cover ..... 6
Precautions Necessary for Steering Wheel Rotation
after Battery Disconnect ........................................... 6
OPERATION PROCEDURE ................................. 6
Precautions for Work ...........................................
..... 7
PREPARATION ........................................................... 8
Special Service Tools ............................................... 8
Commercial Service Tools ........................................ 8
SQUEAK AND RATTLE TROUBLE DIAGNOSIS ...... 9
Work Flow ................................................................ 9
CUSTOMER INTERVIEW ..................................... 9
DUPLICATE THE NOISE AND TEST DRIVE ..... 10
CHECK RELATED SERVICE BULLETINS ......... 10
LOCATE THE NOISE AND IDENTIFY THE
ROOT CAUSE .................................................... 10
REPAIR THE CAUSE ......................................... 10
CONFIRM THE REPAIR ...................................... 11
Generic Squeak and Rattle Troubleshooting .......... 11
INSTRUMENT PANEL ......................................... 11
CENTER CONSOLE ............................................ 11
DOORS ................................................................ 11
TRUNK ................................................................ 12
SUNROOF/HEADLINING ................................... 12
SEATS ................................................................. 12
UNDERHOOD ..................................................... 12
Diagnostic Worksheet ............................................ 13
HOOD ....................................................................... 15
Fitting Adjustment .................................................. 15
Removal and Installation of Hood Assembly .......... 17
REMOVAL ........................................................
... 17
INSTALLETION ................................................... 18
Removal and Installation of Hood Lock Control ..... 18
REMOVAL ........................................................
... 18
INSTALLATION ................................................... 19
Hood Lock Control Inspection ................................ 20RADIATOR CORE SUPPORT .................................. 21
Removal and Installation ........................................ 21
REMOVAL ........................................................
... 21
INSTALLATION ................................................... 22
FRONT FENDER ................................................... ... 23
Removal and Installation ........................................ 23
REMOVAL ........................................................
... 23
INSTALLATION ................................................... 23
POWER DOOR LOCK SYSTEM .............................. 24
Component Parts and Harness Connector Location ... 24
System Description ................................................. 25
DOOR LOCK ACTUATOR OPERATION ............. 26
FUEL LID OPERATION ....................................... 26
OUTLINE ............................................................. 26
CAN Communication System Description .............. 26
CAN Communication Unit ....................................... 26
Schematic ............................................................... 27
Wiring Diagram —D/LOCK— ................................. 28
Terminals and Reference Value of BCM ................. 31
Work Flow ............................................................... 31
CONSULT-II Function (BCM) ................................. 32
CONSULT-II INSPECTION PROCEDURE .......... 32
CONSULT-II APPLICATION ITEMS .................... 33
Trouble Diagnosis Chart by Symptom .................... 34
Power Supply and Ground Circuit Check of BCM ... 35
Check Door Lock and Unlock Switch ..................... 36
Check Door Lock Actuator/Driver Side ................... 38
Check Door Lock Actuator/Passenger Side ........... 39
Check Door Lock Actuator/Rear LH ....................... 40
Check Door Lock Actuator/Rear RH ....................... 40
Check Fuel Lid Opener Actuator ............................ 41
Door Key Cylinder Switch Check ............................ 42
INTELLIGENT KEY SYSTEM ................................... 44
Component Parts and Harness Connector Location ... 44
System Description ................................................. 48
DOOR LOCK/UNLOCK/TRUNK OPEN FUNC-
TION .................................................................... 48
REMOTE KEYLESS ENTRY FUNCTIONS ......... 52
ENGINE START FUNCTION ............................... 54
WARNING FUNCTION ........................................ 55
Page 945 of 5621

BL-6
PRECAUTIONS
Revision: 2006 January2006 M35/M45
PRECAUTIONSPFP:00001
Precautions for Supplemental Restraint System (SRS) “AIR BAG” and “SEAT
BELT PRE-TENSIONER”
NIS001WA
The Supplemental Restraint System such as “AIR BAG” and “SEAT BELT PRE-TENSIONER”, used along
with a front seat belt, helps to reduce the risk or severity of injury to the driver and front passenger for certain
types of collision. This system includes seat belt switch inputs and dual stage front air bag modules. The SRS
system uses the seat belt switches to determine the front air bag deployment, and may only deploy one front
air bag, depending on the severity of a collision and whether the front occupants are belted or unbelted.
Information necessary to service the system safely is included in the SRS and SB section of this Service Man-
ual.
WAR NING :
To avoid rendering the SRS inoperative, which could increase the risk of personal injury or death
in the event of a collision which would result in air bag inflation, all maintenance must be per-
formed by an authorized NISSAN/INFINITI dealer.
Improper maintenance, including incorrect removal and installation of the SRS, can lead to per-
sonal injury caused by unintentional activation of the system. For removal of Spiral Cable and Air
Bag Module, see the SRS section.
Do not use electrical test equipment on any circuit related to the SRS unless instructed to in this
Service Manual. SRS wiring harnesses can be identified by yellow and/or orange harnesses or
harness connectors.
Precautions for Procedures without Cowl Top CoverNIS001WB
When performing the procedure after removing cowl top cover, cover
the lower end of windshield with urethane, etc.
Precautions Necessary for Steering Wheel Rotation after Battery DisconnectNIS001WC
NOTE:
Before removing and installing any control units, first turn the push-button ignition switch to the LOCK
position, then disconnect both battery cables.
After finishing work, confirm that all control unit connectors are connected properly, then re-connect both
battery cables.
Always use CONSULT-II to perform self-diagnosis as a part of each function inspection after finishing
work. If a DTC is detected, perform trouble diagnosis according to self-diagnosis results.
This vehicle is equipped with a push-button ignition switch and a steering lock unit.
If the battery is disconnected or discharged, the steering wheel will lock and cannot be turned.
If turning the steering wheel is required with the battery disconnected or discharged, follow the procedure
below before starting the repair operation.
OPERATION PROCEDURE
1. Connect both battery cables.
NOTE:
Supply power using jumper cables if battery is discharged.
2. Carry the Intelligent Key or insert it to the key slot and turn the push-button ignition switch to ACC position.
(At this time, the steering lock will be released.)
3. Disconnect both battery cables. The steering lock will remain released with both battery cables discon-
nected and the steering wheel can be turned.
4. Perform the necessary repair operation.
PIIB3706J
Page 946 of 5621

PRECAUTIONS
BL-7
C
D
E
F
G
H
J
K
L
MA
B
BL
Revision: 2006 January2006 M35/M45
5. When the repair work is completed, re-connect both battery cables. With the brake pedal released, turn
the push-button ignition switch from ACC position to ON position, then to LOCK position. (The steering
wheel will lock when the push-button ignition switch is turned to LOCK position.)
6. Perform self-diagnosis check of all control units using CONSULT-II.
Precautions for WorkNIS001WD
After removing and installing the opening/closing parts, be sure to carry out fitting adjustments to check
their operational.
Check the lubrication level, damage, and wear of each part. If necessary, grease or replace it.
Page 1227 of 5621

BL-288
BODY REPAIR
Revision: 2006 January2006 M35/M45
1. Hood
2. Front fender (RH&LH)
3. Side body assembly (RH&LH)
4. Outer front pillar reinforcement (RH&LH)
5. Center pillar reinforcement (RH&LH)
6. Outer roof side rail reinforcement (RH&LH)
7. Outer sill reinforcement (RH&LH)
8. Inner roof side rail (RH&LH)
9. Inner center pillar (RH&LH)
10. Front roof rail brace (RH&LH)
11. Outer sill (RH&LH)
12. Inner rear pillar assembly (RH&LH)
13. Inner rear pillar rear (RH&LH)
14. Inner rear pillar reinforcement (RH&LH)
15. Outer rear wheelhouse (RH&LH)
16. Outer rear wheelhouse extension (RH&LH)
17. Inner rear wheelhouse (RH&LH)
18. Side parcel shelf assembly (RH&LH)
19. Seat back support (RH&LH)
20. Parcel shelf assembly
21. Rear waist
22. Roof assembly
23. Front roof rail
24. Front roof bow
25. Rear roof bow
26. Rear roof rail
27. Rear fender assembly (RH&LH)
28. Rear fender extension (RH&LH)
29. Rear bumper side bracket
30. Fuel filler lid (RH)
31. Rear panel assembly
32. Upper rear bumper retainer
33. Lower rear bumper retainer
34. Front door assembly (RH&LH)
35. Outer front door panel (RH&LH)
36. Rear door assembly (RH&LH)
37. Outer rear door panel (RH&LH)
38. Trunk lid
39. Front bumper reinforcement
40. Rear bumper stay
41. Rear bumper reinforcement
Page 1229 of 5621

BL-290
BODY REPAIR
Revision: 2006 January2006 M35/M45
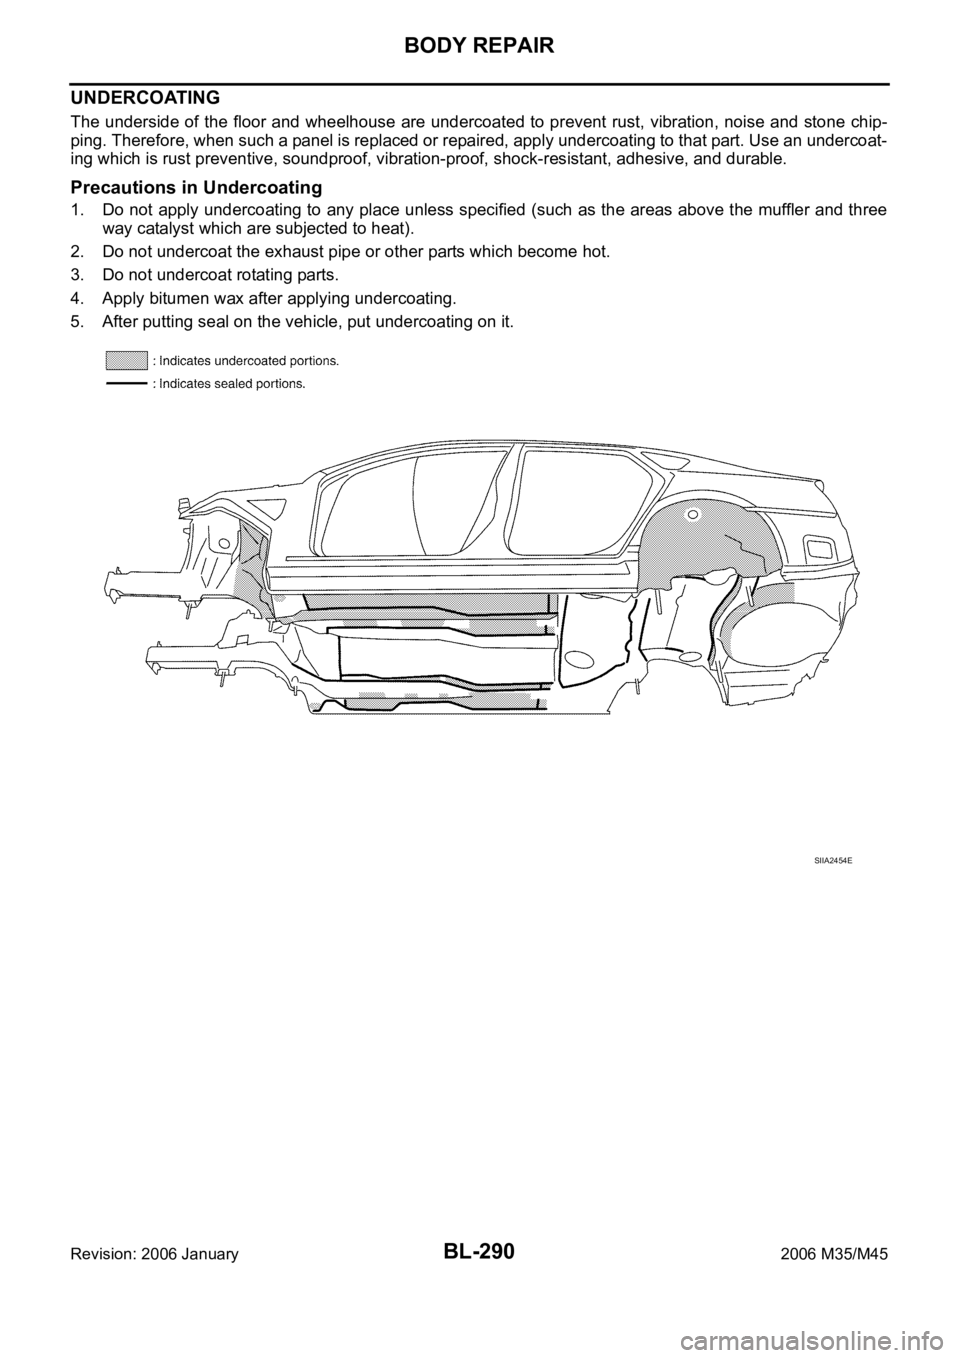
UNDERCOATING
The underside of the floor and wheelhouse are undercoated to prevent rust, vibration, noise and stone chip-
ping. Therefore, when such a panel is replaced or repaired, apply undercoating to that part. Use an undercoat-
ing which is rust preventive, soundproof, vibration-proof, shock-resistant, adhesive, and durable.
Precautions in Undercoating
1. Do not apply undercoating to any place unless specified (such as the areas above the muffler and three
way catalyst which are subjected to heat).
2. Do not undercoat the exhaust pipe or other parts which become hot.
3. Do not undercoat rotating parts.
4. Apply bitumen wax after applying undercoating.
5. After putting seal on the vehicle, put undercoating on it.
SIIA2454E
Page 1251 of 5621

BL-312
BODY REPAIR
Revision: 2006 January2006 M35/M45
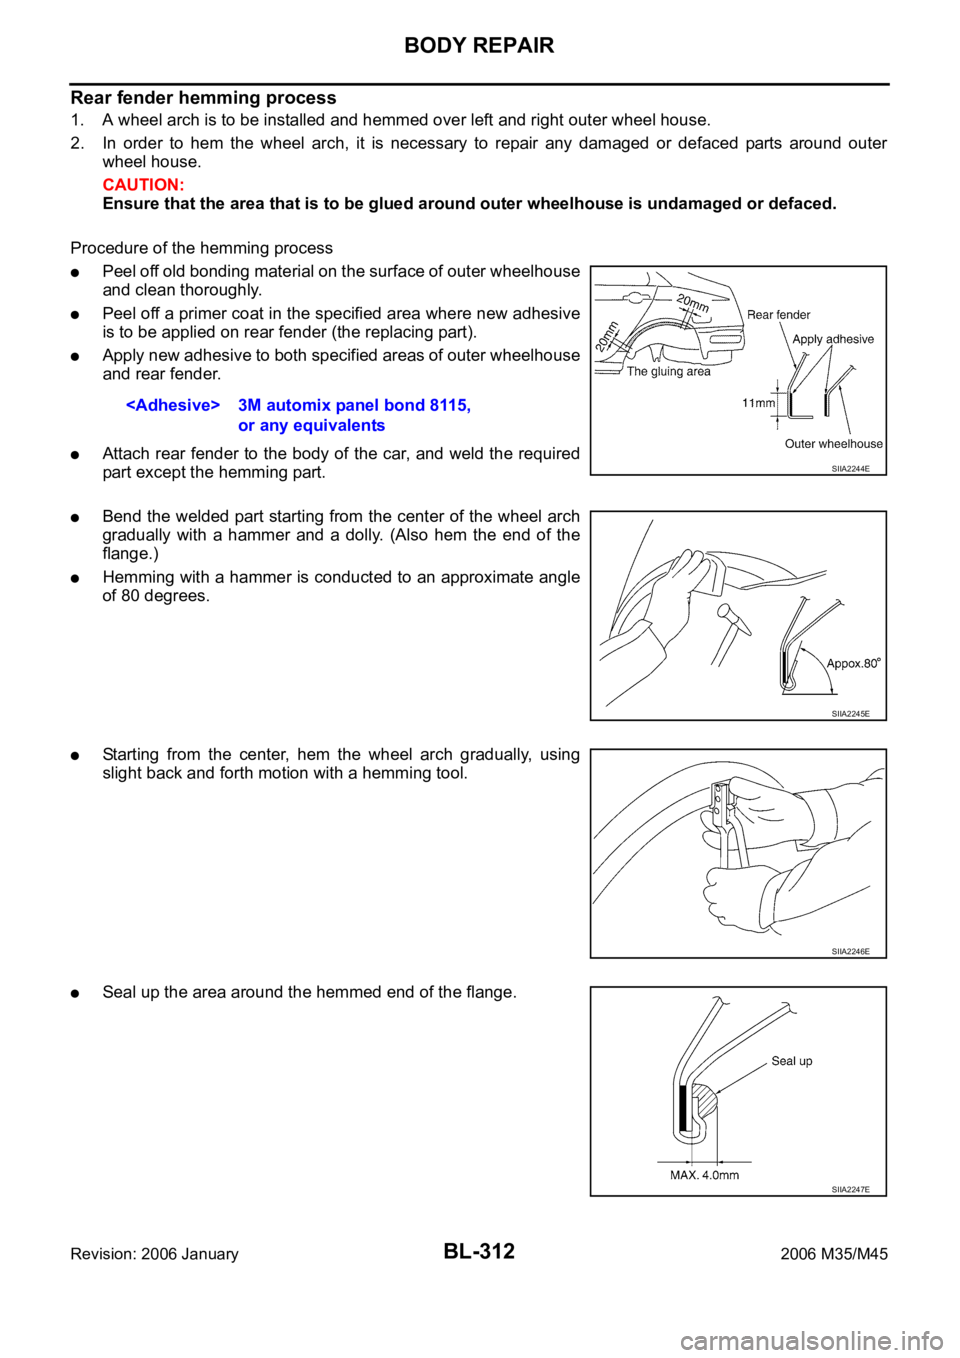
Rear fender hemming process
1. A wheel arch is to be installed and hemmed over left and right outer wheel house.
2. In order to hem the wheel arch, it is necessary to repair any damaged or defaced parts around outer
wheel house.
CAUTION:
Ensure that the area that is to be glued around outer wheelhouse is undamaged or defaced.
Procedure of the hemming process
Peel off old bonding material on the surface of outer wheelhouse
and clean thoroughly.
Peel off a primer coat in the specified area where new adhesive
is to be applied on rear fender (the replacing part).
Apply new adhesive to both specified areas of outer wheelhouse
and rear fender.
Attach rear fender to the body of the car, and weld the required
part except the hemming part.
Bend the welded part starting from the center of the wheel arch
gradually with a hammer and a dolly. (Also hem the end of the
flange.)
Hemming with a hammer is conducted to an approximate angle
of 80 degrees.
Starting from the center, hem the wheel arch gradually, using
slight back and forth motion with a hemming tool.
Seal up the area around the hemmed end of the flange.
or any equivalents
SIIA2244E
SIIA2245E
SIIA2246E
SIIA2247E
Page 1266 of 5621

BODY REPAIR
BL-327
C
D
E
F
G
H
J
K
L
MA
B
BL
Revision: 2006 January2006 M35/M45
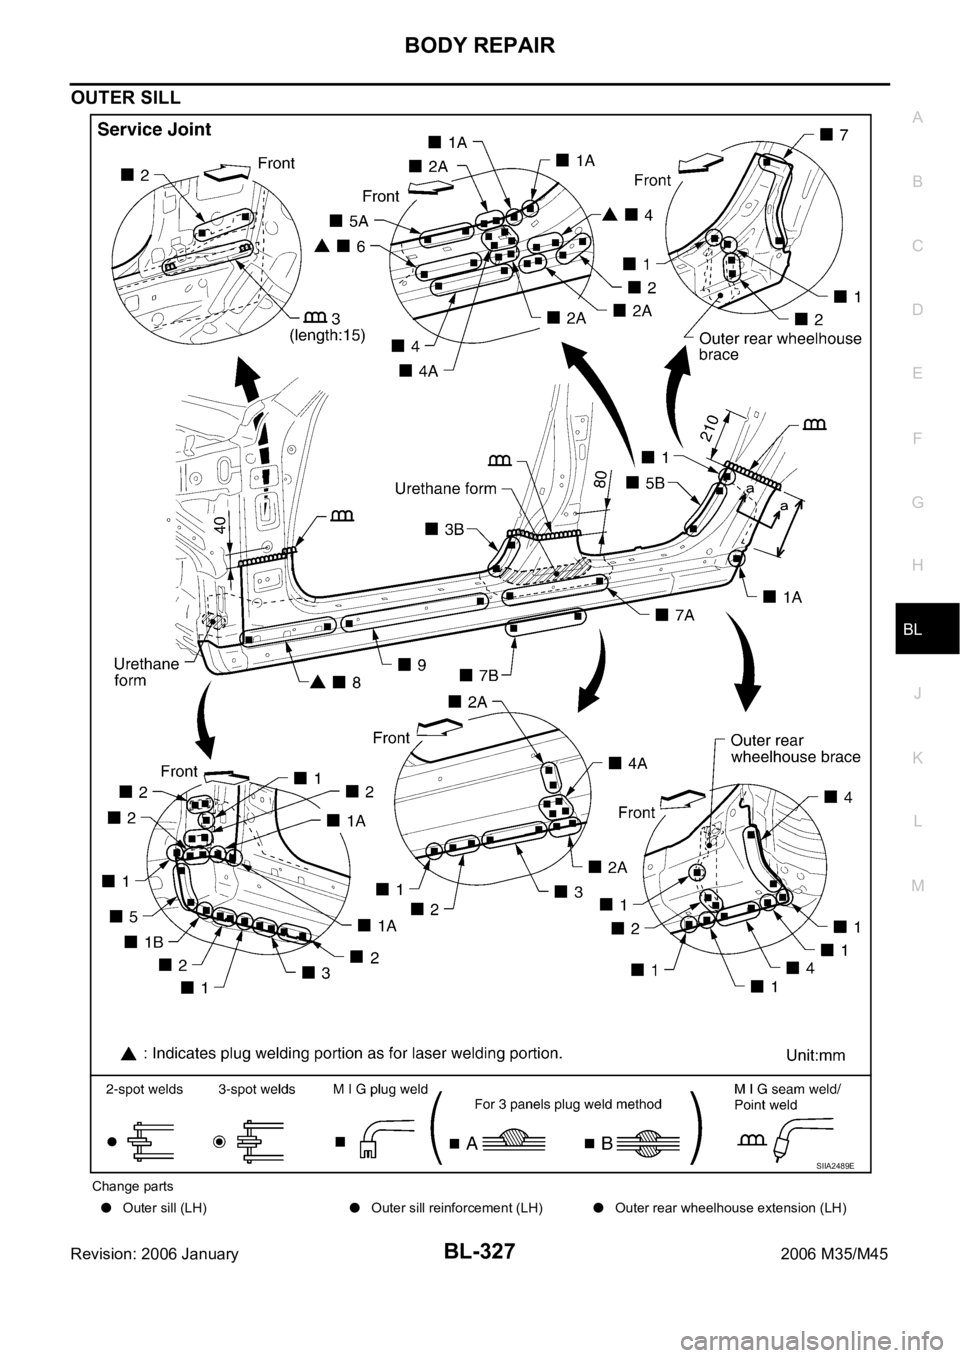
OUTER SILL
Change parts
Outer sill (LH)Outer sill reinforcement (LH)Outer rear wheelhouse extension (LH)
SIIA2489E