Page 1124 of 5621

INTELLIGENT KEY SYSTEM/ENGINE START FUNCTION
BL-185
C
D
E
F
G
H
J
K
L
MA
B
BL
Revision: 2006 January2006 M35/M45
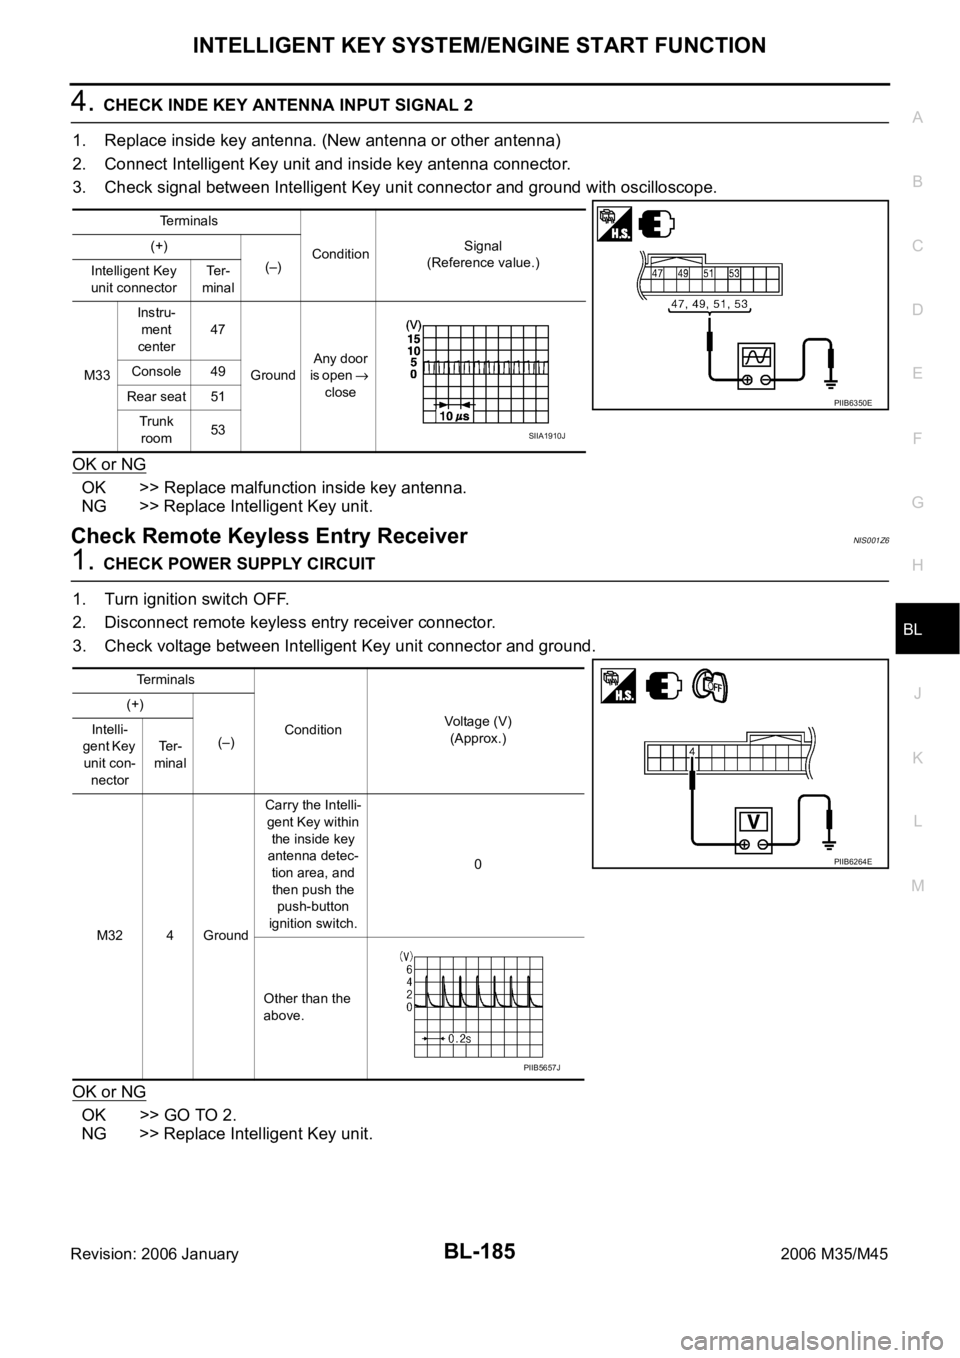
4. CHECK INDE KEY ANTENNA INPUT SIGNAL 2
1. Replace inside key antenna. (New antenna or other antenna)
2. Connect Intelligent Key unit and inside key antenna connector.
3. Check signal between Intelligent Key unit connector and ground with oscilloscope.
OK or NG
OK >> Replace malfunction inside key antenna.
NG >> Replace Intelligent Key unit.
Check Remote Keyless Entry ReceiverNIS001Z6
1. CHECK POWER SUPPLY CIRCUIT
1. Turn ignition switch OFF.
2. Disconnect remote keyless entry receiver connector.
3. Check voltage between Intelligent Key unit connector and ground.
OK or NG
OK >> GO TO 2.
NG >> Replace Intelligent Key unit.
Terminals
ConditionSignal
(Reference value.) (+)
(–)
Intelligent Key
unit connectorTe r -
minal
M33Instru-
ment
center47
GroundAny door
is open
close Console 49
Rear seat 51
Trunk
room53
PIIB6350E
SIIA1910J
Terminals
ConditionVoltage (V)
(Approx.) (+)
(–) Intelli-
gent Key
unit con-
nectorTe r -
minal
M32 4 GroundCarry the Intelli-
gent Key within
the inside key
antenna detec-
tion area, and
then push the
push-button
ignition switch.0
Other than the
above.
PIIB6264E
PIIB5657J
Page 1125 of 5621

BL-186
INTELLIGENT KEY SYSTEM/ENGINE START FUNCTION
Revision: 2006 January2006 M35/M45
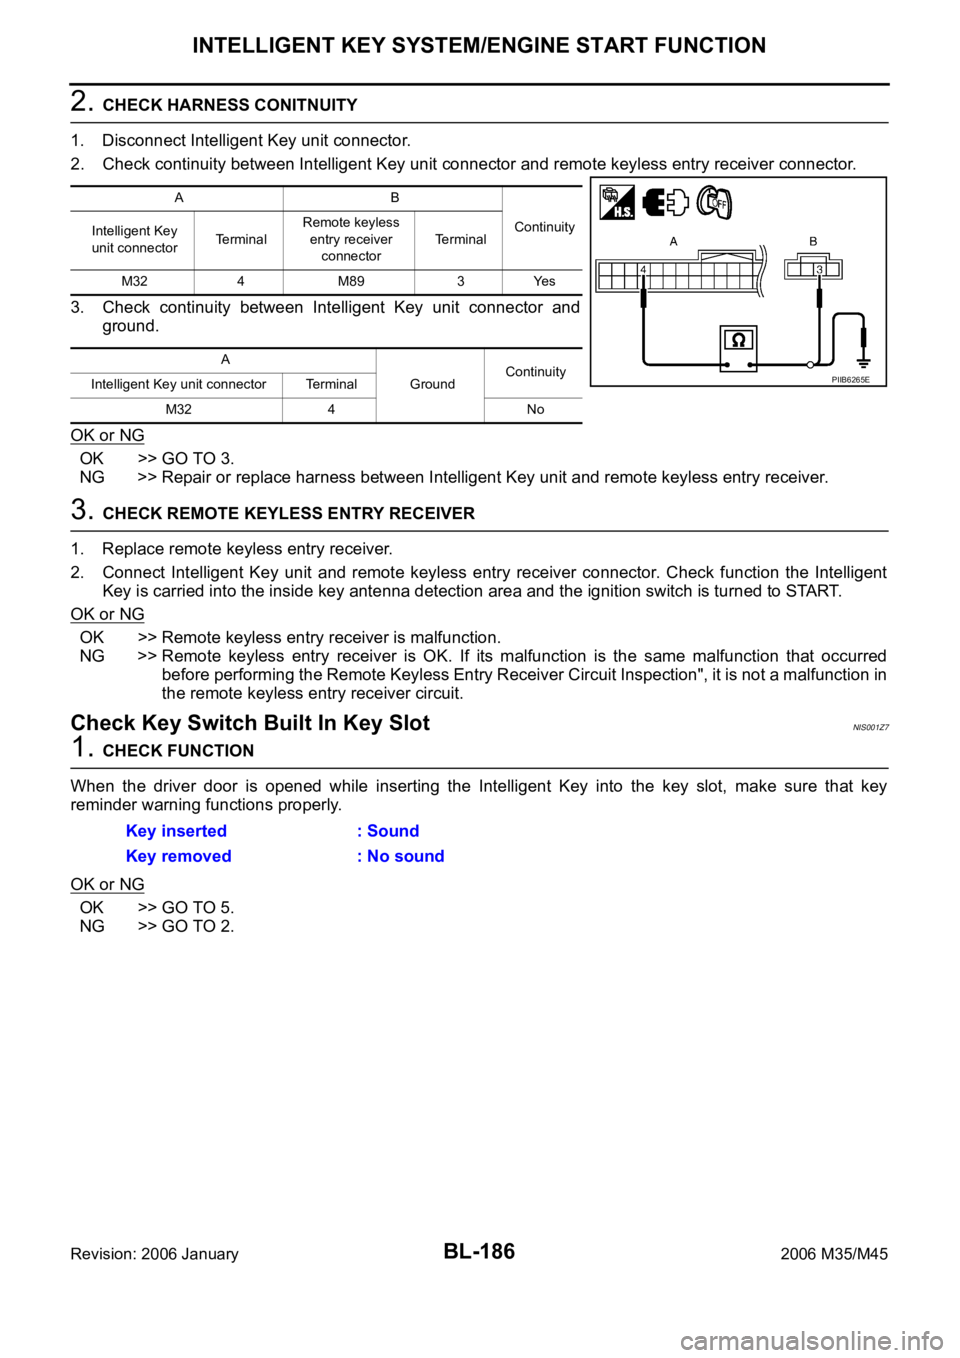
2. CHECK HARNESS CONITNUITY
1. Disconnect Intelligent Key unit connector.
2. Check continuity between Intelligent Key unit connector and remote keyless entry receiver connector.
3. Check continuity between Intelligent Key unit connector and
ground.
OK or NG
OK >> GO TO 3.
NG >> Repair or replace harness between Intelligent Key unit and remote keyless entry receiver.
3. CHECK REMOTE KEYLESS ENTRY RECEIVER
1. Replace remote keyless entry receiver.
2. Connect Intelligent Key unit and remote keyless entry receiver connector. Check function the Intelligent
Key is carried into the inside key antenna detection area and the ignition switch is turned to START.
OK or NG
OK >> Remote keyless entry receiver is malfunction.
NG >> Remote keyless entry receiver is OK. If its malfunction is the same malfunction that occurred
before performing the Remote Keyless Entry Receiver Circuit Inspection", it is not a malfunction in
the remote keyless entry receiver circuit.
Check Key Switch Built In Key SlotNIS001Z7
1. CHECK FUNCTION
When the driver door is opened while inserting the Intelligent Key into the key slot, make sure that key
reminder warning functions properly.
OK or NG
OK >> GO TO 5.
NG >> GO TO 2.
AB
Continuity
Intelligent Key
unit connectorTe r m i n a lRemote keyless
entry receiver
connectorTerminal
M32 4 M89 3 Yes
A
GroundContinuity
Intelligent Key unit connector Terminal
M32 4 No
PIIB6265E
Key inserted : Sound
Key removed : No sound
Page 1126 of 5621

INTELLIGENT KEY SYSTEM/ENGINE START FUNCTION
BL-187
C
D
E
F
G
H
J
K
L
MA
B
BL
Revision: 2006 January2006 M35/M45
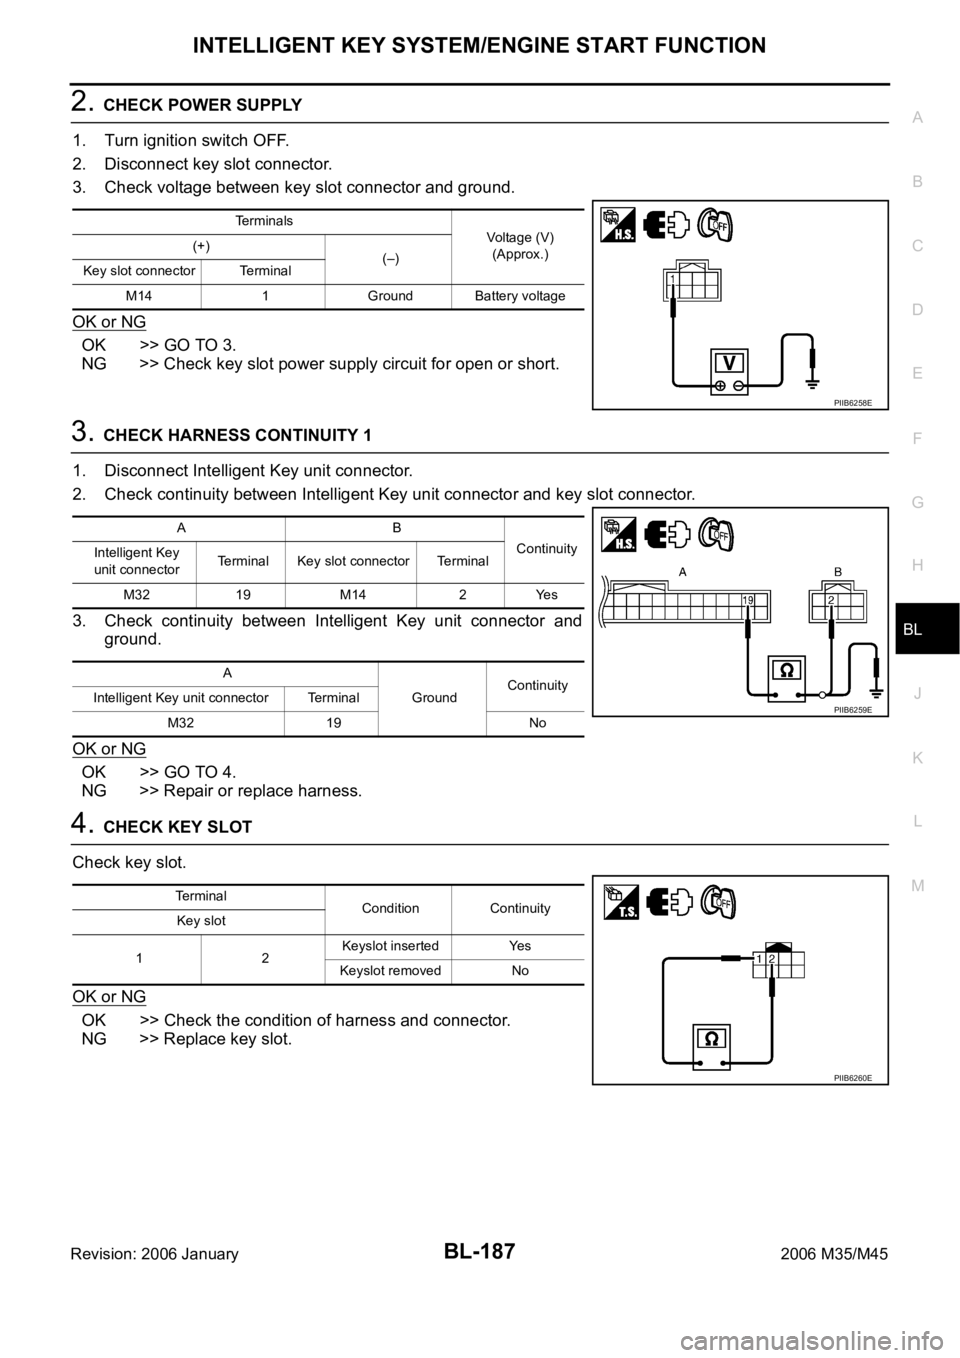
2. CHECK POWER SUPPLY
1. Turn ignition switch OFF.
2. Disconnect key slot connector.
3. Check voltage between key slot connector and ground.
OK or NG
OK >> GO TO 3.
NG >> Check key slot power supply circuit for open or short.
3. CHECK HARNESS CONTINUITY 1
1. Disconnect Intelligent Key unit connector.
2. Check continuity between Intelligent Key unit connector and key slot connector.
3. Check continuity between Intelligent Key unit connector and
ground.
OK or NG
OK >> GO TO 4.
NG >> Repair or replace harness.
4. CHECK KEY SLOT
Check key slot.
OK or NG
OK >> Check the condition of harness and connector.
NG >> Replace key slot.
Terminals
Voltage (V)
(Approx.) (+)
(–)
Key slot connector Terminal
M14 1 Ground Battery voltage
PIIB6258E
AB
Continuity
Intelligent Key
unit connectorTerminal Key slot connector Terminal
M32 19 M14 2 Yes
A
GroundContinuity
Intelligent Key unit connector Terminal
M32 19 No
PIIB6259E
Terminal
Condition Continuity
Key slot
12Keyslot inserted Yes
Keyslot removed No
PIIB6260E
Page 1127 of 5621

BL-188
INTELLIGENT KEY SYSTEM/ENGINE START FUNCTION
Revision: 2006 January2006 M35/M45
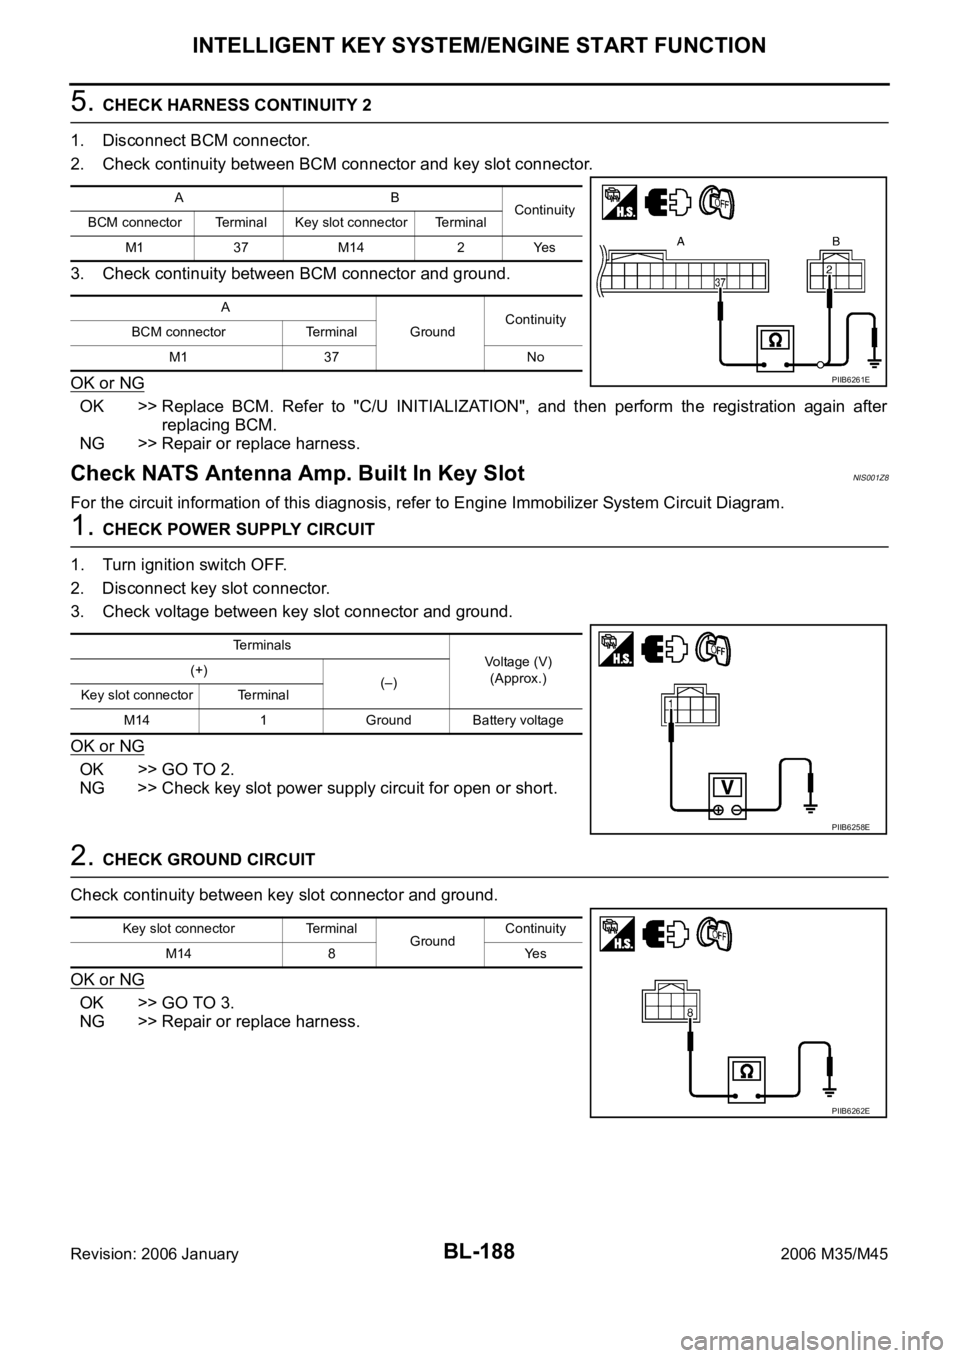
5. CHECK HARNESS CONTINUITY 2
1. Disconnect BCM connector.
2. Check continuity between BCM connector and key slot connector.
3. Check continuity between BCM connector and ground.
OK or NG
OK >> Replace BCM. Refer to "C/U INITIALIZATION", and then perform the registration again after
replacing BCM.
NG >> Repair or replace harness.
Check NATS Antenna Amp. Built In Key SlotNIS001Z8
For the circuit information of this diagnosis, refer to Engine Immobilizer System Circuit Diagram.
1. CHECK POWER SUPPLY CIRCUIT
1. Turn ignition switch OFF.
2. Disconnect key slot connector.
3. Check voltage between key slot connector and ground.
OK or NG
OK >> GO TO 2.
NG >> Check key slot power supply circuit for open or short.
2. CHECK GROUND CIRCUIT
Check continuity between key slot connector and ground.
OK or NG
OK >> GO TO 3.
NG >> Repair or replace harness.
AB
Continuity
BCM connector Terminal Key slot connector Terminal
M1 37 M14 2 Yes
A
GroundContinuity
BCM connector Terminal
M1 37 No
PIIB6261E
Terminals
Voltage (V)
(Approx.) (+)
(–)
Key slot connector Terminal
M14 1 Ground Battery voltage
PIIB6258E
Key slot connector Terminal
GroundContinuity
M14 8 Yes
PIIB6262E
Page 1128 of 5621
INTELLIGENT KEY SYSTEM/ENGINE START FUNCTION
BL-189
C
D
E
F
G
H
J
K
L
MA
B
BL
Revision: 2006 January2006 M35/M45
3. CHECK KEY SLOT SIGNAL
1. Connect key slot connector.
2. Check voltage between key slot connector and ground.
OK or NG
OK >> Check the condition of harness and connector.
NG >> Repair or replace harness between BCM and key slot.
Terminals
ConditionVoltage (V)
(Approx.) (+)
(–)
Key slot
connectorTerminal
M146
GroundCheck the voltage just
after the Intelligent Key
is inserted into the key
slot and the ignition
switch is turned to
START.The pointer of
the analog
tester fluctu-
ates. 7
PIIB6263E
Page 1135 of 5621
BL-196
FRONT DOOR LOCK
Revision: 2006 January2006 M35/M45
FRONT DOOR LOCKPFP:80502
Component StructureNIS001ZD
Removal and InstallationNIS001ZE
REMOVAL
1. Remove the front door finisher. Refer toEI-34, "Removal and Installation" .
2. Disconnect the inside handle knob cable and lock knob cable
from the back side of the front door finisher.
3. Remove the front door window and front door module assembly. Refer toGW-63, "
FRONT DOOR GLASS
AND REGULATOR" .
4. Remove door side grommet, and remove door key cylinder assembly (driver side) and outside handle
escutcheon (passenger side) bolts (TORX T30) from grommet hole.
1. Outside handle 2. Front gasket 3. Lock knob cable
4. Inside handle 5. Inside handle knob cable 6. Door lock assembly
7. Outside handle cable 8. Key cylinder rod (Driver side only) 9. Outside handle bracket
10. Grommet 11. Rear gasket 12. Door key cylinder assembly (Driver
side)
Outside handle escutcheon (Pas-
senger side)
PIIB5806E
PIIB4933E
Page 1136 of 5621
FRONT DOOR LOCK
BL-197
C
D
E
F
G
H
J
K
L
MA
B
BL
Revision: 2006 January2006 M35/M45
CAUTION:
Do not forcibly remove the TORX bolts (T30).
5. Disconnect door antenna and door request switch connector
and remove harness clamp. (Models with intelligent Key system)
6. Reach to separate the key cylinder rod connection (on the handle).
7. Disconnect door key cylinder switch harness connector.
8. While pulling the outside handle, remove door key cylinder
assembly.
9. Disconnect front door request switch harness connector (with Intelligent Key system).
10. While pulling outside handle, slide toward rear of vehicle to
remove outside handle.
PIIB5808E
PIIB5807E
PIIB5809E
PIIB5810E
Page 1145 of 5621
BL-206
TRUNK LID
Revision: 2006 January2006 M35/M45
Removal and Installation of Trunk Lid LockNIS001ZK
REMOVAL
1. Remove the trunk lid finisher. Refer to EI-56, "Removal and Installation for Trunk Room Trim" .
2. Remove the trunk lid emergency opener lever.
3. Disconnect the trunk lid opener cable.
4. Disconnect the trunk lid.
5. Remove the mounting bolts, and remove the trunk lid lock.
INSTALLATION
1. Install in the reverse order of removal.
2. After installing, close the trunk lid height. Perform the lock and surface height adjustment. Refer to BL-
203, "Fitting Adjustment" .
3. After installing, check the operation.
1. Trunk lid lock 2. Trunk lid opener cable 3. Trunk lid key cylinder
4. Trunk lid opener switch 5. Trunk lid emergency opener lever
PIIB5819E
PIIB5820E