2006 INFINITI M35 washer fluid
[x] Cancel search: washer fluidPage 1298 of 5621

FRONT DISC BRAKE
BR-23
C
D
E
G
H
I
J
K
L
MA
B
BR
Revision: 2006 January2006 M35/M45
FRONT DISC BRAKEPFP:41000
On-Board InspectionNFS000PB
PAD WEAR INSPECTION
Check pad thickness from an inspection hole on cylinder body.
Check using a scale if necessary.
ComponentsNFS000PC
WAR NING :
Clean dust on caliper and brake pad with a vacuum dust collector to minimize the hazard of air borne
particles or other materials.
CAUTION:
While removing cylinder body, do not depress brake pedal because piston will pop out. Standard thickness : 11.0 mm (0.433 in)
Repair limit thickness : 2.0 mm (0.079 in)
MAA0439D
1. Union bolt 2. Copper washer 3. Brake hose
4. Cap 5. Bleed valve 6. Sliding pin bolt
7. Piston seal 8. Piston 9. Piston boot
10. Cylinder body 11. Sliding pin 12. Torque member mounting bolt
13. Washer 14. Sliding pin boot 15. Bushing
16. Torque member 17. Inner shim cover 18. Inner shim
19. Inner pad 20. Pad retainer 21. Pad wear sensor
22. Outer pad 23. Outer shim 24. Outer shim cover
Refer to GI-11, "
Components" and the followings for the symbols in the figure.
1: Apply rubber grease.
2: Apply PBC (Poly Butyl Cuprysil) grease or silicone-based grease.
3: Apply polyglycol ether based lubricant.
: Apply brake fluid.
PFIA0820E
Page 1300 of 5621

FRONT DISC BRAKE
BR-25
C
D
E
G
H
I
J
K
L
MA
B
BR
Revision: 2006 January2006 M35/M45
Removal and Installation of Brake Caliper AssemblyNFS000PE
REMOVAL
1. Remove tires from vehicle with power tool.
2. Fasten disc rotor using wheel nut.
3. Drain brake fluid. Refer to BR-10, "
Drain and Refill" .
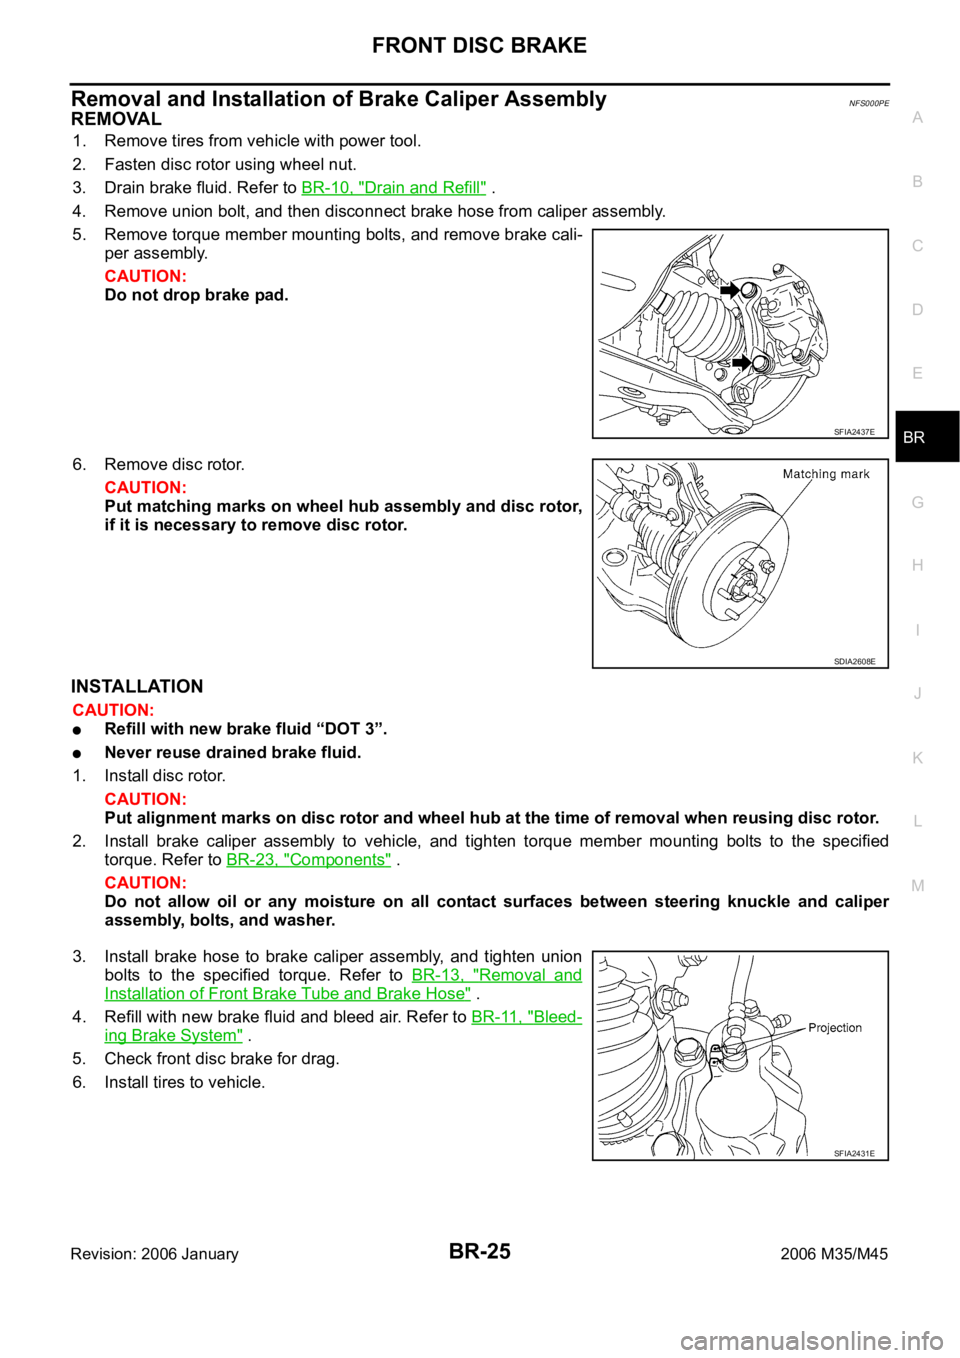
4. Remove union bolt, and then disconnect brake hose from caliper assembly.
5. Remove torque member mounting bolts, and remove brake cali-
per assembly.
CAUTION:
Do not drop brake pad.
6. Remove disc rotor.
CAUTION:
Put matching marks on wheel hub assembly and disc rotor,
if it is necessary to remove disc rotor.
INSTALLATION
CAUTION:
Refill with new brake fluid “DOT 3”.
Never reuse drained brake fluid.
1. Install disc rotor.
CAUTION:
Put alignment marks on disc rotor and wheel hub at the time of removal when reusing disc rotor.
2. Install brake caliper assembly to vehicle, and tighten torque member mounting bolts to the specified
torque. Refer to BR-23, "
Components" .
CAUTION:
Do not allow oil or any moisture on all contact surfaces between steering knuckle and caliper
assembly, bolts, and washer.
3. Install brake hose to brake caliper assembly, and tighten union
bolts to the specified torque. Refer to BR-13, "
Removal and
Installation of Front Brake Tube and Brake Hose" .
4. Refill with new brake fluid and bleed air. Refer to BR-11, "
Bleed-
ing Brake System" .
5. Check front disc brake for drag.
6. Install tires to vehicle.
SFIA2437E
SDIA2608E
SFIA2431E
Page 1306 of 5621

REAR DISC BRAKE
BR-31
C
D
E
G
H
I
J
K
L
MA
B
BR
Revision: 2006 January2006 M35/M45
Removal and Installation of Brake Caliper AssemblyNFS000PJ
REMOVAL
1. Remove tires from vehicle with power tool.
2. Fasten disc rotor using wheel nut.
3. Drain brake fluid. Refer to BR-10, "
Drain and Refill" .
4. Remove union bolt and then disconnect brake hose from caliper
assembly.
5. Remove torque member mounting, bolts, and remove brake cal-
iper assembly.
CAUTION:
Do not drop brake pad.
6. Remove disc rotor.
CAUTION:
Put matching marks on wheel hub assembly and disc rotor,
if it necessary to remove disc rotor.
INSTALLATION
CAUTION:
Refill with new brake fluid “DOT 3”.
Never reuse drained brake fluid.
1. Install disc rotor.
CAUTION:
Alignment marks of disc rotor and wheel hub put at the time of removal when reusing disc rotor.
2. Install brake caliper assembly vehicle, and tighten torque member mounting bolts to the specified torque.
CAUTION:
Before installing caliper assembly, wipe off oil and moisture on all mounting surfaces of rear axle
and caliper assembly and threads, bolts and washers.
3. Install L-shaped pin of brake hose and then tighten union bolt to
the specified torque. Refer to BR-13, "
Removal and Installation
of Rear Brake Tube and Brake Hose" .
4. Refill with new brake fluid and bleed air. Refer to BR-11, "
Bleed-
ing Brake System" .
5. Check rear disc brake for drag.
6. Install tires to vehicle.
SFIA2972E
SDIA2638E
SFIA2049E
Page 1406 of 5621
![INFINITI M35 2006 Factory Service Manual WATER OUTLET AND WATER PIPING
CO-31
[VQ35DE]
C
D
E
F
G
H
I
J
K
L
MA
CO
Revision: 2006 January2006 M35/M45
WATER OUTLET AND WATER PIPINGPFP:11060
ComponentsNBS004R5
Removal and InstallationNBS004R6
REM INFINITI M35 2006 Factory Service Manual WATER OUTLET AND WATER PIPING
CO-31
[VQ35DE]
C
D
E
F
G
H
I
J
K
L
MA
CO
Revision: 2006 January2006 M35/M45
WATER OUTLET AND WATER PIPINGPFP:11060
ComponentsNBS004R5
Removal and InstallationNBS004R6
REM](/manual-img/42/57023/w960_57023-1405.png)
WATER OUTLET AND WATER PIPING
CO-31
[VQ35DE]
C
D
E
F
G
H
I
J
K
L
MA
CO
Revision: 2006 January2006 M35/M45
WATER OUTLET AND WATER PIPINGPFP:11060
ComponentsNBS004R5
Removal and InstallationNBS004R6
REMOVAL
1. Remove engine room cover (RH and LH). Refer to EM-14, "ENGINE ROOM COVER" .
2. Remove engine cover with power tool. Refer to EM-19, "
INTAKE MANIFOLD COLLECTOR" .
3. Remove air duct (inlet) and air cleaner case assembly. Refer to EM-17, "
AIR CLEANER AND AIR DUCT"
.
4. Remove front engine undercover with power tool.
5. Drain engine coolant from radiator drain plug at the bottom of radiator, and from water drain plug at the
front of cylinder block. Refer to CO-11, "
Changing Engine Coolant" and CO-24, "WATER PUMP" .
CAUTION:
Perform this step when the engine is cold.
Do not spill engine coolant on drive belts.
6. Remove radiator hose (upper) and heater hose.
7. Remove the following parts, when remove water outlet.
A/T fluid charging pipe: Refer to AT-271, "TRANSMISSION ASSEMBLY" .
Intake manifold collectors (upper and lower): Refer to EM-19, "INTAKE MANIFOLD COLLECTOR" .
Rocker cover (right bank): Refer to EM-51, "ROCKER COVER" .
8. Remove engine coolant temperature sensor as necessary.
CAUTION:
Be careful not to damage engine coolant temperature sensor.
1. Harness bracket 2. Water hose 3. Water bypass hose
4. Engine coolant temperature sensor 5. Gasket 6. Water outlet
7. Heater hose 8. Water pipe 9. Radiator hose (upper)
10. Heater pipe 11. Washer 12. O-ring
SBIA0484E
Page 3077 of 5621
![INFINITI M35 2006 Factory Service Manual EM-14
[VQ35DE]
ENGINE ROOM COVER
Revision: 2006 January2006 M35/M45
ENGINE ROOM COVERPFP:14049
ComponentsNBS004MS
Removal and InstallationNBS004MT
REMOVAL
CAUTION:
Do not damage or scratch cover when INFINITI M35 2006 Factory Service Manual EM-14
[VQ35DE]
ENGINE ROOM COVER
Revision: 2006 January2006 M35/M45
ENGINE ROOM COVERPFP:14049
ComponentsNBS004MS
Removal and InstallationNBS004MT
REMOVAL
CAUTION:
Do not damage or scratch cover when](/manual-img/42/57023/w960_57023-3076.png)
EM-14
[VQ35DE]
ENGINE ROOM COVER
Revision: 2006 January2006 M35/M45
ENGINE ROOM COVERPFP:14049
ComponentsNBS004MS
Removal and InstallationNBS004MT
REMOVAL
CAUTION:
Do not damage or scratch cover when installing or removing.
Refer to EM-19, "INTAKE MANIFOLD COLLECTOR" for removal and installation of engine cover.
Refer to EM-17, "AIR CLEANER AND AIR DUCT" for removal and installation of air duct (inlet).
Remove the washer tank cap before removing the engine room cover (RH).
Remove the engine room covers (RH and LH) by lifting the clipped point using a clip driver.
Major parts and inspection points under each cover are as follows; (numbered as in figure)
1. Upper side of engine assembly
2. Battery, relay box
3. Power steering fluid reservoir tank, engine coolant reservoir tank, relay box
4. Engine assembly front side, drive belts, cooling fan
5. Mass air flow sensor, air cleaner case
6. Brake master cylinder, brake booster
INSTALLATION
Installation is the reverse order of removal.
1. Engine cover 2. Battery cover 3. Engine room cover (RH)
4. Air duct (inlet) 5. Engine room cover (LH) 6. Brake master cylinder cover
A. Clip (secure at back surface)
PBIC3824E
Page 3236 of 5621
![INFINITI M35 2006 Factory Service Manual ENGINE ROOM COVER
EM-173
[VK45DE]
C
D
E
F
G
H
I
J
K
L
MA
EM
Revision: 2006 January2006 M35/M45
ENGINE ROOM COVERPFP:14049
ComponentsNBS004OI
Removal and InstallationNBS004OJ
REMOVAL
CAUTION:
Do not da INFINITI M35 2006 Factory Service Manual ENGINE ROOM COVER
EM-173
[VK45DE]
C
D
E
F
G
H
I
J
K
L
MA
EM
Revision: 2006 January2006 M35/M45
ENGINE ROOM COVERPFP:14049
ComponentsNBS004OI
Removal and InstallationNBS004OJ
REMOVAL
CAUTION:
Do not da](/manual-img/42/57023/w960_57023-3235.png)
ENGINE ROOM COVER
EM-173
[VK45DE]
C
D
E
F
G
H
I
J
K
L
MA
EM
Revision: 2006 January2006 M35/M45
ENGINE ROOM COVERPFP:14049
ComponentsNBS004OI
Removal and InstallationNBS004OJ
REMOVAL
CAUTION:
Do not damage or scratch cover when installing or removing.
Refer to EM-179, "INTAKE MANIFOLD" for removal and installation of engine cover.
Refer to EM-177, "AIR CLEANER AND AIR DUCT" for removal and installation of air duct (inlet).
Remove the washer tank cap before removing the engine room cover (RH).
Remove the engine room covers (RH and LH) by lifting the clipped point using a clip driver.
Major parts and inspection points under each cover are as follows; (numbered as in the figure)
1. Upper side of engine assembly
2. Battery, relay box
3. Power steering fluid reservoir tank, engine coolant reservoir tank, relay box
4. Engine assembly front side, drive belts, cooling fan
5. Mass air flow sensor, air cleaner case
6. Brake master cylinder, brake booster
INSTALLATION
Installation is the reverse order of removal.
1. Engine cover 2. Battery cover 3. Engine room cover (RH)
4. Air duct (inlet) 5. Engine room cover (LH) 6. Brake master cylinder cover
A. Clip (secure at back surface)
PBIC3294E
Page 3468 of 5621

PRECAUTIONS
GI-5
C
D
E
F
G
H
I
J
K
L
MB
GI
Revision: 2006 January2006 M35/M45
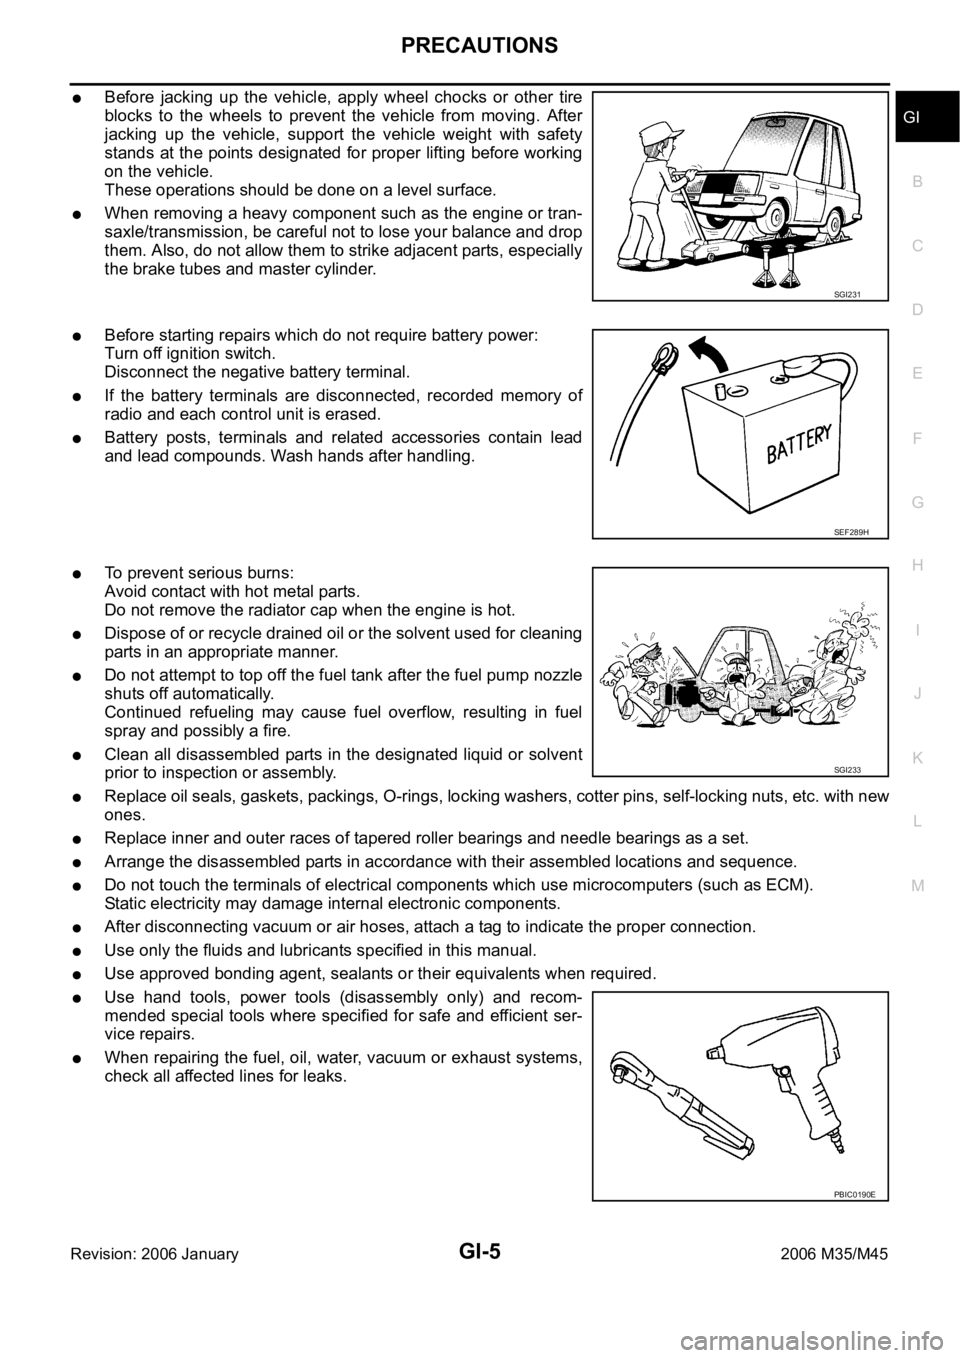
Before jacking up the vehicle, apply wheel chocks or other tire
blocks to the wheels to prevent the vehicle from moving. After
jacking up the vehicle, support the vehicle weight with safety
stands at the points designated for proper lifting before working
on the vehicle.
These operations should be done on a level surface.
When removing a heavy component such as the engine or tran-
saxle/transmission, be careful not to lose your balance and drop
them. Also, do not allow them to strike adjacent parts, especially
the brake tubes and master cylinder.
Before starting repairs which do not require battery power:
Turn off ignition switch.
Disconnect the negative battery terminal.
If the battery terminals are disconnected, recorded memory of
radio and each control unit is erased.
Battery posts, terminals and related accessories contain lead
and lead compounds. Wash hands after handling.
To prevent serious burns:
Avoid contact with hot metal parts.
Do not remove the radiator cap when the engine is hot.
Dispose of or recycle drained oil or the solvent used for cleaning
parts in an appropriate manner.
Do not attempt to top off the fuel tank after the fuel pump nozzle
shuts off automatically.
Continued refueling may cause fuel overflow, resulting in fuel
spray and possibly a fire.
Clean all disassembled parts in the designated liquid or solvent
prior to inspection or assembly.
Replace oil seals, gaskets, packings, O-rings, locking washers, cotter pins, self-locking nuts, etc. with new
ones.
Replace inner and outer races of tapered roller bearings and needle bearings as a set.
Arrange the disassembled parts in accordance with their assembled locations and sequence.
Do not touch the terminals of electrical components which use microcomputers (such as ECM).
Static electricity may damage internal electronic components.
After disconnecting vacuum or air hoses, attach a tag to indicate the proper connection.
Use only the fluids and lubricants specified in this manual.
Use approved bonding agent, sealants or their equivalents when required.
Use hand tools, power tools (disassembly only) and recom-
mended special tools where specified for safe and efficient ser-
vice repairs.
When repairing the fuel, oil, water, vacuum or exhaust systems,
check all affected lines for leaks.
SGI231
SEF289H
SGI233
PBIC0190E
Page 3474 of 5621

HOW TO USE THIS MANUAL
GI-11
C
D
E
F
G
H
I
J
K
L
MB
GI
Revision: 2006 January2006 M35/M45
ComponentsNAS0007L
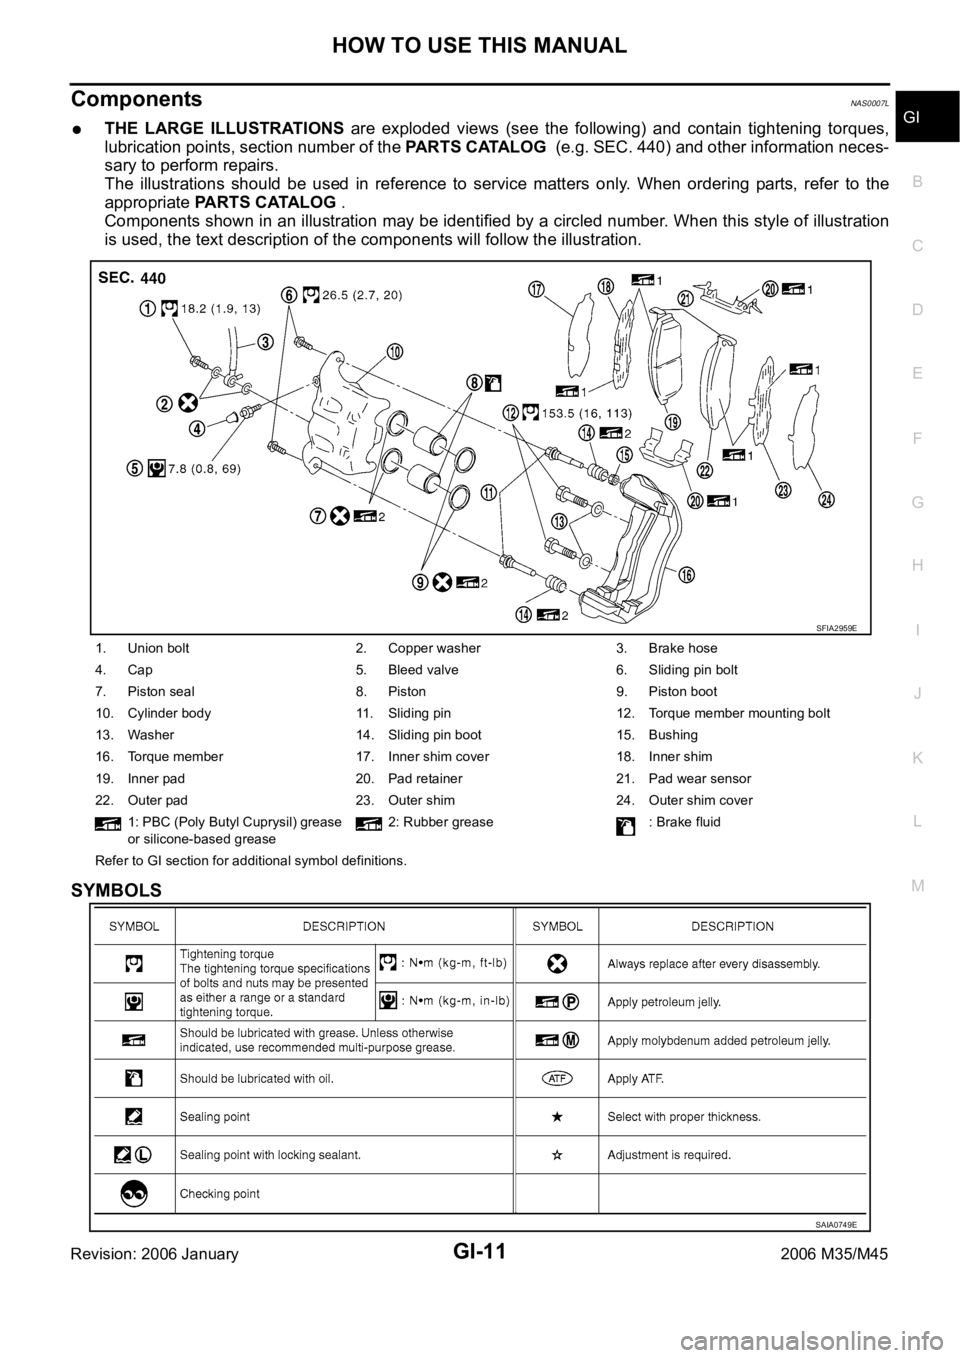
THE LARGE ILLUSTRATIONS are exploded views (see the following) and contain tightening torques,
lubrication points, section number of the PARTS CATALOG (e.g. SEC. 440) and other information neces-
sary to perform repairs.
The illustrations should be used in reference to service matters only. When ordering parts, refer to the
appropriate PARTS CATALOG .
Components shown in an illustration may be identified by a circled number. When this style of illustration
is used, the text description of the components will follow the illustration.
SYMBOLS
1. Union bolt 2. Copper washer 3. Brake hose
4. Cap 5. Bleed valve 6. Sliding pin bolt
7. Piston seal 8. Piston 9. Piston boot
10. Cylinder body 11. Sliding pin 12. Torque member mounting bolt
13. Washer 14. Sliding pin boot 15. Bushing
16. Torque member 17. Inner shim cover 18. Inner shim
19. Inner pad 20. Pad retainer 21. Pad wear sensor
22. Outer pad 23. Outer shim 24. Outer shim cover
1: PBC (Poly Butyl Cuprysil) grease
or silicone-based grease2: Rubber grease : Brake fluid
Refer to GI section for additional symbol definitions.
SFIA2959E
SAIA0749E