2006 INFINITI M35 clutch
[x] Cancel search: clutchPage 3646 of 5621
IDX-5
A
C
D
E
F
G
H
I
J
K
L B
IDX
ALPHABETICAL INDEX
EC-310, EC-1009, EC-1020, EC-1033
Heated oxygen sensor 2 heater (bank 1) ....... EC-189,
EC-911
Heated oxygen sensor 2 heater (bank 2) ....... EC-189,
EC-911
Heated seat ..................................................... SE-143
Heater and cooling unit (Heater core) ........... ATC-135
HFC134a (R134a) system precaution ............... ATC-6
HFC134a (R134a) system service procedure ATC-151
HFC134a (R134a) system service tools .......... ATC-17
HFC134a system service equipment precaution ..........
ATC-13
High and low reverse clutch solenoid valve .... AT-159,
AT-161
Hood ................................................................... BL-15
Horn ................................................................. WW-53
HORN - Wiring diagram ................................... WW-53
How to erase DTC for OBD system ..... EC-67, EC-778
HSEAT - Wiring diagram ................................. SE-146
I
IATS - Wiring diagram ....................... EC-223
, EC-945
ICC - Wiring diagram ....................................... ACS-21
ICC/BS - Wiring diagram ................. EC-578, EC-1304
ICC/SW - Wiring diagram ................ EC-563, EC-1289
ICCBOF - Wiring diagram ................ EC-700, EC-1442
Idle air volume learning ....................... EC-96, EC-807
Idle mixture ratio .................................. EC-84, EC-795
Idle speed .............................. EC-77, EC-788, EC-793
Idle speed control (ISC) .... EC-483, EC-485, EC-1202,
EC-1204
Ignition coil ....................................... EC-666, EC-1407
Ignition coil(VK45DE) ...................................... EM-190
Ignition coil(VQ35DE) ........................................ EM-42
Ignition control system ..................... EC-666, EC-1407
Ignition timing ........................ EC-77, EC-788, EC-793
IGNSYS - Wiring diagram ................ EC-667, EC-1408
Illumination ....................................................... LT-295
Illumination control ................. LT-291, LT-292, LT-293
In vehicle sensor ........................... ATC-116, ATC-127
INJECT - Wiring diagram ................. EC-680, EC-1421
Injector ............................................................. EC-679
Input clutch solenoid valve ................. AT-147, AT-149
Instrument panel .................................................. IP-10
Intake air temperature sensor ........... EC-221, EC-241,
EC-943
, EC-964
Intake door control linkage adjustment ............ ATC-88
Intake door motor ........................... ATC-86, ATC-133
Intake manifold collector(VQ35DE) ................... EM-19
Intake manifold(VK45DE) ................................ EM-179
Intake manifold(VQ35DE) .................................. EM-24
Intake sensor ................................ ATC-122, ATC-129
Intake valve timing control (Bank 1) .. EC-178, EC-891
Intake valve timing control (Bank 2) .. EC-178, EC-891
Intake valve timing control position sensor (Bank 1) ....
EC-1228
Intake valve timing control position sensor (Bank 2) ....
EC-1228
Intake valve timing control solenoid valve (Bank 1) ......
EC-197
, EC-920
Intake valve timing control solenoid valve (Bank 2) ......
EC-197
, EC-920
Integrated homelink transmitter ....................... BL-281
Intelligent cruise control (ICC) system .............. ACS-6
Interior ................................................................. EI-37
Interior lamp ...................................................... LT-267
IPDM (Intelligent power distribution module engine
room) ................................................................. PG-18
IVCB1 - Wiring diagram ..................... EC-198, EC-921
IVCB2 - Wiring diagram ..................... EC-200, EC-923
IVCSB1 - Wiring diagram ............................... EC-1229
IVCSB2 - Wiring diagram ............................... EC-1231
IVIS (Infiniti vehicle immobilizer system) precautions ...
GI-3
IVTB1 - Wiring diagram ................................... EC-894
IVTB2 - Wiring diagram ................................... EC-896
K
Knock sensor (KS) ........................... EC-371
, EC-1094
KS - Wiring diagram ......................... EC-372, EC-1095
L
LAN system circuit ........................................... ATC-70
Lane Departure Warning System ....................... DI-78
Laser beam aiming adjustment ....................... ACS-13
Latch (lower anchors and tether for children) system ...
SB-36
LDW .................................................................... DI-78
LDW - Wiring Diagram ........................................ DI-89
License lamp ..................................................... LT-249
Line pressure solenoid valve ........................... AT-130
Line pressure test (A/T) ..................................... AT-55
Liquid gasket application ......................... EM-7, LU-22
Liquid gasket application(VQ35DE) ........... LU-3, CO-3
Location of electrical units ................................. PG-96
Low coast brake solenoid valve ......... AT-163, AT-165
Low tire pressure warning system ...................... WT-9
Lubricant (R134a) A/C ..................................... ATC-26
Lubrication circuit (engine)(VK45DE) ................ LU-24
Lubrication circuit (engine)(VQ35DE) .................. LU-5
Lubrication oil A/C .......................................... ATC-174
M
MAFS - Wiring diagram ..... EC-208
, EC-216, EC-930,
EC-938
Magnet clutch .................................................. ATC-94
MAIN - Wiring diagram ........ EC-166, EC-879, AT-180
Maintenance (engine)(VQ35DE) ...................... MA-14
Major overhaul (Final drive) .............. FFD-15, RFD-18
Major overhaul (Transfer) .................................. TF-45
Malfunction indicator lamp (MIL) .......... EC-69, EC-780
Manual mode switch ........................................ AT-167
Mass air flow sensor (MAFS) ............ EC-205, EC-214,
EC-927
, EC-936
Page 3648 of 5621
IDX-7
A
C
D
E
F
G
H
I
J
K
L B
IDX
ALPHABETICAL INDEX
LT-266
Rear disc brake ................................................. BR-29
Rear door ............................................ BL-190, GW-67
Rear parcel shelf finisher ..................................... EI-42
Rear seat ......................................................... SE-172
Rear seat belt .................................................... SB-32
Rear suspension ............................................... RSU-5
Rear window ..................................................... GW-61
Rear window defogger ...................................... GW-73
Refrigerant connection precaution ..................... ATC-7
Refrigerant discharging evacuating charging ATC-151
Refrigerant general precaution .......................... ATC-7
Refrigerant lines ............................................ ATC-151
Refrigerant pressure sensor ........... EC-692, EC-1434,
ATC-98
, ATC-167
Refrigeration cycle ........................................... ATC-20
Removal and installation (A/T) ........... AT-271, AT-275
Removal and installation (Transfer) .................... TF-44
Reverse interlock door mirror ........................... GW-96
Revolution sensor (A/T) ...................... AT-119, AT-261
Rocker cover(VK45DE) ................................... EM-199
Rocker cover(VQ35DE) ..................................... EM-51
Room lamp - See Interior lamp ......................... LT-267
ROOM/L - Wiring diagram ................................ LT-274
RP/SEN - Wiring diagram ................ EC-693, EC-1435
S
SAE J1979 - Service $01 - 09 ............. EC-54
, EC-764
SEAT - Wiring diagram ...................................... SE-98
Seat belt inspection ........................................... SB-33
Seat belt, front ................................................... SB-30
Seat belt, rear .................................................... SB-32
Seat, rear ......................................................... SE-172
Self-diagnosis (Transfer) .................................... TF-22
SEN/PW - Wiring diagram ............... EC-500, EC-1219
SHIFT - Wiring diagram ................................... AT-230
Shift lock system .............................................. AT-229
Shock absorber (rear) ..................................... RSU-10
Side air bag (satellite) sensor .......................... SRS-46
Side curtain air bag .......................................... SRS-43
Side trim .............................................................. EI-37
SMJ (super multiple junction) .......................... PG-106
Spark plug replacement ..................................... MA-27
Spark plug replacement(VQ35DE) .................... MA-20
Spark plug(VK45DE) ....................................... EM-191
Spark plug(VQ35DE) ......................................... EM-43
Specification value ............................. EC-155, EC-868
Speedometer ........................................................ DI-5
Spiral cable ...................................................... SRS-40
SROOF - Wiring diagram .................................. RF-13
SRS - See Supplemental Restraint System ...... SRS-5
SRS - Wiring diagram ...................................... SRS-12
SRS Trouble diagnoses ..................................... SRS-8
Stabilizer bar (rear) ......................................... RSU-17
Stall test (A/T) .................................................... AT-53
Standardized relay ........................................... PG-109
START - Wiring diagram ................................... SC-11
Starter ................................................................ SC-10
Starting system .................................................. SC-10
Steering gear and linkage inspection ................ MA-36
Steering linkage ................................................. PS-18
Steering wheel and column ................... PS-10, PS-13
Steering wheel turning force .............................. PS-10
Stop lamp .......................................................... LT-243
Stop lamp switch .............................. EC-598, EC-1329
STSIG - Wiring diagram ................................... AT-109
Sun roof, electric ................................................ RF-10
Sunload sensor ............................. ATC-119, ATC-128
Sunroof .................................................. RF-25, RF-28
Sunshade ............................................................ EI-44
Supplemental Restraint System ....................... SRS-5
Supplemental restraint system - Wiring diagram ..........
SRS-12
Suspension ....................................................... MA-37
Symbols and abbreviations ...................... GI-11, GI-24
System readiness test (SRT) code ...... EC-60, EC-770
T
Tachometer ........................................................... DI-5
Tail lamp ........................................................... LT-249
TCM circuit diagram ........................................... AT-52
TCM inspection table ......................................... AT-89
Thermostat(VK45DE) ....................................... CO-55
Thermostat(VQ35DE) ....................................... CO-29
Three way catalyst function (Bank 1) EC-392, EC-1113
Three way catalyst function (Bank 2) EC-392, EC-1113
Three way catalyst precautions ............................ GI-6
Three way catalyst(VK45DE) .......................... EM-183
Throttle control motor ....................... EC-619, EC-1351
Throttle control motor relay .............. EC-607, EC-1338
Throttle position sensor (TPS) .......... EC-231, EC-354,
EC-533
, EC-535, EC-640, EC-954, EC-1077, EC-1259,
EC-1261
, EC-1372
Throttle valve closed position learning . EC-95, EC-806
Tie-rod ............................................................... PS-18
Timing chain(VK45DE) ................................... EM-203
Timing chain(VQ35DE) ..................................... EM-64
Tire rotation ....................................................... MA-35
TLID - Wiring diagram ...................................... BL-211
Top tether strap child restraint ........................... SB-37
Torque converter installation ............. AT-274, AT-277
Torque convertor clutch solenoid valve AT-126, AT-128
TPS1 - Wiring diagram .................... EC-356, EC-1079
TPS2 - Wiring diagram ...................... EC-233, EC-956
TPS3 - Wiring diagram .................... EC-642, EC-1374
Transfer control unit inspection table ................. TF-20
TRNSCV - Wiring diagram ............................... BL-281
Trouble diagnoses .............................................. GI-12
Trunk lid ........................................................... BL-203
Trunk lid opener - See Trunk lid ...................... BL-209
TURN - Wiring diagram .................................... LT-215
Turn signal lamp ............................................... LT-211
Two trip detection logic ........................ EC-54, EC-764
Tyre pressure monitoring system - trouble diagnoses ..
WT-13
Page 3654 of 5621
SQUEAK AND RATTLE TROUBLE DIAGNOSES
IP-5
C
D
E
F
G
H
J
K
L
MA
B
IP
Revision: 2006 January2006 M35/M45
DUPLICATE THE NOISE AND TEST DRIVE
If possible, drive the vehicle with the customer until the noise is duplicated. Note any additional information on
the Diagnostic Worksheet regarding the conditions or location of the noise. This information can be used to
duplicate the same conditions when you confirm the repair.
If the noise can be duplicated easily during the test drive, to help identify the source of the noise, try to dupli-
cate the noise with the vehicle stopped by doing one or all of the following:
1) Close a door.
2) Tap or push/pull around the area where the noise appears to be coming from.
3) Rev the engine.
4) Use a floor jack to recreate vehicle “twist”.
5) At idle, apply engine load (electrical load, half-clutch on M/T models, drive position on A/T models).
6) Raise the vehicle on a hoist and hit a tire with a rubber hammer.
Drive the vehicle and attempt to duplicate the conditions the customer states exist when the noise occurs.
If it is difficult to duplicate the noise, drive the vehicle slowly on an undulating or rough road to stress the
vehicle body.
CHECK RELATED SERVICE BULLETINS
After verifying the customer concern or symptom, check ASIST for Technical Service Bulletins (TSBs) related
to that concern or symptom.
If a TSB relates to the symptom, follow the procedure to repair the noise.
LOCATE THE NOISE AND IDENTIFY THE ROOT CAUSE
1. Narrow down the noise to a general area. To help pinpoint the source of the noise, use a listening tool
(Chassis Ear: J-39570, Engine Ear and mechanics stethoscope).
2. Narrow down the noise to a more specific area and identify the cause of the noise by:
removing the components in the area that you suspect the noise is coming from.
Do not use too much force when removing clips and fasteners, otherwise clips and fastener can be broken
or lost during the repair, resulting in the creation of new noise.
tapping or pushing/pulling the component that you suspect is causing the noise.
Do not tap or push/pull the component with excessive force, otherwise the noise will be eliminated only
temporarily.
feeling for a vibration with your hand by touching the component(s) that you suspect is (are) causing the
noise.
placing a piece of paper between components that you suspect are causing the noise.
looking for loose components and contact marks.
Refer to IP-6, "
Generic Squeak and Rattle Troubleshooting" .
REPAIR THE CAUSE
If the cause is a loose component, tighten the component securely.
If the cause is insufficient clearance between components:
–separate components by repositioning or loosening and retightening the component, if possible.
–insulate components with a suitable insulator such as urethane pads, foam blocks, felt cloth tape or ure-
thane tape. A Nissan Squeak and Rattle Kit (J-43980) is available through your authorized Nissan Parts
Department.
CAUTION:
Do not use excessive force as many components are constructed of plastic and may be damaged.
NOTE:
Always check with the Parts Department for the latest parts information.
The following materials are contained in the Nissan Squeak and Rattle Kit (J-43980). Each item can be
ordered separately as needed.
URETHANE PADS [1.5 mm (0.059 in) thick]
Insulates connectors, harness, etc.
76268-9E005: 100
135 mm (3.945.31 in)/76884-71L01: 6085 mm (2.363.35 in)/76884-
71L02: 15
25 mm (0.590.98 in)
INSULATOR (Foam blocks)
Insulates components from contact. Can be used to fill space behind a panel.
73982-9E000: 45 mm (1.77 in) thick, 50
50 mm (1.971.97 in)/73982-50Y00:
10 mm (0.39 in) thick, 50
50 mm (1.971.97 in)
Page 4807 of 5621
MA-30
CHASSIS AND BODY MAINTENANCE
Revision: 2006 January2006 M35/M45
NOTE:
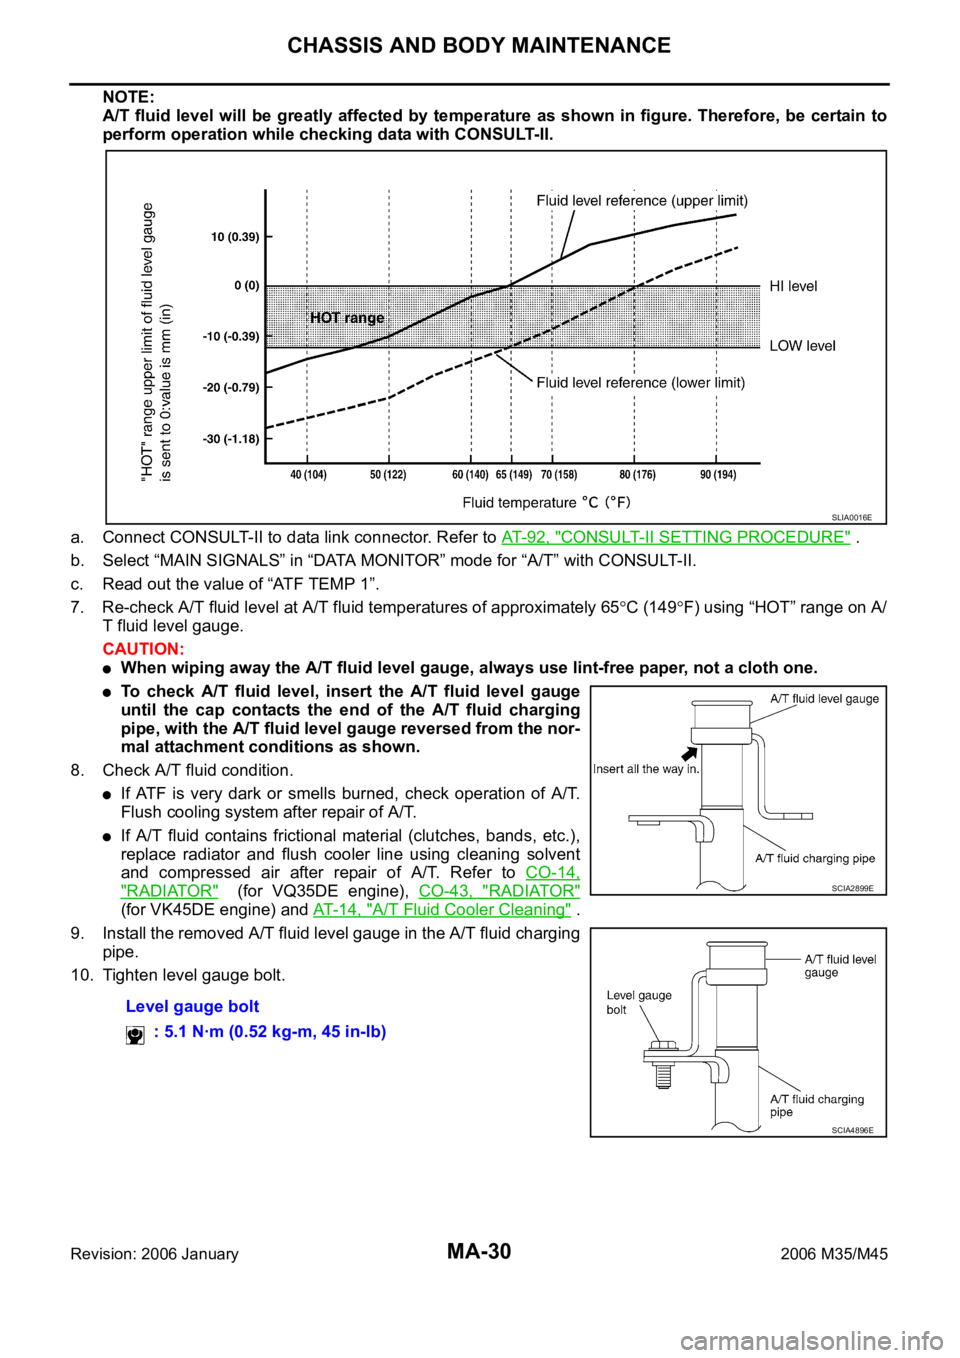
A/T fluid level will be greatly affected by temperature as shown in figure. Therefore, be certain to
perform operation while checking data with CONSULT-II.
a. Connect CONSULT-II to data link connector. Refer to AT-92, "
CONSULT-II SETTING PROCEDURE" .
b. Select “MAIN SIGNALS” in “DATA MONITOR” mode for “A/T” with CONSULT-II.
c. Read out the value of “ATF TEMP 1”.
7. Re-check A/T fluid level at A/T fluid temperatures of approximately 65
C (149F) using “HOT” range on A/
T fluid level gauge.
CAUTION:
When wiping away the A/T fluid level gauge, always use lint-free paper, not a cloth one.
To check A/T fluid level, insert the A/T fluid level gauge
until the cap contacts the end of the A/T fluid charging
pipe, with the A/T fluid level gauge reversed from the nor-
mal attachment conditions as shown.
8. Check A/T fluid condition.
If ATF is very dark or smells burned, check operation of A/T.
Flush cooling system after repair of A/T.
If A/T fluid contains frictional material (clutches, bands, etc.),
replace radiator and flush cooler line using cleaning solvent
and compressed air after repair of A/T. Refer to CO-14,
"RADIATOR" (for VQ35DE engine), CO-43, "RADIATOR"
(for VK45DE engine) and AT- 1 4 , "A/T Fluid Cooler Cleaning" .
9. Install the removed A/T fluid level gauge in the A/T fluid charging
pipe.
10. Tighten level gauge bolt.
Level gauge bolt
: 5.1 Nꞏm (0.52 kg-m, 45 in-lb)
SLIA0016E
SCIA2899E
SCIA4896E
Page 4851 of 5621
PG-24
IPDM E/R (INTELLIGENT POWER DISTRIBUTION MODULE ENGINE ROOM)
Revision: 2006 January2006 M35/M45
Auto Active TestNKS004E7
DESCRIPTION
In auto active test mode, operation inspection can be performed when IPDM E/R sends a drive signal to the
following systems:
Rear window defogger
Front wiper (LO, HI)
Tail lamps, parking lamps and license plate lamps
Front fog lamps
Headlamps (LO, HI)
A/C compressor (magnetic clutch)
Cooling fan
Oil pressure warning lamp
OPERATION PROCEDURE
1. Close hood and front door (passenger side), and then lift wiper arms away from windshield (to prevent
glass damage by wiper operation).
NOTE:
When auto active test is performed with hood opened, sprinkle water on windshield beforehand.
2. Turn ignition switch OFF.
3. Turn ignition switch ON, and within 20 seconds, press driver's door switch 10 times (close other doors).
Then turn ignition switch OFF.
4. Turn ignition switch ON within 10 seconds after ignition switch OFF.
5. When auto active test mode is actuated, horn chirps once. Oil pressure warning lamp starts blinking.
6. After a series of operations is repeated three times, auto active test is completed.
NOTE:
When auto active test mode has to be cancelled halfway, turn ignition switch OFF.
CAUTION:
Never start the engine.
If the engine starting operation is made, delete DTC on the self-diag results of CONSULT-II.
Refer to BL-81, "
CONSULT-II Application Items" .
Be sure to inspect GW-52, "Door Switch Check" when the auto active test cannot be performed.
Page 4852 of 5621
IPDM E/R (INTELLIGENT POWER DISTRIBUTION MODULE ENGINE ROOM)
PG-25
C
D
E
F
G
H
I
J
L
MA
B
PG
Revision: 2006 January2006 M35/M45
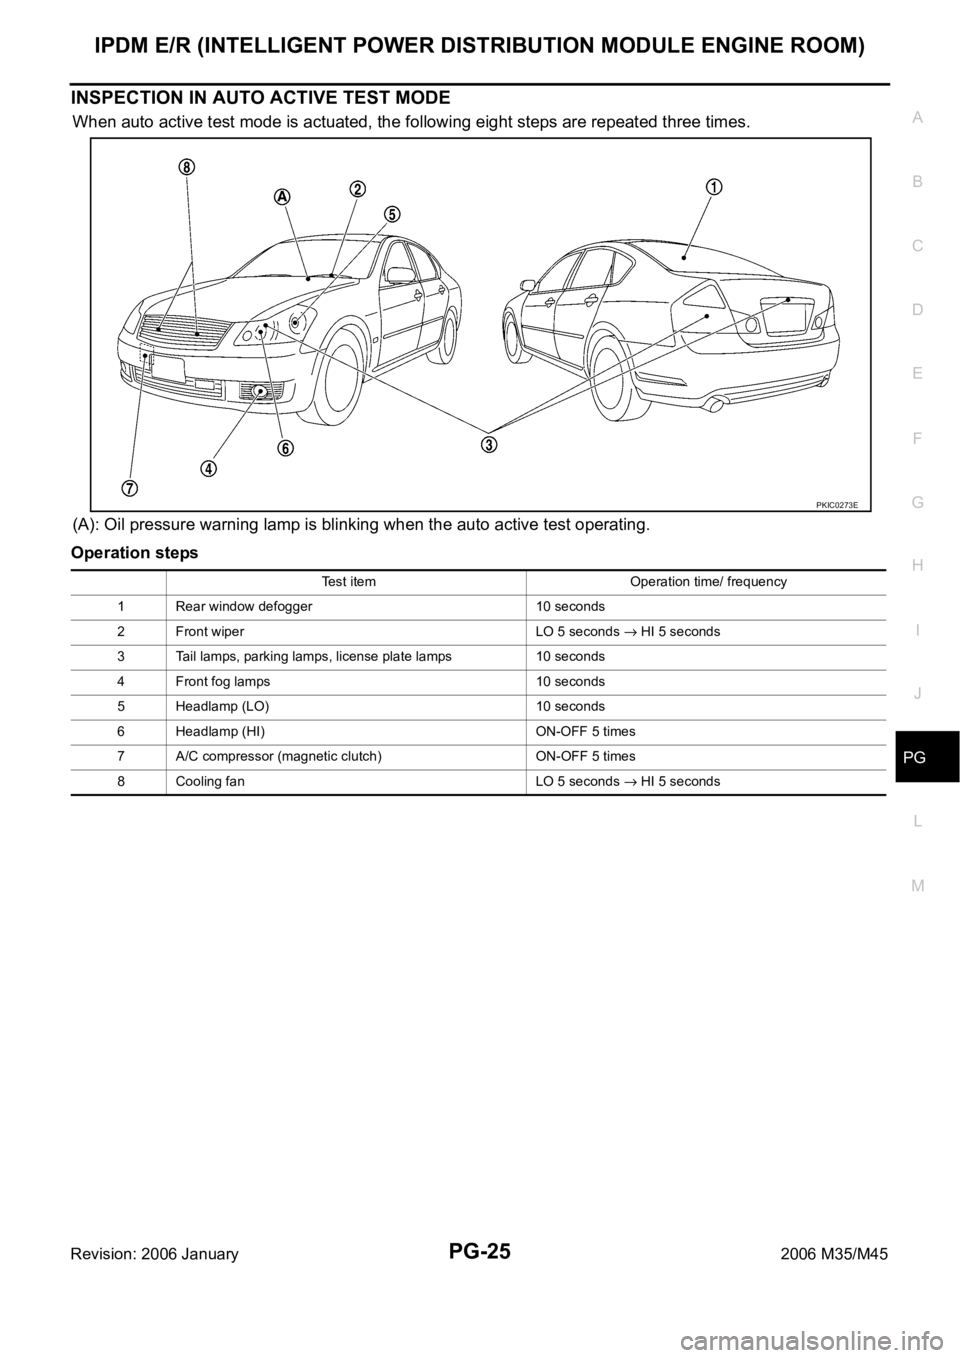
INSPECTION IN AUTO ACTIVE TEST MODE
When auto active test mode is actuated, the following eight steps are repeated three times.
(A): Oil pressure warning lamp is blinking when the auto active test operating.
Operation steps
PKIC0273E
Test item Operation time/ frequency
1 Rear window defogger 10 seconds
2 Front wiper LO 5 seconds
HI 5 seconds
3 Tail lamps, parking lamps, license plate lamps 10 seconds
4 Front fog lamps 10 seconds
5 Headlamp (LO) 10 seconds
6 Headlamp (HI) ON-OFF 5 times
7 A/C compressor (magnetic clutch) ON-OFF 5 times
8 Cooling fan LO 5 seconds
HI 5 seconds
Page 4853 of 5621
PG-26
IPDM E/R (INTELLIGENT POWER DISTRIBUTION MODULE ENGINE ROOM)
Revision: 2006 January2006 M35/M45
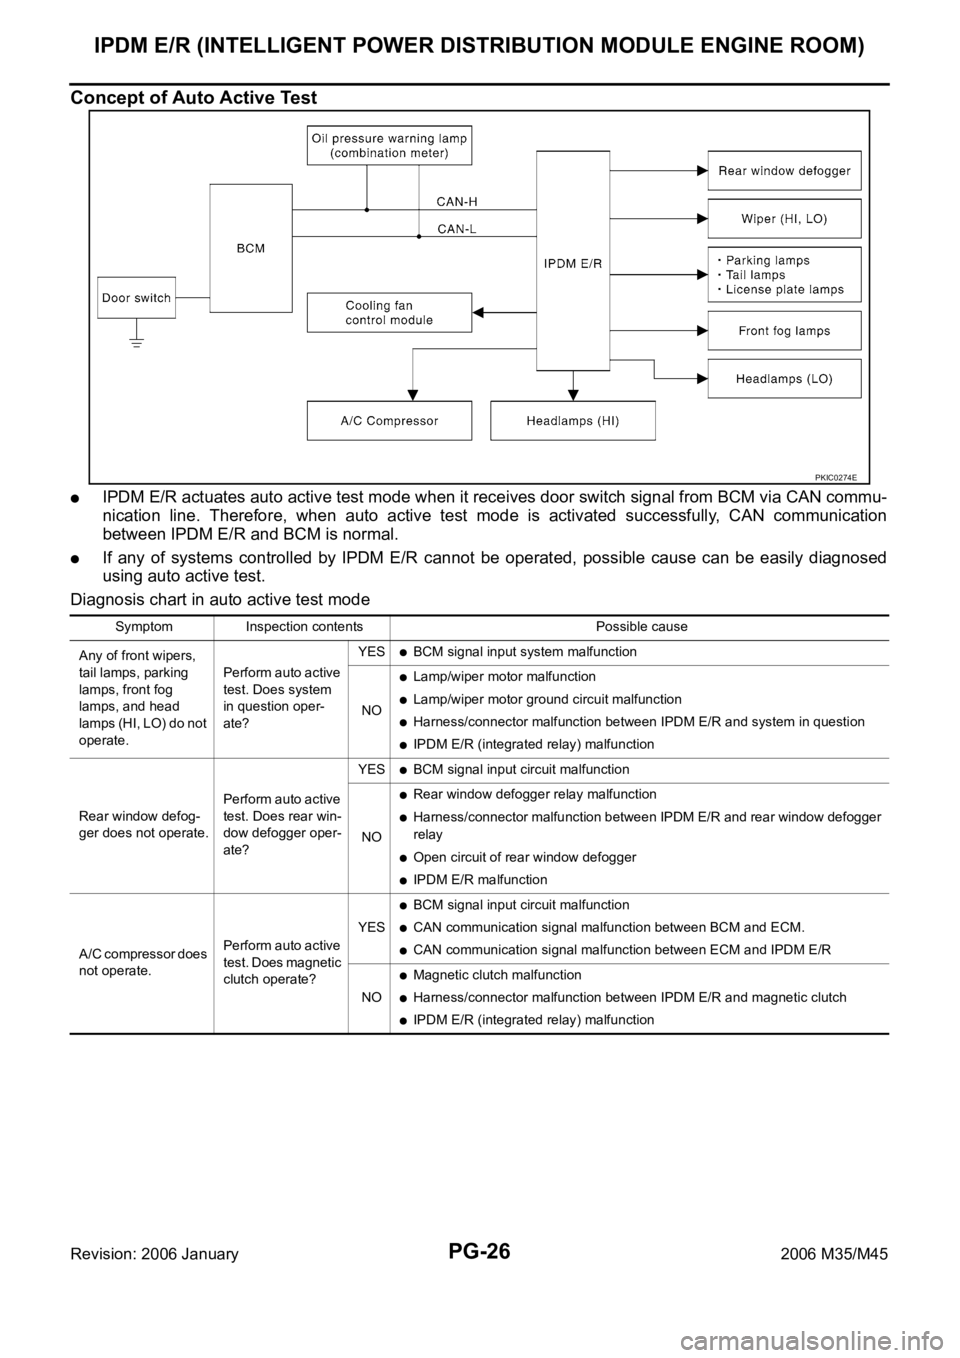
Concept of Auto Active Test
IPDM E/R actuates auto active test mode when it receives door switch signal from BCM via CAN commu-
nication line. Therefore, when auto active test mode is activated successfully, CAN communication
between IPDM E/R and BCM is normal.
If any of systems controlled by IPDM E/R cannot be operated, possible cause can be easily diagnosed
using auto active test.
Diagnosis chart in auto active test mode
PKIC0274E
Symptom Inspection contents Possible cause
Any of front wipers,
tail lamps, parking
lamps, front fog
lamps, and head
lamps (HI, LO) do not
operate.Perform auto active
test. Does system
in question oper-
ate?YES
BCM signal input system malfunction
NO
Lamp/wiper motor malfunction
Lamp/wiper motor ground circuit malfunction
Harness/connector malfunction between IPDM E/R and system in question
IPDM E/R (integrated relay) malfunction
Rear window defog-
ger does not operate.Perform auto active
test. Does rear win-
dow defogger oper-
ate?YES
BCM signal input circuit malfunction
NO
Rear window defogger relay malfunction
Harness/connector malfunction between IPDM E/R and rear window defogger
relay
Open circuit of rear window defogger
IPDM E/R malfunction
A/C compressor does
not operate.Perform auto active
test. Does magnetic
clutch operate?YES
BCM signal input circuit malfunction
CAN communication signal malfunction between BCM and ECM.
CAN communication signal malfunction between ECM and IPDM E/R
NO
Magnetic clutch malfunction
Harness/connector malfunction between IPDM E/R and magnetic clutch
IPDM E/R (integrated relay) malfunction
Page 5018 of 5621
SQUEAK AND RATTLE TROUBLE DIAGNOSES
RF-5
C
D
E
F
G
H
J
K
L
MA
B
RF
Revision: 2006 January2006 M35/M45
DUPLICATE THE NOISE AND TEST DRIVE
If possible, drive the vehicle with the customer until the noise is duplicated. Note any additional information on
the Diagnostic Worksheet regarding the conditions or location of the noise. This information can be used to
duplicate the same conditions when you confirm the repair.
If the noise can be duplicated easily during the test drive, to help identify the source of the noise, try to dupli-
cate the noise with the vehicle stopped by doing one or all of the following:
1) Close a door.
2) Tap or push/pull around the area where the noise appears to be coming from.
3) Rev the engine.
4) Use a floor jack to recreate vehicle “twist”.
5) At idle, apply engine load (electrical load, half-clutch on M/T models, drive position on A/T models).
6) Raise the vehicle on a hoist and hit a tire with a rubber hammer.
Drive the vehicle and attempt to duplicate the conditions the customer states exist when the noise occurs.
If it is difficult to duplicate the noise, drive the vehicle slowly on an undulating or rough road to stress the
vehicle body.
CHECK RELATED SERVICE BULLETINS
After verifying the customer concern or symptom, check ASIST for Technical Service Bulletins (TSBs) related
to that concern or symptom.
If a TSB relates to the symptom, follow the procedure to repair the noise.
LOCATE THE NOISE AND IDENTIFY THE ROOT CAUSE
1. Narrow down the noise to a general area. To help pinpoint the source of the noise, use a listening tool
(Chassis Ear: J-39570, Engine Ear and mechanics stethoscope).
2. Narrow down the noise to a more specific area and identify the cause of the noise by:
removing the components in the area that you suspect the noise is coming from.
Do not use too much force when removing clips and fasteners, otherwise clips and fastener can be broken
or lost during the repair, resulting in the creation of new noise.
tapping or pushing/pulling the component that you suspect is causing the noise.
Do not tap or push/pull the component with excessive force, otherwise the noise will be eliminated only
temporarily.
feeling for a vibration with your hand by touching the component(s) that you suspect is (are) causing the
noise.
placing a piece of paper between components that you suspect are causing the noise.
looking for loose components and contact marks.
Refer to RF-6, "
Generic Squeak and Rattle Troubleshooting" .
REPAIR THE CAUSE
If the cause is a loose component, tighten the component securely.
If the cause is insufficient clearance between components:
–separate components by repositioning or loosening and retightening the component, if possible.
–insulate components with a suitable insulator such as urethane pads, foam blocks, felt cloth tape or ure-
thane tape. A Nissan Squeak and Rattle Kit (J-43980) is available through your authorized Nissan Parts
Department.
CAUTION:
Do not use excessive force as many components are constructed of plastic and may be damaged.
NOTE:
Always check with the Parts Department for the latest parts information.
The following materials are contained in the Nissan Squeak and Rattle Kit (J-43980). Each item can be
ordered separately as needed.
URETHANE PADS [1.5 mm (0.059 in) thick]
Insulates connectors, harness, etc.
76268-9E005: 100
135 mm (3.945.31 in)/76884-71L01: 6085 mm (2.363.35 in)/76884-
71L02: 15
25 mm (0.590.98 in)
INSULATOR (Foam blocks)
Insulates components from contact. Can be used to fill space behind a panel.
73982-9E000: 45 mm (1.77 in) thick, 50
50 mm (1.971.97 in)/73982-50Y00:
10 mm (0.39 in) thick, 50
50 mm (1.971.97 in)