2006 INFINITI M35 brake light
[x] Cancel search: brake lightPage 4523 of 5621

LT-96
HEADLAMP (FOR CANADA) - DAYTIME LIGHT SYSTEM -
Revision: 2006 January2006 M35/M45
NOTE:
This item is displayed, but cannot be monitored.
ACTIVE TEST
Operation Procedure
1. Touch “HEAD LAMP” on “SELECT TEST ITEM” screen.
2. Touch “ACTIVE TEST” on “SELECT DIAG MODE” screen.
3. Touch item to be tested and check operation of the selected item.
4. During the operation check, touching “BACK” deactivates the operation.
Display Item List
DOOR SW - RL “ON/OFF”Displays status of the rear door as judged from the rear door switch (LH) signal. (door is open:
ON/door is closed: OFF)
BACK DOOR SW
NOTE “OFF” —
PKB SW “ON/OFF”Displays status (parking brake released: ON/ parking brake applied: OFF) of parking brake
switch judged from parking brake switch signal.
ENGINE RUN “ON/OFF”Displays status (engine running: ON/ engine stopped: OFF) of engine judged from engine run
signal.
OPTICAL SENSOR “0 - 5V” Displays “outside brightness (close to 5V when light/close to 0V when dark)” judged from opti-
cal sensor signal.
VEHICLE SPEED “km/h” Displays vehicle speed as judged from vehicle speed signal. Monitor item Contents
Test item Description
TAIL LAMP Allows tail lamp relay to operate by switching ON-OFF.
FR FOG LAMP Allows front fog lamp relay to operate by switching ON-OFF.
DAYTIME RUNNING LIGHT Allows daytime relay to operate by switching ON-OFF.
HEAD LAMP (HI, LO) Allows headlamp relay to operate by switching ON-OFF.
Page 4526 of 5621
HEADLAMP (FOR CANADA) - DAYTIME LIGHT SYSTEM -
LT-99
C
D
E
F
G
H
I
J
L
MA
B
LT
Revision: 2006 January2006 M35/M45
Daytime Light Control Does Not Operate Properly (Normal Headlamps Operate
Properly)
NKS003PK
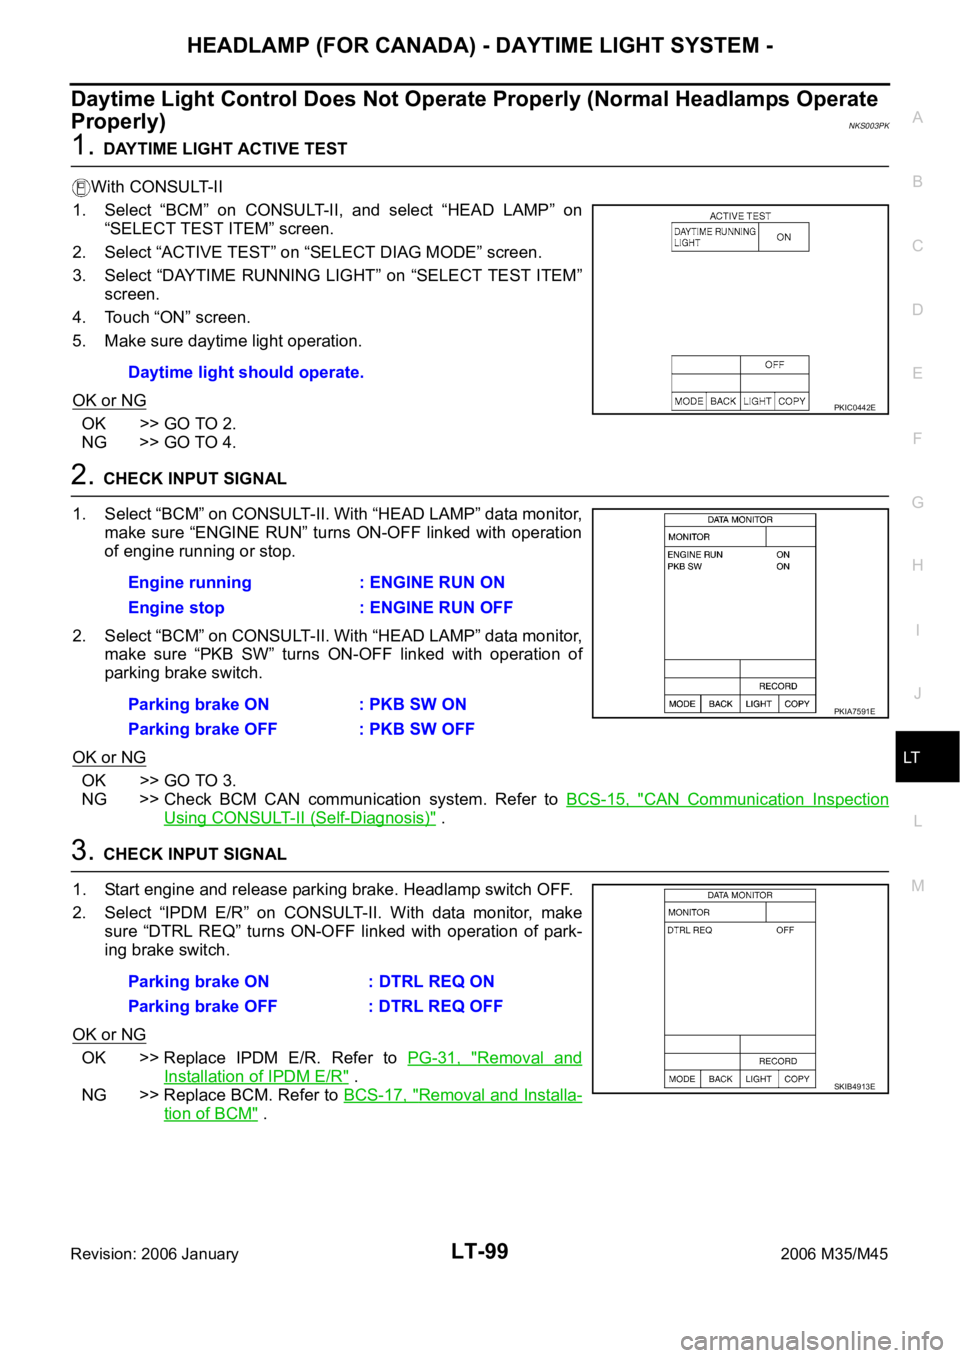
1. DAYTIME LIGHT ACTIVE TEST
With CONSULT-II
1. Select “BCM” on CONSULT-II, and select “HEAD LAMP” on
“SELECT TEST ITEM” screen.
2. Select “ACTIVE TEST” on “SELECT DIAG MODE” screen.
3. Select “DAYTIME RUNNING LIGHT” on “SELECT TEST ITEM”
screen.
4. Touch “ON” screen.
5. Make sure daytime light operation.
OK or NG
OK >> GO TO 2.
NG >> GO TO 4.
2. CHECK INPUT SIGNAL
1. Select “BCM” on CONSULT-II. With “HEAD LAMP” data monitor,
make sure “ENGINE RUN” turns ON-OFF linked with operation
of engine running or stop.
2. Select “BCM” on CONSULT-II. With “HEAD LAMP” data monitor,
make sure “PKB SW” turns ON-OFF linked with operation of
parking brake switch.
OK or NG
OK >> GO TO 3.
NG >> Check BCM CAN communication system. Refer to BCS-15, "
CAN Communication Inspection
Using CONSULT-II (Self-Diagnosis)" .
3. CHECK INPUT SIGNAL
1. Start engine and release parking brake. Headlamp switch OFF.
2. Select “IPDM E/R” on CONSULT-II. With data monitor, make
sure “DTRL REQ” turns ON-OFF linked with operation of park-
ing brake switch.
OK or NG
OK >> Replace IPDM E/R. Refer to PG-31, "Removal and
Installation of IPDM E/R" .
NG >> Replace BCM. Refer to BCS-17, "
Removal and Installa-
tion of BCM" . Daytime light should operate.
PKIC0442E
Engine running : ENGINE RUN ON
Engine stop : ENGINE RUN OFF
Parking brake ON : PKB SW ON
Parking brake OFF : PKB SW OFF
PKIA7591E
Parking brake ON : DTRL REQ ON
Parking brake OFF : DTRL REQ OFF
SKIB4913E
Page 4528 of 5621
HEADLAMP (FOR CANADA) - DAYTIME LIGHT SYSTEM -
LT-101
C
D
E
F
G
H
I
J
L
MA
B
LT
Revision: 2006 January2006 M35/M45
7. CHECK DAYTIME LIGHT RELAY SIGNAL
1. Connect IPDM E/R connector.
2. Install daytime light relay.
3. Turn ignition switch ON.
4. Applied parking brake.
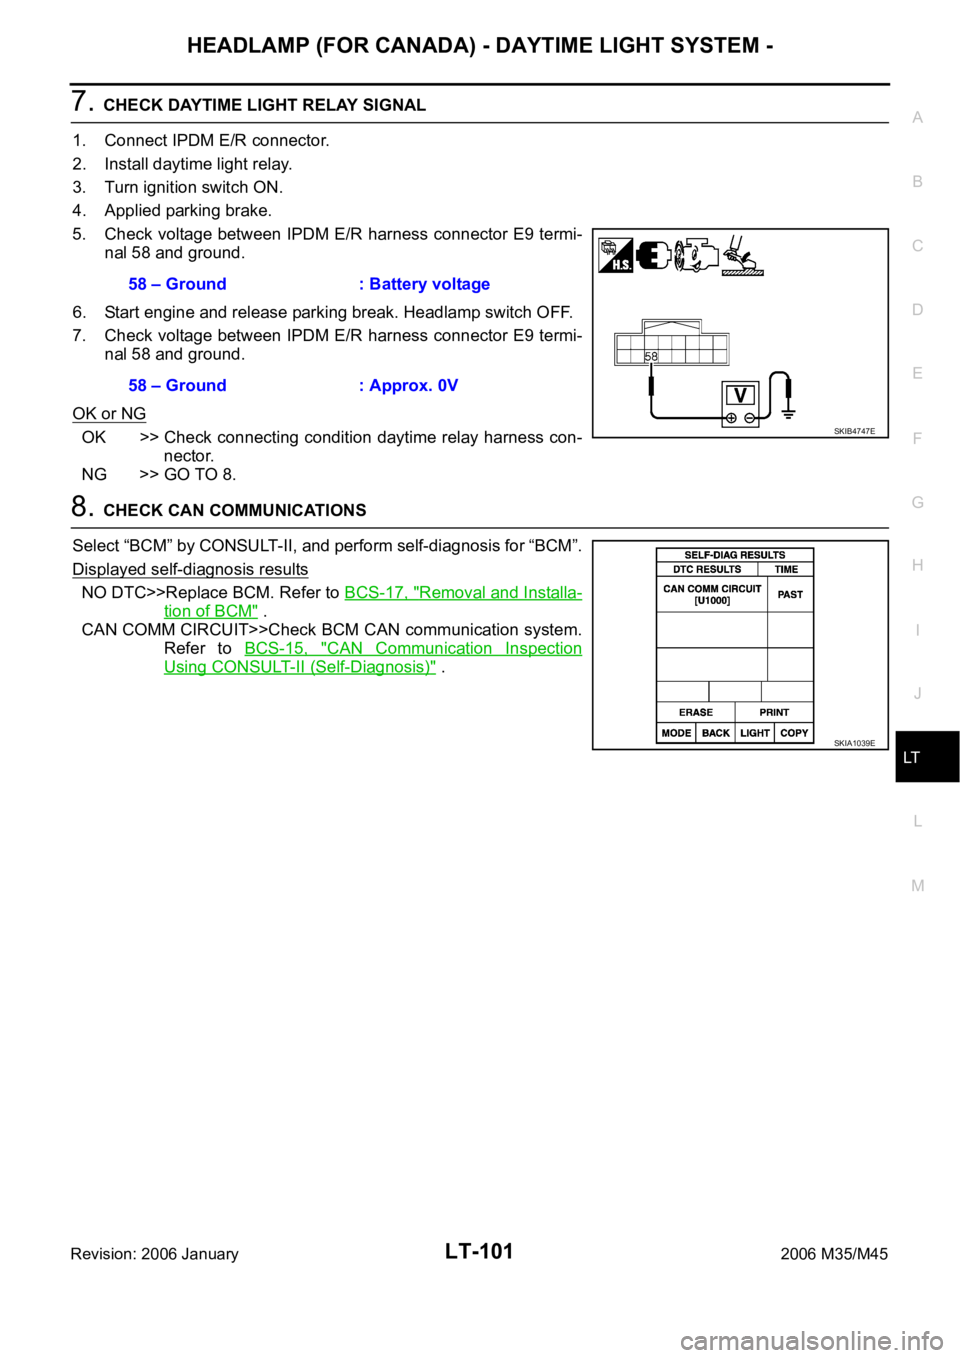
5. Check voltage between IPDM E/R harness connector E9 termi-
nal 58 and ground.
6. Start engine and release parking break. Headlamp switch OFF.
7. Check voltage between IPDM E/R harness connector E9 termi-
nal 58 and ground.
OK or NG
OK >> Check connecting condition daytime relay harness con-
nector.
NG >> GO TO 8.
8. CHECK CAN COMMUNICATIONS
Select “BCM” by CONSULT-II, and perform self-diagnosis for “BCM”.
Displayed self-diagnosis results
NO DTC>>Replace BCM. Refer to BCS-17, "Removal and Installa-
tion of BCM" .
CAN COMM CIRCUIT>>Check BCM CAN communication system.
Refer to BCS-15, "
CAN Communication Inspection
Using CONSULT-II (Self-Diagnosis)" . 58 – Ground : Battery voltage
58 – Ground : Approx. 0V
SKIB4747E
SKIA1039E
Page 4920 of 5621

HARNESS
PG-93
C
D
E
F
G
H
I
J
L
MA
B
PG
Revision: 2006 January2006 M35/M45
Wiring Diagram Codes (Cell Codes) NKS004ET
Use the chart below to find out what each wiring diagram code stands for.
Refer to the wiring diagram code in the alphabetical index to find the location (page number) of each wiring
diagram.
Code Section Wiring Diagram Name
A/C ATC Air Conditioner
AF1B1 EC Air Fuel Ratio Sensor 1 Bank 1
AF1B2 EC Air Fuel Ratio Sensor 1 Bank 2
AF1HB1 EC Air Fuel Ratio Sensor 1 Heater Bank 1
AF1HB2 EC Air Fuel Ratio Sensor 1 Heater Bank 2
AFS LT Adaptive Front Lighting System
APPS1 EC Accelerator Pedal Position Sensor
APPS2 EC Accelerator Pedal Position Sensor
APPS3 EC Accelerator Pedal Position Sensor
ASC/BS EC Automatic Speed Control Device (ASCD) Brake Switch
ASC/SW EC Automatic Speed Control Device (ASCD) Steering Switch
ASCBOF EC Automatic Speed Control Device (ASCD) Brake Switch
ASCIND EC Automatic Speed Control Device (ASCD) Indicator
AT/IND DI A/T Indicator Lamp
AUT/DP SE Automatic Drive Positioner
AUTO/L LT Automatic Light System
AV AV Audio and Visual System
AWD TF AWD Control System
BACK/L LT Back-Up Lamp
BRK/SW EC Brake Switch
C/SEAT SE Climate Controlled Seat
CAN AT CAN Communication Line
CAN EC CAN Communication Line
CAN LAN CAN System
CHARGE SC Charging System
CHIME DI Warning Chime
CIGAR WW Cigarette Lighter
CLOCK DI Clock
COMBSW LT Combination Switch
COMPAS DI Compass and Thermometer
COOL/F EC Cooling Fan Control
CUR/SE EC Battery Current Sensor
D/LOCK BL Power Door Lock
DEF GW Rear Window Defogger
DTRL LT Headlamp - with Daytime Light System
ECM/PW EC ECM Power Supply for Back-Up
ECTS EC Engine Coolant Temperature Sensor
ENG/ST BL Engine Start System
EPS STC Electric Controlled Power Steering System
ETC1 EC Electric Throttle Control Function
ETC2 EC Electric Throttle Control Motor Relay
Page 4963 of 5621
PS-10
STEERING WHEEL
Revision: 2006 January2006 M35/M45
STEERING WHEELPFP:48430
On-Vehicle Inspection and ServiceNGS000D8
CHECKING CONDITION OF INSTALLATION
Check installation conditions of steering gear assembly, front suspension assembly, axle and steering col-
umn assembly.
Check if movement exists when steering wheel is moved up and down, to the left and right and to the axial
direction.
Check steering gear assembly mounting bolts and nut for looseness. Refer to PS-18, "COMPONENTS" .
CHECKING STEERING WHEEL PLAY
Turn steering wheel so that front wheels come to the straight-ahead position. Start engine and lightly turn
steering wheel to the left and right until front wheels start to move. Measure steering wheel movement on
the outer circumference.
When the measurement value is outside the standard value, check backlash for each joint of steering col-
umn assembly and installation condition of steering gear assembly.
CHECKING NEUTRAL POSITION STEERING WHEEL
Make sure that steering gear assembly, steering column assembly and steering wheel are installed in the
correct position.
Perform neutral position inspection after wheel alignment. Refer to FSU-6, "Wheel Alignment Inspection"
(2WD), FSU-23, "Wheel Alignment Inspection" (AWD).
Set vehicle to the straight-ahead position and confirm steering wheel is in the neutral position.
Loosen outer socket lock nut and turn inner socket to left and right equally to make fine adjustments if
steering wheel is not in the neutral position.
CHECKING STEERING WHEEL TURNING FORCE
1. Park vehicle on a level and dry surface, set parking brake.
2. Start engine.
3. Bring power steering fluid up to adequate operating temperature. [Make sure temperature of fluid is
approximately 50 to 80
C (122 to 176F).]
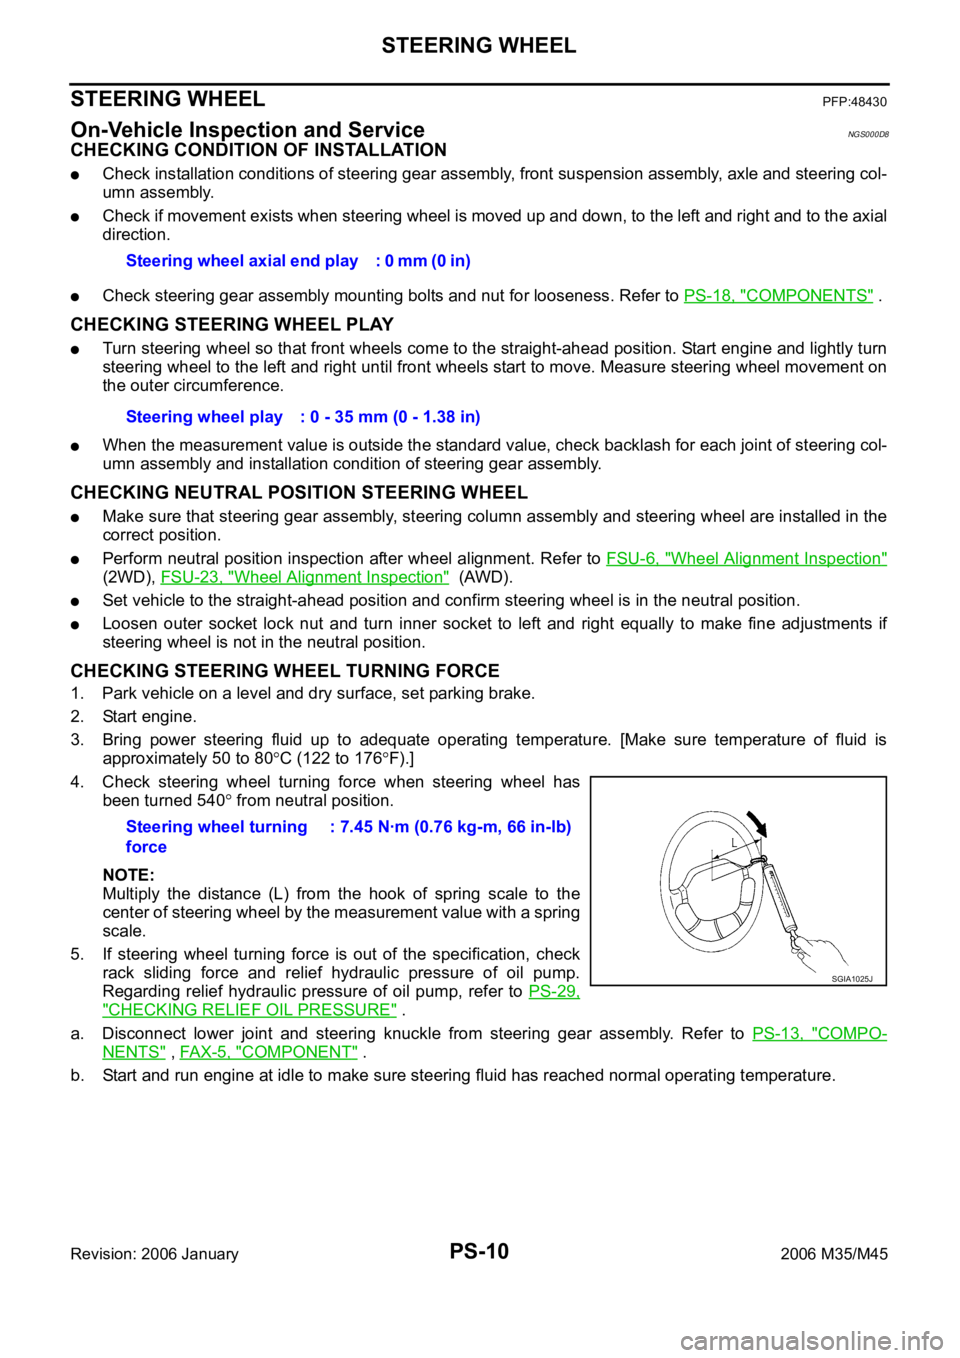
4. Check steering wheel turning force when steering wheel has
been turned 540
from neutral position.
NOTE:
Multiply the distance (L) from the hook of spring scale to the
center of steering wheel by the measurement value with a spring
scale.
5. If steering wheel turning force is out of the specification, check
rack sliding force and relief hydraulic pressure of oil pump.
Regarding relief hydraulic pressure of oil pump, refer to PS-29,
"CHECKING RELIEF OIL PRESSURE" .
a. Disconnect lower joint and steering knuckle from steering gear assembly. Refer to PS-13, "
COMPO-
NENTS" , FAX-5, "COMPONENT" .
b. Start and run engine at idle to make sure steering fluid has reached normal operating temperature. Steering wheel axial end play : 0 mm (0 in)
Steering wheel play : 0 - 35 mm (0 - 1.38 in)
Steering wheel turning
force: 7.45 Nꞏm (0.76 kg-m, 66 in-lb)
SGIA1025J
Page 5005 of 5621
RAX-6
WHEEL HUB
Revision: 2006 January2006 M35/M45
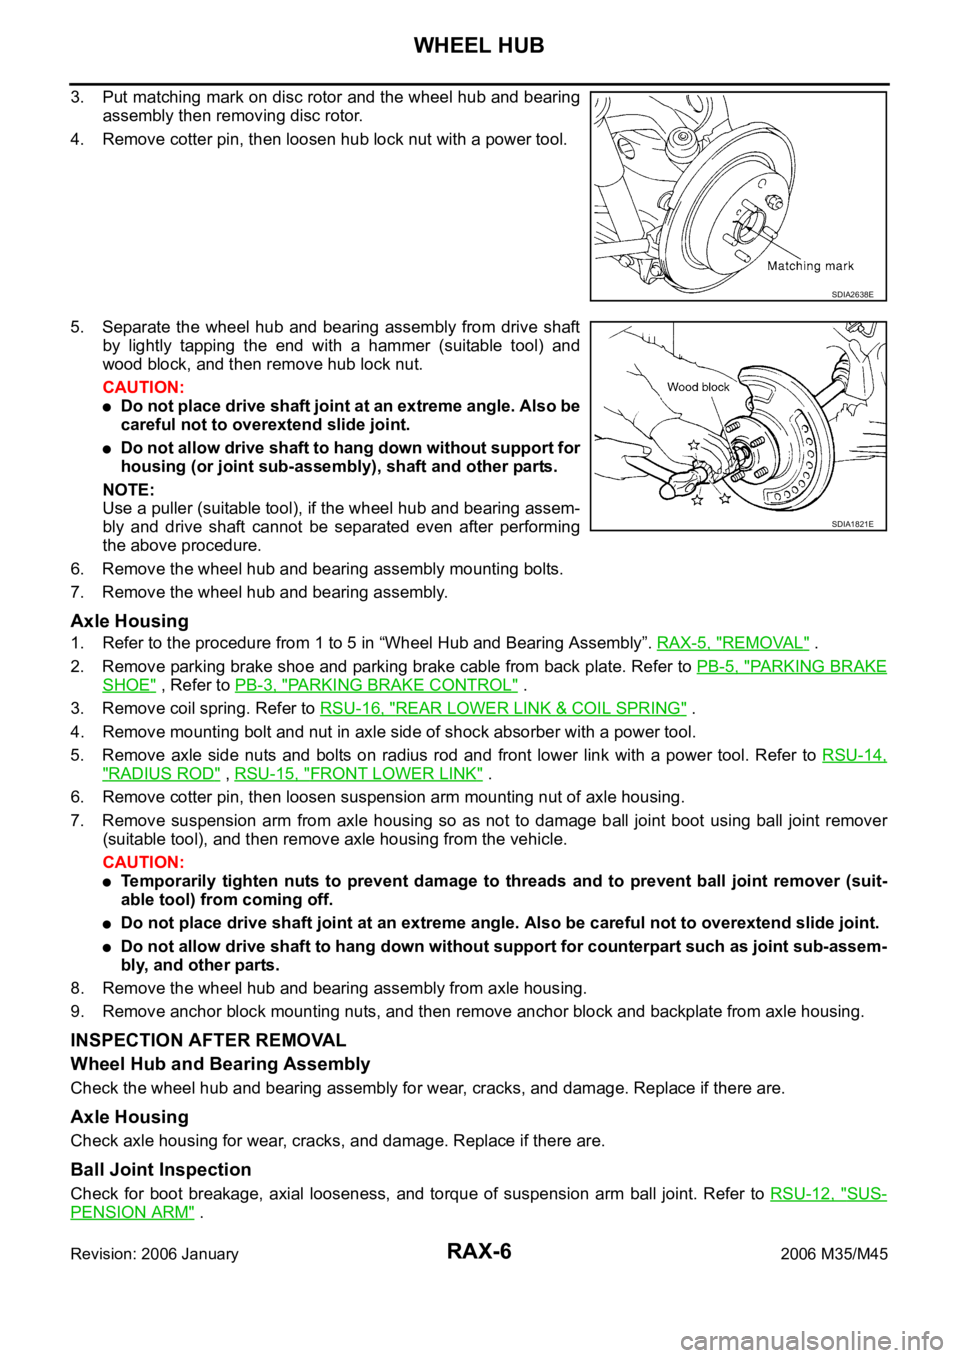
3. Put matching mark on disc rotor and the wheel hub and bearing
assembly then removing disc rotor.
4. Remove cotter pin, then loosen hub lock nut with a power tool.
5. Separate the wheel hub and bearing assembly from drive shaft
by lightly tapping the end with a hammer (suitable tool) and
wood block, and then remove hub lock nut.
CAUTION:
Do not place drive shaft joint at an extreme angle. Also be
careful not to overextend slide joint.
Do not allow drive shaft to hang down without support for
housing (or joint sub-assembly), shaft and other parts.
NOTE:
Use a puller (suitable tool), if the wheel hub and bearing assem-
bly and drive shaft cannot be separated even after performing
the above procedure.
6. Remove the wheel hub and bearing assembly mounting bolts.
7. Remove the wheel hub and bearing assembly.
Axle Housing
1. Refer to the procedure from 1 to 5 in “Wheel Hub and Bearing Assembly”. RAX-5, "REMOVAL" .
2. Remove parking brake shoe and parking brake cable from back plate. Refer to PB-5, "
PA R K I N G B R A K E
SHOE" , Refer to PB-3, "PARKING BRAKE CONTROL" .
3. Remove coil spring. Refer to RSU-16, "
REAR LOWER LINK & COIL SPRING" .
4. Remove mounting bolt and nut in axle side of shock absorber with a power tool.
5. Remove axle side nuts and bolts on radius rod and front lower link with a power tool. Refer to RSU-14,
"RADIUS ROD" , RSU-15, "FRONT LOWER LINK" .
6. Remove cotter pin, then loosen suspension arm mounting nut of axle housing.
7. Remove suspension arm from axle housing so as not to damage ball joint boot using ball joint remover
(suitable tool), and then remove axle housing from the vehicle.
CAUTION:
Temporarily tighten nuts to prevent damage to threads and to prevent ball joint remover (suit-
able tool) from coming off.
Do not place drive shaft joint at an extreme angle. Also be careful not to overextend slide joint.
Do not allow drive shaft to hang down without support for counterpart such as joint sub-assem-
bly, and other parts.
8. Remove the wheel hub and bearing assembly from axle housing.
9. Remove anchor block mounting nuts, and then remove anchor block and backplate from axle housing.
INSPECTION AFTER REMOVAL
Wheel Hub and Bearing Assembly
Check the wheel hub and bearing assembly for wear, cracks, and damage. Replace if there are.
Axle Housing
Check axle housing for wear, cracks, and damage. Replace if there are.
Ball Joint Inspection
Check for boot breakage, axial looseness, and torque of suspension arm ball joint. Refer to RSU-12, "SUS-
PENSION ARM" .
SDIA2638E
SDIA1821E
Page 5112 of 5621
PRE-CRASH SEAT BELT
SB-13
C
D
E
F
G
I
J
K
L
MA
B
SB
Revision: 2006 January2006 M35/M45
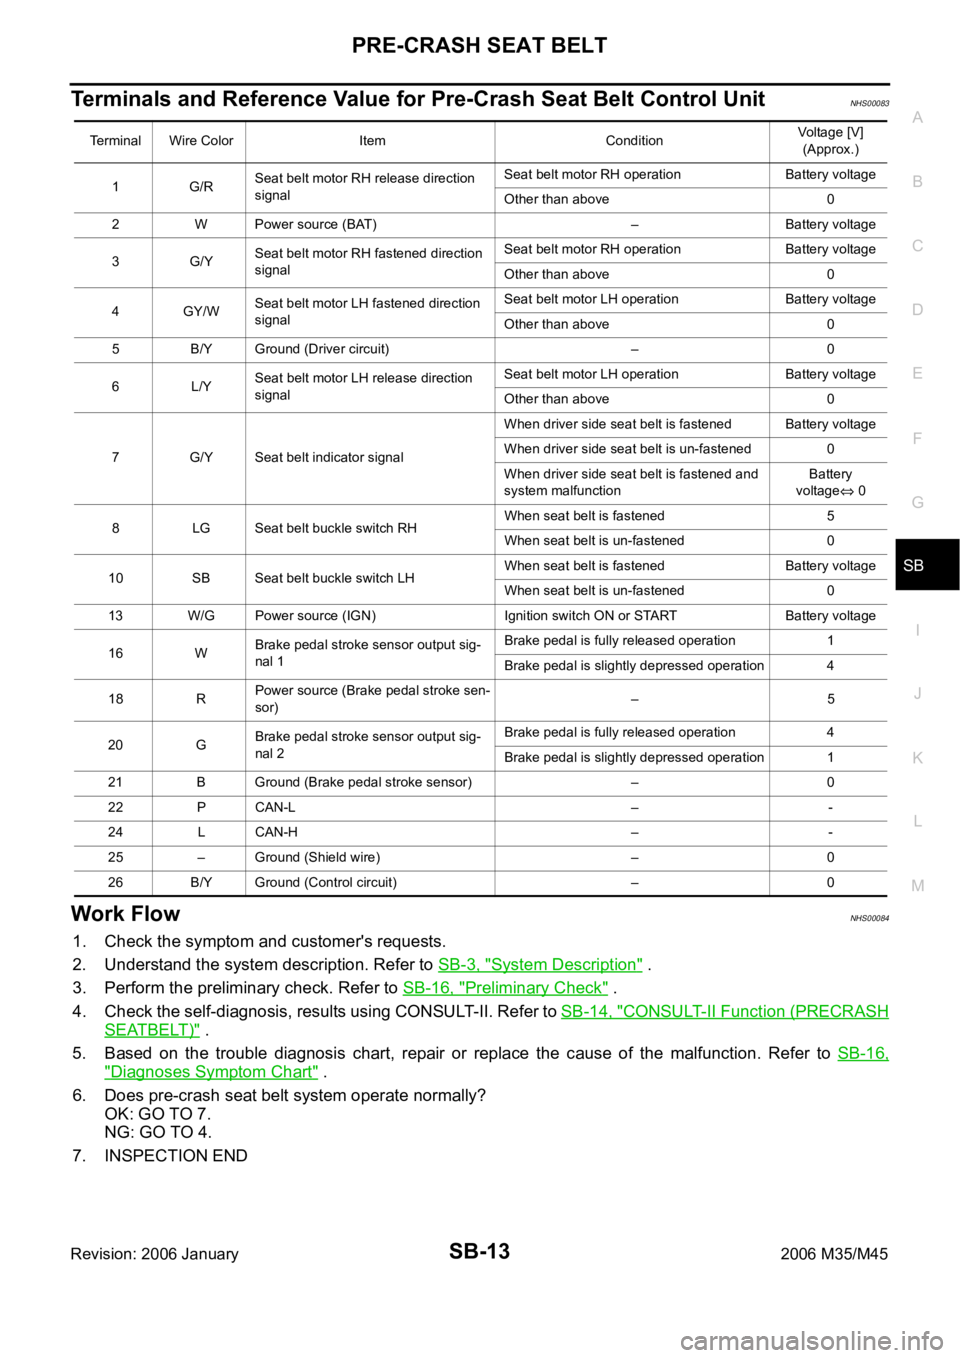
Terminals and Reference Value for Pre-Crash Seat Belt Control UnitNHS00083
Work FlowNHS00084
1. Check the symptom and customer's requests.
2. Understand the system description. Refer to SB-3, "
System Description" .
3. Perform the preliminary check. Refer to SB-16, "
Preliminary Check" .
4. Check the self-diagnosis, results using CONSULT-II. Refer to SB-14, "
CONSULT-II Function (PRECRASH
SEATBELT)" .
5. Based on the trouble diagnosis chart, repair or replace the cause of the malfunction. Refer to SB-16,
"Diagnoses Symptom Chart" .
6. Does pre-crash seat belt system operate normally?
OK: GO TO 7.
NG: GO TO 4.
7. INSPECTION END
Terminal Wire Color Item ConditionVoltage [V]
(Approx.)
1G/RSeat belt motor RH release direction
signalSeat belt motor RH operation Battery voltage
Other than above 0
2 W Power source (BAT) – Battery voltage
3G/YSeat belt motor RH fastened direction
signalSeat belt motor RH operation Battery voltage
Other than above 0
4GY/WSeat belt motor LH fastened direction
signalSeat belt motor LH operation Battery voltage
Other than above 0
5 B/Y Ground (Driver circuit) – 0
6L/YSeat belt motor LH release direction
signalSeat belt motor LH operation Battery voltage
Other than above 0
7 G/Y Seat belt indicator signalWhen driver side seat belt is fastened Battery voltage
When driver side seat belt is un-fastened 0
When driver side seat belt is fastened and
system malfunctionBattery
voltage
0
8 LG Seat belt buckle switch RHWhen seat belt is fastened 5
When seat belt is un-fastened 0
10 SB Seat belt buckle switch LHWhen seat belt is fastened Battery voltage
When seat belt is un-fastened 0
13 W/G Power source (IGN) Ignition switch ON or START Battery voltage
16 WBrake pedal stroke sensor output sig-
nal 1Brake pedal is fully released operation 1
Brake pedal is slightly depressed operation 4
18 RPower source (Brake pedal stroke sen-
sor)
–5
20 GBrake pedal stroke sensor output sig-
nal 2Brake pedal is fully released operation 4
Brake pedal is slightly depressed operation 1
21 B Ground (Brake pedal stroke sensor) – 0
22 P CAN-L – -
24 L CAN-H – -
25 – Ground (Shield wire) – 0
26 B/Y Ground (Control circuit) – 0
Page 5501 of 5621
TF-36
TROUBLE DIAGNOSIS FOR SYMPTOMS
Revision: 2006 January2006 M35/M45
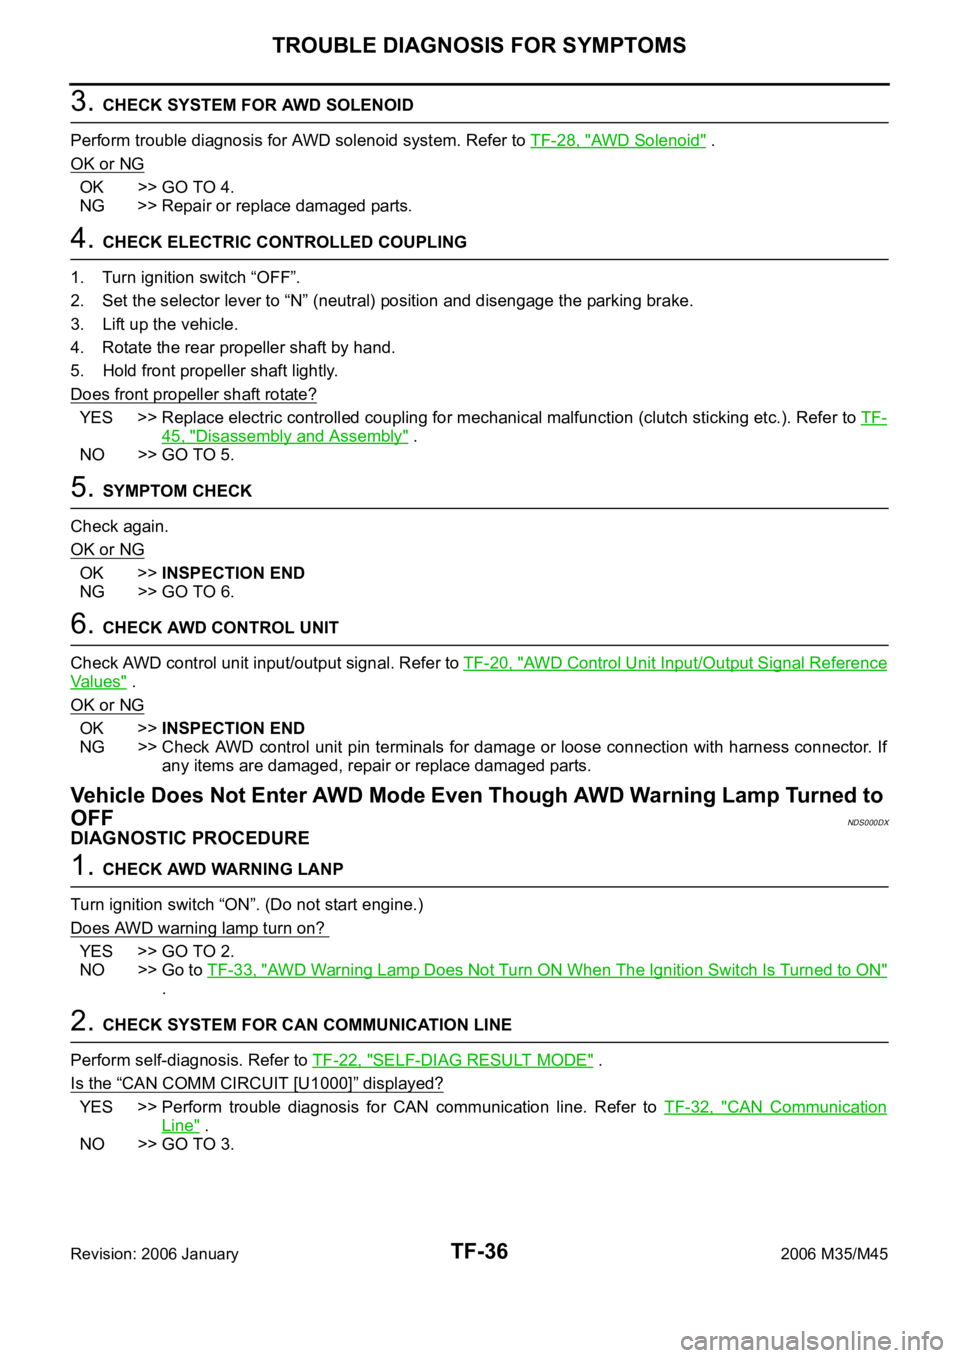
3. CHECK SYSTEM FOR AWD SOLENOID
Perform trouble diagnosis for AWD solenoid system. Refer to TF-28, "
AWD Solenoid" .
OK or NG
OK >> GO TO 4.
NG >> Repair or replace damaged parts.
4. CHECK ELECTRIC CONTROLLED COUPLING
1. Turn ignition switch “OFF”.
2. Set the selector lever to “N” (neutral) position and disengage the parking brake.
3. Lift up the vehicle.
4. Rotate the rear propeller shaft by hand.
5. Hold front propeller shaft lightly.
Does front propeller shaft rotate?
YES >> Replace electric controlled coupling for mechanical malfunction (clutch sticking etc.). Refer to TF-
45, "Disassembly and Assembly" .
NO >> GO TO 5.
5. SYMPTOM CHECK
Check again.
OK or NG
OK >>INSPECTION END
NG >> GO TO 6.
6. CHECK AWD CONTROL UNIT
Check AWD control unit input/output signal. Refer to TF-20, "
AWD Control Unit Input/Output Signal Reference
Va l u e s" .
OK or NG
OK >>INSPECTION END
NG >> Check AWD control unit pin terminals for damage or loose connection with harness connector. If
any items are damaged, repair or replace damaged parts.
Vehicle Does Not Enter AWD Mode Even Though AWD Warning Lamp Turned to
OFF
NDS000DX
DIAGNOSTIC PROCEDURE
1. CHECK AWD WARNING LANP
Turn ignition switch “ON”. (Do not start engine.)
Does AWD warning lamp turn on?
YES >> GO TO 2.
NO >> Go to TF-33, "
AWD Warning Lamp Does Not Turn ON When The Ignition Switch Is Turned to ON"
.
2. CHECK SYSTEM FOR CAN COMMUNICATION LINE
Perform self-diagnosis. Refer to TF-22, "
SELF-DIAG RESULT MODE" .
Is the
“CAN COMM CIRCUIT [U1000]” displayed?
YES >> Perform trouble diagnosis for CAN communication line. Refer to TF-32, "CAN Communication
Line" .
NO >> GO TO 3.